Table of Contents
- Preface
- 1. Getting Started
- 2. Modules and dependencies
- 3. JAX-RS Application, Resources and Sub-Resources
- 4. Application Deployment and Runtime Environments
- 5. Client API
- 5.1. Uniform Interface Constraint
- 5.2. Ease of use and reusing JAX-RS artifacts
- 5.3. Overview of the Client API
- 5.4. Java instances and types for representations
- 5.5. Client Transport Connectors
- 5.6. Using client request and response filters
- 5.7. Closing connections
- 5.8. Injections into client providers
- 5.9. Securing a Client
- 6. Reactive JAX-RS Client API
- 7. Representations and Responses
- 8. JAX-RS Entity Providers
- 9. Support for Common Media Type Representations
- 10. Filters and Interceptors
- 11. Asynchronous Services and Clients
- 12. URIs and Links
- 13. Declarative Hyperlinking
- 14. Programmatic API for Building Resources
- 15. Server-Sent Events (SSE) Support
- 16. Security
- 17. WADL Support
- 18. Bean Validation Support
- 19. Entity Data Filtering
- 19.1. Enabling and configuring Entity Filtering in your application
- 19.2. Components used to describe Entity Filtering concepts
- 19.3. Using custom annotations to filter entities
- 19.4. Role-based Entity Filtering using (
javax.annotation.security) annotations - 19.5. Entity Filtering based on dynamic and configurable query parameters
- 19.6. Defining custom handling for entity-filtering annotations
- 19.7. Supporting Entity Data Filtering in custom entity providers or frameworks
- 19.8. Modules with support for Entity Data Filtering
- 19.9. Examples
- 20. MVC Templates
- 21. Logging
- 22. Monitoring and Diagnostics
- 23. Custom Injection and Lifecycle Management
- 24. Jersey CDI Container Agnostic Support
- 25. Spring DI
- 26. Jersey Test Framework
- 27. Building and Testing Jersey
- 28. Migration Guide
- 28.1. Migrating from Jersey 2.23 to 2.27
- 28.2. Migrating from Jersey 2.22.1 to 2.23
- 28.3. Breaking Changes
- 28.4. Migrating from Jersey 2.22 to 2.22.1
- 28.5. Migrating from Jersey 2.21 to 2.22
- 28.6. Migrating from Jersey 2.19 to 2.20
- 28.7. Migrating from Jersey 2.18 to 2.19
- 28.8. Migrating from Jersey 2.17 to 2.18
- 28.9. Migrating from Jersey 2.16 to 2.17
- 28.10. Migrating from Jersey 2.15 to 2.16
- 28.11. Migrating to 2.15
- 28.12. Migrating from Jersey 2.11 to 2.12
- 28.13. Migrating from Jersey 2.10 to 2.11
- 28.14. Migrating from Jersey 2.9 to 2.10
- 28.15. Migrating from Jersey 2.8 to 2.9
- 28.16. Migrating from Jersey 2.7 to 2.8
- 28.17. Migrating from Jersey 2.6 to 2.7
- 28.18. Migrating from Jersey 2.5.1 to 2.6
- 28.19. Migrating from Jersey 2.5 to 2.5.1
- 28.20. Migrating from Jersey 2.4.1 to 2.5
- 28.21. Migrating from Jersey 2.4 to 2.4.1
- 28.22. Migrating from Jersey 2.3 to 2.4
- 28.23. Migrating from Jersey 2.0, 2.1 or 2.2 to 2.3
- 28.24. Migrating from Jersey 1.x to 2.0
- A. Configuration Properties
List of Figures
List of Tables
- 2.1. Jersey Core
- 2.2. Jersey Containers
- 2.3. Jersey Connectors
- 2.4. Jersey Media
- 2.5. Jersey Extensions
- 2.6. Jersey Test Framework
- 2.7. Jersey Test Framework Providers
- 2.8. Jersey Glassfish Bundles
- 2.9. Security
- 2.10. Jersey Examples
- 3.1. Resource scopes
- 3.2. Overview of injection types
- 4.1. Servlet 3 Pluggability Overview
- 5.1. List of Jersey Connectors
- 9.1. Default property values for MOXy MessageBodyReader<T> / MessageBodyWriter<T>
- 28.1. List of changed configuration properties:
- 28.2. Mapping of Jersey 1.x to JAX-RS 2.0 client classes
- 28.3. JSON approaches and usage in Jersey 1 vs Jersey 2
- A.1. List of common configuration properties
- A.2. List of server configuration properties
- A.3. List of servlet configuration properties
- A.4. List of client configuration properties
List of Examples
- 3.1. Simple hello world root resource class
- 3.2. Specifying URI path parameter
- 3.3. PUT method
- 3.4. Specifying output MIME type
- 3.5. Using multiple output MIME types
- 3.6. Server-side content negotiation
- 3.7. Specifying input MIME type
- 3.8. Query parameters
- 3.9. Custom Java type for consuming request parameters
- 3.10. Processing POSTed HTML form
- 3.11. Obtaining general map of URI path and/or query parameters
- 3.12. Obtaining general map of header parameters
- 3.13. Obtaining general map of form parameters
- 3.14. Example of the bean which will be used as @BeanParam
- 3.15. Injection of MyBeanParam as a method parameter:
- 3.16. Injection of more beans into one resource methods:
- 3.17. Sub-resource methods
- 3.18. Sub-resource locators
- 3.19. Sub-resource locators with empty path
- 3.20. Sub-resource locators returning sub-type
- 3.21. Sub-resource locators created from classes
- 3.22. Sub-resource locators returning resource model
- 3.23. Injection
- 3.24. Wrong injection into a singleton scope
- 3.25. Injection of proxies into singleton
- 3.26. Example of possible injections
- 4.1. Deployment agnostic application model
- 4.2. Reusing Jersey implementation in your custom application model
- 4.3. Registering SPI implementations using ResourceConfig
- 4.4. Registering SPI implementations using
ResourceConfigsubclass - 4.5. Using Jersey with JDK HTTP Server
- 4.6. Using Jersey with Grizzly HTTP Server
- 4.7. Using Jersey with the Simple framework
- 4.8. Using Jersey with Jetty HTTP Server
- 4.9. Using Jersey with Netty HTTP Server
- 4.10. Hooking up Jersey as a Servlet
- 4.11. Hooking up Jersey as a Servlet Filter
- 4.12.
Configuring Jersey container Servlet or Filter to use custom
Applicationsubclass - 4.13. Configuring Jersey container Servlet or Filter to use package scanning
- 4.14. Configuring Jersey container Servlet or Filter to use a list of classes
- 4.15. Deployment of a JAX-RS application using
@ApplicationPathwith Servlet 3.0 - 4.16. Configuration of maven-war-plugin to ignore missing
web.xml - 4.17. Deployment of a JAX-RS application using
web.xmlwith Servlet 3.0 - 4.18.
web.xmlof a JAX-RS application without anApplicationsubclass - 4.19.
- 4.20.
- 5.1. POST request with form parameters
- 5.2. Using JAX-RS Client API
- 5.3. Using JAX-RS Client API fluently
- 5.4. Setting JAX-RS Client ExecutorService
- 5.5. Sending restricted headers with
HttpUrlConnector - 5.6. Closing connections
- 5.7. ServiceLocatorClientProvider example
- 6.1. Excerpt from a synchronous approach while implementing the orchestration layer
- 6.2. Excerpt from an asynchronous approach while implementing the orchestration layer
- 6.3. Excerpt from a reactive approach while implementing the orchestration layer
- 6.4. Synchronous invocation of HTTP requests
- 6.5. Asynchronous invocation of HTTP requests
- 6.6. Reactive invocation of HTTP requests
- 6.7. Creating JAX-RS Client with RxJava reactive extension
- 6.8. Obtaining Observable<Response> from Jersey/RxJava Client
- 6.9. Creating JAX-RS Client with RxJava2 reactive extension
- 6.10. Obtaining Flowable<Response> from Jersey/RxJava Client
- 6.11. Creating Jersey/Guava Client
- 6.12. Obtaining ListenableFuture<Response> from Jersey/Guava Client
- 6.13. Extending RxIvoker
- 6.14. Extending RxInvokerProvider
- 7.1. Using
Filewith a specific media type to produce a response - 7.2. Returning 201 status code and adding
Locationheader in response to POST request - 7.3. Adding an entity body to a custom response
- 7.4. Throwing exceptions to control response
- 7.5. Application specific exception implementation
- 7.6. Mapping generic exceptions to responses
- 7.7. Conditional GET support
- 8.1. Example resource class
- 8.2. MyBean entity class
- 8.3. MessageBodyWriter example
- 8.4. Example of assignment of annotations to a response entity
- 8.5. Client code testing MyBeanMessageBodyWriter
- 8.6. Result of MyBeanMessageBodyWriter test
- 8.7. MessageBodyReader example
- 8.8. Testing MyBeanMessageBodyReader
- 8.9. Result of testing MyBeanMessageBodyReader
- 8.10. MessageBodyReader registered on a JAX-RS client
- 8.11. Result of client code execution
- 8.12. Usage of MessageBodyWorkers interface
- 9.1. Simple JAXB bean implementation
- 9.2. JAXB bean used to generate JSON representation
- 9.3. Tweaking JSON format using JAXB
- 9.4. JAXB bean creation
- 9.5. Constructing a
JsonObject(JSON-Processing) - 9.6. Constructing a
JSONObject(Jettison) - 9.7. MoxyJsonConfig - Setting properties.
- 9.8. Creating
ContextResolver<MoxyJsonConfig> - 9.9. Setting properties for MOXy providers into Configurable
- 9.10. Building client with MOXy JSON feature enabled.
- 9.11. Creating JAX-RS application with MOXy JSON feature enabled.
- 9.12. Building client with JSON-Processing JSON feature enabled.
- 9.13. Creating JAX-RS application with JSON-Processing JSON feature enabled.
- 9.14.
ContextResolver<ObjectMapper> - 9.15. Building client with Jackson JSON feature enabled.
- 9.16. Creating JAX-RS application with Jackson JSON feature enabled.
- 9.17. JAXB beans for JSON supported notations description, simple address bean
- 9.18. JAXB beans for JSON supported notations description, contact bean
- 9.19. JAXB beans for JSON supported notations description, initialization
- 9.20.
XML namespace to JSON mapping configuration for Jettison based
mappednotation - 9.21. JSON expression with XML namespaces mapped into JSON
- 9.22.
JSON Array configuration for Jettison based
mappednotation - 9.23. JSON expression with JSON arrays explicitly configured via Jersey
- 9.24. JSON expression produced using
badgerfishnotation - 9.25.
ContextResolver<ObjectMapper> - 9.26. Building client with Jettison JSON feature enabled.
- 9.27. Creating JAX-RS application with Jettison JSON feature enabled.
- 9.28. Simplest case of using
@JSONP - 9.29. JaxbBean for @JSONP example
- 9.30. Example of
@JSONPwith configured parameters. - 9.31. Low level XML test - methods added to
HelloWorldResource.java - 9.32. Planet class
- 9.33. Resource class
- 9.34. Method for consuming Planet
- 9.35. Resource class - JAXBElement
- 9.36. Client side - JAXBElement
- 9.37. PlanetJAXBContextProvider
- 9.38. Using Provider with JAX-RS client
- 9.39. Add
jersey-media-moxydependency. - 9.40. Register the
MoxyXmlFeatureclass. - 9.41. Configure and register an
MoxyXmlFeatureinstance. - 9.42. Building client with MultiPart feature enabled.
- 9.43. Creating JAX-RS application with MultiPart feature enabled.
- 9.44.
MultiPartentity - 9.45.
MultiPartentity in HTTP message. - 9.46.
FormDataMultiPartentity - 9.47.
FormDataMultiPartentity in HTTP message. - 9.48. Multipart - sending files.
- 9.49. Resource method using
MultiPartas input parameter / return value. - 9.50. Use of
@FormDataParamannotation - 10.1. Container response filter
- 10.2. Container request filter
- 10.3. Pre-matching request filter
- 10.4. Client request filter
- 10.5. GZIP writer interceptor
- 10.6. GZIP reader interceptor
- 10.7.
@NameBindingexample - 10.8. Dynamic binding example
- 10.9. Priorities example
- 11.1. Simple async resource
- 11.2. Simple async method with timeout
- 11.3. CompletionCallback example
- 11.4. ChunkedOutput example
- 11.5. Simple client async invocation
- 11.6. Simple client fluent async invocation
- 11.7. Client async callback
- 11.8. Client async callback for specific entity
- 11.9. ChunkedInput example
- 12.1. URI building
- 12.2. Building URIs using query parameters
- 13.1. Creating JAX-RS application with Declarative Linking feature enabled.
- 14.1. A standard resource class
- 14.2. A programmatic resource
- 14.3. A programmatic resource
- 14.4. A programmatic resource
- 14.5. A programmatic resource
- 14.6. A programmatic resource
- 15.1. Adding the SSE dependency
- 15.2. Simple SSE resource method
- 15.3. Broadcasting SSE messages (with JAX-RS 2.1 API)
- 15.4. Consuming SSE events with SseEventSource
- 15.5. SseEventSource subscribe() methods
- 15.6. Add
jersey-media-ssedependency. - 15.7. Simple SSE resource method
- 15.8. Broadcasting SSE messages
- 15.9. Registering
EventListenerwithEventSource - 15.10. Overriding
EventSource.onEvent(InboundEvent)method - 16.1. Using
SecurityContextfor a Resource Selection - 16.2. Injecting
SecurityContextinto a singleton resource - 16.3. Securing resources using
web.xml - 16.4. Registering RolesAllowedDynamicFeature using ResourceConfig
- 16.5. Registering RolesAllowedDynamicFeature by extending ResourceConfig
- 16.6. Applying
javax.annotation.securityto JAX-RS resource methods. - 16.7. Build the authorization flow utility
- 16.8. Perform the OAuth Authorization Flow
- 16.9. Authenticated requests
- 16.10. Build feature from Access Token
- 16.11. Specifying Access Token on a Request.
- 16.12. Creating Public/Private RSA-SHA1 keys
- 16.13. Building OAuth 2 Authorization Flow.
- 17.1. A simple WADL example - JAX-RS resource definition
- 17.2. A simple WADL example - WADL content
- 17.3. OPTIONS method returning WADL
- 17.4. More complex WADL example - JAX-RS resource definition
- 17.5. More complex WADL example - WADL content
- 18.1. Configuring Jersey specific properties for Bean Validation.
- 18.2. Using
ValidationConfigto configureValidator. - 18.3. Constraint annotations on input parameters
- 18.4. Constraint annotations on fields
- 18.5. Constraint annotations on class
- 18.6. Definition of a constraint annotation
- 18.7. Validator implementation.
- 18.8. Entity validation
- 18.9. Entity validation 2
- 18.10. Response entity validation
- 18.11. Validate getter on execution
- 18.12. Injecting UriInfo into a ConstraintValidator
- 18.13. Support for injecting Jersey's resources/providers via ConstraintValidatorFactory.
- 18.14.
ValidationErrortotext/plain - 18.15.
ValidationErrortotext/html - 18.16.
ValidationErrortoapplication/xml - 18.17.
ValidationErrortoapplication/json - 19.1. Registering and configuring entity-filtering feature on server.
- 19.2. Registering and configuring entity-filtering feature with security annotations on server.
- 19.3. Registering and configuring entity-filtering feature based on dynamic and configurable query parameters.
- 19.4. Registering and configuring entity-filtering feature on client.
- 19.5. Project
- 19.6. User
- 19.7. Task
- 19.8. ProjectsResource
- 19.9. ProjectDetailedView
- 19.10. Annotated Project
- 19.11. Annotated User
- 19.12. Annotated Task
- 19.13. ProjectsResource - Response entity-filtering annotations
- 19.14. ProjectsResource - Entity-filtering annotations on methods
- 19.15. Client - Request entity-filtering annotations
- 19.16. Client - Request entity-filtering annotations
- 19.17. Sever - Query Parameter driven entity-filtering
- 19.18.
- 19.19. Entity-filtering annotation with custom meaning
- 19.20. Entity Data Filtering support in MOXy JSON binding provider
- 20.1. Using
Viewablein a resource class - 20.2. Using
@Templateon a resource method - 20.3. Using
@Templateon a resource class - 20.4. Using absolute path to template in
Viewable - 20.5. Using
@ErrorTemplateon a resource method - 20.6. Using
@ErrorTemplatewith Bean Validation - 20.7. Iterating through
ValidationErrorin JSP - 20.8. Registering
MvcFeature - 20.9. Registering
FreemarkerMvcFeature - 20.10. Setting
MvcFeature.TEMPLATE_BASE_PATHvalue inResourceConfig - 20.11. Setting
FreemarkerMvcProperties.TEMPLATE_BASE_PATHvalue inweb.xml - 20.12. Including JSP page into JSP page
- 20.13. Custom TemplateProcessor
- 20.14. Registering custom TemplateProcessor
- 21.1. Logging on the client side
- 21.2. Register
LoggingFeaturevia constructor - 21.3. Register
LoggingFeatureclass - 22.1. Application event listener
- 22.2. Request event listener
- 22.3. Event listener test resource
- 22.4. Injecting MonitoringStatistics
- 22.5. Summary level messages
- 22.6. On demand request, snippet of MVC JSP forwarding
- 24.1. Bootstrapping Jersey application with Weld support on Grizzly
- 28.1. Jersey 1 reloader implementation
- 28.2. Jersey 1 reloader registration
- 28.3. Jersey 2 reloader implementation
- 28.4. Jersey 2 reloader registration
- 28.5. Initializing JAXB-based support with MOXy
This is user guide for Jersey 2.29.1. We are trying to keep it up to date as we add new features. When reading the user guide, please consult also our Jersey API documentation as an additional source of information about Jersey features and API.
If you would like to contribute to the guide or have questions on things not covered in our docs, please
contact us atusers@jersey.java.net. Similarly,
in case you spot any errors in the Jersey documentation, please report them by filing a new issue in our
Jersey JIRA Issue Tracker
under
docs
component. Please make sure to specify the version of the Jersey User Guide where the error has been spotted
by selecting the proper value for the
Affected Version
field.
First mention of any Jersey and JAX-RS API component in a section links to the API documentation of the
referenced component. Any sub-sequent mentions of the component in the same chapter are rendered using a
monospaced
font.
Emphasised font is used to a call attention to a newly introduce concept, when it first occurs in the text.
In some of the code listings, certain lines are too long to be displayed on one line for the available
page width. In such case, the lines that exceed the available page width are broken up into multiple lines
using a
'\'
at the end of each line to indicate that a break has been introduced to
fit the line in the page. For example:
This is an overly long line that \
might not fit the available page \
width and had to be broken into \
multiple lines.

This line fits the page width.
Should read as:
This is an overly long line that might not fit the available page width and had to be broken into multiple lines.

This line fits the page width.
Table of Contents
This chapter provides a quick introduction on how to get started building RESTful services using Jersey. The example described here uses the lightweight Grizzly HTTP server. At the end of this chapter you will see how to implement equivalent functionality as a JavaEE web application you can deploy on any servlet container supporting Servlet 2.5 and higher.
Jersey project is built using Apache Maven software project build and management tool. All modules produced as part of Jersey project build are pushed to the Central Maven Repository. Therefore it is very convenient to work with Jersey for any Maven-based project as all the released (non-SNAPSHOT) Jersey dependencies are readily available without a need to configure a special maven repository to consume the Jersey modules.
Note
In case you want to depend on the latest SNAPSHOT versions of Jersey modules, the following repository configuration needs to be added to your Maven project pom:
<repository>
    <id>snapshot-repository.java.net</id>
    <name>Java.net Snapshot Repository for Maven</name>
    <url>https://maven.java.net/content/repositories/snapshots/</url>
    <layout>default</layout>
</repository>
Since starting from a Maven project is the most convenient way for working with Jersey, let's now have a look at this approach. We will now create a new Jersey project that runs on top of a Grizzly container. We will use a Jersey-provided maven archetype. To create the project, execute the following Maven command in the directory where the new project should reside:
mvn archetype:generate -DarchetypeArtifactId=jersey-quickstart-grizzly2 \
-DarchetypeGroupId=org.glassfish.jersey.archetypes -DinteractiveMode=false \
-DgroupId=com.example -DartifactId=simple-service -Dpackage=com.example \
-DarchetypeVersion=2.29.1
Feel free to adjust the groupId, package and/or artifactId
of your new project. Alternatively, you can change it by updating the new project pom.xml once it gets generated.
Once the project generation from a Jersey maven archetype is successfully finished, you should see the new
simple-service project directory created in your current location. The directory contains
a standard Maven project structure:
Project build and management configuration is described in the pom.xml located
in the project root directory.
|
Project sources are located under src/main/java. |
Project test sources are located under src/test/java. |
There are 2 classes in the project source directory in the com.example package.
The Main class is responsible for bootstrapping the Grizzly container as well as configuring
and deploying the project's JAX-RS application to the container. Another class in the same package
is MyResource class, that contains implementation of a simple JAX-RS resource.
It looks like this:
package com.example;

import javax.ws.rs.GET;
import javax.ws.rs.Path;
import javax.ws.rs.Produces;
import javax.ws.rs.core.MediaType;

/**
 * Root resource (exposed at "myresource" path)
 */
@Path("myresource")
public class MyResource {

    /**
     * Method handling HTTP GET requests. The returned object will be sent
     * to the client as "text/plain" media type.
     *
     * @return String that will be returned as a text/plain response.
     */
    @GET
    @Produces(MediaType.TEXT_PLAIN)
    public String getIt() {
        return "Got it!";
    }
}
A JAX-RS resource is an annotated POJO that provides so-called resource methods that
are able to handle HTTP requests for URI paths that the resource is bound to. See
Chapter 3, JAX-RS Application, Resources and Sub-Resources for a complete guide to JAX-RS resources. In our case, the resource
exposes a single resource method that is able to handle HTTP GET requests, is bound to
/myresource URI path and can produce responses with response message content represented
in "text/plain" media type. In this version, the resource returns the same
"Got it!" response to all client requests.
The last piece of code that has been generated in this skeleton project is a MyResourceTest
unit test class that is located in the same com.example package as the
MyResource class, however, this unit test class is placed into the maven project test source
directory src/test/java (certain code comments and JUnit imports have been excluded for brevity):
package com.example;

import javax.ws.rs.client.Client;
import javax.ws.rs.client.ClientBuilder;
import javax.ws.rs.client.WebTarget;

import org.glassfish.grizzly.http.server.HttpServer;

...

public class MyResourceTest {

    private HttpServer server;
    private WebTarget target;

    @Before
    public void setUp() throws Exception {
        server = Main.startServer();

        Client c = ClientBuilder.newClient();
        target = c.target(Main.BASE_URI);
    }

    @After
    public void tearDown() throws Exception {
        server.stop();
    }

    /**
     * Test to see that the message "Got it!" is sent in the response.
     */
    @Test
    public void testGetIt() {
        String responseMsg = target.path("myresource").request().get(String.class);
        assertEquals("Got it!", responseMsg);
    }
}
In this unit test, a Grizzly container is first started and server application is deployed in the
test setUp() method by a static call to Main.startServer().
Next, a JAX-RS client components are created in the same test set-up method. First a new JAX-RS client
instance c is built and then a JAX-RS web target component pointing to the context root of our
application deployed at http://localhost:8080/myapp/ (a value of
Main.BASE_URI constant) is stored into a target field of the unit test class.
This field is then used in the actual unit test method (testGetIt()).
In the testGetIt() method a fluent JAX-RS Client API is used to connect to and send
a HTTP GET request to the MyResource JAX-RS resource class listening on
/myresource URI. As part of the same fluent JAX-RS API method invocation chain, a response is
read as a Java String type. On the second line in the test method, the response content string
returned from the server is compared with the expected phrase in the test assertion. To learn more about using
JAX-RS Client API, please see the Chapter 5, Client API chapter.
Now that we have seen the content of the project, let's try to test-run it. To do this, we need to invoke following command on the command line:
mvn clean test
This will compile the project and run the project unit tests. We should see a similar output that informs about a successful build once the build is finished:
Results :

Tests run: 1, Failures: 0, Errors: 0, Skipped: 0

[INFO] ------------------------------------------------------------------------
[INFO] BUILD SUCCESS
[INFO] ------------------------------------------------------------------------
[INFO] Total time: 34.527s
[INFO] Finished at: Sun May 26 19:26:24 CEST 2013
[INFO] Final Memory: 17M/490M
[INFO] ------------------------------------------------------------------------
Now that we have verified that the project compiles and that the unit test passes, we can execute the application in a standalone mode. To do this, run the following maven command:
mvn exec:java
The application starts and you should soon see the following notification in your console:
May 26, 2013 8:08:45 PM org.glassfish.grizzly.http.server.NetworkListener start
INFO: Started listener bound to [localhost:8080]
May 26, 2013 8:08:45 PM org.glassfish.grizzly.http.server.HttpServer start
INFO: [HttpServer] Started.
Jersey app started with WADL available at http://localhost:8080/myapp/application.wadl
Hit enter to stop it...
This informs you that the application has been started and it's WADL descriptor is available at
http://localhost:8080/myapp/application.wadl URL. You can retrieve the WADL content by
executing a curl http://localhost:8080/myapp/application.wadl command in your console
or by typing the WADL URL into your favorite browser. You should get back an XML document in describing
your deployed RESTful application in a WADL format. To learn more about working with WADL, check the
Chapter 17, WADL Support chapter.
The last thing we should try before concluding this section is to see if we can communicate with our
resource deployed at /myresource path. We can again either type the resource URL
in the browser or we can use curl:
$ curl http://localhost:8080/myapp/myresource
Got it!
As we can see, the curl command returned with the Got it! message that
was sent by our resource. We can also ask curl to provide more information about the response,
for example we can let it display all response headers by using the -i switch:
curl -i http://localhost:8080/myapp/myresource
HTTP/1.1 200 OK
Content-Type: text/plain
Date: Sun, 26 May 2013 18:27:19 GMT
Content-Length: 7

Got it!
Here we see the whole content of the response message that our Jersey/JAX-RS application returned, including all
the HTTP headers. Notice the Content-Type: text/plain header that was derived from the
value of @Produces annotation attached to the MyResource class.
In case you want to see even more details about the communication between our curl client
and our resource running on Jersey in a Grizzly I/O container, feel free to try other various options and switches
that curl provides. For example, this last command will make curl output
a lot of additional information about the whole communication:
$ curl -v http://localhost:8080/myapp/myresource
* About to connect() to localhost port 8080 (#0)
*   Trying ::1...
* Connection refused
*   Trying 127.0.0.1...
* connected
* Connected to localhost (127.0.0.1) port 8080 (#0)
> GET /myapp/myresource HTTP/1.1
> User-Agent: curl/7.25.0 (x86_64-apple-darwin11.3.0) libcurl/7.25.0 OpenSSL/1.0.1e zlib/1.2.7 libidn/1.22
> Host: localhost:8080
> Accept: */*
>
< HTTP/1.1 200 OK
< Content-Type: text/plain
< Date: Sun, 26 May 2013 18:29:18 GMT
< Content-Length: 7
<
* Connection #0 to host localhost left intact
Got it!* Closing connection #0
To create a Web Application that can be packaged as WAR and deployed in a Servlet container follow a similar process to the one described in Section 1.1, “Creating a New Project from Maven Archetype”. In addition to the Grizzly-based archetype, Jersey provides also a Maven archetype for creating web application skeletons. To create the new web application skeleton project, execute the following Maven command in the directory where the new project should reside:
mvn archetype:generate -DarchetypeArtifactId=jersey-quickstart-webapp \
                -DarchetypeGroupId=org.glassfish.jersey.archetypes -DinteractiveMode=false \
                -DgroupId=com.example -DartifactId=simple-service-webapp -Dpackage=com.example \
                -DarchetypeVersion=2.29.1
As with the Grizzly based project, feel free to adjust the groupId, package
and/or artifactId of your new web application project. Alternatively, you can change it by updating
the new project pom.xml once it gets generated.
Once the project generation from a Jersey maven archetype is successfully finished, you should see the new
simple-service-webapp project directory created in your current location. The directory contains
a standard Maven project structure, similar to the simple-service project content we have seen
earlier, except it is extended with an additional web application specific content:
Project build and management configuration is described in the pom.xml located
in the project root directory.
|
Project sources are located under src/main/java. |
Project resources are located under src/main/resources. |
Project web application files are located under src/main/webapp. |
The project contains the same MyResouce JAX-RS resource class. It does not contain any unit tests
as well as it does not contain a Main class that was used to setup Grizzly container in the
previous project. Instead, it contains the standard Java EE web application web.xml deployment
descriptor under src/main/webapp/WEB-INF.
The last component in the project is an index.jsp page that serves as a client for the
MyResource resource class that is packaged and deployed with the application.
To compile and package the application into a WAR, invoke the following maven command in your console:
mvn clean package
A successful build output will produce an output similar to the one below:
Results :

Tests run: 0, Failures: 0, Errors: 0, Skipped: 0

[INFO]
[INFO] --- maven-war-plugin:2.1.1:war (default-war) @ simple-service-webapp ---
[INFO] Packaging webapp
[INFO] Assembling webapp [simple-service-webapp] in [.../simple-service-webapp/target/simple-service-webapp]
[INFO] Processing war project
[INFO] Copying webapp resources [.../simple-service-webapp/src/main/webapp]
[INFO] Webapp assembled in [75 msecs]
[INFO] Building war: .../simple-service-webapp/target/simple-service-webapp.war
[INFO] WEB-INF/web.xml already added, skipping
[INFO] ------------------------------------------------------------------------
[INFO] BUILD SUCCESS
[INFO] ------------------------------------------------------------------------
[INFO] Total time: 9.067s
[INFO] Finished at: Sun May 26 21:07:44 CEST 2013
[INFO] Final Memory: 17M/490M
[INFO] ------------------------------------------------------------------------
Now you are ready to take the packaged WAR (located under ./target/simple-service-webapp.war)
and deploy it to a Servlet container of your choice.
Important
To deploy a Jersey application, you will need a Servlet container that supports Servlet 2.5 or later. For full set of advanced features (such as JAX-RS 2.0 Async Support) you will need a Servlet 3.0 or later compliant container.
To create a Web Application that can be either packaged as WAR and deployed in a Servlet container or that can be pushed and deployed on Heroku the process is very similar to the one described in Section 1.4, “Creating a JavaEE Web Application”. To create the new web application skeleton project, execute the following Maven command in the directory where the new project should reside:
mvn archetype:generate -DarchetypeArtifactId=jersey-heroku-webapp \
                -DarchetypeGroupId=org.glassfish.jersey.archetypes -DinteractiveMode=false \
                -DgroupId=com.example -DartifactId=simple-heroku-webapp -Dpackage=com.example \
                -DarchetypeVersion=2.29.1
Adjust the groupId, package and/or artifactId of your new web
application project to your needs or, alternatively, you can change it by updating the new project pom.xml once it
gets generated.
Once the project generation from a Jersey maven archetype is successfully finished, you should see the new
simple-heroku-webapp project directory created in your current location. The directory contains
a standard Maven project structure:
Project build and management configuration is described in the pom.xml located
in the project root directory.
|
Project sources are located under src/main/java. |
Project resources are located under src/main/resources. |
Project web application files are located under src/main/webapp. |
Project test-sources (based on JerseyTest) are located under src/test/java. |
Heroku system properties (OpenJDK version) are defined in system.properties. |
Lists of the process types in an application for Heroku is in Procfile. |
The project contains one JAX-RS resource class, MyResouce, and one resource method which returns
simple text message. To make sure the resource is properly tested there is also a end-to-end test-case
in MyResourceTest (the test is based on JerseyTest from our Chapter 26, Jersey Test Framework).
Similarly to simple-service-webapp, the project contains the standard Java EE web application
web.xml deployment descriptor under src/main/webapp/WEB-INF since the goal is to
deploy the application in a Servlet container (the application will run in Jetty on Heroku).
To compile and package the application into a WAR, invoke the following maven command in your console:
mvn clean package
A successful build output will produce an output similar to the one below:
    Results :

    Tests run: 1, Failures: 0, Errors: 0, Skipped: 0

    [INFO]
    [INFO] --- maven-war-plugin:2.2:war (default-war) @ simple-heroku-webapp ---
    [INFO] Packaging webapp
    [INFO] Assembling webapp [simple-heroku-webapp] in [.../simple-heroku-webapp/target/simple-heroku-webapp]
    [INFO] Processing war project
    [INFO] Copying webapp resources [.../simple-heroku-webapp/src/main/webapp]
    [INFO] Webapp assembled in [57 msecs]
    [INFO] Building war: .../simple-heroku-webapp/target/simple-heroku-webapp.war
    [INFO] WEB-INF/web.xml already added, skipping
    [INFO]
    [INFO] --- maven-dependency-plugin:2.8:copy-dependencies (copy-dependencies) @ simple-heroku-webapp ---
    [INFO] Copying hk2-locator-2.2.0-b21.jar to .../simple-heroku-webapp/target/dependency/hk2-locator-2.2.0-b21.jar
    [INFO] Copying jetty-security-9.0.6.v20130930.jar to .../simple-heroku-webapp/target/dependency/jetty-security-9.0.6.v20130930.jar
    [INFO] Copying asm-all-repackaged-2.2.0-b21.jar to .../simple-heroku-webapp/target/dependency/asm-all-repackaged-2.2.0-b21.jar
    [INFO] Copying jersey-common-2.5.jar to .../simple-heroku-webapp/target/dependency/jersey-common-2.5.jar
    [INFO] Copying validation-api-1.1.0.Final.jar to .../simple-heroku-webapp/target/dependency/validation-api-1.1.0.Final.jar
    [INFO] Copying jetty-webapp-9.0.6.v20130930.jar to .../simple-heroku-webapp/target/dependency/jetty-webapp-9.0.6.v20130930.jar
    [INFO] Copying jersey-container-servlet-2.5.jar to .../simple-heroku-webapp/target/dependency/jersey-container-servlet-2.5.jar
    [INFO] Copying cglib-2.2.0-b21.jar to .../simple-heroku-webapp/target/dependency/cglib-2.2.0-b21.jar
    [INFO] Copying osgi-resource-locator-1.0.1.jar to .../simple-heroku-webapp/target/dependency/osgi-resource-locator-1.0.1.jar
    [INFO] Copying hk2-utils-2.2.0-b21.jar to .../simple-heroku-webapp/target/dependency/hk2-utils-2.2.0-b21.jar
    [INFO] Copying hk2-api-2.2.0-b21.jar to .../simple-heroku-webapp/target/dependency/hk2-api-2.2.0-b21.jar
    [INFO] Copying jetty-io-9.0.6.v20130930.jar to .../simple-heroku-webapp/target/dependency/jetty-io-9.0.6.v20130930.jar
    [INFO] Copying jetty-server-9.0.6.v20130930.jar to .../simple-heroku-webapp/target/dependency/jetty-server-9.0.6.v20130930.jar
    [INFO] Copying jetty-util-9.0.6.v20130930.jar to .../simple-heroku-webapp/target/dependency/jetty-util-9.0.6.v20130930.jar
    [INFO] Copying jersey-client-2.5.jar to .../simple-heroku-webapp/target/dependency/jersey-client-2.5.jar
    [INFO] Copying jetty-http-9.0.6.v20130930.jar to .../simple-heroku-webapp/target/dependency/jetty-http-9.0.6.v20130930.jar
    [INFO] Copying guava-14.0.1.jar to .../simple-heroku-webapp/target/dependency/guava-14.0.1.jar
    [INFO] Copying jetty-xml-9.0.6.v20130930.jar to .../simple-heroku-webapp/target/dependency/jetty-xml-9.0.6.v20130930.jar
    [INFO] Copying jersey-server-2.5.jar to .../simple-heroku-webapp/target/dependency/jersey-server-2.5.jar
    [INFO] Copying jersey-container-servlet-core-2.5.jar to .../simple-heroku-webapp/target/dependency/jersey-container-servlet-core-2.5.jar
    [INFO] Copying javax.ws.rs-api-2.0.jar to .../simple-heroku-webapp/target/dependency/javax.ws.rs-api-2.0.jar
    [INFO] Copying jetty-servlet-9.0.6.v20130930.jar to .../simple-heroku-webapp/target/dependency/jetty-servlet-9.0.6.v20130930.jar
    [INFO] Copying javax.inject-2.2.0-b21.jar to .../simple-heroku-webapp/target/dependency/javax.inject-2.2.0-b21.jar
    [INFO] Copying javax.servlet-3.0.0.v201112011016.jar to .../simple-heroku-webapp/target/dependency/javax.servlet-3.0.0.v201112011016.jar
    [INFO] Copying javax.annotation-api-1.2.jar to .../simple-heroku-webapp/target/dependency/javax.annotation-api-1.2.jar
    [INFO] ------------------------------------------------------------------------
    [INFO] BUILD SUCCESS
    [INFO] ------------------------------------------------------------------------
    [INFO] Total time: 4.401s
    [INFO] Finished at: Mon Dec 09 20:19:06 CET 2013
    [INFO] Final Memory: 20M/246M
    [INFO] ------------------------------------------------------------------------
Now that you know everything went as expected you are ready to:
- make some changes in your project,
-
take the packaged WAR (located under
./target/simple-service-webapp.war) and deploy it to a Servlet container of your choice, or - Section 1.5.1, “Deploy it on Heroku”
Tip
If you want to make some changes to your application you can run the application locally by simply running
mvn clean package jetty:run (which starts the embedded Jetty server) or by
java -cp target/classes:target/dependency/* com.example.heroku.Main (this is how Jetty is
started on Heroku).
We won't go into details how to create an account on Heroku and setup the Heroku tools
on your machine. You can find a lot of information in this article: Getting Started with Java on Heroku.
Instead, we'll take a look at the steps needed after your environment is ready.
The first step is to create a Git repository from your project:
    $ git init
    Initialized empty Git repository in /.../simple-heroku-webapp/.git/
Then, create a Heroku instance and add a remote reference to your Git repository:
    $ heroku create
    Creating simple-heroku-webapp... done, stack is cedar
    http://simple-heroku-webapp.herokuapp.com/ | git@heroku.com:simple-heroku-webapp.git
    Git remote heroku added
Note
The name of the instance is changed in the output to simple-heroku-webapp. Your will be
named more like tranquil-basin-4744.
Add and commit files to your Git repository:
$ git add src/ pom.xml Procfile system.properties
    $ git commit -a -m "initial commit"
    [master (root-commit) e2b58e3] initial commit
     7 files changed, 221 insertions(+)
     create mode 100644 Procfile
     create mode 100644 pom.xml
     create mode 100644 src/main/java/com/example/MyResource.java
     create mode 100644 src/main/java/com/example/heroku/Main.java
     create mode 100644 src/main/webapp/WEB-INF/web.xml
     create mode 100644 src/test/java/com/example/MyResourceTest.java
     create mode 100644 system.properties
Push changes to Heroku:
    $ git push heroku master
    Counting objects: 21, done.
    Delta compression using up to 8 threads.
    Compressing objects: 100% (11/11), done.
    Writing objects: 100% (21/21), 3.73 KiB | 0 bytes/s, done.
    Total 21 (delta 0), reused 0 (delta 0)

    -----> Java app detected
    -----> Installing OpenJDK 1.7... done
    -----> Installing Maven 3.0.3... done
    -----> Installing settings.xml... done
    -----> executing /app/tmp/cache/.maven/bin/mvn -B -Duser.home=/tmp/build_992cc747-26d6-4800-bdb1-add47b9583cd -Dmaven.repo.local=/app/tmp/cache/.m2/repository -s /app/tmp/cache/.m2/settings.xml -DskipTests=true clean install
           [INFO] Scanning for projects...
           [INFO]
           [INFO] ------------------------------------------------------------------------
           [INFO] Building simple-heroku-webapp 1.0-SNAPSHOT
           [INFO] ------------------------------------------------------------------------
           [INFO]
           [INFO] --- maven-clean-plugin:2.4.1:clean (default-clean) @ simple-heroku-webapp ---
           [INFO]
           [INFO] --- maven-resources-plugin:2.4.3:resources (default-resources) @ simple-heroku-webapp ---
           [INFO] Using 'UTF-8' encoding to copy filtered resources.
           [INFO] skip non existing resourceDirectory /tmp/build_992cc747-26d6-4800-bdb1-add47b9583cd/src/main/resources
           [INFO]
           [INFO] --- maven-compiler-plugin:2.5.1:compile (default-compile) @ simple-heroku-webapp ---
           [INFO] Compiling 2 source files to /tmp/build_992cc747-26d6-4800-bdb1-add47b9583cd/target/classes
           [INFO]
           [INFO] --- maven-resources-plugin:2.4.3:testResources (default-testResources) @ simple-heroku-webapp ---
           [INFO] Using 'UTF-8' encoding to copy filtered resources.
           [INFO] skip non existing resourceDirectory /tmp/build_992cc747-26d6-4800-bdb1-add47b9583cd/src/test/resources
           [INFO]
           [INFO] --- maven-compiler-plugin:2.5.1:testCompile (default-testCompile) @ simple-heroku-webapp ---
           [INFO] Compiling 1 source file to /tmp/build_992cc747-26d6-4800-bdb1-add47b9583cd/target/test-classes
           [INFO]
           [INFO] --- maven-surefire-plugin:2.7.2:test (default-test) @ simple-heroku-webapp ---
           [INFO] Tests are skipped.
           [INFO]
           [INFO] --- maven-war-plugin:2.1.1:war (default-war) @ simple-heroku-webapp ---
           [INFO] Packaging webapp
           [INFO] Assembling webapp [simple-heroku-webapp] in [/tmp/build_992cc747-26d6-4800-bdb1-add47b9583cd/target/simple-heroku-webapp]
           [INFO] Processing war project
           [INFO] Copying webapp resources [/tmp/build_992cc747-26d6-4800-bdb1-add47b9583cd/src/main/webapp]
           [INFO] Webapp assembled in [88 msecs]
           [INFO] Building war: /tmp/build_992cc747-26d6-4800-bdb1-add47b9583cd/target/simple-heroku-webapp.war
           [INFO] WEB-INF/web.xml already added, skipping
           [INFO]
           [INFO] --- maven-dependency-plugin:2.1:copy-dependencies (copy-dependencies) @ simple-heroku-webapp ---
           [INFO] Copying guava-14.0.1.jar to /tmp/build_992cc747-26d6-4800-bdb1-add47b9583cd/target/dependency/guava-14.0.1.jar
           [INFO] Copying javax.annotation-api-1.2.jar to /tmp/build_992cc747-26d6-4800-bdb1-add47b9583cd/target/dependency/javax.annotation-api-1.2.jar
           [INFO] Copying validation-api-1.1.0.Final.jar to /tmp/build_992cc747-26d6-4800-bdb1-add47b9583cd/target/dependency/validation-api-1.1.0.Final.jar
           [INFO] Copying javax.ws.rs-api-2.0.jar to /tmp/build_992cc747-26d6-4800-bdb1-add47b9583cd/target/dependency/javax.ws.rs-api-2.0.jar
           [INFO] Copying jetty-http-9.0.6.v20130930.jar to /tmp/build_992cc747-26d6-4800-bdb1-add47b9583cd/target/dependency/jetty-http-9.0.6.v20130930.jar
           [INFO] Copying jetty-io-9.0.6.v20130930.jar to /tmp/build_992cc747-26d6-4800-bdb1-add47b9583cd/target/dependency/jetty-io-9.0.6.v20130930.jar
           [INFO] Copying jetty-security-9.0.6.v20130930.jar to /tmp/build_992cc747-26d6-4800-bdb1-add47b9583cd/target/dependency/jetty-security-9.0.6.v20130930.jar
           [INFO] Copying jetty-server-9.0.6.v20130930.jar to /tmp/build_992cc747-26d6-4800-bdb1-add47b9583cd/target/dependency/jetty-server-9.0.6.v20130930.jar
           [INFO] Copying jetty-servlet-9.0.6.v20130930.jar to /tmp/build_992cc747-26d6-4800-bdb1-add47b9583cd/target/dependency/jetty-servlet-9.0.6.v20130930.jar
           [INFO] Copying jetty-util-9.0.6.v20130930.jar to /tmp/build_992cc747-26d6-4800-bdb1-add47b9583cd/target/dependency/jetty-util-9.0.6.v20130930.jar
           [INFO] Copying jetty-webapp-9.0.6.v20130930.jar to /tmp/build_992cc747-26d6-4800-bdb1-add47b9583cd/target/dependency/jetty-webapp-9.0.6.v20130930.jar
           [INFO] Copying jetty-xml-9.0.6.v20130930.jar to /tmp/build_992cc747-26d6-4800-bdb1-add47b9583cd/target/dependency/jetty-xml-9.0.6.v20130930.jar
           [INFO] Copying javax.servlet-3.0.0.v201112011016.jar to /tmp/build_992cc747-26d6-4800-bdb1-add47b9583cd/target/dependency/javax.servlet-3.0.0.v201112011016.jar
           [INFO] Copying hk2-api-2.2.0-b21.jar to /tmp/build_992cc747-26d6-4800-bdb1-add47b9583cd/target/dependency/hk2-api-2.2.0-b21.jar
           [INFO] Copying hk2-locator-2.2.0-b21.jar to /tmp/build_992cc747-26d6-4800-bdb1-add47b9583cd/target/dependency/hk2-locator-2.2.0-b21.jar
           [INFO] Copying hk2-utils-2.2.0-b21.jar to /tmp/build_992cc747-26d6-4800-bdb1-add47b9583cd/target/dependency/hk2-utils-2.2.0-b21.jar
           [INFO] Copying osgi-resource-locator-1.0.1.jar to /tmp/build_992cc747-26d6-4800-bdb1-add47b9583cd/target/dependency/osgi-resource-locator-1.0.1.jar
           [INFO] Copying asm-all-repackaged-2.2.0-b21.jar to /tmp/build_992cc747-26d6-4800-bdb1-add47b9583cd/target/dependency/asm-all-repackaged-2.2.0-b21.jar
           [INFO] Copying cglib-2.2.0-b21.jar to /tmp/build_992cc747-26d6-4800-bdb1-add47b9583cd/target/dependency/cglib-2.2.0-b21.jar
           [INFO] Copying javax.inject-2.2.0-b21.jar to /tmp/build_992cc747-26d6-4800-bdb1-add47b9583cd/target/dependency/javax.inject-2.2.0-b21.jar
           [INFO] Copying jersey-container-servlet-2.5.jar to /tmp/build_992cc747-26d6-4800-bdb1-add47b9583cd/target/dependency/jersey-container-servlet-2.5.jar
           [INFO] Copying jersey-container-servlet-core-2.5.jar to /tmp/build_992cc747-26d6-4800-bdb1-add47b9583cd/target/dependency/jersey-container-servlet-core-2.5.jar
           [INFO] Copying jersey-client-2.5.jar to /tmp/build_992cc747-26d6-4800-bdb1-add47b9583cd/target/dependency/jersey-client-2.5.jar
           [INFO] Copying jersey-common-2.5.jar to /tmp/build_992cc747-26d6-4800-bdb1-add47b9583cd/target/dependency/jersey-common-2.5.jar
           [INFO] Copying jersey-server-2.5.jar to /tmp/build_992cc747-26d6-4800-bdb1-add47b9583cd/target/dependency/jersey-server-2.5.jar
           [INFO]
           [INFO] --- maven-install-plugin:2.3.1:install (default-install) @ simple-heroku-webapp ---
           [INFO] Installing /tmp/build_992cc747-26d6-4800-bdb1-add47b9583cd/target/simple-heroku-webapp.war to /app/tmp/cache/.m2/repository/com/example/simple-heroku-webapp/1.0-SNAPSHOT/simple-heroku-webapp-1.0-SNAPSHOT.war
           [INFO] Installing /tmp/build_992cc747-26d6-4800-bdb1-add47b9583cd/pom.xml to /app/tmp/cache/.m2/repository/com/example/simple-heroku-webapp/1.0-SNAPSHOT/simple-heroku-webapp-1.0-SNAPSHOT.pom
           [INFO] ------------------------------------------------------------------------
           [INFO] BUILD SUCCESS
           [INFO] ------------------------------------------------------------------------
           [INFO] Total time: 45.861s
           [INFO] Finished at: Mon Dec 09 19:51:34 UTC 2013
           [INFO] Final Memory: 17M/514M
           [INFO] ------------------------------------------------------------------------
    -----> Discovering process types
           Procfile declares types -> web

    -----> Compiled slug size: 75.9MB
    -----> Launching... done, v6
           http://simple-heroku-webapp.herokuapp.com deployed to Heroku

    To git@heroku.com:simple-heroku-webapp.git
     * [new branch]      master -> master
Now you can access your application at, for example: http://simple-heroku-webapp.herokuapp.com/myresource
In the sections above, we have covered an approach how to get dirty with Jersey quickly. Please consult the other sections of the Jersey User Guide to learn more about Jersey and JAX-RS. Even though we try our best to cover as much as possible in the User Guide, there is always a chance that you would not be able to get a full answer to the problem you are solving. In that case, consider diving in our examples that provide additional tips and hints to the features you may want to use in your projects.
Jersey codebase contains a number of useful examples on how to use various JAX-RS and Jersey features. Feel free to browse through the code of individual Jersey Examples in the Jersey source repository. For off-line browsing, you can also download a bundle with all the examples from here.
Table of Contents
2.x branch:
Until version 2.6, Jersey was compiled with Java SE 6. This has changed in Jersey 2.7.
Up to version 2.25.x almost all Jersey components are compiled with Java SE 7 target. It means, that you will need at least Java SE 7 to be able to compile and run your application that is using latest Jersey. Only
core-commonandcore-clientmodules are still compiled with Java class version runnable with Java SE 6.Since Jersey 2.26, all modules are build using Java SE 8 and there is no support for running it on older Java SE distributions.
Jersey is built, assembled and installed using Apache Maven. Non-snapshot Jersey releases are deployed to the Central Maven Repository. Jersey is also being deployed to Java.Net Maven repositories, which contain also Jersey SNAPSHOT versions. In case you would want to test the latest development builds check out the Java.Net Snapshots Maven repository.
An application that uses Jersey and depends on Jersey modules is in turn required to also include in the application dependencies the set of 3rd party modules that Jersey modules depend on. Jersey is designed as a pluggable component architecture and different applications can therefore require different sets of Jersey modules. This also means that the set of external Jersey dependencies required to be included in the application dependencies may vary in each application based on the Jersey modules that are being used by the application.
Developers using Maven or a Maven-aware build system in their projects are likely to find it easier to include and manage dependencies of their applications compared to developers using ant or other build systems that are not compatible with Maven. This document will explain to both maven and non-maven developers how to depend on Jersey modules in their application. Ant developers are likely to find the Ant Tasks for Maven very useful.
If you are using Glassfish application server, you don't need to package anything with your application, everything is already included. You just need to declare (provided) dependency on JAX-RS API to be able to compile your application.
<dependency>
    <groupId>jakarta.ws.rs</groupId>
    <artifactId>jakarta.ws.rs-api</artifactId>
    <version>2.1.6</version>
    <scope>provided</scope>
</dependency>
If you are using any Jersey specific feature, you will need to depend on Jersey directly.
<dependency>
    <groupId>org.glassfish.jersey.containers</groupId>
    <artifactId>jersey-container-servlet</artifactId>
    <version>2.29.1</version>
    <scope>provided</scope>
</dependency>
<!-- if you are using Jersey client specific features without the server side -->
<dependency>
    <groupId>org.glassfish.jersey.core</groupId>
    <artifactId>jersey-client</artifactId>
    <version>2.29.1</version>
    <scope>provided</scope>
</dependency>
Following dependencies apply to application server (servlet containers) without any integrated JAX-RS implementation. Then application needs to include JAX-RS API and Jersey implementation in deployed application.
<dependency>
    <groupId>org.glassfish.jersey.containers</groupId>
    <!-- if your container implements Servlet API older than 3.0, use "jersey-container-servlet-core"  -->
    <artifactId>jersey-container-servlet</artifactId>
    <version>2.29.1</version>
</dependency>
<!-- Required only when you are using JAX-RS Client -->
<dependency>
    <groupId>org.glassfish.jersey.core</groupId>
    <artifactId>jersey-client</artifactId>
    <version>2.29.1</version>
</dependency>Applications running on plain JDK using only client part of JAX-RS specification need to depend only on client. There are various additional modules which can be added, like for example grizzly or apache or jetty connector (see dependencies snipped below). Jersey client runs by default with plain JDK (using HttpUrlConnection). See Chapter 5, Client API. for more details.
<dependency>
    <groupId>org.glassfish.jersey.core</groupId>
    <artifactId>jersey-client</artifactId>
    <version>2.29.1</version>
</dependency>
Currently available connectors:
<dependency>
    <groupId>org.glassfish.jersey.connectors</groupId>
    <artifactId>jersey-grizzly-connector</artifactId>
    <version>2.29.1</version>
</dependency>

<dependency>
    <groupId>org.glassfish.jersey.connectors</groupId>
    <artifactId>jersey-apache-connector</artifactId>
    <version>2.29.1</version>
</dependency>

<dependency>
    <groupId>org.glassfish.jersey.connectors</groupId>
    <artifactId>jersey-jetty-connector</artifactId>
    <version>2.29.1</version>
</dependency>Apart for a standard JAX-RS Servlet-based deployment that works with any Servlet container that supports Servlet 2.5 and higher, Jersey provides support for programmatic deployment to the following containers: Grizzly 2 (HTTP and Servlet), JDK Http server, Simple Http server and Jetty Http server. This chapter presents only required maven dependencies, more information can be found in Chapter 4, Application Deployment and Runtime Environments.
<dependency>
    <groupId>org.glassfish.jersey.containers</groupId>
    <artifactId>jersey-container-grizzly2-http</artifactId>
    <version>2.29.1</version>
</dependency>

<dependency>
    <groupId>org.glassfish.jersey.containers</groupId>
    <artifactId>jersey-container-grizzly2-servlet</artifactId>
    <version>2.29.1</version>
</dependency>

<dependency>
    <groupId>org.glassfish.jersey.containers</groupId>
    <artifactId>jersey-container-jdk-http</artifactId>
    <version>2.29.1</version>
</dependency>

<dependency>
    <groupId>org.glassfish.jersey.containers</groupId>
    <artifactId>jersey-container-simple-http</artifactId>
    <version>2.29.1</version>
</dependency>

<dependency>
    <groupId>org.glassfish.jersey.containers</groupId>
    <artifactId>jersey-container-jetty-http</artifactId>
    <version>2.29.1</version>
</dependency>

<dependency>
    <groupId>org.glassfish.jersey.containers</groupId>
    <artifactId>jersey-container-jetty-servlet</artifactId>
    <version>2.29.1</version>
</dependency>The following chapters provide an overview of all Jersey modules and their dependencies with links to the respective binaries (follow a link on a module name to get complete set of downloadable dependencies).
Table 2.1. Jersey Core
| Jersey Core | |
|---|---|
| jersey-client | Jersey core client implementation |
| jersey-common | Jersey core common packages |
| jersey-server | Jersey core server implementation |
Table 2.2. Jersey Containers
| Jersey Containers | |
|---|---|
| jersey-container-grizzly2-http | Grizzly 2 Http Container. |
| jersey-container-grizzly2-servlet | Grizzly 2 Servlet Container. |
| jersey-container-jdk-http | JDK Http Container |
| jersey-container-jetty-http | Jetty Http Container |
| jersey-container-jetty-servlet | Jetty Servlet Container |
| jersey-container-netty-http | Netty Http Container. |
| jersey-container-servlet | Jersey core Servlet 3.x implementation |
| jersey-container-servlet-core | Jersey core Servlet 2.x implementation |
| jersey-container-simple-http | Simple Http Container |
| jersey-gf-ejb | Jersey EJB for GlassFish integration |
Table 2.3. Jersey Connectors
| Jersey Connectors | |
|---|---|
| jersey-apache-connector | Jersey Client Transport via Apache |
| jersey-grizzly-connector | Jersey Client Transport via Grizzly |
| jersey-jdk-connector | Jersey Client Transport via JDK connector |
| jersey-jetty-connector | Jersey Client Transport via Jetty |
| jersey-netty-connector | Jersey Client Transport via Netty |
Table 2.4. Jersey Media
| Jersey Media | |
|---|---|
| jersey-media-jaxb | JAX-RS features based upon JAX-B. |
| jersey-media-json-binding | Jersey JSON-B support module. |
| jersey-media-json-jackson | Jersey JSON Jackson (2.x) entity providers support module. |
| jersey-media-json-jackson1 | Jersey JSON Jackson (1.x) entity providers support module. |
| jersey-media-json-jettison | Jersey JSON Jettison entity providers support module. |
| jersey-media-json-processing | Jersey JSON-P (JSR 353) entity providers support proxy module. |
| jersey-media-kryo | Jersey/JAX-RS Message Body Writer and Reader using Kryo serialization framework |
| jersey-media-moxy | Jersey JSON entity providers support module based on EclipseLink MOXy. |
| jersey-media-multipart | Jersey Multipart entity providers support module. |
| jersey-media-sse | Jersey Server Sent Events entity providers support module. |
Table 2.5. Jersey Extensions
| Jersey Extensions | |
|---|---|
| jersey-bean-validation | Jersey extension module providing support for Bean Validation (JSR-349) API. |
| jersey-cdi1x | Jersey CDI 1.1 integration |
| jersey-cdi1x-ban-custom-hk2-binding | Jersey CDI integration - this module disables custom HK2 bindings |
| jersey-cdi1x-servlet | Jersey CDI 1.x Servlet Support |
| jersey-cdi1x-transaction | Jersey CDI 1.x Transactional Support |
| jersey-cdi1x-validation | Jersey CDI 1.x Bean Validation Support |
| jersey-declarative-linking | Jersey support for declarative hyperlinking. |
| jersey-entity-filtering | Jersey extension module providing support for Entity Data Filtering. |
| jersey-metainf-services | Jersey extension module enabling automatic registration of JAX-RS providers (MBW/MBR/EM) via META-INF/services mechanism. |
| jersey-mvc | Jersey extension module providing support for MVC. |
| jersey-mvc-bean-validation | Jersey extension module providing support for Bean Validation in MVC. |
| jersey-mvc-freemarker | Jersey extension module providing support for Freemarker templates. |
| jersey-mvc-jsp | Jersey extension module providing support for JSP templates. |
| jersey-mvc-mustache | Jersey extension module providing support for Mustache templates. |
| jersey-proxy-client | Jersey extension module providing support for (proxy-based) high-level client API. |
| jersey-rx-client-guava | Jersey Reactive Client - Guava (ListenableFuture) provider. |
| jersey-rx-client-rxjava | Jersey Reactive Client - RxJava (Observable) provider. |
| jersey-rx-client-rxjava2 | Jersey Reactive Client - RxJava2 (Flowable) provider. |
| jersey-servlet-portability | Library that enables writing web applications that run with both Jersey 1.x and Jersey 2.x servlet containers. |
| jersey-spring4 | Jersey extension module providing support for Spring 4 integration. |
| jersey-wadl-doclet | A doclet that generates a resourcedoc xml file: this file contains the javadoc documentation of resource classes, so that this can be used for extending generated wadl with useful documentation. |
| jersey-weld2-se | WELD 2.x SE support |
Table 2.6. Jersey Test Framework
| Jersey Test Framework | |
|---|---|
| container-runner-maven-plugin | The container runner maven plugin provides means to start and stop a container (currently, Weblogic, Tomcat and Glassfish4 are supported). To deploy an application to this container or to repetitively redeploy and test an application in the container. |
| custom-enforcer-rules | Jersey test framework Maven projects |
| jersey-test-framework-core | Jersey Test Framework Core |
| jersey-test-framework-provider-bundle | Jersey Test Framework Providers Bundle |
| jersey-test-framework-provider-external | Jersey Test Framework - External container |
| jersey-test-framework-provider-grizzly2 | Jersey Test Framework - Grizzly2 container |
| jersey-test-framework-provider-inmemory | Jersey Test Framework - InMemory container |
| jersey-test-framework-provider-jdk-http | Jersey Test Framework - JDK HTTP container |
| jersey-test-framework-provider-jetty | Jersey Test Framework - Jetty HTTP container |
| jersey-test-framework-provider-netty | Jersey Test Framework - Netty container |
| jersey-test-framework-provider-simple | Jersey Test Framework - Simple HTTP container |
| jersey-test-framework-util | Jersey Test Framework Utils |
| memleak-test-common | Jersey test framework umbrella project |
Table 2.7. Jersey Test Framework Providers
| Jersey Test Framework Providers | |
|---|---|
| jersey-test-framework-provider-bundle | Jersey Test Framework Providers Bundle |
| jersey-test-framework-provider-external | Jersey Test Framework - External container |
| jersey-test-framework-provider-grizzly2 | Jersey Test Framework - Grizzly2 container |
| jersey-test-framework-provider-inmemory | Jersey Test Framework - InMemory container |
| jersey-test-framework-provider-jdk-http | Jersey Test Framework - JDK HTTP container |
| jersey-test-framework-provider-jetty | Jersey Test Framework - Jetty HTTP container |
| jersey-test-framework-provider-netty | Jersey Test Framework - Netty container |
| jersey-test-framework-provider-simple | Jersey Test Framework - Simple HTTP container |
Table 2.8. Jersey Glassfish Bundles
| Jersey Glassfish Bundles | |
|---|---|
| jersey-gf-ejb | Jersey EJB for GlassFish integration |
Table 2.9. Security
| Security | |
|---|---|
| oauth1-client | Module that adds an OAuth 1 support to Jersey client. |
| oauth1-server | Module that adds an OAuth 1 support to Jersey server |
| oauth1-signature | OAuth1 signature module |
| oauth2-client | Module that adds an OAuth 2 support to Jersey client |
Table 2.10. Jersey Examples
| Jersey Examples | |
|---|---|
| additional-bundle | OSGi Helloworld Webapp - additional bundle |
| alternate-version-bundle | OSGi Helloworld Webapp - alternate version bundle |
| assemblies | Jersey examples shared assembly types. |
| bean-validation-webapp | Jersey Bean Validation (JSR-349) example. |
| bookmark | Jersey Bookmark example. |
| bookmark-em | Jersey Bookmark example using EntityManager. |
| bookstore-webapp | Jersey MVC Bookstore example. |
| bundle | OSGi HttpService example bundle |
| cdi-webapp | Jersey CDI example. |
| clipboard | Jersey clipboard example. |
| clipboard-programmatic | Jersey programmatic resource API clipboard example. |
| declarative-linking | Declarative Hyperlinking - Jersey Sample |
| entity-filtering | Jersey Entity Data Filtering Example. |
| entity-filtering-security | Jersey Entity Data Filtering Security Example. |
| entity-filtering-selectable | Jersey Entity Data Filtering Selectable Example. |
| exception-mapping | Jersey example showing exception mappers in action. |
| extended-wadl-webapp | Extended WADL example. |
| feed-combiner-java8-webapp | Jersey Web Application (Servlet) examples parent POM. |
| flight-management-webapp | Jersey Flight Management Demo Web Application Example |
| freemarker-webapp | Jersey Freemarker example. |
| functional-test | Jersey examples |
| functional-test | OSGi HttpService example |
| groovy | Groovy Jersey |
| helloworld | Jersey annotated resource class "Hello world" example. |
| helloworld-benchmark | Jersey "Hello World" benchmark example. |
| helloworld-cdi2-se | Jersey "Hello world" example with CDI 2 SE. |
| helloworld-netty | Jersey "Hello world" example on Netty container. |
| helloworld-programmatic | Jersey programmatic resource API "Hello world" example. |
| helloworld-pure-jax-rs | Example using only the standard JAX-RS API's and the lightweight HTTP server bundled in JDK. |
| helloworld-spring-annotations | Spring 4 Integration Jersey Example |
| helloworld-spring-webapp | Spring 4 Integration Jersey Example |
| helloworld-webapp | Jersey annotated resource class "Hello world" example. |
| helloworld-weld | Jersey annotated resource class "Hello world" example with Weld support. |
| http-patch | Jersey example for implementing generic PATCH support via JAX-RS reader interceptor. Taken from Gerard Davison's blog entry: http://kingsfleet.blogspot.co.uk/2014/02/transparent-patch-support-in-jax-rs-20.html |
| http-trace | Jersey HTTP TRACE support example. |
| https-clientserver-grizzly | Jersey HTTPS Client/Server example on Grizzly. |
| https-server-glassfish | Jersey HTTPS server on GlassFish example. |
| java8-webapp | Java 8 Types WebApp Example. |
| jaxb | Jersey JAXB example. |
| jaxrs-types-injection | Jersey JAX-RS types injection example. |
| jersey-ejb | Jersey Web Application (Servlet) examples parent POM. |
| json-binding-webapp | Jersey JSON Binding example. |
| json-jackson | Jersey JSON with Jackson example. |
| json-jackson1 | Jersey JSON with Jackson 1.x example. |
| json-jettison | Jersey JSON with Jettison JAXB example. |
| json-moxy | Jersey JSON with MOXy example. |
| json-processing-webapp | Jersey JSON-P (JSR 353) example. |
| json-with-padding | Jersey JSON with Padding example. |
| lib-bundle | OSGi Helloworld Webapp - lib bundle |
| managed-beans-webapp | Jersey Managed Beans Web Application Example. |
| managed-client | Jersey managed client example. |
| managed-client-simple-webapp | Jersey Web Application (Servlet) examples parent POM. |
| managed-client-webapp | Jersey managed client web application example. |
| monitoring-webapp | Jersey Web Application (Servlet) examples parent POM. |
| multipart-webapp | Jersey Multipart example. |
| oauth-client-twitter | Twitter client using OAuth 1 support for Jersey that retrieves Tweets from the home timeline of a registered Twitter account. |
| oauth2-client-google-webapp | Google API data retrieving example using OAuth2 for authentication and authorization |
| open-tracing | Jersey OpenTracing example |
| osgi-helloworld-webapp | Jersey examples |
| osgi-http-service | OSGi HttpService example |
| reload | Jersey resource configuration reload example. |
| rx-client-webapp | Jersey Reactive Client WebApp Example. |
| server-async | Jersey JAX-RS asynchronous server-side example. |
| server-async-managed | Jersey JAX-RS asynchronous server-side example with custom Jersey executor providers. |
| server-async-standalone | Standalone Jersey JAX-RS asynchronous server-side processing example. |
| server-async-standalone-client | Standalone Jersey JAX-RS asynchronous server-side processing example client. |
| server-async-standalone-webapp | Standalone Jersey JAX-RS asynchronous server-side processing example web application. |
| server-sent-events-jaxrs | Jersey JAX-RS 2.1 Server-Sent Events example. |
| server-sent-events-jersey | Jersey Server-Sent Events example. |
| servlet3-webapp | Jersey Servlet 3 example with missing servlet-class in the web.xml file |
| shortener-webapp | Jersey Shortener Webapp (MVC + Bean Validation). |
| simple-console | Jersey Simple Console example |
| sparklines | Jersey examples |
| sse-item-store-jaxrs-webapp | Jersey JAX-RS 2.1 SSE API-based item store example. |
| sse-item-store-jersey-webapp | Jersey SSE API-based item store example. |
| sse-twitter-aggregator | Jersey SSE Twitter Message Aggregator Example. |
| system-properties-example | Jersey system properties example. |
| tone-generator | Jersey examples |
| war-bundle | OSGi Helloworld Webapp WAR bundle |
| webapp-example-parent | Jersey Web Application (Servlet) examples parent POM. |
| xml-moxy | Jersey XML MOXy example. |
Table of Contents
This chapter presents an overview of the core JAX-RS concepts - resources and sub-resources.
The JAX-RS 2.1.6 JavaDoc can be found online here.
The JAX-RS 2.1.6 specification draft can be found online here.
Root resource classes are POJOs (Plain Old Java Objects) that are annotated with @Path have at least one method annotated with @Path or a resource method designator annotation such as @GET, @PUT, @POST, @DELETE. Resource methods are methods of a resource class annotated with a resource method designator. This section shows how to use Jersey to annotate Java objects to create RESTful web services.
The following code example is a very simple example of a root resource class using JAX-RS annotations. The example code shown here is from one of the samples that ships with Jersey, the zip file of which can be found in the maven repository here.
Example 3.1. Simple hello world root resource class
package org.glassfish.jersey.examples.helloworld;

import javax.ws.rs.GET;
import javax.ws.rs.Path;
import javax.ws.rs.Produces;

@Path("helloworld")
public class HelloWorldResource {
    public static final String CLICHED_MESSAGE = "Hello World!";

@GET
@Produces("text/plain")
    public String getHello() {
        return CLICHED_MESSAGE;
    }
}
Let's look at some of the JAX-RS annotations used in this example.
The @Path annotation's value is a relative URI path. In the example above, the Java class will be hosted at the URI path
/helloworld. This is an extremely simple use of the @Path annotation. What makes JAX-RS so useful is that you can embed variables in the URIs.
URI path templates are URIs with variables embedded within the URI syntax. These variables are substituted at runtime in order for a resource to respond to a request based on the substituted URI. Variables are denoted by curly braces. For example, look at the following @Path annotation:
@Path("/users/{username}")
In this type of example, a user will be prompted to enter their name, and then a Jersey web service configured to respond to requests to this URI path template will respond. For example, if the user entered their username as "Galileo", the web service will respond to the following URL:
http://example.com/users/Galileo
To obtain the value of the username variable the @PathParam may be used on method parameter of a request method, for example:
Example 3.2. Specifying URI path parameter
@Path("/users/{username}")
public class UserResource {

    @GET
    @Produces("text/xml")
    public String getUser(@PathParam("username") String userName) {
        ...
    }
}
If it is required that a user name must only consist of
lower and upper case numeric characters then it is possible to declare a
particular regular expression, which overrides the default regular
expression, "[^/]+", for example:
@Path("users/{username: [a-zA-Z][a-zA-Z_0-9]*}")In this type of example the username variable will only match user names that begin with one upper or lower case letter and zero or more alpha numeric characters and the underscore character. If a user name does not match that a 404 (Not Found) response will occur.
A @Path value may or may not begin with a '/', it makes no difference. Likewise, by default, a @Path value may or may not end in a '/', it makes no difference, and thus request URLs that end or do not end in a '/' will both be matched.
@GET, @PUT, @POST, @DELETE and @HEAD are resource method designator annotations defined by JAX-RS and which correspond to the similarly named HTTP methods. In the example above, the annotated Java method will process HTTP GET requests. The behavior of a resource is determined by which of the HTTP methods the resource is responding to.
The following example is an extract from the storage service sample that shows the use of the PUT method to create or update a storage container:
Example 3.3. PUT method
@PUT
public Response putContainer() {
    System.out.println("PUT CONTAINER " + container);

    URI uri = uriInfo.getAbsolutePath();
    Container c = new Container(container, uri.toString());

    Response r;
    if (!MemoryStore.MS.hasContainer(c)) {
        r = Response.created(uri).build();
    } else {
        r = Response.noContent().build();
    }

    MemoryStore.MS.createContainer(c);
    return r;
}
By default the JAX-RS runtime will automatically support the methods HEAD and OPTIONS, if not explicitly
implemented. For HEAD the runtime will invoke the implemented GET method (if present) and ignore the
response entity (if set). A response returned for the OPTIONS method depends on the requested media type
defined in the 'Accept' header. The OPTIONS method can return a response with a set of supported
resource methods in the 'Allow' header or return
a WADL document.
See wadl section for more information.
The @Produces annotation is used to specify the MIME media types of representations a resource can produce and send back to the client. In this example, the Java method will produce representations identified by the MIME media type "text/plain". @Produces can be applied at both the class and method levels. Here's an example:
Example 3.4. Specifying output MIME type
@Path("/myResource")
@Produces("text/plain")
public class SomeResource {
    @GET
    public String doGetAsPlainText() {
        ...
    }

    @GET
    @Produces("text/html")
    public String doGetAsHtml() {
        ...
    }
}
The
doGetAsPlainText
method defaults to the MIME type of the @Produces annotation at the class level. The
doGetAsHtml
method's @Produces annotation overrides the class-level @Produces setting, and specifies that the
method can produce HTML rather than plain text.
If a resource class is capable of producing more that one MIME
media type then the resource method chosen will correspond to the most
acceptable media type as declared by the client. More specifically the
Accept header of the HTTP request declares what is most acceptable. For
example if the Accept header is "Accept: text/plain" then the
doGetAsPlainText
method will be invoked.
Alternatively if the Accept header is "
Accept: text/plain;q=0.9, text/html", which declares that the client can accept media types of
"text/plain" and "text/html" but prefers the latter, then the
doGetAsHtml
method will be invoked.
More than one media type may be declared in the same @Produces declaration, for example:
Example 3.5. Using multiple output MIME types
@GET
@Produces({"application/xml", "application/json"})
public String doGetAsXmlOrJson() {
    ...
}
The
doGetAsXmlOrJson
method will get
invoked if either of the media types "application/xml" and
"application/json" are acceptable. If both are equally acceptable then
the former will be chosen because it occurs first.
Optionally, server can also specify the quality factor for individual media types. These are considered if several are equally acceptable by the client. For example:
Example 3.6. Server-side content negotiation
@GET
@Produces({"application/xml; qs=0.9", "application/json"})
public String doGetAsXmlOrJson() {
    ...
}
In the above sample, if client accepts both "application/xml" and "application/json" (equally),
then a server always sends "application/json", since "application/xml" has a lower quality factor.
The examples above refers explicitly to MIME media types for clarity. It is possible to refer to constant values, which may reduce typographical errors, see the constant field values of MediaType.
The @Consumes annotation is used to specify the MIME media types of representations that can be consumed by a resource. The above example can be modified to set the cliched message as follows:
Example 3.7. Specifying input MIME type
@POST
@Consumes("text/plain")
public void postClichedMessage(String message) {
    // Store the message
}
In this example, the Java method will consume representations identified by the MIME media type "text/plain". Notice that the resource method returns void. This means no representation is returned and response with a status code of 204 (No Content) will be returned to the client.
@Consumes can be applied at both the class and the method levels and more than one media type may be declared in the same @Consumes declaration.
Parameters of a resource method may be annotated with parameter-based annotations to extract information from a request. One of the previous examples presented the use of @PathParam to extract a path parameter from the path component of the request URL that matched the path declared in @Path.
@QueryParam is used to extract query parameters from the Query component of the request URL. The following example is an extract from the sparklines sample:
Example 3.8. Query parameters
@Path("smooth")
@GET
public Response smooth(
    @DefaultValue("2") @QueryParam("step") int step,
    @DefaultValue("true") @QueryParam("min-m") boolean hasMin,
    @DefaultValue("true") @QueryParam("max-m") boolean hasMax,
    @DefaultValue("true") @QueryParam("last-m") boolean hasLast,
    @DefaultValue("blue") @QueryParam("min-color") ColorParam minColor,
    @DefaultValue("green") @QueryParam("max-color") ColorParam maxColor,
    @DefaultValue("red") @QueryParam("last-color") ColorParam lastColor) {
    ...
}
If a query parameter "step" exists in the query component of the
request URI then the "step" value will be extracted and parsed as a
32 bit signed integer and assigned to the step method parameter. If "step"
does not exist then a default value of 2, as declared in the @DefaultValue
annotation, will be assigned to the step method parameter. If the "step"
value cannot be parsed as a 32 bit signed integer then a HTTP 404 (Not
Found) response is returned. User defined Java types such as
ColorParam
may be used, which as implemented as
follows:
Example 3.9. Custom Java type for consuming request parameters
public class ColorParam extends Color {

    public ColorParam(String s) {
        super(getRGB(s));
    }

    private static int getRGB(String s) {
        if (s.charAt(0) == '#') {
            try {
                Color c = Color.decode("0x" + s.substring(1));
                return c.getRGB();
            } catch (NumberFormatException e) {
                throw new WebApplicationException(400);
            }
        } else {
            try {
                Field f = Color.class.getField(s);
                return ((Color)f.get(null)).getRGB();
            } catch (Exception e) {
                throw new WebApplicationException(400);
            }
        }
    }
}
In general the Java type of the method parameter may:
Be a primitive type;
Have a constructor that accepts a single
Stringargument;Have a static method named
valueOforfromStringthat accepts a singleStringargument (see, for example,Integer.valueOf(String)andjava.util.UUID.fromString(String));Have a registered implementation of
javax.ws.rs.ext.ParamConverterProviderJAX-RS extension SPI that returns ajavax.ws.rs.ext.ParamConverterinstance capable of a "from string" conversion for the type. orBe
List<T>,Set<T>orSortedSet<T>, whereTsatisfies 2 or 3 above. The resulting collection is read-only.
Sometimes parameters may contain more than one value for the same name. If this is the case then types in 5) may be used to obtain all values.
If the @DefaultValue is not used in conjunction with @QueryParam
and the query parameter is not present in the request then value will be
an empty collection forList, Set or SortedSet,
null for other object types, and the Java-defined default for primitive types.
The @PathParam and the other parameter-based annotations, @MatrixParam, @HeaderParam, @CookieParam, @FormParam obey the same rules as @QueryParam. @MatrixParam extracts information from URL path segments. @HeaderParam extracts information from the HTTP headers. @CookieParam extracts information from the cookies declared in cookie related HTTP headers.
@FormParam is slightly special because it extracts information from a request representation that
is of the MIME media type
"application/x-www-form-urlencoded"
and conforms to the encoding
specified by HTML forms, as described here. This parameter is very useful for extracting information that is
POSTed by HTML forms, for example the following extracts the form parameter named "name" from the POSTed form
data:
Example 3.10. Processing POSTed HTML form
@POST
@Consumes("application/x-www-form-urlencoded")
public void post(@FormParam("name") String name) {
    // Store the message
}
If it is necessary to obtain a general map of parameter name to values then, for query and path parameters it is possible to do the following:
Example 3.11. Obtaining general map of URI path and/or query parameters
@GET
public String get(@Context UriInfo ui) {
    MultivaluedMap<String, String> queryParams = ui.getQueryParameters();
    MultivaluedMap<String, String> pathParams = ui.getPathParameters();
}
For header and cookie parameters the following:
Example 3.12. Obtaining general map of header parameters
@GET
public String get(@Context HttpHeaders hh) {
    MultivaluedMap<String, String> headerParams = hh.getRequestHeaders();
    Map<String, Cookie> pathParams = hh.getCookies();
}
In general @Context can be used to obtain contextual Java types related to the request or response.
Because form parameters (unlike others) are part of the message entity, it is possible to do the following:
Example 3.13. Obtaining general map of form parameters
@POST
@Consumes("application/x-www-form-urlencoded")
public void post(MultivaluedMap<String, String> formParams) {
    // Store the message
}
I.e. you don't need to use the @Context annotation.
Another kind of injection is the @BeanParam which allows to inject the parameters described above into a
single bean. A bean annotated with @BeanParam containing any fields and appropriate
*param
annotation(like @PathParam) will be initialized with corresponding request values in expected way as if these
fields were in the resource class. Then instead of injecting request values like path param into a constructor parameters
or class fields the @BeanParam can be used to inject such a bean into a resource or resource method. The
@BeanParam is used this way to aggregate more request parameters into a single bean.
Example 3.14. Example of the bean which will be used as @BeanParam
public class MyBeanParam {
    @PathParam("p")
    private String pathParam;

    @MatrixParam("m")
    @Encoded
    @DefaultValue("default")
    private String matrixParam;

    @HeaderParam("header")
    private String headerParam;

    private String queryParam;

    public MyBeanParam(@QueryParam("q") String queryParam) {
        this.queryParam = queryParam;
    }

    public String getPathParam() {
        return pathParam;
    }
    ...
}
Example 3.15. Injection of MyBeanParam as a method parameter:
@POST
public void post(@BeanParam MyBeanParam beanParam, String entity) {
    final String pathParam = beanParam.getPathParam(); // contains injected path parameter "p"
    ...
}
The example shows aggregation of injections @PathParam, @QueryParam @MatrixParam and @HeaderParam into one single bean. The rules for injections inside the bean are the same as described above for these injections. The @DefaultValue is used to define the default value for matrix parameter matrixParam. Also the @Encoded annotation has the same behaviour as if it were used for injection in the resource method directly. Injecting the bean parameter into @Singleton resource class fields is not allowed (injections into method parameter must be used instead).
@BeanParam can contain all parameters injections (@PathParam, @QueryParam, @MatrixParam, @HeaderParam, @CookieParam, @FormParam). More beans can be injected into one resource or method parameters even if they inject the same request values. For example the following is possible:
Example 3.16. Injection of more beans into one resource methods:
@POST
public void post(@BeanParam MyBeanParam beanParam, @BeanParam AnotherBean anotherBean, @PathParam("p") pathParam,
String entity) {
    // beanParam.getPathParam() == pathParam
    ...
}@Path may be used on classes and such classes are referred to as root resource classes. @Path may also be used on methods of root resource classes. This enables common functionality for a number of resources to be grouped together and potentially reused.
The first way @Path may be used is on resource methods and such methods are referred to as sub-resource methods. The following example shows the method signatures for a root resource class from the jmaki-backend sample:
Example 3.17. Sub-resource methods
@Singleton
@Path("/printers")
public class PrintersResource {

    @GET
    @Produces({"application/json", "application/xml"})
    public WebResourceList getMyResources() { ... }

    @GET @Path("/list")
    @Produces({"application/json", "application/xml"})
    public WebResourceList getListOfPrinters() { ... }

    @GET @Path("/jMakiTable")
    @Produces("application/json")
    public PrinterTableModel getTable() { ... }

    @GET @Path("/jMakiTree")
    @Produces("application/json")
    public TreeModel getTree() { ... }

    @GET @Path("/ids/{printerid}")
    @Produces({"application/json", "application/xml"})
    public Printer getPrinter(@PathParam("printerid") String printerId) { ... }

    @PUT @Path("/ids/{printerid}")
    @Consumes({"application/json", "application/xml"})
    public void putPrinter(@PathParam("printerid") String printerId, Printer printer) { ... }

    @DELETE @Path("/ids/{printerid}")
    public void deletePrinter(@PathParam("printerid") String printerId) { ... }
}
If the path of the request URL is "printers" then the resource methods not annotated with @Path
will be selected. If the request path of the request URL is "printers/list" then first the root resource class
will be matched and then the sub-resource methods that match "list" will be selected, which in this case
is the sub-resource methodgetListOfPrinters. So, in this example hierarchical matching
on the path of the request URL is performed.
The second way @Path may be used is on methods not annotated with resource method designators such as @GET or @POST. Such methods are referred to as sub-resource locators. The following example shows the method signatures for a root resource class and a resource class from the optimistic-concurrency sample:
Example 3.18. Sub-resource locators
@Path("/item")
public class ItemResource {
    @Context UriInfo uriInfo;

    @Path("content")
    public ItemContentResource getItemContentResource() {
        return new ItemContentResource();
    }

    @GET
    @Produces("application/xml")
        public Item get() { ... }
    }
}

public class ItemContentResource {

    @GET
    public Response get() { ... }

    @PUT
    @Path("{version}")
    public void put(@PathParam("version") int version,
                    @Context HttpHeaders headers,
                    byte[] in) {
        ...
    }
}
The root resource class
ItemResource
contains the
sub-resource locator method
getItemContentResource
that
returns a new resource class. If the path of the request URL is
"item/content" then first of all the root resource will be matched, then
the sub-resource locator will be matched and invoked, which returns an
instance of the
ItemContentResource
resource class.
Sub-resource locators enable reuse of resource classes. A method can be annotated with the
@Path annotation with empty path (@Path("/") or @Path("")) which
means that the sub resource locator is matched for the path of the enclosing resource (without sub-resource path).
Example 3.19. Sub-resource locators with empty path
@Path("/item")
public class ItemResource {

    @Path("/")
    public ItemContentResource getItemContentResource() {
        return new ItemContentResource();
    }
}
In the example above the sub-resource locator method getItemContentResource
is matched for example for request path "/item/locator" or even for only "/item".
In addition the processing of resource classes returned by sub-resource locators is performed at runtime thus it is possible to support polymorphism. A sub-resource locator may return different sub-types depending on the request (for example a sub-resource locator could return different sub-types dependent on the role of the principle that is authenticated). So for example the following sub resource locator is valid:
Example 3.20. Sub-resource locators returning sub-type
@Path("/item")
public class ItemResource {

    @Path("/")
    public Object getItemContentResource() {
        return new AnyResource();
    }
}
Note that the runtime will not manage the life-cycle or perform any
field injection onto instances returned from sub-resource locator methods.
This is because the runtime does not know what the life-cycle of the
instance is. If it is required that the runtime manages the sub-resources
as standard resources the Class should be returned
as shown in the following example:
Example 3.21. Sub-resource locators created from classes
import javax.inject.Singleton;

@Path("/item")
public class ItemResource {
    @Path("content")
    public Class<ItemContentSingletonResource> getItemContentResource() {
        return ItemContentSingletonResource.class;
    }
}

@Singleton
public class ItemContentSingletonResource {
    // this class is managed in the singleton life cycle
}
JAX-RS resources are managed in per-request scope by default which means that
new resource is created for each request.
In this example the javax.inject.Singleton annotation says
that the resource will be managed as singleton and not in request scope.
The sub-resource locator method returns a class which means that the runtime
will managed the resource instance and its life-cycle. If the method would return instance instead,
the Singleton annotation would have no effect and the returned instance
would be used.
The sub resource locator can also return a programmatic resource model. See resource builder section for information of how the programmatic resource model is constructed. The following example shows very simple resource returned from the sub-resource locator method.
Example 3.22. Sub-resource locators returning resource model
import org.glassfish.jersey.server.model.Resource;

@Path("/item")
public class ItemResource {

    @Path("content")
    public Resource getItemContentResource() {
        return Resource.from(ItemContentSingletonResource.class);
    }
}
The code above has exactly the same effect as previous example. Resource is a resource
simple resource constructed from ItemContentSingletonResource. More complex programmatic
resource can be returned as long they are valid resources.
By default the life-cycle of root resource classes is per-request which,
namely that a new instance of a root resource class is created every time
the request URI path matches the root resource. This makes for a very
natural programming model where constructors and fields can be utilized
(as in the previous section showing the constructor of the
SparklinesResource
class) without concern for multiple
concurrent requests to the same resource.
In general this is unlikely to be a cause of performance issues. Class construction and garbage collection of JVMs has vastly improved over the years and many objects will be created and discarded to serve and process the HTTP request and return the HTTP response.
Instances of singleton root resource classes can be declared by an instance of Application.
Jersey supports two further life-cycles using Jersey specific annotations.
Table 3.1. Resource scopes
| Scope | Annotation | Annotation full class name | Description |
|---|---|---|---|
| Request scope | @RequestScoped (or none) | org.glassfish.jersey.process.internal.RequestScoped | Default lifecycle (applied when no annotation is present). In this scope the resource instance is created for each new request and used for processing of this request. If the resource is used more than one time in the request processing, always the same instance will be used. This can happen when a resource is a sub resource and is returned more times during the matching. In this situation only one instance will serve the requests. |
| Per-lookup scope | @PerLookup | org.glassfish.hk2.api.PerLookup | In this scope the resource instance is created every time it is needed for the processing even it handles the same request. |
| Singleton | @Singleton | javax.inject.Singleton | In this scope there is only one instance per jax-rs application. Singleton resource can be either annotated with @Singleton and its class can be registered using the instance of Application. You can also create singletons by registering singleton instances into Application. |
Previous sections have presented examples of annotated types, mostly annotated method parameters but also annotated fields of a class, for the injection of values onto those types.
This section presents the rules of injection of values on annotated types. Injection can be performed on fields, constructor parameters, resource/sub-resource/sub-resource locator method parameters and bean setter methods. The following presents an example of all such injection cases:
Example 3.23. Injection
@Path("{id:\\d+}")
public class InjectedResource {
    // Injection onto field
    @DefaultValue("q") @QueryParam("p")
    private String p;

    // Injection onto constructor parameter
    public InjectedResource(@PathParam("id") int id) { ... }

    // Injection onto resource method parameter
    @GET
    public String get(@Context UriInfo ui) { ... }

    // Injection onto sub-resource resource method parameter
    @Path("sub-id")
    @GET
    public String get(@PathParam("sub-id") String id) { ... }

    // Injection onto sub-resource locator method parameter
    @Path("sub-id")
    public SubResource getSubResource(@PathParam("sub-id") String id) { ... }

    // Injection using bean setter method
    @HeaderParam("X-header")
    public void setHeader(String header) { ... }
}
There are some restrictions when injecting on to resource classes with a life-cycle of singleton scope. In such cases the class fields or constructor parameters cannot be injected with request specific parameters. So, for example the following is not allowed.
Example 3.24. Wrong injection into a singleton scope
@Path("resource")
@Singleton
public static class MySingletonResource {

    @QueryParam("query")
    String param; // WRONG: initialization of application will fail as you cannot
                  // inject request specific parameters into a singleton resource.

    @GET
    public String get() {
        return "query param: " + param;
    }
}
The example above will cause validation failure during application initialization as singleton resources cannot inject request specific parameters. The same example would fail if the query parameter would be injected into constructor parameter of such a singleton. In other words, if you wish one resource instance to server more requests (in the same time) it cannot be bound to a specific request parameter.
The exception exists for specific request objects which can injected even into
constructor or class fields. For these objects the runtime will inject proxies
which are able to simultaneously server more request. These request objects are
HttpHeaders, Request, UriInfo,
SecurityContext. These proxies can be injected using the @Context
annotation. The following example shows injection of proxies into the singleton resource class.
Example 3.25. Injection of proxies into singleton
@Path("resource")
@Singleton
public static class MySingletonResource {
    @Context
    Request request; // this is ok: the proxy of Request will be injected into this singleton

    public MySingletonResource(@Context SecurityContext securityContext) {
        // this is ok too: the proxy of SecurityContext will be injected
    }

    @GET
    public String get() {
        return "query param: " + param;
    }
}
To summarize the injection can be done into the following constructs:
Table 3.2. Overview of injection types
| Java construct | Description |
|---|---|
| Class fields | Inject value directly into the field of the class. The field can be private and must not be final. Cannot be used in Singleton scope except proxiable types mentioned above. |
| Constructor parameters | The constructor will be invoked with injected values. If more constructors exists the one with the most injectable parameters will be invoked. Cannot be used in Singleton scope except proxiable types mentioned above. |
| Resource methods | The resource methods (these annotated with @GET, @POST, ...) can contain parameters that can be injected when the resource method is executed. Can be used in any scope. |
| Sub resource locators | The sub resource locators (methods annotated with @Path but not @GET, @POST, ...) can contain parameters that can be injected when the resource method is executed. Can be used in any scope. |
| Setter methods | Instead of injecting values directly into field the value can be injected into the setter method which will initialize the field. This injection can be used only with @Context annotation. This means it cannot be used for example for injecting of query params but it can be used for injections of request. The setters will be called after the object creation and only once. The name of the method does not necessary have a setter pattern. Cannot be used in Singleton scope except proxiable types mentioned above. |
The following example shows all possible java constructs into which the values can be injected.
Example 3.26. Example of possible injections
@Path("resource")
public static class SummaryOfInjectionsResource {
    @QueryParam("query")
    String param; // injection into a class field


    @GET
    public String get(@QueryParam("query") String methodQueryParam) {
        // injection into a resource method parameter
        return "query param: " + param;
    }

    @Path("sub-resource-locator")
    public Class<SubResource> subResourceLocator(@QueryParam("query") String subResourceQueryParam) {
        // injection into a sub resource locator parameter
        return SubResource.class;
    }

    public SummaryOfInjectionsResource(@QueryParam("query") String constructorQueryParam) {
        // injection into a constructor parameter
    }


    @Context
    public void setRequest(Request request) {
        // injection into a setter method
        System.out.println(request != null);
    }
}

public static class SubResource {
    @GET
    public String get() {
        return "sub resource";
    }
}
The @FormParam annotation is special and may only be utilized on resource and sub-resource methods. This is because it extracts information from a request entity.
Previous sections have introduced the use of @Context. Chapter "Context" in the JAX-RS specification presents all the standard JAX-RS Java types that may be used with @Context.
When deploying a JAX-RS application using servlet then ServletConfig, ServletContext, HttpServletRequest and HttpServletResponse are available using @Context.
Resources can be constructed from classes or instances but also can be constructed from a programmatic resource model. Every resource created from resource classes can also be constructed using the programmatic resource builder api. See resource builder section for more information.
Table of Contents
This chapter is an overview of various server-side environments currently capable of running JAX-RS applications on top of Jersey server runtime. Jersey supports wide range of server environments from lightweight http containers up to full-fledged Java EE servers. Jersey applications can also run in an OSGi runtime. The way how the application is published depends on whether the application shall run in a Java SE environment or within a container.
Note
This chapter is focused on server-side Jersey deployment models. The Jersey client runtime does not have any specific container requirements and runs in plain Java SE 6 or higher runtime.
JAX-RS provides a deployment agnostic abstract class Application for declaring root resource and provider classes, and root resource and provider singleton instances. A Web service may extend this class to declare root resource and provider classes. For example,
Example 4.1. Deployment agnostic application model
public class MyApplication extends Application {
    @Override
    public Set<Class<?>> getClasses() {
        Set<Class<?>> s = new HashSet<Class<?>>();
        s.add(HelloWorldResource.class);
        return s;
    }
}
Alternatively it is possible to reuse ResourceConfig - Jersey's own implementations
of Application class. This class can either be directly instantiated and then configured
or it can be extended and the configuration code placed into the constructor of the extending class. The
approach typically depends on the chosen deployment runtime.
Compared to Application, the ResourceConfig provides advanced capabilities
to simplify registration of JAX-RS components, such as scanning for root resource and provider classes in a provided
classpath or a in a set of package names etc. All JAX-RS component classes that are either manually registered or
found during scanning are automatically added to the set of classes that are returned by
getClasses. For example, the following application class that extends from
ResourceConfig scans during deployment for JAX-RS components in packages
org.foo.rest and org.bar.rest:
Note
Package scanning ignores an inheritance and therefore @Path annotation
on parent classes and interfaces will be ignored. These classes won't be registered as the JAX-RS component
classes.
Example 4.2. Reusing Jersey implementation in your custom application model
public class MyApplication extends ResourceConfig {
    public MyApplication() {
        packages("org.foo.rest;org.bar.rest");
    }
}
Note
Later in this chapter, the term Application subclass is frequently used.
Whenever used, this term refers to the JAX-RS Application Model explained above.
By default Jersey 2.x does not implicitly register any extension features from the modules available on the
classpath, unless explicitly stated otherwise in the documentation of each particular extension.
Users are expected to explicitly register the extension Features using their
Application subclass.
For a few Jersey provided modules however there is no need to explicitly register their extension
Features as these are discovered and registered in the Configuration (on client/server)
automatically by Jersey runtime whenever the modules implementing these features are present on the classpath
of the deployed JAX-RS application. The modules that are automatically discovered include:
JSON binding feature from
jersey-media-moxyjersey-media-json-processingjersey-bean-validation
Besides these modules there are also few features/providers present in jersey-server module that
are discovered by this mechanism and their availability is affected by Jersey auto-discovery support configuration
(see Section 4.3.1, “Configuring Feature Auto-discovery Mechanism”), namely:
WadlFeature - enables WADL processing.
UriConnegFilter - a URI-based content negotiation filter.
Almost all Jersey auto-discovery implementations have AutoDiscoverable.DEFAULT_PRIORITY
@Priority set.
Note
Auto discovery functionality is in Jersey supported by implementing an internal
AutoDiscoverable Jersey SPI. This interface is not public at the moment,
and is subject to change in the future, so be careful when trying to use it.
The mechanism of feature auto-discovery in Jersey that described above is enabled by default. It can be disabled by using special (common/server/client) properties:
Common auto discovery properties
CommonProperties.FEATURE_AUTO_DISCOVERY_DISABLE
When set, disables auto discovery globally on client/server.
CommonProperties.JSON_PROCESSING_FEATURE_DISABLE
When set, disables configuration of Json Processing (JSR-353) feature.
CommonProperties.MOXY_JSON_FEATURE_DISABLE
When set, disables configuration of MOXy Json feature.
For each of these properties there is a client/server counter-part that is only honored by the Jersey client or server runtime respectively (see ClientProperties/ServerProperties). When set, each of these client/server specific auto-discovery related properties overrides the value of the related common property.
Note
In case an auto-discoverable mechanism (in general or for a specific feature) is disabled, then all the features, components and/or properties, registered by default using the auto-discovery mechanism have to be registered manually.
Jersey uses a common Java Service Provider mechanism to obtain all service implementations. It means that Jersey
scans the whole class path to find appropriate META-INF/services/ files. The class path scanning
may be time consuming. The more jar or war files on the classpath the longer the scanning time.
In use cases where you need to save every millisecond of application bootstrap time,
you may typically want to disable the services provider lookup in Jersey.
List of SPIs recognized by Jersey
AutoDiscoverable(server, client) - it means if you disable service loading the AutoDiscoverable feature is automatically disabled tooForcedAutoDiscoverable(server, client) - Jersey always looks for these auto discoverable features even if the service loading is disabledHeaderDelegateProvider(server, client)ComponentProvider(server)ContainerProvider(server)AsyncContextDelegateProvider(server/Servlet)
List of additional SPIs recognized by Jersey in case the metainf-services module is on the classpath
MessageBodyReader(server, client)MessageBodyWriter(server, client)ExceptionMapper(server, client)
Since it is possible to configure all SPI implementation classes or instances manually in your
Application subclass, disabling services lookup in Jersey does not affect any
functionality of Jersey core modules and extensions and can save dozens of ms during application
initialization in exchange for a more verbose application configuration code.
The services lookup in Jersey (enabled by default) can be disabled via a dedicated CommonProperties.METAINF_SERVICES_LOOKUP_DISABLE property. There is a client/server counter-part that only disables the feature on the client or server respectively: ClientProperties.METAINF_SERVICES_LOOKUP_DISABLE/ServerProperties.METAINF_SERVICES_LOOKUP_DISABLE. As in all other cases, the client/server specific properties overrides the value of the related common property, when set.
For example, following code snippet disables service provider lookup and manually registers implementations of different JAX-RS and Jersey provider types (ContainerRequestFilter, Feature, ComponentProvider and ContainerProvider):
Example 4.3. Registering SPI implementations using ResourceConfig
ResourceConfig resourceConfig = new ResourceConfig(MyResource.class);
resourceConfig.register(org.glassfish.jersey.server.filter.UriConnegFilter.class);
resourceConfig.register(org.glassfish.jersey.server.validation.ValidationFeature.class);
resourceConfig.register(org.glassfish.jersey.server.spring.SpringComponentProvider.class);
resourceConfig.register(org.glassfish.jersey.grizzly2.httpserver.GrizzlyHttpContainerProvider.class);
resourceConfig.property(ServerProperties.METAINF_SERVICES_LOOKUP_DISABLE, true);
Similarly, in scenarios where the deployment model requires extending the Application subclass
(e.g. in all Servlet container deployments), the following code could be used to achieve the same application
configuration:
Example 4.4. Registering SPI implementations using ResourceConfig subclass
public class MyApplication extends ResourceConfig {
    public MyApplication() {
        register(org.glassfish.jersey.server.filter.UriConnegFilter.class);
        register(org.glassfish.jersey.server.validation.ValidationFeature.class);
        register(org.glassfish.jersey.server.spring.SpringComponentProvider.class);
        register(org.glassfish.jersey.grizzly2.httpserver.GrizzlyHttpContainerProvider.class);
        property(ServerProperties.METAINF_SERVICES_LOOKUP_DISABLE, true);
    }
}
Java based HTTP servers represent a minimalistic and flexible way of deploying Jersey application. The HTTP servers are usually embedded in the application and configured and started programmatically. In general, Jersey container for a specific HTTP server provides a custom factory method that returns a correctly initialized HTTP server instance.
Starting with Java SE 6, Java runtime ships with a built-in lightweight HTTP server. Jersey offers
integration with this Java SE HTTP server through the jersey-container-jdk-http
container extension module.
Instead of creating the HttpServer instance directly, use the
createHttpServer() method of JdkHttpServerFactory,
which creates the HttpServer instance configured as a Jersey container and
initialized with the supplied Application subclass.
Creating new Jersey-enabled jdk http server is as easy as:
Example 4.5. Using Jersey with JDK HTTP Server
 URI baseUri = UriBuilder.fromUri("http://localhost/").port(9998).build();
ResourceConfig config = new ResourceConfig(MyResource.class);
HttpServer server = JdkHttpServerFactory.createHttpServer(baseUri, config);
A JDK HTTP Container dependency needs to be added:
<dependency>
    <groupId>org.glassfish.jersey.containers</groupId>
    <artifactId>jersey-container-jdk-http</artifactId>
    <version>2.29.1</version>
</dependency>
Grizzly is a multi-protocol framework built on top of Java NIO. Grizzly aims to simplify development of robust and scalable servers. Jersey provides a container extension module that enables support for using Grizzly as a plain vanilla HTTP container that runs JAX-RS applications. Starting a Grizzly server to run a JAX-RS or Jersey application is one of the most lightweight and easy ways how to expose a functional RESTful services application.
Grizzly HTTP container supports injection of Grizzly-specific
org.glassfish.grizzly.http.server.Request and
org.glassfish.grizzly.http.server.Response instances into JAX-RS and Jersey
application resources and providers. However, since Grizzly Request is not proxiable,
the injection of Grizzly Request into singleton (by default) JAX-RS / Jersey providers
is only possible via javax.inject.Provider instance. (Grizzly Response
does not suffer the same restriction.)
Example 4.6. Using Jersey with Grizzly HTTP Server
URI baseUri = UriBuilder.fromUri("http://localhost/").port(9998).build();
    ResourceConfig config = new ResourceConfig(MyResource.class);
    HttpServer server = GrizzlyHttpServerFactory.createHttpServer(baseUri, config);
The container extension module dependency to be added is:
<dependency>
    <groupId>org.glassfish.jersey.containers</groupId>
    <artifactId>jersey-container-grizzly2-http</artifactId>
    <version>2.29.1</version>
</dependency>
Note
Jersey uses Grizzly extensively in the project unit and end-to-end tests via test framework.
Simple is a framework which allows developers
to create a HTTP server instance and embed it within
an application. Again, creating the server instance is achieved by calling a factory method from the
jersey-container-simple-http container extension module.
Simple framework HTTP container supports injection of Simple framework-specific
org.simpleframework.http.Request and
org.simpleframework.http.Response instances into JAX-RS and Jersey
application resources and providers.
Example 4.7. Using Jersey with the Simple framework
URI baseUri = UriBuilder.fromUri("http://localhost/").port(9998).build();
    ResourceConfig config = new ResourceConfig(MyResource.class);
    SimpleContainer server = SimpleContainerFactory.create(baseUri, config);
The necessary container extension module dependency in this case is:
<dependency>
    <groupId>org.glassfish.jersey.containers</groupId>
    <artifactId>jersey-container-simple-http</artifactId>
    <version>2.29.1</version>
</dependency>
Note
Simple framework HTTP container does not support deployment on context paths other than
root path ("/"). Non-root context path is ignored during deployment.
Jetty is a popular Servlet container and HTTP server. We will not look into Jetty's capabilities as a Servlet container (although we are using it in our tests and examples), because there is nothing specific to Jetty when using a Servlet-based deployment model, which is extensively described later in our Section 4.7, “Servlet-based Deployment” section. We will here only focus on describing how to use Jetty's HTTP server.
Jetty HTTP container supports injection of Jetty-specific
org.eclipse.jetty.server.Request and
org.eclipse.jetty.server.Response instances into JAX-RS and Jersey
application resources and providers. However, since Jetty HTTP Request is not proxiable,
the injection of Jetty Request into singleton (by default) JAX-RS / Jersey providers
is only possible via javax.inject.Provider instance. (Jetty Response
does not suffer the same restriction.)
Example 4.8. Using Jersey with Jetty HTTP Server
URI baseUri = UriBuilder.fromUri("http://localhost/").port(9998).build();
ResourceConfig config = new ResourceConfig(MyResource.class);
Server server = JettyHttpContainerFactory.createServer(baseUri, config);
And, of course, we add the necessary container extension module dependency:
<dependency>
    <groupId>org.glassfish.jersey.containers</groupId>
    <artifactId>jersey-container-jetty-http</artifactId>
    <version>2.29.1</version>
</dependency>
Note
Jetty HTTP container does not support deployment on context paths other than
root path ("/"). Non-root context path is ignored during deployment.
Netty is a NIO client server framework which enables quick and easy development of network applications such as protocol servers and clients. Jersey supports Netty as a container and as a client connector - this chapter will present how to use the container.
Example 4.9. Using Jersey with Netty HTTP Server
URI baseUri = UriBuilder.fromUri("http://localhost/").port(9998).build();
ResourceConfig resourceConfig = new ResourceConfig(HelloWorldResource.class);
Channel server = NettyHttpContainerProvider.createServer(baseUri, resourceConfig, false);
And, of course, we add the necessary container extension module dependency:
<dependency>
    <groupId>org.glassfish.jersey.containers</groupId>
    <artifactId>jersey-container-netty-http</artifactId>
    <version>2.29.1</version>
</dependency>
Note
Netty HTTP container does not support deployment on context paths other than
root path ("/"). Non-root context path is ignored during deployment.
JAX-RS specification also defines the ability to programmatically create a JAX-RS application endpoint
(i.e. container) for any instance of a Application subclass. For example, Jersey supports
creation of Grizzly HttpHandler instance
as follows:
HttpHandler endpoint = RuntimeDelegate.getInstance()
        .createEndpoint(new MyApplication(), HttpHandler.class);
Once the Grizzly HttpHandler endpoint is created, it can be used for in-process deployment
to a specific base URL.
In a Servlet container, JAX-RS defines multiple deployment options depending on the Servlet API version supported by the Servlet container. Following sections describe these options in detail.
Jersey integrates with any Servlet containers supporting at least Servlet 2.5 specification. Running on a Servlet container that supports Servlet API 3.0 or later gives you the advantage of wider feature set (especially asynchronous request processing support) and easier and more flexible deployment options. In this section we will focus on the basic deployment models available in any Servlet 2.5 or higher container.
In Servlet 2.5 environment, you have to explicitly declare the Jersey container Servlet in your Web application's
web.xml deployment descriptor file.
Example 4.10. Hooking up Jersey as a Servlet
<web-app>
    <servlet>
        <servlet-name>MyApplication</servlet-name>
        <servlet-class>org.glassfish.jersey.servlet.ServletContainer</servlet-class>
        <init-param>
            ...
        </init-param>
    </servlet>
    ...
    <servlet-mapping>
        <servlet-name>MyApplication</servlet-name>
        <url-pattern>/myApp/*</url-pattern>
    </servlet-mapping>
    ...
</web-app>
Alternatively, you can register Jersey container as a filter:
Example 4.11. Hooking up Jersey as a Servlet Filter
<web-app>
    <filter>
        <filter-name>MyApplication</filter-name>
        <filter-class>org.glassfish.jersey.servlet.ServletContainer</filter-class>
        <init-param>
            ...
        </init-param>
    </filter>
    ...
    <filter-mapping>
        <filter-name>MyApplication</filter-name>
        <url-pattern>/myApp/*</url-pattern>
    </filter-mapping>
    ...
</web-app>
Important
Servlet 2.x API does not provide a way how to programmatically read the filter mappings. To make application
deployed using filter work correctly, either Servlet 3.x container must be used
(jersey-container-servlet instead of jersey-container-servlet-core), or
the context path of the app needs to be defined using init parameter
jersey.config.servlet.filter.contextPath.
The content of the <init-param> element will vary depending on the way you decide to
configure Jersey resources.
If you extend the Application class to provide the list of relevant root resource
classes (getClasses()) and singletons (getSingletons()),
i.e. your JAX-RS application model, you then need to register it in your web application
web.xml deployment descriptor using a Servlet or Servlet filter initialization
parameter with a name of javax.ws.rs.Application [sic] as follows:
Example 4.12.
Configuring Jersey container Servlet or Filter to use custom Application subclass
<init-param>
    <param-name>javax.ws.rs.Application</param-name>
    <param-value>org.foo.MyApplication</param-value>
</init-param>
Jersey will consider all the classes returned by getClasses() and
getSingletons() methods of your Application implementation.
Note
The name of the configuration property as defined by JAX-RS specification is indeed
javax.ws.rs.Application and not javax.ws.rs.core.Application
as one might expect.
If there is no configuration properties to be set and deployed application consists only from resources and providers stored in particular packages, you can instruct Jersey to scan these packages and register any found resources and providers automatically:
Example 4.13. Configuring Jersey container Servlet or Filter to use package scanning
<init-param>
    <param-name>jersey.config.server.provider.packages</param-name>
    <param-value>
        org.foo.myresources,org.bar.otherresources
    </param-value>
</init-param>
<init-param>
    <param-name>jersey.config.server.provider.scanning.recursive</param-name>
    <param-value>false</param-value>
</init-param>
Jersey will automatically discover the resources and providers in the selected packages.
You can also decide whether Jersey should recursively scan also sub-packages by setting the
jersey.config.server.provider.scanning.recursive property.
The default value is true, i.e. the recursive scanning of sub-packages is enabled.
While the above-mentioned package scanning is useful esp. for development and testing, you may want to
have a little bit more control when it comes to production deployment in terms of being able to enumerate
specific resource and provider classes. In Jersey it is possible to achieve this even without a need to
implement a custom Application subclass. The specific resource and provider
fully-qualified class names can be provided in a comma-separated value of
jersey.config.server.provider.classnames initialization parameter.
Example 4.14. Configuring Jersey container Servlet or Filter to use a list of classes
<init-param>
    <param-name>jersey.config.server.provider.classnames</param-name>
    <param-value>
        org.foo.myresources.MyDogResource,
        org.bar.otherresources.MyCatResource
    </param-value>
</init-param>
Note
All of the techniques that have been described in this section also apply to Servlet containers that support Servlet API 3.0 and later specification. Newer Servlet specifications only give you additional features, deployment options and more flexibility.
There are multiple deployment options in the Servlet 3.0 container for a JAX-RS application defined
by implementing a custom Application subclass. For simple deployments, no
web.xml is necessary at all. Instead, an @ApplicationPath annotation can be used
to annotate the custom Application subclass and define the base application URI for all
JAX-RS resources configured in the application:
Example 4.15. Deployment of a JAX-RS application using @ApplicationPath with Servlet 3.0
@ApplicationPath("resources")
public class MyApplication extends ResourceConfig {
    public MyApplication() {
        packages("org.foo.rest;org.bar.rest");
    }
}
Note
There are many other convenience methods in the ResourceConfig that can be used
in the constructor of your custom subclass to configure your JAX-RS application,
see ResourceConfig API documentation for more details.
In case you are not providing web.xml deployment descriptor for your maven-based web
application project, you need to configure your maven-war-plugin to ignore the missing
web.xml file by setting
failOnMissingWebXml
configuration property to false in your project pom.xml file:
Example 4.16. Configuration of maven-war-plugin to ignore missing web.xml
<plugins>
    ...
    <plugin>
        <groupId>org.apache.maven.plugins</groupId>
        <artifactId>maven-war-plugin</artifactId>
        <version>2.3</version>
        <configuration>
            <failOnMissingWebXml>false</failOnMissingWebXml>
        </configuration>
    </plugin>
    ...
</plugins>
Another Servlet 3.x container deployment model is to declare the JAX-RS application details in the
web.xml.
This is typically suitable for more complex deployments, e.g. when security model needs to be
properly defined or when additional initialization parameters have to be passed to Jersey runtime.
JAX-RS 1.1 and later specifies that a fully qualified name of the class that implements
Application may be used in the definition of a <servlet-name>
element as part of your application's web.xml deployment descriptor.
Following example illustrates this approach:
Example 4.17. Deployment of a JAX-RS application using web.xml with Servlet 3.0
<web-app>
    <servlet>
        <servlet-name>org.foo.rest.MyApplication</servlet-name>
    </servlet>
    ...
    <servlet-mapping>
        <servlet-name>org.foo.rest.MyApplication</servlet-name>
        <url-pattern>/resources</url-pattern>
    </servlet-mapping>
    ...
</web-app>
Note that the <servlet-class> element is omitted from the Servlet declaration.
This is a correct declaration utilizing the Servlet 3.0 extension mechanism described in detail in the
Section 4.7.2.3, “Servlet Pluggability Mechanism” section. Also note that
<servlet-mapping> is used in the example to define the base resource URI.
Tip
When running in a Servlet 2.x it would instead be necessary to declare the Jersey container Servlet
or Filter and pass the Application implementation class name as one of the
init-param entries, as described in Section 4.7.1, “Servlet 2.x Container”.
Servlet framework pluggability mechanism is a feature introduced with Servlet 3.0 specification. It
simplifies the configuration of various frameworks built on top of Servlets. Instead of having one
web.xml file working as a central point for all the configuration options, it is possible
to modularize the deployment descriptor by using the concept of so-called web fragments - several specific
and focused web.xml files. A set of web fragments basically builds up the final
deployment descriptor. This mechanism also provides SPI hooks that enable web frameworks to register
themselves in the Servlet container or customize the Servlet container deployment process in some other way.
This section describes how JAX-RS and Jersey leverage the Servlet pluggability mechanism.
Application (or ResourceConfig) subclass is present,
Jersey will dynamically add a Jersey container Servlet and set its name to
javax.ws.rs.core.Application. The web application path will be scanned and all the
root resource classes (the classes annotated with @Path annotation) as well as any providers that are
annotated with @Provider annotation packaged with the application will be automatically registered
in the JAX-RS application. The web application has to be packaged with a deployment descriptor specifying
at least the mapping for the added javax.ws.rs.core.Application Servlet:
Example 4.18.
web.xml of a JAX-RS application without an Application subclass
<web-app version="3.0"
    xmlns="http://java.sun.com/xml/ns/javaee"
    xmlns:xsi="http://www.w3.org/2001/XMLSchema-instance">

    <!-- Servlet declaration can be omitted in which case
         it would be automatically added by Jersey -->
    <servlet>
        <servlet-name>javax.ws.rs.core.Application</servlet-name>
    </servlet>

    <servlet-mapping>
        <servlet-name>javax.ws.rs.core.Application</servlet-name>
        <url-pattern>/myresources/*</url-pattern>
    </servlet-mapping>
</web-app>
When a custom Application subclass is provided, in such case the Jersey server runtime
behavior depends od whether or not there is a Servlet defined to handle the application subclass.
If the web.xml contains a Servlet definition, that has an initialization parameter
javax.ws.rs.Application whose value is the fully qualified name of the
Application subclass, Jersey does not perform any additional steps in such case.
If no such Servlet is defined to handle the custom Application subclass, Jersey
dynamically adds a Servlet with a fully qualified name equal to the name of the provided
Application subclass. To define the mapping for the added Servlet, you can either
annotate the custom Application subclass with an @ApplicationPath annotation
(Jersey will use the annotation value appended with /* to automatically define
the mapping for the Servlet), or specify the mapping for the Servlet in the
web.xml descriptor directly.
In the following example, let's assume that the JAX-RS application is defined using a custom
Application subclass named org.example.MyApplication.
Then the web.xml file could have the following structure:
Example 4.19.
<web-app version="3.0"
    xmlns="http://java.sun.com/xml/ns/javaee"
    xmlns:xsi="http://www.w3.org/2001/XMLSchema-instance">

    <!-- Servlet declaration can be omitted in which case
         it would be automatically added by Jersey -->
    <servlet>
        <servlet-name>org.example.MyApplication</servlet-name>
    </servlet>

    <!-- Servlet mapping can be omitted in case the Application subclass
         is annotated with @ApplicationPath annotation; in such case
         the mapping would be automatically added by Jersey -->
    <servlet-mapping>
        <servlet-name>org.example.MyApplication</servlet-name>
        <url-pattern>/myresources/*</url-pattern>
    </servlet-mapping>
</web-app>
Note
If your custom Application subclass is packaged in the war, it defines
which resources will be taken into account.
-
If both
getClasses()andgetSingletons()methods return an empty collection, then ALL the root resource classes and providers packaged in the web application archive will be used, Jersey will automatically discover them by scanning the.warfile. -
If any of the two mentioned methods -
getClasses()orgetSingletons()returns a non-empty collection, only those classes and/or singletons will be published in the JAX-RS application.
Table 4.1. Servlet 3 Pluggability Overview
| Condition | Jersey action | Servlet Name | web.xml |
|---|---|---|---|
No Application subclass | Adds Servlet | javax.ws.rs.core.Application | Servlet mapping is required |
Application subclass handled by existing Servlet | No action | Already defined | Not required |
Application subclass NOT handled by existing Servlet | Adds Servlet | FQN of the Application subclass |
if no @ApplicationPath on the Application
subclass, then Servlet mapping is required
|
Jersey uses its own ServletContainer implementation of Servlet and
Servlet Filter API to integrate with Servlet containers. As any JAX-RS runtime, Jersey provides support
for Servlet containers that support Servlet specification version 2.5 and higher. To support JAX-RS 2.0
asynchronous resources on top of a Servlet container, support for Servlet specification version 3.0 or higher
is required.
When deploying to a Servlet container, Jersey application is typically packaged as a .war file.
As with any other Servlet application, JAX-RS application classes are packaged in
WEB-INF/classes or WEB-INF/lib and required application libraries are
located in WEB-INF/lib.
For more details, please refer to the Servlet Specification (JSR 315).
Jersey provides two Servlet modules. The first module is the Jersey core Servlet module that provides the core Servlet integration support and is required in any Servlet 2.5 or higher container:
<dependency>
    <groupId>org.glassfish.jersey.containers</groupId>
    <artifactId>jersey-container-servlet-core</artifactId>
</dependency>
To support additional Servlet 3.x deployment modes and asynchronous JAX-RS resource programming model, an additional Jersey module is required:
<dependency>
    <groupId>org.glassfish.jersey.containers</groupId>
    <artifactId>jersey-container-servlet</artifactId>
</dependency>
The jersey-container-servlet module depends on
jersey-container-servlet-core module, therefore when it is used, it is not necessary to
explicitly declare the jersey-container-servlet-core dependency.
Note that in simple cases, you don't need to provide the deployment descriptor (web.xml)
and can use the @ApplicationPath annotation, as described in
Section 4.7.2.3.1, “JAX-RS application without an Application subclass” section.
This section describes, how you can publish Jersey JAX-RS resources as various Java EE platform elements. JAX-RS and Jersey give you wide choice of possibilities and it is up to your taste (and design of your application), what Java EE technology you decide to use for the management of your resources.
Jersey supports the use of Java EE Managed beans as root resource classes, providers as well as
Application subclasses.
In the code below, you can find an example of a bean, that uses a managed-bean interceptor defined as a JAX-RS
bean. The bean is used to intercept calls to the resource method getIt():
@ManagedBean
@Path("/managedbean")
public class ManagedBeanResource {

    public static class MyInterceptor {
        @AroundInvoke
        public String around(InvocationContext ctx) throws Exception {
            System.out.println("around() called");
            return (String) ctx.proceed();
        }
    }

    @GET
    @Produces("text/plain")
    @Interceptors(MyInterceptor.class)
    public String getIt() {
        return "Hi managed bean!";
    }
}
CDI beans can be used as Jersey root resource classes, providers as well as Application
subclasses. Providers and Application subclasses have to be singleton or application scoped.
The next example shows a usage of a CDI bean as a JAX-RS root resource class. We assume, that CDI has been
enabled. The code snipped uses the type-safe dependency injection provided in CDI by using another bean
(MyOtherCdiBean):
@Path("/cdibean")
public class CdiBeanResource {
    @Inject MyOtherCdiBean bean;  // CDI injected bean

    @GET
    @Produces("text/plain")
    public String getIt() {
        return bean.getIt();
    }
}
The above works naturally inside any Java EE compliant AS container. In Jersey version 2.15, container agnostic CDI support was introduced. This feature allows you to publish CDI based JAX-RS resources also in other containers. Jersey cdi-webapp example shows Jersey/CDI integration in Grizzly HTTP and Apache Tomcat server. Detailed description of Jersey CDI support outside of a fully fledged Java EE application container could be found in Chapter 24, Jersey CDI Container Agnostic Support.
Stateless and Singleton Session beans can be used as Jersey root resource classes, providers and/or
Application subclasses. You can choose from annotating the methods in the EJB's local
interface or directly the method in an interface-less EJB POJO. JAX-RS specifications requires its
implementors to discover EJBs by inspecting annotations on classes (or local interfaces),
but not in the deployment descriptors (ejb-jar.xml). As such, to keep your JAX-RS
application portable, do not override EJB annotations or provide any additional meta-data in the deployment
descriptor file.
Following example consists of a stateless EJB and a local interface used in Jersey:
@Local
public interface LocalEjb {
    @GET
    @Produces("text/plain")
   public String getIt();
}

@Stateless
@Path("/stateless")
public class StatelessEjbResource implements LocalEjb {
    @Override
    public String getIt() {
        return "Hi Stateless!";
    }
}
Note
Please note that Jersey currently does not support deployment of JAX-RS applications packaged as standalone EJB modules (ejb-jars). To use EJBs as JAX-RS resources, the EJBs need to be packaged either directly in a WAR or in an EAR that contains at least one WAR. This is to ensure Servlet container initialization that is necessary for bootstrapping of the Jersey runtime.
As explained in 2.3.1 , you don't need to add any specific
dependencies on GlassFish, Jersey is already packaged within GlassFish. You only need to add the
provided-scoped dependencies to you project to be able to compile it. At runtime,
GlassFish will make sure that your application has access to the Jersey libraries.
Started with version 2.7, Jersey allows injecting Jersey specific types into CDI enabled JAX-RS components
using the @javax.inject.Inject annotation. This covers also custom HK2 bindings, that are configured
as part of Jersey application. The feature specifically enables usage of Jersey monitoring statistics (provided that the statistic feature is turned on)
in CDI environment, where injection is the only mean to get access to monitoring data.
Since both CDI and HK2 use the same injection annotation, Jersey could get confused in certain cases, which could lead to nasty runtime issues. The get better control over what Jersey evaluates as HK2 injection, end-users could take advantage of newly introduced, Hk2CustomBoundTypesProvider, SPI. Please see the linked javadoc to get detailed information on how to use the SPI in your application.
WebLogic 12.1.2 and earlier supports only JAX-RS 1.1 (JSR 311) out of the box with Jersey 1.x (WebLogic 12.1.2 ships with Jersey 1.13). To update the version of Jersey 1.x in these earlier WebLogic releases, please read the Updating the Version of Jersey JAX-RS RI chapter in the WebLogic RESTful Web Services Development Guide.
In WebLogic 12.1.3, Jersey 1.18 is shipped as a default JAX-RS 1.1 provider. In this version of WebLogic, JAX-RS 2.0 (using Jersey 2.5.1) is supported as an optionally installable shared library. Please read through the WebLogic 12.1.3 RESTful Web Services Development Guide for details how to enable JAX-RS 2.0 support on WebLogic 12.1.3.
Third party Java EE application servers usually ship with a JAX-RS implementation. If you want to use Jersey instead of the default JAX-RS provider, you need to add Jersey libraries to your classpath and disable the default JAX-RS provider in the container.
In general, Jersey will be deployed as a Servlet and the resources can be deployed in various ways, as described in this section. However, the exact steps will vary from vendor to vendor.
OSGi support has been added to the Jersey version 1.2. Since then, you should be able to utilize standard OSGi means to run Jersey based web applications in OSGi runtime as described in the OSGi Service Platform Enterprise Specification. Jersey is currently compatible with OSGi 4.2.0, the specification could be downloaded from the OSGi 4.2.0 Download Site.
The two supported ways of running an OSGi web application are:
- WAB (Web Application Bundle)
- HTTP Service
WAB is in fact just an OSGified WAR archive. HTTP Service feature allows you to publish Java EE Servlets in the OSGi runtime.
Two examples were added to the Jersey distribution to depict the above mentioned features and show how to use them with Jersey:
Both examples are multi-module maven projects and both consist of an application OSGi bundle module and a test module. The tests are based on the PAX Exam framework. Both OSGi examples also include a readme file containing instructions how to manually run the example applications using Apache Felix framework.
The rest of the chapter describes how to run the above mentioned examples on GlassFish 4 application server.
Since GlassFish utilizes Apache Felix, an OSGi runtime comes out of the box with GlassFish.
However, for security reasons, the OSGi shell has been turned off. You can however explicitly enable it
either by starting GlassFish the asadmin console and creating a Java system property
glassfish.osgi.start.level.final and setting its value to 3:
Example 4.20.
~/glassfish/bin$ ./asadmin
Use "exit" to exit and "help" for online help.
asadmin>
You can check the actual value of the java property (loaded from the configuration file):
asadmin>  list-jvm-options
...
-Dglassfish.osgi.start.level.final=2
...
And change the value by typing:
asadmin> create-jvm-options --target server -Dglassfish.osgi.start.level.final=3
The second option is to change the value in the osgi.properties configuration file:
# Final start level of OSGi framework. This is used by GlassFish launcher code
# to set the start level of the OSGi framework once server is up and running so that
# optional services can start. The initial start level of framework is controlled using
# the standard framework property called org.osgi.framework.startlevel.beginning
glassfish.osgi.start.level.final=3
You can then execute the Felix shell commands by typing osgi <felix_command> in
the asadmin console. For example:
asadmin> osgi lb
... list of bundles ...
or launching the shell using osgi-shell command in the admin console (the domain must be
started, otherwise the osgi shell won't launch):
asadmin> osgi-shell
Use "exit" to exit and "help" for online help.
gogo$
and execute the osgi commands directly (without the "osgi" prefix):
gogo$ lb
... list of bundles ...
As mentioned above, WAB is just an OSGi-fied WAR archive. Besides the usual OSGi headers it must in addition contain a special header, Web-ContextPath, specifying the web application context path. Our WAB has (beside some other) the following headers present in the manifest:
Web-ContextPath: helloworld
Webapp-Context: helloworld
Bundle-ClassPath: WEB-INF/classese
Here, the second header is ignored by GlassFish, but may be required by other containers not fully compliant with the OSGi Enterprise Specification mentioned above. The third manifest header worth mentioning is the Bundle-ClassPath specifying where to find the application Java classes within the bundle archive. More about manifest headers in OSGi can be found in the OSGi Wiki.
For more detailed information on the example please see the WAB Example source code. This
example does not package into a single war file. Instead a war and a
set of additional jars is produced during the build. See the next example to see how to deploy OSGi
based Jersey application to GlassFish.
Note
When deploying an OSGi HTTP Service example to GlassFish, please make sure the OSGi HTTP Service bundle is installed on your GlassFish instance.
You can directly install and activate the Jersey application bundle. In case of our example, you can either install the example bundle stored locally (and alternatively build from Jersey sources):
1) Build (optional)
examples$ cd osgi-http-service/bundle
bundle$ mvn clean package
You can also get the binary readily compiled from Java.net Maven Repository.
2) Install into OSGi runtime:
gogo$ install file:///path/to/file/bundle.jar
Bundle ID: 303
or install it directly from the maven repository:
gogo$ install http://maven.java.net/content/repositories/releases/org/glassfish/jersey/examples/osgi-http-service/bundle/<version>/bundle-<version>.jar
Bundle ID: 303
Make sure to replace <version> with an appropriate version number. Which one is
appropriate depends on the specific GlassFish 4.x version you are using. The version of the bundle cannot
be higher than the version of Jersey integrated in your GlassFish 4.x server. Jersey bundles declare
dependencies on other bundles at the OSGi level and those dependencies are version-sensitive. If you use
example bundle from let's say version 2.5, but Glassfish has Jersey 2.3.1, dependencies will not be satisfied
and bundle will not start. If this happens, the error will look something like this:
gogo$ lb
...
303 | Installed  |    1| jersey-examples-osgi-http-service-bundle (2.5.0.SNAPSHOT)
gogo$ start 303

org.osgi.framework.BundleException: Unresolved constraint in bundle
org.glassfish.jersey.examples.osgi-http-service.bundle [303]: Unable to resolve 308.0: missing requirement
[303.0] osgi.wiring.package; (&(osgi.wiring.package=org.glassfish.jersey.servlet)
(version>=2.5.0)(!(version>=3.0.0)))

gogo$
In the opposite scenario (example bundle version 2.3.1 and Glassfish Jersey version higher), everything should work fine.
Also, if you build GlassFish from the main trunk sources and use the example from most recent Jersey release, you will most likely be able to run the examples from the latest Jersey release, as Jersey team typically integrates all newly released versions of Jersey immediately into GlassFish.
As a final step, start the bundle:
gogo$ start 303
Again, the Bundle ID (in our case 303) has to be replaced by the correct one returned from the
install command.
The example app should now be up and running. You can access it on http://localhost:8080/osgi/jersey-http-service/status . Please see HTTP Service example source code for more details on the example.
As Oracle Public Cloud is based on WebLogic server, the same applies as in the paragraph about WebLogic deployment (see Section 4.8.4.2, “Oracle WebLogic Server”). More on developing applications for Oracle Java Cloud Service can be found in this guide.
Table of Contents
- 5.1. Uniform Interface Constraint
- 5.2. Ease of use and reusing JAX-RS artifacts
- 5.3. Overview of the Client API
- 5.4. Java instances and types for representations
- 5.5. Client Transport Connectors
- 5.6. Using client request and response filters
- 5.7. Closing connections
- 5.8. Injections into client providers
- 5.9. Securing a Client
This section introduces the JAX-RS Client API, which is a fluent Java based API for communication with RESTful Web services. This standard API that is also part of Java EE 7 is designed to make it very easy to consume a Web service exposed via HTTP protocol and enables developers to concisely and efficiently implement portable client-side solutions that leverage existing and well established client-side HTTP connector implementations.
The JAX-RS client API can be utilized to consume any Web service exposed on top of a HTTP protocol or it's extension (e.g. WebDAV), and is not restricted to services implemented using JAX-RS. Yet, developers familiar with JAX-RS should find the client API complementary to their services, especially if the client API is utilized by those services themselves, or to test those services. The JAX-RS client API finds inspiration in the proprietary Jersey 1.x Client API and developers familiar with the Jersey 1.x Client API should find it easy to understand all the concepts introduced in the new JAX-RS Client API.
The goals of the client API are threefold:
Encapsulate a key constraint of the REST architectural style, namely the Uniform Interface Constraint and associated data elements, as client-side Java artifacts;
Make it as easy to consume RESTful Web services exposed over HTTP, same as the JAX-RS server-side API makes it easy to develop RESTful Web services; and
Share common concepts and extensibility points of the JAX-RS API between the server and the client side programming models.
As an extension to the standard JAX-RS Client API, the Jersey Client API supports a pluggable architecture to enable the
use of different underlying HTTP client Connector implementations. Several such implementations are
currently provided with Jersey. We have a default client connector using Http(s)URLConnection supplied
with the JDK as well as connector implementations based on Apache HTTP Client, Jetty HTTP client and Grizzly Asynchronous Client.
The uniform interface constraint bounds the architecture of RESTful Web services so that a client, such as a browser, can utilize the same interface to communicate with any service. This is a very powerful concept in software engineering that makes Web-based search engines and service mash-ups possible. It induces properties such as:
simplicity, the architecture is easier to understand and maintain; and
evolvability or loose coupling, clients and services can evolve over time perhaps in new and unexpected ways, while retaining backwards compatibility.
Further constraints are required:
every resource is identified by a URI;
a client interacts with the resource via HTTP requests and responses using a fixed set of HTTP methods;
one or more representations can be returned and are identified by media types; and
the contents of which can link to further resources.
The above process repeated over and again should be familiar to anyone who has used a browser to fill in HTML forms and follow links. That same process is applicable to non-browser based clients.
Many existing Java-based client APIs, such as the Apache HTTP client API or HttpUrlConnection
supplied with the JDK place too much focus on the Client-Server constraint for the exchanges of request and
responses rather than a resource, identified by a URI, and the use of a fixed set of HTTP methods.
A resource in the JAX-RS client API is an instance of the Java class
WebTarget.
and encapsulates an URI. The fixed set of HTTP methods can be invoked based on the
WebTarget.
The representations are Java types, instances of which, may contain links that new instances of
WebTarget may be created from.
Since a JAX-RS component is represented as an annotated Java type, it makes it easy to configure, pass around and inject in ways that are not so intuitive or possible with other client-side APIs. The Jersey Client API reuses many aspects of the JAX-RS and the Jersey implementation such as:
URI building using UriBuilder and UriTemplate to safely build URIs;
Built-in support for Java types of representations such as
byte[],String,Number,Boolean,Character,InputStream,java.io.Reader,File,DataSource, JAXB beans as well as additional Jersey-specific JSON and Multi Part support.Using the fluent builder-style API pattern to make it easier to construct requests.
Some APIs, like the Apache HTTP Client or HttpURLConnection
can be rather hard to use and/or require too much code to do something relatively simple, especially when
the client needs to understand different payload representations.
This is why the Jersey implementation of JAX-RS Client API provides support for wrapping HttpUrlConnection
and the Apache HTTP client. Thus it is possible to get the benefits of the established JAX-RS implementations and
features while getting the ease of use benefit of the simple design of the JAX-RS client API.
For example, with a low-level HTTP client library, sending a POST request with a bunch of typed HTML form parameters
and receiving a response de-serialized into a JAXB bean is not straightforward at all. With the new JAX-RS Client API
supported by Jersey this task is very easy:
Example 5.1. POST request with form parameters
Client client = ClientBuilder.newClient();
WebTarget target = client.target("http://localhost:9998").path("resource");

Form form = new Form();
form.param("x", "foo");
form.param("y", "bar");

MyJAXBBean bean =
target.request(MediaType.APPLICATION_JSON_TYPE)
    .post(Entity.entity(form,MediaType.APPLICATION_FORM_URLENCODED_TYPE),
        MyJAXBBean.class);
In the Example 5.1, “POST request with form parameters” a new WebTarget instance is created using a new
Client instance first, next a Form instance is created with two form parameters.
Once ready, the Form instance is POSTed to the target resource.
First, the acceptable media type is specified in the request(...) method. Then in the
post(...) method, a call to a static method on JAX-RS Entity is made to construct
the request entity instance and attach the proper content media type to the form entity that is being sent. The
second parameter in the post(...) method specifies the Java type of the response entity that should
be returned from the method in case of a successful response. In this case an instance of JAXB bean is requested to
be returned on success. The Jersey client API takes care of selecting the proper MessageBodyWriter<T> for
the serialization of the Form instance, invoking the POST request and producing and
de-serialization of the response message payload into an instance of a JAXB bean using a proper
MessageBodyReader<T>.
If the code above had to be written using HttpUrlConnection, the developer would have to write custom
code to serialize the form data that are sent within the POST request and de-serialize the response input stream
into a JAXB bean. Additionally, more code would have to be written to make it easy to reuse the logic when
communicating with the same resource “http://localhost:8080/resource” that is represented by
the JAX-RS WebTarget instance in our example.
Refer to the dependencies for details on the dependencies when using the Jersey JAX-RS Client support.
You may also want to use a custom Connector implementation. In such case you would need to include
additional dependencies on the module(s) containing the custom client connector that you want to use. See section
"Configuring custom Connectors" about how to use and configure a custom
Jersey client transport Connector.
JAX-RS Client API is a designed to allow fluent programming model. This means, a construction of a
Client instance, from which a WebTarget is created, from which a
request Invocation is built and invoked can be chained in a single "flow" of invocations.
The individual steps of the flow will be shown in the following sections.
To utilize the client API it is first necessary to build an instance of a
Client using one of the static ClientBuilder factory methods. Here's the most
simple example:
Client client = ClientBuilder.newClient();
The ClientBuilder is a JAX-RS API used to create new instances of Client.
In a slightly more advanced scenarios, ClientBuilder can be used to configure additional
client instance properties, such as a SSL transport settings, if needed (see ???
below).
A Client instance can be configured during creation by passing a ClientConfig
to the newClient(Configurable) ClientBuilder factory method.
ClientConfig implements Configurable and therefore it offers methods to register
providers (e.g. features or individual entity providers, filters or interceptors) and setup properties.
The following code shows a registration of custom client filters:
ClientConfig clientConfig = new ClientConfig();
clientConfig.register(MyClientResponseFilter.class);
clientConfig.register(new AnotherClientFilter());
Client client = ClientBuilder.newClient(clientConfig);
In the example, filters are registered using the ClientConfig.register(...) method. There are
multiple overloaded versions of the method that support registration of feature and provider classes or instances.
Once a ClientConfig instance is configured, it can be passed to the
ClientBuilder to create a pre-configured Client instance.
Note that the Jersey ClientConfig supports the fluent API model of Configurable.
With that the code that configures a new client instance can be also written using a more compact style as shown
below.
Client client = ClientBuilder.newClient(new ClientConfig()
        .register(MyClientResponseFilter.class)
        .register(new AnotherClientFilter());
The ability to leverage this compact pattern is inherent to all JAX-RS and Jersey Client API components.
Since Client implements Configurable interface too, it can be configured further
even after it has been created. Important is to mention that any configuration change done on a
Client instance will not influence the ClientConfig instance that was used to
provide the initial Client instance configuration at the instance creation time.
The next piece of code shows a configuration of an existing Client instance.
client.register(ThirdClientFilter.class);
Similarly to earlier examples, since Client.register(...) method supports the fluent API style,
multiple client instance configuration calls can be chained:
client.register(FilterA.class)
      .register(new FilterB())
      .property("my-property", true);
To get the current configuration of the Client instance a getConfiguration()
method can be used.
ClientConfig clientConfig = new ClientConfig();
clientConfig.register(MyClientResponseFilter.class);
clientConfig.register(new AnotherClientFilter());
Client client = ClientBuilder.newClient(clientConfig);
client.register(ThirdClientFilter.class);
Configuration newConfiguration = client.getConfiguration();
In the code, an additional MyClientResponseFilter class and
AnotherClientFilter instance are registered in the clientConfig. The
clientConfig is then used to construct a new Client instance. The
ThirdClientFilter is added separately to the constructed Client instance.
This does not influence the configuration represented by the original clientConfig.
In the last step a newConfiguration is retrieved from the client. This
configuration contains all three registered filters while the original clientConfig instance
still contains only two filters. Unlike clientConfig created separately, the
newConfiguration retrieved from the client instance represents a live
client configuration view. Any additional configuration changes made to the client instance
are also reflected in the newConfiguration. So, newConfiguration is really
a view of the client configuration and not a configuration state copy. These principles are
important in the client API and will be used in the following sections too. For example, you can construct a
common base configuration for all clients (in our case it would be clientConfig) and
then reuse this common configuration instance to configure multiple client instances that can
be further specialized. Similarly, you can use an existing client instance configuration to
configure another client instance without having to worry about any side effects in the original
client instance.
Once you have a Client instance you can create a WebTarget from it.
WebTarget webTarget = client.target("http://example.com/rest");
A Client contains several target(...) methods that allow for creation of
WebTarget instance. In this case we're using target(String uri) version.
The uri passed to the method as a String is the URI of the targeted
web resource. In more complex scenarios it could be the context root URI of the whole RESTful application, from
which WebTarget instances representing individual resource targets can be derived and
individually configured. This is possible, because JAX-RS WebTarget also implements
Configurable:
WebTarget webTarget = client.target("http://example.com/rest");
webTarget.register(FilterForExampleCom.class);
The configuration principles used in JAX-RS client API apply to WebTarget as well. Each
WebTarget instance inherits a configuration from it's parent (either a client or another
web target) and can be further custom-configured without affecting the configuration of the parent component.
In this case, the FilterForExampleCom will be registered only in the
webTarget and not in client. So, the client
can still be used to create new WebTarget instances pointing at other URIs using just the
common client configuration, which FilterForExampleCom filter is not part of.
Let's assume we have a webTarget pointing at "http://example.com/rest" URI
that represents a context root of a RESTful application and there is a resource exposed on the URI
"http://example.com/rest/resource". As already mentioned, a WebTarget
instance can be used to derive other web targets. Use the following code to define a path to the resource.
WebTarget resourceWebTarget = webTarget.path("resource");
The resourceWebTarget now points to the resource on URI
"http://example.com/rest/resource". Again if we configure the
resourceWebTarget with a filter specific to the resource,
it will not influence the original webTarget instance. However, the filter
FilterForExampleCom registration will still be inherited by the
resourceWebTarget as it has been created from webTarget. This mechanism
allows you to share the common configuration of related resources (typically hosted under the same URI root,
in our case represented by the webTarget instance), while allowing for further configuration
specialization based on the specific requirements of each individual resource. The same configuration principles
of inheritance (to allow common config propagation) and decoupling (to allow individual config customization)
applies to all components in JAX-RS Client API discussed below.
Let's say there is a sub resource on the path "http://example.com/rest/resource/helloworld".
You can derive a WebTarget for this resource simply by:
WebTarget helloworldWebTarget = resourceWebTarget.path("helloworld");
Let's assume that the helloworld resource accepts a query param for GET
requests which defines the greeting message. The next code snippet shows a code that creates
a new WebTarget with the query param defined.
WebTarget helloworldWebTargetWithQueryParam =
        helloworldWebTarget.queryParam("greeting", "Hi World!");
Please note that apart from methods that can derive new WebTarget instance based on a URI path
or query parameters, the JAX-RS WebTarget API contains also methods for working with matrix
parameters too.
Let's now focus on invoking a GET HTTP request on the created web targets. To start building a new
HTTP request invocation, we need to create a new Invocation.Builder.
Invocation.Builder invocationBuilder =
        helloworldWebTargetWithQueryParam.request(MediaType.TEXT_PLAIN_TYPE);
invocationBuilder.header("some-header", "true");
A new invocation builder instance is created using one of the request(...) methods that are
available on WebTarget. A couple of these methods accept parameters that let you define
the media type of the representation requested to be returned from the resource. Here we are saying that we
request a "text/plain" type. This tells Jersey to add a Accept: text/plain
HTTP header to our request.
The invocationBuilder is used to setup request specific parameters. Here we can setup headers
for the request or for example cookie parameters. In our example we set up a "some-header"
header to value true.
Once finished with request customizations, it's time to invoke the request. We have two options now.
We can use the Invocation.Builder to build a generic Invocation instance
that will be invoked some time later. Using Invocation we will be able to e.g. set additional
request properties which are properties in a batch of several requests and use the generic JAX-RS
Invocation API to invoke the batch of requests without actually knowing all the details
(such as request HTTP method, configuration etc.). Any properties set on an invocation instance can be read
during the request processing. For example, in a custom ClientRequestFilter you can call
getProperty() method on the supplied ClientRequestContext to read a request
property. Note that these request properties are different from the configuration properties set on
Configurable. As mentioned earlier, an Invocation instance provides generic
invocation API to invoke the HTTP request it represents either synchronously or asynchronously. See
the Chapter 11, Asynchronous Services and Clients for more information on asynchronous invocations.
In case you do not want to do any batch processing on your HTTP request invocations prior to invoking them, there
is another, more convenient approach that you can use to invoke your requests directly from an
Invocation.Builder instance. This approach is demonstrated in the next Java code listing.
Response response = invocationBuilder.get();
While short, the code in the example performs multiple actions. First, it will build the the request from the
invocationBuilder. The URI of request will be
http://example.com/rest/resource/helloworld?greeting="Hi%20World!" and the request will contain
some-header: true and Accept: text/plain headers. The request will then pass
trough all configured request filters ( AnotherClientFilter,
ThirdClientFilter and
FilterForExampleCom). Once processed by the filters, the request will be sent to the remote
resource. Let's say the resource then returns an HTTP 200 message with a plain text response content that contains
the value sent in the request greeting query parameter. Now we can observe the returned
response:
System.out.println(response.getStatus());
System.out.println(response.readEntity(String.class));
which will produce the following output to the console:
200
Hi World!
As we can see, the request was successfully processed (code 200) and returned an entity (representation) is
"Hi World!". Note that since we have configured a MyClientResponseFilter
in the resource target, when response.readEntity(String.class) gets called, the response
returned from the remote endpoint is passed through the response filter chain (including the
MyClientResponseFilter) and entity interceptor chain and at last a proper
MessageBodyReader<T> is located to read the response content bytes from the response stream into a
Java String instance. Check Chapter 10, Filters and Interceptors to lear more about
request and response filters and entity interceptors.
Imagine now that you would like to invoke a POST request but without any query parameters. You would
just use the helloworldWebTarget instance created earlier and call the
post() instead of get().
Response postResponse =
        helloworldWebTarget.request(MediaType.TEXT_PLAIN_TYPE)
                .post(Entity.entity("A string entity to be POSTed", MediaType.TEXT_PLAIN));
The following code puts together the pieces used in the earlier examples.
Example 5.2. Using JAX-RS Client API
ClientConfig clientConfig = new ClientConfig();
clientConfig.register(MyClientResponseFilter.class);
clientConfig.register(new AnotherClientFilter());

Client client = ClientBuilder.newClient(clientConfig);
client.register(ThirdClientFilter.class);

WebTarget webTarget = client.target("http://example.com/rest");
webTarget.register(FilterForExampleCom.class);
WebTarget resourceWebTarget = webTarget.path("resource");
WebTarget helloworldWebTarget = resourceWebTarget.path("helloworld");
WebTarget helloworldWebTargetWithQueryParam =
        helloworldWebTarget.queryParam("greeting", "Hi World!");

Invocation.Builder invocationBuilder =
        helloworldWebTargetWithQueryParam.request(MediaType.TEXT_PLAIN_TYPE);
invocationBuilder.header("some-header", "true");

Response response = invocationBuilder.get();
System.out.println(response.getStatus());
System.out.println(response.readEntity(String.class));
Now we can try to leverage the fluent API style to write this code in a more compact way.
Example 5.3. Using JAX-RS Client API fluently
Client client = ClientBuilder.newClient(new ClientConfig()
            .register(MyClientResponseFilter.class)
            .register(new AnotherClientFilter()));

String entity = client.target("http://example.com/rest")
            .register(FilterForExampleCom.class)
            .path("resource/helloworld")
            .queryParam("greeting", "Hi World!")
            .request(MediaType.TEXT_PLAIN_TYPE)
            .header("some-header", "true")
            .get(String.class);
The code above does the same thing except it skips the generic Response processing and directly
requests an entity in the last get(String.class) method call. This shortcut method let's you
specify that (in case the response was returned successfully with a HTTP 2xx status code) the response entity
should be returned as Java String type. This compact example demonstrates another advantage of
the JAX-RS client API. The fluency of JAX-RS Client API is convenient especially with simple use cases.
Here is another a very simple GET request returning a String representation (entity):
String responseEntity = ClientBuilder.newClient()
            .target("http://example.com").path("resource/rest")
                        .request().get(String.class);
Some client invocations, like asynchronous or reactive, could lead to a need to start a new thread. This is
being done on provided ExecutorService or ScheduledExecutorService. ClientBuilder has two
methods, which can be used to define them: executorService(ExecutorService) and
scheduledExecutorService(ScheduledExecutorService). When specified, all invocations which
do require running on another thread, should be executed using provided services.
Default values do depend on the environment - in Java EE container, it has to be ManagedExecutorService
and ManagedScheduledExecutorService, for Java SE it would be
ForkJoinPool.commonPool for Executor service and something undefined for Scheduled
executor service.
Example 5.4. Setting JAX-RS Client ExecutorService
ExecutorService myExecutorService = Executors.newCachedThreadPool();
Client client = ClientBuilder.newBuilder().executorService(myExecutorService).build();
All the Java types and representations supported by default on the Jersey server side for requests and responses are also supported on the client side. For example, to process a response entity (or representation) as a stream of bytes use InputStream as follows:
InputStream in = response.readEntity(InputStream.class);

... // Read from the stream

in.close();
Note that it is important to close the stream after processing so that resources are freed up.
To POST a file use a File instance as follows:
File f = ...

...

webTarget.request().post(Entity.entity(f, MediaType.TEXT_PLAIN_TYPE));
The support for new application-defined representations as Java types requires the implementation of the same JAX-RS entity provider extension interfaces as for the server side JAX-RS API, namely MessageBodyReader<T> and MessageBodyWriter<T> respectively, for request and response entities (or inbound and outbound representations).
Classes or implementations of the provider-based interfaces need to be registered as providers within the
JAX-RS or Jersey Client API components that implement Configurable contract
(ClientBuilder, Client, WebTarget or
ClientConfig), as was shown in the earlier sections.
Some media types are provided in the form of JAX-RS Feature a concept that allows the extension
providers to group together multiple different extension providers and/or configuration properties in order
to simplify the registration and configuration of the provided feature by the end users. For example,
MoxyJsonFeature can be register to enable and configure JSON binding support via MOXy
library.
By default, the transport layer in Jersey is provided by HttpUrlConnection. This transport is implemented
in Jersey via HttpUrlConnectorProvider that implements Jersey-specific Connector SPI.
You can implement and/or register your own Connector instance to the Jersey
Client implementation, that will replace the default HttpUrlConnection-based
transport layer. Jersey provides several alternative client transport connector implementations that are ready-to-use.
Table 5.1. List of Jersey Connectors
| Transport framework | Jersey Connector implementation | Maven dependency |
|---|---|---|
| Grizzly NIO framework | GrizzlyConnectorProvider | org.glassfish.jersey.connectors:jersey-grizzly-connector |
| Apache HTTP client | ApacheConnectorProvider | org.glassfish.jersey.connectors:jersey-apache-connector |
| Jetty HTTP client | JettyConnectorProvider | org.glassfish.jersey.connectors:jersey-jetty-connector |
| Netty NIO framework | NettyConnectorProvider | org.glassfish.jersey.connectors:jersey-netty-connector |
| JDK NIO client | JdkConnectorProvider | org.glassfish.jersey.connectors:jersey-jdk-connector |
Warning
Be aware of using other than default Connector implementation.
There is an issue handling HTTP headers in
WriterInterceptor or MessageBodyWriter<T>.
If you need to change header fields do not use nor
ApacheConnectorProvider nor GrizzlyConnectorProvider
nor JettyConnectorProvider neither NettyConnectorProvider.
The issue for example applies to Jersey Multipart
feature that also modifies HTTP headers.
On the other hand, in the default transport connector, there are some restrictions on the headers, that
can be sent in the default configuration.
HttpUrlConnectorProvider uses HttpUrlConnection as an underlying connection
implementation. This JDK class by default restricts the use of following headers:
Access-Control-Request-HeadersAccess-Control-Request-MethodConnection(with one exception -Connectionheader with valueClosedis allowed by default)Content-LengthContent-Transfer-Encoding-HostKeep-AliveOriginTrailerTransfer-EncodingUpgradeVia- all the headers starting with
Sec-
The underlying connection can be configured to permit all headers to be sent,
however this behaviour can be changed only by setting the system property
sun.net.http.allowRestrictedHeaders.
Example 5.5. Sending restricted headers with HttpUrlConnector
                            Client client = ClientBuilder.newClient();
                            System.setProperty("sun.net.http.allowRestrictedHeaders", "true");

                            Response response = client.target(yourUri).path(yourPath).request().
                            header("Origin", "http://example.com").
                            header("Access-Control-Request-Method", "POST").
                            get();
Note, that internally the HttpUrlConnection instances are pooled, so (un)setting the
property after already creating a target typically does not have any effect.
The property influences all the connections created after the property has been
(un)set, but there is no guarantee, that your request will use a connection
created after the property change.
In a simple environment, setting the property before creating the first target is sufficient, but in complex environments (such as application servers), where some poolable connections might exist before your application even bootstraps, this approach is not 100% reliable and we recommend using a different client transport connector, such as Apache Connector. These limitations have to be considered especially when invoking CORS (Cross Origin Resource Sharing) requests.
As indicated earlier, Connector and ConnectorProvider contracts are Jersey-specific
extension APIs that would only work with Jersey and as such are not part of JAX-RS. Following example shows how to
setup the custom Grizzly Asynchronous HTTP Client based ConnectorProvider in a Jersey client
instance:
ClientConfig clientConfig = new ClientConfig();
clientConfig.connectorProvider(new GrizzlyConnectorProvider());
Client client = ClientBuilder.newClient(clientConfig);
Client accepts as as a constructor argument a Configurable instance. Jersey
implementation of the Configurable provider for the client is ClientConfig.
By using the Jersey ClientConfig you can configure the custom
ConnectorProvider
into the ClientConfig. The GrizzlyConnectorProvider is used as a custom
connector provider in the example above. Please note that the connector provider cannot be registered as a provider
using Configurable.register(...). Also, please note that in this API has changed
in Jersey 2.5, where the ConnectorProvider SPI has been introduced in order to decouple client
initialization from the connector instantiation. Starting with Jersey 2.5 it is therefore not possible to directly
register Connector instances in the Jersey ClientConfig. The new
ConnectorProvider SPI must be used instead to configure a custom client-side transport connector.
Filtering requests and responses can provide useful lower-level concept focused on a certain independent aspect or domain that is decoupled from the application layer of building and sending requests, and processing responses. Filters can read/modify the request URI, headers and entity or read/modify the response status, headers and entity.
Jersey contains the following useful client-side filters (and features registering filters) that you may want to use in your applications:
CsrfProtectionFilter: Cross-site request forgery protection filter (adds
X-Requested-By to each state changing request). |
| EncodingFeature: Feature that registers encoding filter which use registered ContentEncoders to encode and decode the communication. The encoding/decoding is performed in interceptor (you don't need to register this interceptor). Check the javadoc of the EncodingFeature in order to use it. |
| HttpAuthenticationFeature: HTTP Authentication Feature (see ??? below). |
Note that these features are provided by Jersey, but since they use and implement JAX-RS API, the features should be portable and run in any JAX-RS implementation, not just Jersey. See Chapter 10, Filters and Interceptors chapter for more information on filters and interceptors.
The underlying connections are opened for each request and closed after the response is received and entity is processed (entity is read). See the following example:
Example 5.6. Closing connections
final WebTarget target = ... some web target
Response response = target.path("resource").request().get();
System.out.println("Connection is still open.");
System.out.println("string response: " + response.readEntity(String.class));
System.out.println("Now the connection is closed.");
If you don't read the entity, then you need to close the response manually by
response.close(). Also if the entity is read into an InputStream
(by response.readEntity(InputStream.class)), the connection stays open until
you finish reading from the InputStream. In that case, the InputStream
or the Response should be closed manually at the end of reading from InputStream.
In some cases you might need to inject some custom types into your client provider instance. JAX-RS types do not need to be injected as they are passed as arguments into API methods. Injections into client providers (filters, interceptor) are possible as long as the provider is registered as a class. If the provider is registered as an instance then runtime will not inject the provider. The reason is that this provider instance might be registered into multiple client configurations. For example one instance of ClientRequestFilter can be registered to two Clients.
To solve injection of a custom type into a client provider instance
use ServiceLocatorClientProvider to
extract ServiceLocator which can return the required injection. The following example shows how to utilize
ServiceLocatorClientProvider:
Example 5.7. ServiceLocatorClientProvider example
public static class MyRequestFilter implements ClientRequestFilter {
    // this injection does not work as filter is registered as an instance:
    // @Inject
    // private MyInjectedService service;

    @Override
    public void filter(ClientRequestContext requestContext) throws IOException {
        // use ServiceLocatorClientProvider to extract HK2 ServiceLocator from request
        final ServiceLocator locator = ServiceLocatorClientProvider.getServiceLocator(requestContext);

        // and ask for MyInjectedService:
        final MyInjectedService service = locator.getService(MyInjectedService.class);

        final String name = service.getName();
        ...
    }
}
For more information see javadoc of ServiceLocatorClientProvider (and javadoc of ServiceLocatorProvider which supports common JAX-RS components).
This section describes how to setup SSL configuration on Jersey client (using JAX-RS API). The SSL configuration is setup in ClientBuilder. The client builder contains methods for definition of KeyStore, TrustStore or entire SslContext. See the following example:
SSLContext ssl = ... your configured SSL context;
Client client = ClientBuilder.newBuilder().sslContext(ssl).build();
Response response = client.target("https://example.com/resource").request().get();
The example above shows how to setup a custom SslContext to the ClientBuilder.
Creating a SslContext can be more difficult as you might need to init instance properly with the protocol,
KeyStore, TrustStore, etc. Jersey offers a utility SslConfigurator class that
can be used to setup the SslContext. The SslConfigurator can be configured based on
standardized system properties for SSL configuration, so for example you can configure the KeyStore file
name using a environment variable javax.net.ssl.keyStore and SslConfigurator
will use such a variable to setup the SslContext. See javadoc of SslConfigurator for more
details. The following code shows how a SslConfigurator can be used to create a custom SSL
context.
SslConfigurator sslConfig = SslConfigurator.newInstance()
        .trustStoreFile("./truststore_client")
        .trustStorePassword("secret-password-for-truststore")
        .keyStoreFile("./keystore_client")
        .keyPassword("secret-password-for-keystore");

SSLContext sslContext = sslConfig.createSSLContext();
Client client = ClientBuilder.newBuilder().sslContext(sslContext).build();
Note that you can also setup KeyStore and TrustStore directly on a
ClientBuilder instance without wrapping them into the SslContext. However, if you setup
a SslContext it will override any previously defined KeyStore and TrustStore
settings.
ClientBuilder also offers a method for defining a custom HostnameVerifier implementation.
HostnameVerifier implementations are invoked when default host URL verification fails.
Important
A behaviour of HostnameVerifier is dependent on an http client implementation.
HttpUrlConnectorProvider and ApacheConnectorProvider work properly, that means that after
the unsuccessful URL verification HostnameVerifier is called and by means of it is possible to
revalidate URL using a custom implementation of HostnameVerifier and go on in a handskahe processing.
JettyConnectorProvider and GrizzlyConnectorProvider provide only host URL verification
and throw a CertificateException without any possibility to use custom HostnameVerifier.
Moreover, in case of JettyConnectorProvider there is a property
JettyClientProperties.ENABLE_SSL_HOSTNAME_VERIFICATION to disable an entire host URL verification
mechanism in a handshake.
Important
Note that to utilize HTTP with SSL it is necessary to utilize the “https” scheme.
Currently the default connector provider HttpUrlConnectorProvider provides connectors based on
HttpUrlConnection which implement support for SSL defined by JAX-RS configuration discussed in this
example.
Jersey supports Basic and Digest HTTP Authentication.
Important
In version prior to Jersey 2.5 the support was
provided by org.glassfish.jersey.client.filter.HttpBasicAuthFilter
and org.glassfish.jersey.client.filter.HttpDigestAuthFilter. Since Jersey
2.5 these filters are deprecated (and removed in 2.6) and both authentication methods
are provided by single Feature
HttpAuthenticationFeature.
In order to enable http authentication support in Jersey client register the HttpAuthenticationFeature. This feature can provide both authentication methods, digest and basic. Feature can work in the following modes:
BASIC: Basic preemptive authentication. In preemptive mode the authentication information is send always with each HTTP request. This mode is more usual than the following non-preemptive mode (if you require BASIC authentication you will probably use this preemptive mode). This mode must be combined with usage of SSL/TLS as the password is send only BASE64 encoded.
BASIC NON-PREEMPTIVE:Basic non-preemptive authentication. In non-preemptive mode the authentication information is added only when server refuses the request with
401status code and then the request is repeated with authentication information. This mode has negative impact on the performance. The advantage is that it does not send credentials when they are not needed. This mode must be combined with usage of SSL/TLS as the password is send only BASE64 encoded.DIGEST: Http digest authentication. Does not require usage of SSL/TLS.
UNIVERSAL: Combination of basic and digest authentication. The feature works in non-preemptive mode which means that it sends requests without authentication information. If
401status code is returned, the request is repeated and an appropriate authentication is used based on the authentication requested in the response (defined inWWW-AuthenticateHTTP header. The feature remembers which authentication requests were successful for given URI and next time tries to preemptively authenticate against this URI with latest successful authentication method.
To initialize the feature use static methods and builder of this feature. Example of building the feature in Basic authentication mode:
HttpAuthenticationFeature feature = HttpAuthenticationFeature.basic("user", "superSecretPassword");
Example of building the feature in basic non-preemptive mode:
HttpAuthenticationFeature feature = HttpAuthenticationFeature.basicBuilder()
    .nonPreemptive().credentials("user", "superSecretPassword").build();
You can also build the feature without any default credentials:
HttpAuthenticationFeature feature = HttpAuthenticationFeature.basicBuilder().build();
In this case you need to supply username and password for each request using request properties:
Response response = client.target("http://localhost:8080/rest/homer/contact").request()
    .property(HTTP_AUTHENTICATION_BASIC_USERNAME, "homer")
    .property(HTTP_AUTHENTICATION_BASIC_PASSWORD, "p1swd745").get();
This allows you to reuse the same client for authenticating with many different credentials.
See javadoc of the HttpAuthenticationFeature for more details.
Table of Contents
Warning
Jersey 2.26 (JAX-RS 2.1 implementation) dropped Jersey-proprietary API in favor of JAX-RS 2.1 Reactive Client API.
Reactive client extension is quite a generic API allowing end users to utilize the popular reactive programming model when using JAX-RS Client. The API is designed to be extensible, so any existing reactive framework can integrate with it and there is build in support for CompletionStage. Along with describing the API itself, this section also covers existing extension modules and provides hints to implement a custom extension if needed.
If you are not familiar with the JAX-RS Client API, it is recommended that you see Chapter 5, Client API where the basics of JAX-RS Client API along with some advanced techniques are described.
Imagine a travel agency whose information system consists of multiple basic services. These services might be built using different technologies (JMS, EJB, WS, ...). For simplicity we presume that the services can be consumed using REST interface via HTTP method calls (e.g. using a JAX-RS Client). We also presume that the basic services we need to work with are:
Customers service – provides information about customers of the travel agency.
Destinations service – provides a list of visited and recommended destinations for an authenticated customer.
Weather service – provides weather forecast for a given destination.
Quoting service – provides price calculation for a customer to travel to a recommended destination.
The task is to create a publicly available feature that would, for an authenticated user, display a list of 10 last visited places and also display a list of 10 new recommended destinations including weather forecast and price calculations for the user. Notice that some of the requests (to retrieve data) depend on results of previous requests. E.g. getting recommended destinations depends on obtaining information about the authenticated user first. Obtaining weather forecast depends on destination information, etc. This relationship between some of the requests is an important part of the problem and an area where you can take a real advantage of the reactive programming model.
One way how to obtain data is to make multiple HTTP method calls from the client (e.g. mobile device) to all services involved and combine the retrieved data on the client. However, since the basic services are available in the internal network only we'd rather create a public orchestration layer instead of exposing all internal services to the outside world. The orchestration layer would expose only the desired operations of the basic services to the public. To limit traffic and achieve lower latency we'd like to return all the necessary information to the client in a single response.
The orchestration layer is illustrated in the Figure 6.1. The layer accepts requests from the outside and is responsible of invoking multiple requests to the internal services. When responses from the internal services are available in the orchestration layer they're combined into a single response that is sent back to the client.
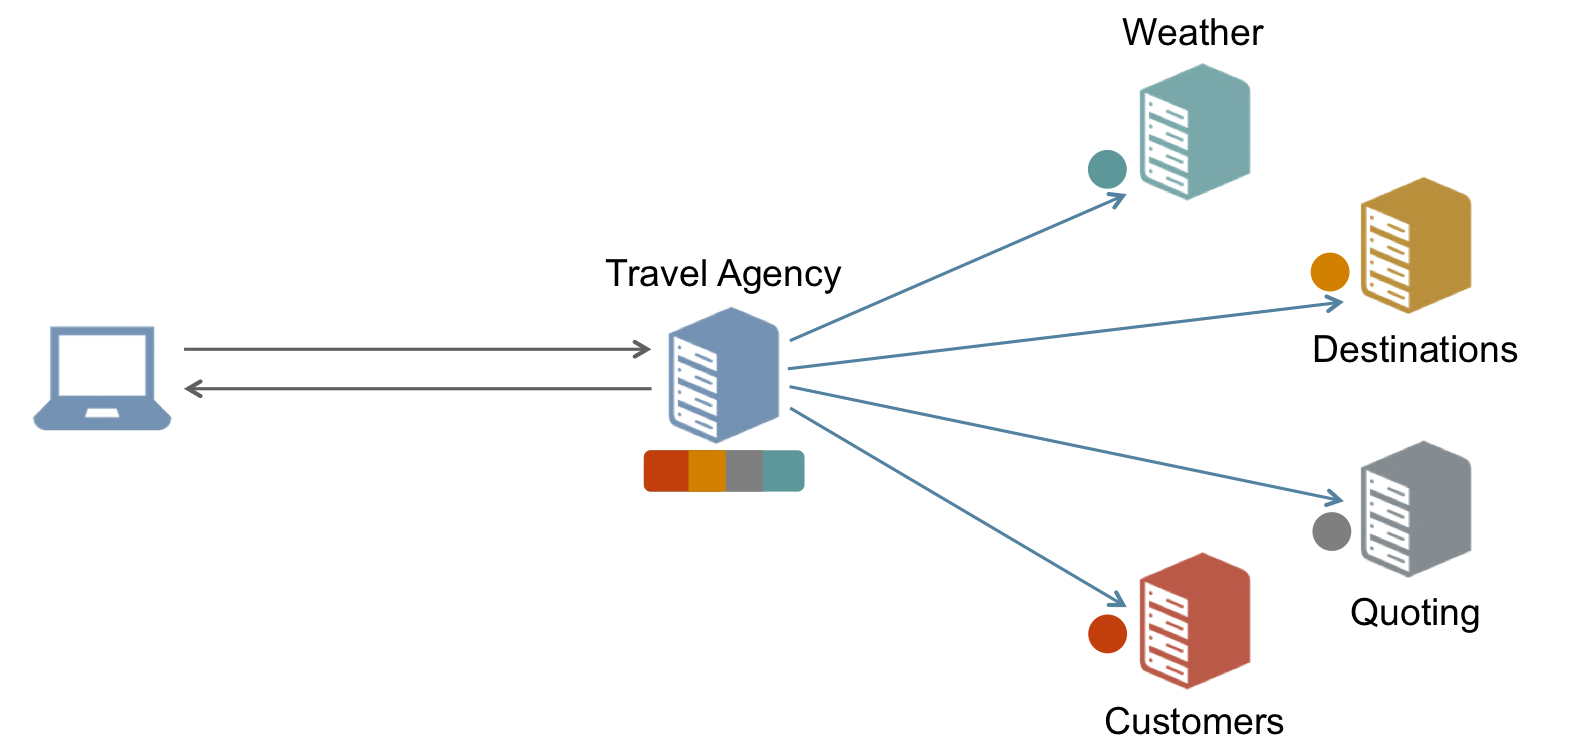
The next sections describe various approaches (using JAX-RS Client) how the orchestration layer can be implemented.
The simplest way to implement the orchestration layer is to use synchronous approach. For this purpose we can use JAX-RS Client Sync API (see Example 6.1, “Excerpt from a synchronous approach while implementing the orchestration layer”). The implementation is simple to do, easy to read and straightforward to debug.
Example 6.1. Excerpt from a synchronous approach while implementing the orchestration layer
final WebTarget destination = ...;
final WebTarget forecast = ...;

// Obtain recommended destinations.
List<Destination> recommended = Collections.emptyList();
try {
    recommended = destination.path("recommended").request()
            // Identify the user.
            .header("Rx-User", "Sync")
            // Return a list of destinations.
            .get(new GenericType<List<Destination>>() {});
} catch (final Throwable throwable) {
    errors.offer("Recommended: " + throwable.getMessage());
}

// Forecasts. (depend on recommended destinations)
final Map<String, Forecast> forecasts = new HashMap<>();
for (final Destination dest : recommended) {
    try {
        forecasts.put(dest.getDestination(),
                forecast.resolveTemplate("destination", dest.getDestination()).request().get(Forecast.class));
    } catch (final Throwable throwable) {
        errors.offer("Forecast: " + throwable.getMessage());
    }
}
The downside of this approach is it's slowness. You need to sequentially process all the independent requests which
means that you're wasting resources. You are needlessly blocking threads, that could be otherwise used for some real work.
If you take a closer look at the example you can notice that at the moment when all the recommended destinations are available for further processing we try to obtain forecasts for these destinations. Obtaining a weather forecast can be done only for a single destination with a single request, so we need to make 10 requests to the Forecast service to get all the destinations covered. In a synchronous way this means getting the forecasts one-by-one. When one response with a forecast arrives we can send another request to obtain another one. This takes time. The whole process of constructing a response for the client can be seen in Figure 6.2.
Let's try to quantify this with assigning an approximate time to every request we make to the internal services. This way we can easily compute the time needed to complete a response for the client. For example, obtaining
Customer details takes 150 ms
Recommended destinations takes 250 ms
Price calculation for a customer and destination takes 170 ms (each)
Weather forecast for a destination takes 330 ms (each)
When summed up, 5400 ms is approximately needed to construct a response for the client.
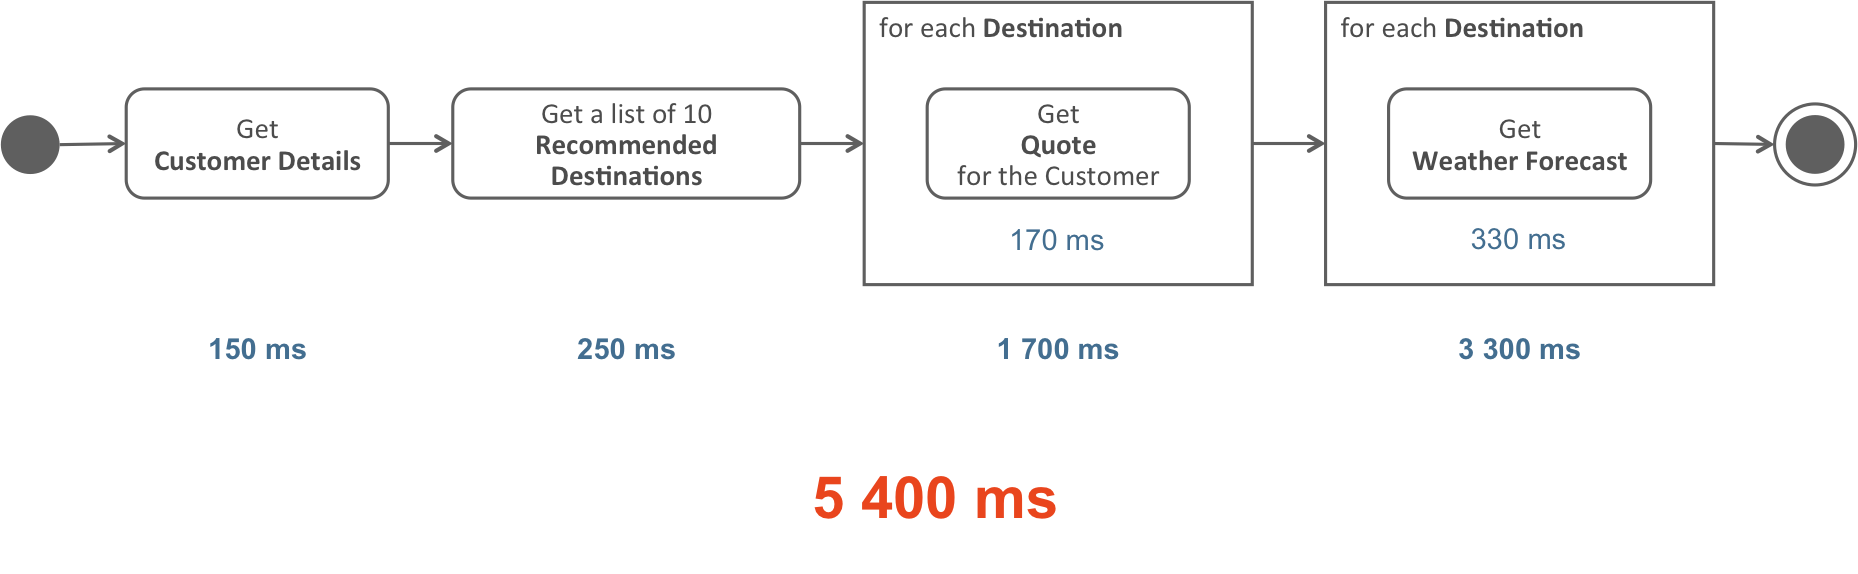
Synchronous approach is better to use for lower number of requests (where the accumulated time doesn't matter that
much) or for a single request that depends on the result of previous operations.
The amount of time needed by the synchronous approach can be lowered by invoking independent requests in parallel. We're going to use JAX-RS Client Async API to illustrate this approach. The implementation in this case is slightly more difficult to get right because of the nested callbacks and the need to wait at some points for the moment when all partial responses are ready to be processed. The implementation is also a little bit harder to debug and maintain. The nested calls are causing a lot of complexity here. An example of concrete Java code following the asynchronous approach can be seen in Example 6.2, “Excerpt from an asynchronous approach while implementing the orchestration layer”.
Example 6.2. Excerpt from an asynchronous approach while implementing the orchestration layer
final WebTarget destination = ...;
final WebTarget forecast = ...;

// Obtain recommended destinations. (does not depend on visited ones)
destination.path("recommended").request()
        // Identify the user.
        .header("Rx-User", "Async")
        // Async invoker.
        .async()
        // Return a list of destinations.
        .get(new InvocationCallback<List<Destination>>() {
            @Override
            public void completed(final List<Destination> recommended) {
                final CountDownLatch innerLatch = new CountDownLatch(recommended.size());

                // Forecasts. (depend on recommended destinations)
                final Map<String, Forecast> forecasts = Collections.synchronizedMap(new HashMap<>());
                for (final Destination dest : recommended) {
                    forecast.resolveTemplate("destination", dest.getDestination()).request()
                            .async()
                            .get(new InvocationCallback<Forecast>() {
                                @Override
                                public void completed(final Forecast forecast) {
                                    forecasts.put(dest.getDestination(), forecast);
                                    innerLatch.countDown();
                                }

                                @Override
                                public void failed(final Throwable throwable) {
                                    errors.offer("Forecast: " + throwable.getMessage());
                                    innerLatch.countDown();
                                }
                            });
                }

                // Have to wait here for dependent requests ...
                try {
                    if (!innerLatch.await(10, TimeUnit.SECONDS)) {
                        errors.offer("Inner: Waiting for requests to complete has timed out.");
                    }
                } catch (final InterruptedException e) {
                    errors.offer("Inner: Waiting for requests to complete has been interrupted.");
                }

                // Continue with processing.
            }

            @Override
            public void failed(final Throwable throwable) {
                errors.offer("Recommended: " + throwable.getMessage());
            }
        });
The example is a bit more complicated from the first glance. We provided an InvocationCallback to async
get method. One of the callback methods (completed or failed)
is called when the request finishes. This is a pretty convenient way to handle async invocations when no nested
calls are present. Since we have some nested calls (obtaining weather forecasts) we needed to introduce
a CountDownLatch synchronization primitive as we use asynchronous approach in obtaining the weather
forecasts as well. The latch is decreased every time a request, to the Forecasts service,
completes successfully or fails. This indicates that the request actually finished and it is a signal for us that
we can continue with processing (otherwise we wouldn't have all required data to construct the response for the
client). This additional synchronization is something that was not present when taking the synchronous approach,
but it is needed here.
Also the error processing can not be written as it could be in an ideal case. The error handling is scattered in too many places within the code, that it is quite difficult to create a comprehensive response for the client.
On the other hand taking asynchronous approach leads to code that is as fast as it gets. The resources are used optimally (no waiting threads) to achieve quick response time. The whole process of constructing the response for the client can be seen in Figure 6.3. It only took 730 ms instead of 5400 ms which we encountered in the previous approach.
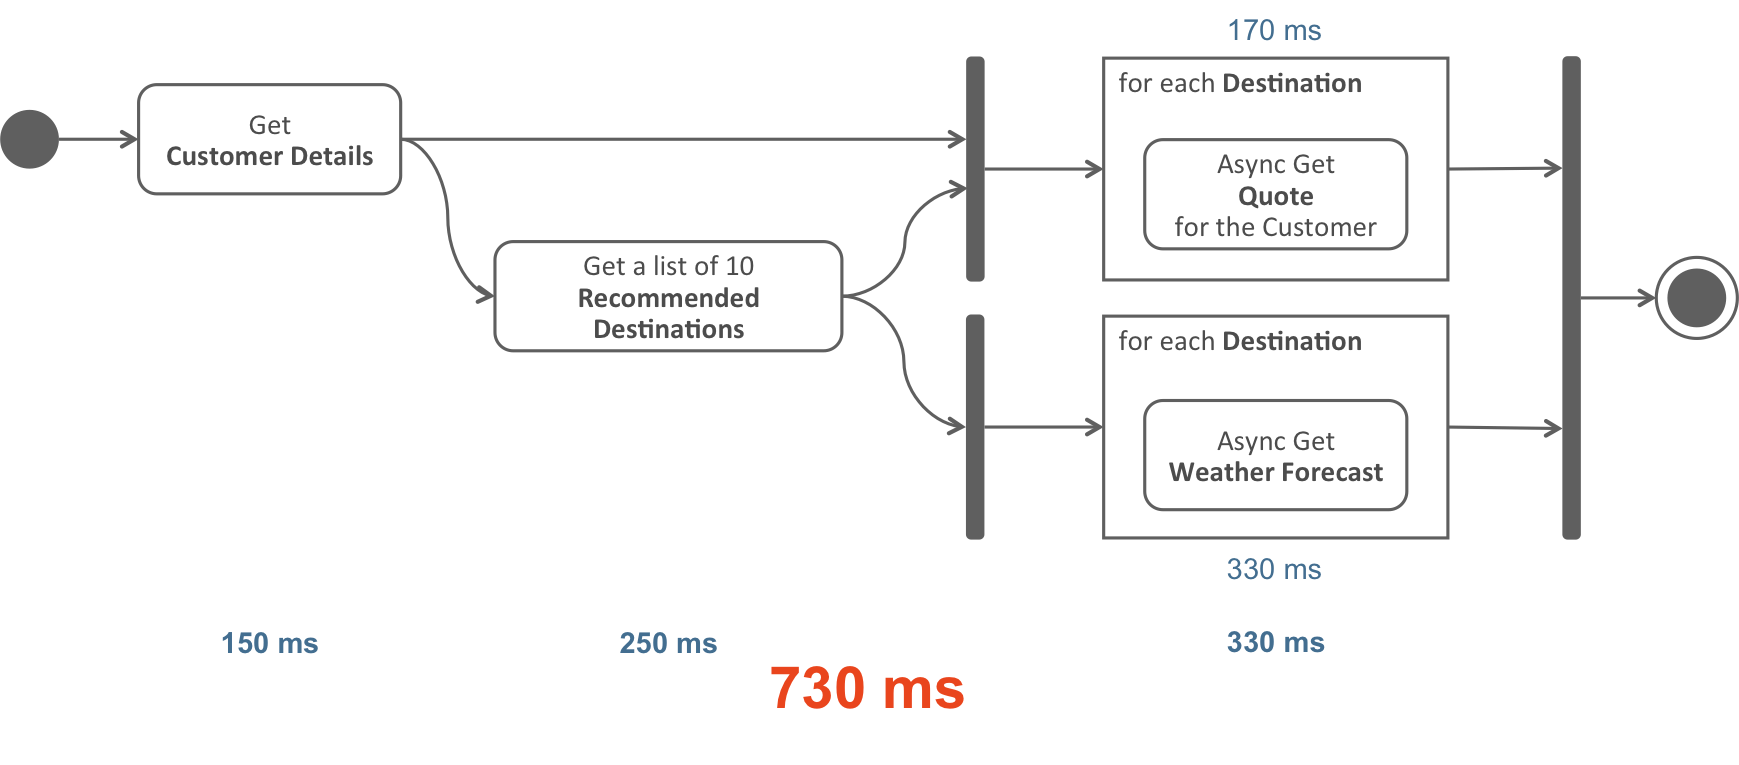
As you can guess, this approach, even with all it's benefits, is the one that is really hard to implement, debug
and maintain. It's a safe bet when you have many independent calls to make but it gets uglier with an increasing
number of nested calls.
Reactive approach is a way out of the so-called Callback Hell which you can encounter when
dealing with Java's Futures or invocation callbacks. Reactive approach is based on a data-flow
concept and the execution model propagate changes through the flow. An example of a single item in the data-flow
chain can be a JAX-RS Client HTTP method call. When the JAX-RS request finishes then the next item (or the user code)
in the data-flow chain is notified about the continuation, completion or error in the chain. You're more describing
what should be done next than how the next action in the chain should be triggered. The other important part here
is that the data-flows are composable. You can compose/transform multiple flows into the resulting one and apply
more operations on the result.
An example of this approach can be seen in Example 6.3, “Excerpt from a reactive approach while implementing the orchestration layer”. The APIs would be described in more detail in the next sections.
Example 6.3. Excerpt from a reactive approach while implementing the orchestration layer
final WebTarget destination = ...;
final WebTarget forecast = ...;

// Recommended places.
CompletionStage<List<Destination>> recommended =
        destination.path("recommended")
                   .request()
                   // Identify the user.
                   .header("Rx-User", "CompletionStage")
                   // Reactive invoker.
                   .rx()
                   // Return a list of destinations.
                   .get(new GenericType<List<Destination>>() {})
                   .exceptionally(throwable -> {
                       errors.offer("Recommended: " + throwable.getMessage());
                       return Collections.emptyList();
                   });

// get Forecast for recommended destinations.
return recommended.thenCompose(destinations -> {

    List<CompletionStage<Recommendation>> recommendations = destinations.stream().map(destination -> {
    // For each destination, obtain a weather forecast ...
    final CompletionStage<Forecast> forecastResult =
            forecast.resolveTemplate("destination", destination.getDestination())
                    .request().rx().get(Forecast.class)
                    .exceptionally(throwable -> {
                        errors.offer("Forecast: " + throwable.getMessage());
                        return new Forecast(destination.getDestination(), "N/A");
                    });

                    //noinspection unchecked
                    return CompletableFuture.completedFuture(new Recommendation(destination))
                                            // Set forecast for recommended destination.
                                            .thenCombine(forecastResult, Recommendation::forecast)
                    }).collect(Collectors.toList());

                    // Transform List<CompletionStage<Recommendation>> to CompletionStage<List<Recommendation>>
                    return sequence(recommendations);
    });
As you can see the code achieves the same work as the previous two examples. It's more readable than the pure asynchronous approach even though it's equally fast. It's as easy to read and implement as the synchronous approach. The error processing is also better handled in this way than in the asynchronous approach.
When dealing with a large amount of requests (that depend on each other) and when you need to compose/combine the results of these requests, the reactive programming model is the right technique to use.
Reactive Client API is part of the JAX-RS specification since version 2.1.
When you compare synchronous invocation of HTTP calls ( Example 6.4, “Synchronous invocation of HTTP requests”)
Example 6.4. Synchronous invocation of HTTP requests
Response response = ClientBuilder.newClient()
        .target("http://example.com/resource")
        .request()
        .get();
with asynchronous invocation (Example 6.5, “Asynchronous invocation of HTTP requests”)
Example 6.5. Asynchronous invocation of HTTP requests
Future<Response> response = ClientBuilder.newClient()
        .target("http://example.com/resource")
        .request()
        .async()
        .get();
it is apparent how to pretty conveniently modify the way how a request is invoked (from sync to async) only by calling
async method on an Invocation.Builder.
Naturally, it'd be nice to copy the same pattern to allow invoking requests in a reactive way. Just instead of
async you'd call rx on an extension of Invocation.Builder,
like in Example 6.6, “Reactive invocation of HTTP requests”.
Example 6.6. Reactive invocation of HTTP requests
CompletionStage<Response> response = ClientBuilder.newClient()
        .target("http://example.com/resource")
        .request()
        .rx()
        .get();
The first reactive interface in the invocation chain is RxInvoker which is very similar to
SyncInvoker and AsyncInvoker. It contains all methods present in the two latter
JAX-RS interfaces but the RxInvoker interface is more generic, so that it can be extended
and used in particular implementations taking advantage of various reactive libraries. Extending this new interface
in a particular implementation also preserves type safety which means that you're not loosing type information when a HTTP
method call returns an object that you want to process further.
The method "rx()" in the example above is perfect example of that principle. It returns CompletionStageRxInvoker, which extends RxInvoker.
As a user of the Reactive Client API you only need to keep in mind that you won't be working with
RxInvoker directly. You'd rather be working with an extension of this interface created for
a particular implementation and you don't need to be bothered much with why are things designed the way they are.
Note
To see how the RxInvoker should be extended, refer to
Section 6.4, “Implementing Support for Custom Reactive Libraries (SPI)”.
The important thing to notice here is that an extension of RxInvoker holds the type
information and the Reactive Client needs to know about this type to properly propagate it among the method
calls you'll be making. This is the reason why other interfaces (described bellow) are parametrized with this type.
In order to extend the API to be used with other reactive frameworks, RxInvokerProvider needs to be registered into the Client runtime:
Client client = ClientBuilder.newClient();
client.register(RxFlowableInvokerProvider.class);

Flowable<String> responseFlowable =
        client.target("http://jersey.java.net")
              .request()
              .rx(RxFlowableInvoker.class)
              .get(String.class);

String responseString = responseFlowable.blockingFirst();JAX-RS mandates support for CompletionStage, which doesn't required any other dependency and can be used out of the box.
To add support for a particular library, see the Section 6.3, “Supported Reactive Libraries”.
Note
If you're not using Maven (or other dependency management tool) make sure to add also all the transitive dependencies of Jersey client module and any other extensions (when used) on the class-path.
There are already some available reactive (or reactive-like) libraries out there and Jersey brings support for some of them out of the box. Jersey currently supports:
RxJava, contributed by Netflix, is probably the most advanced reactive library for Java at the moment. It's
used for composing asynchronous and event-based programs by using observable sequences. It uses the
observer pattern to support these sequences of data/events
via it's Observable entry point class which implements the Reactive Pattern. Observable is
actually the parameter type in the RxJava's extension of RxInvoker, called
RxObservableInvoker. This means that the return type of HTTP method calls is
Observable in this case (accordingly parametrized).
Requests are by default invoked at the moment when a subscriber is subscribed to an observable (it's a cold
Observable). If not said otherwise a separate thread (JAX-RS Async Client requests) is used to
obtain data. This behavior can be overridden by providing an ExecutorService when a reactive
Client is created.
The extensibility is built-in JAX-RS Client API, so there are no special dependencies on Jersey Client API other than the extension itself.
Example 6.7. Creating JAX-RS Client with RxJava reactive extension
// New Client
Client client = ClientBuilder.newClient();
client.register(RxObservableInvokerProvider.class);
An example of obtaining Observable with JAX-RS Response from a remote service
can be seen in Example 6.8, “Obtaining Observable<Response> from Jersey/RxJava Client”.
Example 6.8. Obtaining Observable<Response> from Jersey/RxJava Client
Observable<Response> observable = RxObservable.newClient()
                                                    .target("http://example.com/resource")
                                                    .request()
                                                    .rx(RxObservableInvoker.class)
                                                    .get();
The RxJava support is available as an extension module in Jersey. For Maven users,
simply add the following dependency to your pom.xml:
<dependency>
    <groupId>org.glassfish.jersey.ext.rx</groupId>
    <artifactId>jersey-rx-client-rxjava</artifactId>
    <version>2.29.1</version>
</dependency>
After this step you can use the extended client right away. The dependency transitively adds the following
dependencies to your class-path as well: io.reactivex:rxjava.
Note
If you're not using Maven (or other dependency management tool) make sure to add also all the transitive dependencies of this extension module (see jersey-rx-client-rxjava) on the class-path.
RxJava, contributed by Netflix, is probably the most advanced reactive library for Java at the moment. It's
used for composing asynchronous and event-based programs by using observable sequences. It uses the
observer pattern to support these sequences of data/events
via it's Flowable entry point class which implements the Reactive Pattern. Flowable is
actually the parameter type in the RxJava's extension of RxInvoker, called
RxFlowableInvoker. This means that the return type of HTTP method calls is
Flowable in this case (accordingly parametrized).
Requests are by default invoked at the moment when a subscriber is subscribed to a flowable (it's a cold
Flowable). If not said otherwise a separate thread (JAX-RS Async Client requests) is used to
obtain data. This behavior can be overridden by providing an ExecutorService when a reactive
Client is created.
The extensibility is built-in JAX-RS Client API, so there are no special dependencies on Jersey Client API other than the extension itself.
Example 6.9. Creating JAX-RS Client with RxJava2 reactive extension
// New Client
Client client = ClientBuilder.newClient();
client.register(RxFlowableInvokerProvider.class);
An example of obtaining Flowable with JAX-RS Response from a remote service
can be seen in Example 6.8, “Obtaining Observable<Response> from Jersey/RxJava Client”.
Example 6.10. Obtaining Flowable<Response> from Jersey/RxJava Client
Flowable<Response> observable = RxObservable.newClient()
                            .target("http://example.com/resource")
                            .request()
                            .rx(RxFlowableInvoker.class)
                            .get();
The RxJava support is available as an extension module in Jersey. For Maven users,
simply add the following dependency to your pom.xml:
<dependency>
    <groupId>org.glassfish.jersey.ext.rx</groupId>
    <artifactId>jersey-rx-client-rxjava2</artifactId>
    <version>2.29.1</version>
</dependency>
After this step you can use the extended client right away. The dependency transitively adds the following
dependencies to your class-path as well: io.reactivex:rxjava2.
Note
If you're not using Maven (or other dependency management tool) make sure to add also all the transitive dependencies of this extension module (see jersey-rx-client-rxjava2) on the class-path.
Guava, contributed by Google, also contains a type, ListenableFuture, which can be decorated with
listeners that are notified when the future completes. The ListenableFuture can be combined with
Futures to achieve asynchronous/event-based completion aware processing. ListenableFuture
is the parameter type in the Guava's extension of RxInvoker, called
RxListenableFutureInvoker. This means that the return type of HTTP method calls is
ListenableFuture in this case (accordingly parametrized).
Requests are by default invoked immediately. If not said otherwise the Executors#newCachedThreadPool() pool
is used to obtain a thread which processed the request. This behavior can be overridden by providing a
ExecutorService when a Client is created.
The extensibility is built-in JAX-RS Client API, so there are no special dependencies on Jersey Client API other than the extension itself.
Example 6.11. Creating Jersey/Guava Client
// New Client
Client client = ClientBuilder.newClient();
client.register(RxListenableFutureInvokerProvider.class);
An example of obtaining ListenableFuture with JAX-RS Response from a remote
service can be seen in Example 6.12, “Obtaining ListenableFuture<Response> from Jersey/Guava Client”.
Example 6.12. Obtaining ListenableFuture<Response> from Jersey/Guava Client
ListenableFuture<Response> response = client.target("http://jersey.java.net")
                                            .request()
                                            .rx(RxListenableFutureInvoker.class)
                                            .get();
The Reactive Jersey Client with Guava support is available as an extension module in Jersey. For Maven users,
simply add the following dependency to your pom.xml:
<dependency>
    <groupId>org.glassfish.jersey.ext.rx</groupId>
    <artifactId>jersey-rx-client-guava</artifactId>
    <version>2.29.1</version>
</dependency>
After this step you can use the extended client right away. The dependency transitively adds the following
dependencies to your class-path as well: com.google.guava:guava.
Note
If you're not using Maven (or other dependency management tool) make sure to add also all the transitive dependencies of this extension module (see jersey-rx-client-guava) on the class-path.
In case you want to bring support for some other library providing Reactive Programming Model into your application you can extend functionality of Reactive JAX-RS Client by implementing RxInvokerProvider, registering that implementation into the client runtime and then using rx(Class<T>) in your code.
The first step when implementing support for another reactive library is to implement RxInvoker. JAX-RS API itself contains one implementation, which will be used as an example: CompletionStageRxInvoker.
Example 6.13. Extending RxIvoker
public interface CompletionStageRxInvoker extends RxInvoker<CompletionStage> {
    @Override
    public CompletionStage<Response> get();

    @Override
    public <T> CompletionStage<T> get(Class<T> responseType);

    // ...
}
The important fact to notice is that the generic parameter of RxInvoker is CompletionStage and also that the return type is overriden to be always CompletionStage with some generic param (Response; or T).
After having the extended RxInvoker interface, the implementor has to provide RxInvokerProvider, which will be registered as an provider to a client instance.
Example 6.14. Extending RxInvokerProvider
public static class CompletionStageRxInvokerProvider implements RxInvokerProvider<CompletionStageRxInvoker> {
    @Override
    public boolean isProviderFor(Class<?%gt; clazz) {
        return CompletionStage.class.equals(clazz);
    }

    @Override
    public CompletionStageRxInvoker getRxInvoker(SyncInvoker syncInvoker, ExecutorService executorService) {
        return new CompletionStageRxInvoker() {
            // ...
        };
    }
}
Considering the work above was done and the implementation of custom RxInvoker and
RxInvokerProvider is available, the client code using those extensions will be:
Client client = ClientBuilder.newClient();
// register custom RxInvokerProvider
client.register(CompletionStageRxInvokerProvider.class);

CompletionStage<Response> response =
        client.target("http://jersey.java.net")
              .request()
              .rx(CompletionStageRxInvoker.class)
              // Now we have an instance of CompletionStageRxInvoker returned from our registered RxInvokerProvider,
              // which is CompletionStageRxInvokerProvider in this particular scenario.
.get();Table of Contents
Previous sections on @Produces and @Consumes annotations referred to media type of an entity representation. Examples above depicted resource methods that could consume and/or produce String Java type for a number of different media types. This approach is easy to understand and relatively straightforward when applied to simple use cases.
To cover also other cases, handling non-textual data for example or handling data stored in the file system, etc., JAX-RS implementations are required to support also other kinds of media type conversions where additional, non-String, Java types are being utilized. Following is a short listing of the Java types that are supported out of the box with respect to supported media type:
- All media types (
*/*)byte[]java.lang.Stringjava.io.Reader(inbound only)java.io.Filejavax.activation.DataSourcejavax.ws.rs.core.StreamingOutput(outbound only)
- XML media types (
text/xml,application/xmlandapplication/...+xml)javax.xml.transform.Sourcejavax.xml.bind.JAXBElement- Application supplied JAXB classes (types annotated with @XmlRootElement or@XmlType)
- Form content (
application/x-www-form-urlencoded)MultivaluedMap<String,String>
- Plain text (
text/plain)java.lang.Booleanjava.lang.Characterjava.lang.Number
Unlike method parameters that are associated with the extraction of request parameters, the method parameter associated with the representation being consumed does not require annotating. In other words the representation (entity) parameter does not require a specific 'entity' annotation. A method parameter without a annotation is an entity. A maximum of one such unannotated method parameter may exist since there may only be a maximum of one such representation sent in a request.
The representation being produced corresponds to what is returned by
the resource method. For example JAX-RS makes it simple to produce images
that are instance of
File
as follows:
Example 7.1. Using
File
with a specific media type to produce a response
@GET
@Path("/images/{image}")
@Produces("image/*")
public Response getImage(@PathParam("image") String image) {
  File f = new File(image);

  if (!f.exists()) {
    throw new WebApplicationException(404);
  }

  String mt = new MimetypesFileTypeMap().getContentType(f);
  return Response.ok(f, mt).build();
}
The
File type can also be used when consuming a representation (request entity).
In that case a temporary file will be created from the incoming request entity and passed as a
parameter to the resource method.
The Content-Type response header
(if not set programmatically as described in the next section)
will be automatically set based on the media types declared by @Produces annotation.
Given the following method, the most acceptable media type is used when multiple output media types are allowed:
@GET
@Produces({"application/xml", "application/json"})
public String doGetAsXmlOrJson() {
  ...
}
If application/xml is the most acceptable media type defined
by the request (e.g. by header Accept: application/xml), then the
Content-Type response header
will be set to application/xml.
Sometimes it is necessary to return additional
information in response to a HTTP request. Such information may be built
and returned using Response and Response.ResponseBuilder.
For example, a common RESTful pattern for the creation of a new resource
is to support a POST request that returns a 201 (Created) status code and
a
Location
header whose value is the URI to the newly
created resource. This may be achieved as follows:
Example 7.2. Returning 201 status code and adding
Location
header in response to POST request
@POST
@Consumes("application/xml")
public Response post(String content) {
  URI createdUri = ...
  create(content);
  return Response.created(createdUri).build();
}
In the above no representation produced is returned, this can be achieved by building an entity as part of the response as follows:
Example 7.3. Adding an entity body to a custom response
@POST
@Consumes("application/xml")
public Response post(String content) {
  URI createdUri = ...
  String createdContent = create(content);
  return Response.created(createdUri).entity(Entity.text(createdContent)).build();
}
Response building provides other functionality such as setting the entity tag and last modified date of the representation.
Previous section shows how to return HTTP responses, that are built up programmatically. It is possible to use the very same mechanism to return HTTP errors directly, e.g. when handling exceptions in a try-catch block. However, to better align with the Java programming model, JAX-RS allows to define direct mapping of Java exceptions to HTTP error responses.
The following example shows throwing
CustomNotFoundException
from a resource method in order to return an error HTTP response to the client:
Example 7.4. Throwing exceptions to control response
@Path("items/{itemid}/")
public Item getItem(@PathParam("itemid") String itemid) {
  Item i = getItems().get(itemid);
  if (i == null) {
    throw new CustomNotFoundException("Item, " + itemid + ", is not found");
  }

  return i;
}
This exception is an application specific exception that extends WebApplicationException and builds a HTTP response with the 404 status code and an optional message as the body of the response:
Example 7.5. Application specific exception implementation
public class CustomNotFoundException extends WebApplicationException {

  /**
  * Create a HTTP 404 (Not Found) exception.
  */
  public CustomNotFoundException() {
    super(Responses.notFound().build());
  }

  /**
  * Create a HTTP 404 (Not Found) exception.
  * @param message the String that is the entity of the 404 response.
  */
  public CustomNotFoundException(String message) {
    super(Response.status(Responses.NOT_FOUND).
    entity(message).type("text/plain").build());
  }
}
In other cases it may not be appropriate to throw instances of WebApplicationException, or classes that extend WebApplicationException, and instead it may be preferable to map an existing exception to a response. For such cases it is possible to use a custom exception mapping provider. The provider must implement the ExceptionMapper<E extends Throwable> interface. For example, the following maps the EntityNotFoundException to a HTTP 404 (Not Found) response:
Example 7.6. Mapping generic exceptions to responses
@Provider
public class EntityNotFoundMapper implements ExceptionMapper<javax.persistence.EntityNotFoundException> {
  public Response toResponse(javax.persistence.EntityNotFoundException ex) {
    return Response.status(404).
      entity(ex.getMessage()).
      type("text/plain").
      build();
  }
}
The above class is annotated with @Provider, this declares that the class is of interest to the JAX-RS runtime. Such a
class may be added to the set of classes of the Application instance that is configured. When an application throws an
EntityNotFoundException
the
toResponse
method of the
EntityNotFoundMapper
instance will be invoked.
Jersey supports extension of the exception mappers. These extended mappers must implement
the org.glassfish.jersey.spi.ExtendedExceptionMapper interface. This interface additionally
defines method isMappable(Throwable) which will be invoked by the Jersey runtime
when exception is thrown and this provider is considered as mappable based on the exception type. Using this
method the provider can reject mapping of the exception before the method toResponse
is invoked. The provider can for example check the exception parameters and based on them return false
and let other provider to be chosen for the exception mapping.
Conditional GETs are a great way to reduce bandwidth, and potentially improve on the server-side performance, depending on how the information used to determine conditions is calculated. A well-designed web site may for example return 304 (Not Modified) responses for many of static images it serves.
JAX-RS provides support for conditional GETs using the contextual interface Request.
The following example shows conditional GET support:
Example 7.7. Conditional GET support
public SparklinesResource(
  @QueryParam("d") IntegerList data,
  @DefaultValue("0,100") @QueryParam("limits") Interval limits,
  @Context Request request,
  @Context UriInfo ui) {
  if (data == null) {
    throw new WebApplicationException(400);
  }

  this.data = data;
  this.limits = limits;

  if (!limits.contains(data)) {
    throw new WebApplicationException(400);
  }

  this.tag = computeEntityTag(ui.getRequestUri());

  if (request.getMethod().equals("GET")) {
    Response.ResponseBuilder rb = request.evaluatePreconditions(tag);
    if (rb != null) {
      throw new WebApplicationException(rb.build());
    }
  }
}
The constructor of the
SparklinesResouce
root
resource class computes an entity tag from the request URI and then calls
the
request.evaluatePreconditions
with that entity tag. If a client request contains an
If-None-Match
header with a value that contains the
same entity tag that was calculated then the
evaluatePreconditions
returns a pre-filled out response, with the 304 status code and entity tag
set, that may be built and returned. Otherwise,
evaluatePreconditions
returns
null
and the normal response can be
returned.
Notice that in this example the constructor of a resource class is used to perform actions that may otherwise have to be duplicated to invoked for each resource method. The life cycle of resource classes is per-request which means that the resource instance is created for each request and therefore can work with request parameters and for example make changes to the request processing by throwing an exception as it is shown in this example.
Table of Contents
Entity payload, if present in an received HTTP message, is passed to Jersey from an I/O container as an input stream. The stream may, for example, contain data represented as a plain text, XML or JSON document. However, in many JAX-RS components that process these inbound data, such as resource methods or client responses, the JAX-RS API user can access the inbound entity as an arbitrary Java object that is created from the content of the input stream based on the representation type information. For example, an entity created from an input stream that contains data represented as a XML document, can be converted to a custom JAXB bean. Similar concept is supported for the outbound entities. An entity returned from the resource method in the form of an arbitrary Java object can be serialized by Jersey into a container output stream as a specified representation. Of course, while JAX-RS implementations do provide default support for most common combinations of Java type and it's respective on-the-wire representation formats, JAX-RS implementations do not support the conversion described above for any arbitrary Java type and any arbitrary representation format by default. Instead, a generic extension concept is exposed in JAX-RS API to allow application-level customizations of this JAX-RS runtime to support for entity conversions. The JAX-RS extension API components that provide the user-level extensibility are typically referred to by several terms with the same meaning, such as entity providers, message body providers, message body workers or message body readers and writers. You may find all these terms used interchangeably throughout the user guide and they all refer to the same concept.
In JAX-RS extension API (or SPI - service provider interface, if you like) the concept is captured in 2 interfaces.
One for handling inbound entity representation-to-Java de-serialization - MessageBodyReader<T> and the other
one for handling the outbound entity Java-to-representation serialization - MessageBodyWriter<T>.
A MessageBodyReader<T>, as the name suggests, is an extension that supports reading the message body
representation from an input stream and converting the data into an instance of a specific Java type.
A MessageBodyWriter<T> is then responsible for converting a message payload from an instance of a
specific Java type into a specific representation format that is sent over the wire to the other party as part of an
HTTP message exchange.
Both of these providers can be used to provide message payload serialization and de-serialization support on the
server as well as the client side. A message body reader or writer is always used whenever a HTTP request or
response contains an entity and the entity is either requested by the application code (e.g. injected as a parameter
of JAX-RS resource method or a response entity read on the client from a Response) or has to be
serialized and sent to the other party (e.g. an instance returned from a JAX-RS resource method or a request
entity sent by a JAX-RS client).
A best way how to learn about entity providers is to walk through an example of writing one. Therefore we will describe here the process of implementing a custom MessageBodyWriter<T> and MessageBodyReader<T> using a practical example. Let's first setup the stage by defining a JAX-RS resource class for the server side story of our application.
Example 8.1. Example resource class
@Path("resource")
public class MyResource {
    @GET
    @Produces("application/xml")
    public MyBean getMyBean() {
        return new MyBean("Hello World!", 42);
    }

    @POST
    @Consumes("application/xml")
    public String postMyBean(MyBean myBean) {
        return myBean.anyString;
    }
}
The resource class defines GET and POST resource methods. Both methods work with an entity
that is an instance of MyBean.
The MyBean class is defined in the next example:
Example 8.2. MyBean entity class
@XmlRootElement
public class MyBean {
    @XmlElement
    public String anyString;
    @XmlElement
    public int anyNumber;

    public MyBean(String anyString, int anyNumber) {
        this.anyString = anyString;
        this.anyNumber = anyNumber;
    }

    // empty constructor needed for deserialization by JAXB
    public MyBean() {
    }

    @Override
    public String toString() {
        return "MyBean{" +
            "anyString='" + anyString + '\'' +
            ", anyNumber=" + anyNumber +
            '}';
    }
}
The MyBean is a JAXB-annotated POJO. In GET resource method we return
the instance of MyBean and we would like Jersey runtime to serialize it into XML and write
it as an entity body to the response output stream. We design a custom MessageBodyWriter<T>
that can serialize this POJO into XML. See the following code sample:
Note
Please note, that this is only a demonstration of how to write a custom entity provider. Jersey already contains default support for entity providers that can serialize JAXB beans into XML.
Example 8.3. MessageBodyWriter example
@Produces("application/xml")
public class MyBeanMessageBodyWriter implements MessageBodyWriter<MyBean> {

    @Override
    public boolean isWriteable(Class<?> type, Type genericType,
                               Annotation[] annotations, MediaType mediaType) {
        return type == MyBean.class;
    }

    @Override
    public long getSize(MyBean myBean, Class<?> type, Type genericType,
                        Annotation[] annotations, MediaType mediaType) {
        // deprecated by JAX-RS 2.0 and ignored by Jersey runtime
        return -1;
    }

    @Override
    public void writeTo(MyBean myBean,
                        Class<?> type,
                        Type genericType,
                        Annotation[] annotations,
                        MediaType mediaType,
                        MultivaluedMap<String, Object> httpHeaders,
                        OutputStream entityStream)
                        throws IOException, WebApplicationException {

        try {
            JAXBContext jaxbContext = JAXBContext.newInstance(MyBean.class);

            // serialize the entity myBean to the entity output stream
            jaxbContext.createMarshaller().marshal(myBean, entityStream);
        } catch (JAXBException jaxbException) {
            throw new ProcessingException(
                "Error serializing a MyBean to the output stream", jaxbException);
        }
    }
}
The MyBeanMessageBodyWriter implements the MessageBodyWriter<T>
interface that contains three methods. In the next sections we'll explore these methods more closely.
A method isWriteable
should return true if the MessageBodyWriter<T> is able to write the given type. Method
does not decide only based on the Java type of the entity but also on annotations attached to the entity
and the requested representation media type.
Parameters type and genericType both define the entity,
where type is a raw Java type
(for example, a java.util.List class) and genericType is a
ParameterizedType including generic information (for example List<String>).
Parameter annotations contains annotations that are either attached to the resource
method and/or annotations that are attached to the entity by building response like in the following piece
of code:
Example 8.4. Example of assignment of annotations to a response entity
@Path("resource")
public static class AnnotatedResource {

    @GET
    public Response get() {
        Annotation annotation = AnnotatedResource.class
                            .getAnnotation(Path.class);
        return Response.ok()
                .entity("Entity", new Annotation[] {annotation}).build();
    }
}
In the example above, the MessageBodyWriter<T> would get
annotations parameter containing a JAX-RS @GET annotation
as it annotates the resource method and also a @Path annotation as it
is passed in the response (but not because it annotates the resource; only resource
method annotations are included). In the case of MyResource
and method getMyBean the annotations would contain the
@GET and the @Produces annotation.
The last parameter of the isWriteable method is the mediaType
which is the media type attached to the response entity by annotating the resource method with a
@Produces annotation or the request media type specified in the JAX-RS Client API.
In our example, the media type passed to providers for the resource MyResource and method
getMyBean would be "application/xml".
In our implementation of the isWriteable method, we
just check that the type is MyBean. Please note, that
this method might be executed multiple times by Jersey runtime as Jersey needs to check
whether this provider can be used for a particular combination of entity Java type, media type, and attached
annotations, which may be potentially a performance hog. You can limit the number of execution by
properly defining the @Produces annotation on the MessageBodyWriter<T>.
In our case thanks to @Produces annotation, the provider will be considered
as writeable (and the method isWriteable might be executed) only if the
media type of the outbound message is "application/xml". Additionally, the provider
will only be considered as possible candidate and its isWriteable method will
be executed, if the generic type of the provider is either a sub class or super class of
type parameter.
Once a message body writer is selected as the most appropriate (see the Section 8.3, “Entity Provider Selection”
for more details on entity provider selection), its writeTo method is invoked. This method
receives parameters with the same meaning as in isWriteable as well as a few additional ones.
In addition to the parameters already introduced, the writeTo method defies also
httpHeaders parameter, that contains HTTP headers associated with the
outbound message.
Note
When a MessageBodyWriter<T> is invoked, the headers still can be modified in this point
and any modification will be reflected in the outbound HTTP message being sent. The modification of
headers must however happen before a first byte is written to the supplied output stream.
Another new parameter, myBean, contains the entity instance to be serialized (the type of
entity corresponds to generic type of MessageBodyWriter<T>). Related parameter
entityStream contains the entity output stream to which the method should serialize the entity.
In our case we use JAXB to marshall the entity into the entityStream. Note, that the
entityStream is not closed at the end of method; the stream will be closed by Jersey.
Important
Do not close the entity output stream in the writeTo method of your
MessageBodyWriter<T> implementation.
The method is deprecated since JAX-RS 2.0 and Jersey 2 ignores the return value. In JAX-RS 1.0 the
method could return the size of the entity that would be then used for "Content-Length" response
header. In Jersey 2.0 the "Content-Length" parameter is computed automatically using an internal
outbound entity buffering. For details about configuration options of outbound entity buffering see the javadoc
of MessageProperties, property OUTBOUND_CONTENT_LENGTH_BUFFER
which configures the size of the buffer.
Note
You can disable the Jersey outbound entity buffering by setting the buffer size to 0.
Before testing the MyBeanMessageBodyWriter, the writer must
be registered as a custom JAX-RS extension provider. It should either be added to your application
ResourceConfig, or returned from your custom Application sub-class, or
annotated with @Provider annotation to leverage JAX-RS provider auto-discovery feature.
After registering the MyBeanMessageBodyWriter and MyResource class
in our application, the request can be initiated (in this example from Client API).
Example 8.5. Client code testing MyBeanMessageBodyWriter
WebTarget webTarget = // initialize web target to the context root
            // of example application
Response response = webTarget.path("resource")
                        .request(MediaType.APPLICATION_XML).get();
System.out.println(response.getStatus());
String myBeanXml = response.readEntity(String.class);
System.out.println(myBeanXml);
The client code initiates the GET which will be matched to the resource method
MyResource.getMyBean(). The response entity is de-serialized as a String.
The result of console output is:
Example 8.6. Result of MyBeanMessageBodyWriter test
200
<?xml version="1.0" encoding="UTF-8" standalone="yes"?><myBean>
<anyString>Hello World!</anyString><anyNumber>42</anyNumber></myBean>
The returned status is 200 and the entity is stored in the response in a XML format.
Next, we will look at how the Jersey de-serializes this XML document into a MyBean consumed by
our POST resource method.
In order to de-serialize the entity of MyBean on the server or the client, we need to implement
a custom MessageBodyReader<T>.
Note
Please note, that this is only a demonstration of how to write a custom entity provider. Jersey already contains default support for entity providers that can serialize JAXB beans into XML.
Our MessageBodyReader<T> implementation is listed in Example 8.7, “MessageBodyReader example”.
Example 8.7. MessageBodyReader example
public static class MyBeanMessageBodyReader
        implements MessageBodyReader<MyBean> {

@Override
public boolean isReadable(Class<?> type, Type genericType,
    Annotation[] annotations, MediaType mediaType) {
    return type == MyBean.class;
}

@Override
public MyBean readFrom(Class<MyBean> type,
    Type genericType,
    Annotation[] annotations, MediaType mediaType,
    MultivaluedMap<String, String> httpHeaders,
    InputStream entityStream)
        throws IOException, WebApplicationException {

    try {
        JAXBContext jaxbContext = JAXBContext.newInstance(MyBean.class);
        MyBean myBean = (MyBean) jaxbContext.createUnmarshaller()
            .unmarshal(entityStream);
        return myBean;
    } catch (JAXBException jaxbException) {
        throw new ProcessingException("Error deserializing a MyBean.",
            jaxbException);
    }
}
}
It is obvious that the MessageBodyReader<T> interface is similar to MessageBodyWriter<T>.
In the next couple of sections we will explore it's API methods.
It defines the method isReadable() which has a very simliar meaning as method
isWriteable() in MessageBodyWriter<T>. The method returns true
if it is able to de-serialize the given type. The annotations parameter contains annotations
that are attached to the entity parameter in the resource method. In our POST resource
method postMyBean the entity parameter myBean is not
annotated, therefore no annotation will be passed to the isReadable. The mediaType
parameter contains the entity media type. The media type, in our case, must be consumable by the POST
resource method, which is specified by placing a JAX-RS @Consumes annotation to the method.
The resource method postMyBean() is annotated with
@Consumes("application/xml"),
therefore for purpose of de-serialization of entity for the postMyBean() method,
only requests with entities represented as "application/xml"
media type will match the method. However, this method might be executed for for entity types that are sub classes
or super classes of the declared generic type on the MessageBodyReader<T> will be also considered.
It is a responsibility of the isReadable method to decide whether it is able
to de-serialize the entity and type comparison is one of the basic decision steps.
Tip
In order to reduce number of isReadable executions, always define correctly the consumable
media type(s) with the @Consumes annotation on your custom MessageBodyReader<T>.
The readForm() method gets the parameters with the same meaning as in
isReadable(). The additional entityStream parameter provides a handle
to the entity input stream from which the entity bytes should be read and de-serialized into a Java entity which
is then returned from the method. Our MyBeanMessageBodyReader de-serializes the incoming
XML data into an instance of MyBean using JAXB.
Important
Do not close the entity input stream in your MessageBodyReader<T> implementation. The stream
will be automatically closed by Jersey runtime.
Now let's send a test request using the JAX-RS Client API.
Example 8.8. Testing MyBeanMessageBodyReader
final MyBean myBean = new MyBean("posted MyBean", 11);
Response response = webTarget.path("resource").request("application/xml")
        .post(Entity.entity(myBean, "application/xml"));

System.out.println(response.getStatus());
final String responseEntity = response.readEntity(String.class);
System.out.println(responseEntity);
The console output is:
Both, MessageBodyReader<T> and MessageBodyWriter<T> can be registered in a
configuration of JAX-RS Client API components typically without any need to change their code. The example
Example 8.10, “MessageBodyReader registered on a JAX-RS client” is a variation on the Example 8.5, “Client code testing MyBeanMessageBodyWriter”
listed in one of the previous sections.
Example 8.10. MessageBodyReader registered on a JAX-RS client
Client client = ClientBuilder.newBuilder()
    .register(MyBeanMessageBodyReader.class).build();

Response response = client.target("http://example/comm/resource")
    .request(MediaType.APPLICATION_XML).get();
System.out.println(response.getStatus());
MyBean myBean = response.readEntity(MyBean.class);
System.out.println(myBean);
The code above registers MyBeanMessageBodyReader to the Client configuration
using a ClientBuilder which means that the provider will be used for any WebTarget
produced by the client instance.
Note
You could also register the JAX-RS entity (and any other) providers to individual
WebTarget instances produced by the client.
Then, using the fluent chain of method invocations, a resource target pointing to our
MyResource is defined, a HTTP GET request is invoked.
The response entity is then read as an instance of a MyBean type by invoking the
response.readEntity method, that internally locates the registered
MyBeanMessageBodyReader and uses it for entity de-serialization.
The console output for the example is:
Usually there are many entity providers registered on the server or client side (be default there must be
at least providers mandated by the JAX-RS specification, such as providers for primitive types, byte array,
JAXB beans, etc.).
JAX-RS defines an algorithm for selecting the most suitable provider for entity processing. This algorithm
works with information such as entity Java type and on-the-wire media type representation of entity, and searches
for the most suitable entity provider from the list of available providers based on the supported media type
declared on each provider (defined by @Produces or @Consumes on the provider class)
as well as based on the generic type declaration of the available providers. When a list of suitable candidate
entity providers is selected and sorted based on the rules defined in JAX-RS specification, a JAX-RS runtime
then it invokes isReadable or isWriteable method respectively on each
provider in the list until a first provider is found that returns true. This provider is then used to
process the entity.
The following steps describe the algorithm for selecting a MessageBodyWriter<T> (extracted
from JAX-RS with little modifications). The steps refer to the previously discussed example application.
The MessageBodyWriter<T> is searched for purpose of deserialization of MyBean
entity returned from the method getMyBean. So, type is MyBean
and media type "application/xml". Let's assume the runtime contains also
registered providers, namely:
A: @Produces("application/*") with generic type
<Object>
|
B: @Produces("*/*") with generic type <MyBean>
|
C: @Produces("text/plain") with generic type
<MyBean>
|
D: @Produces("application/xml") with generic type
<Object>
|
MyBeanMessageBodyWriter: @Produces("application/xml") with generic
type <MyBean>
|
The algorithm executed by a JAX-RS runtime to select a proper MessageBodyWriter<T> implementation
is illustrated in Procedure 8.1, “MessageBodyWriter<T> Selection Algorithm”.
Procedure 8.1. MessageBodyWriter<T> Selection Algorithm
Obtain the object that will be mapped to the message entity body. For a return type of Response or subclasses, the object is the value of the entity property, for other return types it is the returned object.
So in our case, for the resource method
getMyBeanthe type will beMyBean.Determine the media type of the response.
In our case. for resource method
getMyBeanannotated with@Produces("application/xml"), the media type will be"application/xml".Select the set of MessageBodyWriter providers that support the object and media type of the message entity body.
In our case, for entity media type
"application/xml"and typeMyBean, the appropriateMessageBodyWriter<T>will be theA,B,DandMyBeanMessageBodyWriter. The providerCdoes not define the appropriate media type.AandBare fine as their type is more generic and compatible with"application/xml".Sort the selected MessageBodyWriter providers with a primary key of generic type where providers whose generic type is the nearest superclass of the object class are sorted first and a secondary key of media type. Additionally, JAX-RS specification mandates that custom, user registered providers have to be sorted ahead of default providers provided by JAX-RS implementation. This is used as a tertiary comparison key. User providers are places prior to Jersey internal providers in to the final ordered list.
The sorted providers will be:
MyBeanMessageBodyWriter,B.D,A.Iterate through the sorted
MessageBodyWriter<T>providers and, utilizing theisWriteablemethod of each until you find aMessageBodyWriter<T>that returnstrue.The first provider in the list - our
MyBeanMessageBodyWriterreturnstrueas it compares types and the types matches. If it would returnfalse, the next providerBwould by check by invoking itsisWriteablemethod.If step 5 locates a suitable
MessageBodyWriter<T>then use its writeTo method to map the object to the entity body.MyBeanMessageBodyWriter.writeTowill be executed and it will serialize the entity.Otherwise, the server runtime MUST generate a generate an
InternalServerErrorException, a subclass ofWebApplicationExceptionwith its status set to 500, and no entity and the client runtime MUST generate aProcessingException.We have successfully found a provider, thus no exception is generated.
Note
JAX-RS 2.0 is incompatible with JAX-RS 1.x in one step of the entity provider selection algorithm.
JAX-RS 1.x defines sorting keys priorities in the Step 4
in exactly opposite order. So, in JAX-RS 1.x the keys are defined in the order: primary media type,
secondary type declaration distance where custom providers have always precedence to internal providers.
If you want to force Jersey to use the algorithm compatible with JAX-RS 1.x, setup the property
(to ResourceConfig or return from Application from its
getProperties method):
jersey.config.workers.legacyOrdering=true
Documentation of this property can be found in the javadoc of MessageProperties.
The algorithm for selection of MessageBodyReader<T> is similar, including the incompatibility
between JAX-RS 2.0 and JAX-RS 1.x and the property to workaround it. The algorithm is defined as follows:
Procedure 8.2. MessageBodyReader<T> Selection Algorithm
Obtain the media type of the request. If the request does not contain a
Content-Typeheader then useapplication/octet-streammedia type.Identify the Java type of the parameter whose value will be mapped from the entity body. The Java type on the server is the type of the entity parameter of the resource method. On the client it is the
Classpassed toreadFrommethod.Select the set of available
MessageBodyReader<T>providers that support the media type of the request.Iterate through the selected
MessageBodyReader<T>classes and, utilizing theirisReadablemethod, choose the firstMessageBodyReader<T>provider that supports the desired combination of Java type/media type/annotations parameters.If Step 4 locates a suitable
MessageBodyReader<T>, then use itsreadFrommethod to map the entity body to the desired Java type.Otherwise, the server runtime MUST generate a
NotSupportedException(HTTP 415 status code) and no entity and the client runtime MUST generate an instance ofProcessingException.
In case you need to directly work with JAX-RS entity providers, for example to serialize an entity in your resource
method, filter or in a composite entity provider, you would need to perform quite a lot of steps.
You would need to choose the appropriate MessageBodyWriter<T> based on the type, media type and
other parameters. Then you would need to instantiate it, check it by isWriteable method and
basically perform all the steps that are normally performed by Jersey
(see Procedure 8.2, “MessageBodyReader<T> Selection Algorithm”).
To remove this burden from developers, Jersey exposes a proprietary public API that simplifies the manipulation
of entity providers. The API is defined by MessageBodyWorkers interface and Jersey provides an
implementation that can be injected using the @Context injection annotation. The interface declares
methods for selection of most appropriate MessageBodyReader<T> and MessageBodyWriter<T>
based on the rules defined in JAX-RS spec, methods for writing and reading entity that ensure proper and timely
invocation of interceptors and other useful methods.
See the following example of usage of MessageBodyWorkers.
Example 8.12. Usage of MessageBodyWorkers interface
@Path("workers")
public static class WorkersResource {

    @Context
    private MessageBodyWorkers workers;

    @GET
    @Produces("application/xml")
    public String getMyBeanAsString() {

        final MyBean myBean = new MyBean("Hello World!", 42);

        // buffer into which myBean will be serialized
        ByteArrayOutputStream baos = new ByteArrayOutputStream();

        // get most appropriate MBW
        final MessageBodyWriter<MyBean> messageBodyWriter =
                workers.getMessageBodyWriter(MyBean.class, MyBean.class,
                        new Annotation[]{}, MediaType.APPLICATION_XML_TYPE);

        try {
            // use the MBW to serialize myBean into baos
            messageBodyWriter.writeTo(myBean,
                MyBean.class, MyBean.class, new Annotation[] {},
                MediaType.APPLICATION_XML_TYPE, new MultivaluedHashMap<String, Object>(),
                baos);
        } catch (IOException e) {
            throw new RuntimeException(
                "Error while serializing MyBean.", e);
        }

        final String stringXmlOutput = baos.toString();
        // stringXmlOutput now contains XML representation:
        // "<?xml version="1.0" encoding="UTF-8" standalone="yes"?>
        // <myBean><anyString>Hello World!</anyString>
        // <anyNumber>42</anyNumber></myBean>"

        return stringXmlOutput;
    }
}
In the example a resource injects MessageBodyWorkers and uses it for selection
of the most appropriate MessageBodyWriter<T>. Then the writer is utilized to serialize the entity
into the buffer as XML document. The String content of the buffer is then returned.
This will cause that Jersey will not use MyBeanMessageBodyWriter
to serialize the entity as it is already in the String type
(MyBeanMessageBodyWriter does not support String). Instead, a simple
String-based MessageBodyWriter<T> will be chosen and it will only serialize the
String with XML to the output entity stream by writing out the bytes of the
String.
Of course, the code in the example does not bring any benefit as the entity could
have been serialized by MyBeanMessageBodyWriter by Jersey as in previous examples;
the purpose of the example was to show how to use MessageBodyWorkers in a resource method.
Jersey internally contains entity providers for these types with combination of media types (in brackets):
byte[] (*/*)
|
String (*/*)
|
InputStream (*/*)
|
Reader (*/*)
|
File (*/*)
|
DataSource (*/*)
|
Source (text/xml, application/xml and media types of the form
application/*+xml)
|
JAXBElement (text/xml, application/xml and media types of the form
application/*+xml)
|
MultivaluedMap<K,V> (application/x-www-form-urlencoded)
|
Form (application/x-www-form-urlencoded)
|
StreamingOutput ((*/*)) - this class can be used as an lightweight
MessageBodyWriter<T> that can be returned from a resource method
|
Boolean, Character and Number (text/plain) - corresponding
primitive types supported via boxing/unboxing conversion
|
For other media type supported in jersey please see the Chapter 9, Support for Common Media Type Representations which describes additional Jersey entity provider extensions for serialization to JSON, XML, serialization of collections, Multi Part and others.
Table of Contents
Jersey JSON support comes as a set of extension modules where each of these modules contains an implementation of a Feature that needs to be registered into your Configurable instance (client/server). There are multiple frameworks that provide support for JSON processing and/or JSON-to-Java binding. The modules listed below provide support for JSON representations by integrating the individual JSON frameworks into Jersey. At present, Jersey integrates with the following modules to provide JSON support:
MOXy - JSON binding support via MOXy is a default and preferred way of supporting JSON binding in your Jersey applications since Jersey 2.0. When JSON MOXy module is on the class-path, Jersey will automatically discover the module and seamlessly enable JSON binding support via MOXy in your applications. (See Section 4.3, “Auto-Discoverable Features”.)
Each of the aforementioned extension modules uses one or more of the three basic approaches available when working with JSON representations:
POJO based JSON binding support
JAXB based JSON binding support
Low-level JSON parsing & processing support
The first method is pretty generic and allows you to map any Java Object to JSON and vice versa. The other two approaches limit you in Java types your resource methods could produce and/or consume. JAXB based approach is useful if you plan to utilize certain JAXB features and support both XML and JSON representations. The last, low-level, approach gives you the best fine-grained control over the out-coming JSON data format.
POJO support represents the easiest way to convert your Java Objects to JSON and back.
Media modules that support this approach are MOXy and Jackson
Taking this approach will save you a lot of time, if you want to easily produce/consume both JSON and XML data format. With JAXB beans you will be able to use the same Java model to generate JSON as well as XML representations. Another advantage is simplicity of working with such a model and availability of the API in Java SE Platform. JAXB leverages annotated POJOs and these could be handled as simple Java beans.
A disadvantage of JAXB based approach could be if you need to work with a very specific JSON format. Then it might be difficult to find a proper way to get such a format produced and consumed. This is a reason why a lot of configuration options are provided, so that you can control how JAXB beans get serialized and de-serialized. The extra configuration options however requires you to learn more details about the framework you are using.
Following is a very simple example of how a JAXB bean could look like.
Example 9.1. Simple JAXB bean implementation
@XmlRootElement
public class MyJaxbBean {
    public String name;
    public int age;

    public MyJaxbBean() {} // JAXB needs this

    public MyJaxbBean(String name, int age) {
        this.name = name;
        this.age = age;
    }
}
Using the above JAXB bean for producing JSON data format from you resource method, is then as simple as:
Example 9.2. JAXB bean used to generate JSON representation
@GET
@Produces("application/json")
public MyJaxbBean getMyBean() {
    return new MyJaxbBean("Agamemnon", 32);
}
Notice, that JSON specific mime type is specified in @Produces annotation, and the method returns
an instance of MyJaxbBean, which JAXB is able to process. Resulting JSON in this case
would look like:
{"name":"Agamemnon", "age":"32"}
A proper use of JAXB annotations itself enables you to control output JSON format to certain extent.
Specifically, renaming and omitting items is easy to do directly just by using JAXB annotations.
For example, the following example depicts changes in the above mentioned MyJaxbBean that will result in
{"king":"Agamemnon"} JSON output.
Example 9.3. Tweaking JSON format using JAXB
@XmlRootElement
public class MyJaxbBean {

    @XmlElement(name="king")
    public String name;

    @XmlTransient
    public int age;

    // several lines removed
}
Media modules that support this approach are MOXy, Jackson, Jettison
JSON Processing API is a new standard API for parsing and processing JSON structures in similar way to what
SAX and StAX parsers provide for XML. The API is part of Java EE 7 and later. Another such JSON
parsing/processing API is provided by Jettison framework. Both APIs provide a low-level access to producing
and consuming JSON data structures. By adopting this low-level approach you would be working with
JsonObject (or JSONObject respectively) and/or
JsonArray (or JSONArray respectively) classes when processing your
JSON data representations.
The biggest advantage of these low-level APIs is that you will gain full control over the JSON format produced and consumed. You will also be able to produce and consume very large JSON structures using streaming JSON parser/generator APIs. On the other hand, dealing with your data model objects will probably be a lot more complex, compared to the POJO or JAXB based binding approach. Differences are depicted at the following code snippets.
Let's start with JAXB-based approach.
Above you construct a simple JAXB bean, which could be written in JSON as
{"name":"Agamemnon", "age":32}
Now to build an equivalent JsonObject/JSONObject (in terms of
resulting JSON expression), you would need several more lines of code. The following example illustrates
how to construct the same JSON data using the standard Java EE 7 JSON-Processing API.
Example 9.5. Constructing a JsonObject (JSON-Processing)
JsonObject myObject = Json.createObjectBuilder()
        .add("name", "Agamemnon")
        .add("age", 32)
        .build();
And at last, here's how the same work can be done with Jettison API.
Example 9.6. Constructing a JSONObject (Jettison)
JSONObject myObject = new JSONObject();
try {
    myObject.put("name", "Agamemnon");
    myObject.put("age", 32);
} catch (JSONException ex) {
    LOGGER.log(Level.SEVERE, "Error ...", ex);
}
Media modules that support the low-level JSON parsing and generating approach are Java API for JSON Processing (JSON-P) and Jettison. Unless you have a strong reason for using the non-standard Jettison API, we recommend you to use the new standard Java API for JSON Processing (JSON-P) API instead.
To use MOXy as your JSON provider you need to add jersey-media-moxy module to your pom.xml file:
<dependency>
    <groupId>org.glassfish.jersey.media</groupId>
    <artifactId>jersey-media-moxy</artifactId>
    <version>2.29.1</version>
</dependency>
If you're not using Maven make sure to have all needed dependencies (see jersey-media-moxy) on the classpath.
As stated in the Section 4.3, “Auto-Discoverable Features” as well as earlier in this chapter, MOXy media
module is one of the modules where you don't need to explicitly register it's Features
(MoxyJsonFeature) in your client/server Configurable as this feature is
automatically discovered and registered when you add jersey-media-moxy module to your class-path.
The auto-discoverable jersey-media-moxy module defines a few properties that can be used to control the
automatic registration of MoxyJsonFeature (besides the generic
CommonProperties.FEATURE_AUTO_DISCOVERY_DISABLE an the its client/server variants):
Note
A manual registration of any other Jersey JSON provider feature (except for Java API for JSON Processing (JSON-P))
disables the automated enabling and configuration of MoxyJsonFeature.
To configure MessageBodyReader<T>s / MessageBodyWriter<T>s provided by MOXy you can simply create an instance of MoxyJsonConfig and set values of needed properties. For most common properties you can use a particular method to set the value of the property or you can use more generic methods to set the property:
MoxyJsonConfig#property(java.lang.String, java.lang.Object) - sets a property value for both Marshaller and Unmarshaller.
MoxyJsonConfig#marshallerProperty(java.lang.String, java.lang.Object) - sets a property value for Marshaller.
MoxyJsonConfig#unmarshallerProperty(java.lang.String, java.lang.Object) - sets a property value for Unmarshaller.
Example 9.7. MoxyJsonConfig - Setting properties.
final Map<String, String> namespacePrefixMapper = new HashMap<String, String>();
namespacePrefixMapper.put("http://www.w3.org/2001/XMLSchema-instance", "xsi");

final MoxyJsonConfig configuration = new MoxyJsonConfig()
        .setNamespacePrefixMapper(namespacePrefixMapper)
        .setNamespaceSeparator(':');
In order to make MoxyJsonConfig visible for MOXy you need to create and register
ContextResolver<T> in your client/server code.
Example 9.8. Creating ContextResolver<MoxyJsonConfig>
final Map<String, String> namespacePrefixMapper = new HashMap<String, String>();
namespacePrefixMapper.put("http://www.w3.org/2001/XMLSchema-instance", "xsi");

final MoxyJsonConfig moxyJsonConfig = MoxyJsonConfig()
            .setNamespacePrefixMapper(namespacePrefixMapper)
            .setNamespaceSeparator(':');

final ContextResolver<MoxyJsonConfig> jsonConfigResolver = moxyJsonConfig.resolver();
Another way to pass configuration properties to the underlying MOXyJsonProvider is to set
them directly into your Configurable instance (see an example below). These are overwritten by
properties set into the MoxyJsonConfig.
Example 9.9. Setting properties for MOXy providers into Configurable
new ResourceConfig()
                            .property(MarshallerProperties.JSON_NAMESPACE_SEPARATOR, ".")
                            // further configuration
There are some properties for which Jersey sets the default value when MessageBodyReader<T> / MessageBodyWriter<T> from MOXy is used and they are:
Table 9.1. Default property values for MOXy MessageBodyReader<T> / MessageBodyWriter<T>
javax.xml.bind.Marshaller#JAXB_FORMATTED_OUTPUT | false |
org.eclipse.persistence.jaxb.JAXBContextProperties#JSON_INCLUDE_ROOT
| false |
org.eclipse.persistence.jaxb.MarshallerProperties#JSON_MARSHAL_EMPTY_COLLECTIONS
| true |
org.eclipse.persistence.jaxb.JAXBContextProperties#JSON_NAMESPACE_SEPARATOR
| org.eclipse.persistence.oxm.XMLConstants#DOT |
Example 9.10. Building client with MOXy JSON feature enabled.
final Client client = ClientBuilder.newBuilder()
        // The line below that registers MOXy feature can be
        // omitted if FEATURE_AUTO_DISCOVERY_DISABLE is
        // not disabled.
        .register(MoxyJsonFeature.class)
        .register(jsonConfigResolver)
        .build();
Example 9.11. Creating JAX-RS application with MOXy JSON feature enabled.
// Create JAX-RS application.
final Application application = new ResourceConfig()
        .packages("org.glassfish.jersey.examples.jsonmoxy")
        // The line below that registers MOXy feature can be
        // omitted if FEATURE_AUTO_DISCOVERY_DISABLE is
        // not disabled.
        .register(MoxyJsonFeature.class)
.register(jsonConfigResolver);Jersey provides a JSON MOXy example on how to use MOXy to consume/produce JSON.
To use JSON-P as your JSON provider you need to add jersey-media-json-processing module to your
pom.xml file:
<dependency>
    <groupId>org.glassfish.jersey.media</groupId>
    <artifactId>jersey-media-json-processing</artifactId>
    <version>2.29.1</version>
</dependency>
If you're not using Maven make sure to have all needed dependencies (see jersey-media-json-processing) on the class-path.
As stated in Section 4.3, “Auto-Discoverable Features” JSON-Processing media module is one of the
modules where you don't need to explicitly register it's
Features (JsonProcessingFeature) in your client/server
Configurable as this feature is automatically discovered and registered when you add
jersey-media-json-processing module to your classpath.
As for the other modules, jersey-media-json-processing has also few properties that can affect the
registration of JsonProcessingFeature
(besides CommonProperties.FEATURE_AUTO_DISCOVERY_DISABLE and the like):
To configure MessageBodyReader<T>s / MessageBodyWriter<T>s provided by JSON-P you can simply add values for supported properties into the Configuration instance (client/server). Currently supported are these properties:
JsonGenerator.PRETTY_PRINTING("javax.json.stream.JsonGenerator.prettyPrinting")
Example 9.12. Building client with JSON-Processing JSON feature enabled.
ClientBuilder.newClient(new ClientConfig()
        // The line below that registers JSON-Processing feature can be
        // omitted if FEATURE_AUTO_DISCOVERY_DISABLE is not disabled.
        .register(JsonProcessingFeature.class)
        .property(JsonGenerator.PRETTY_PRINTING, true)
);
Example 9.13. Creating JAX-RS application with JSON-Processing JSON feature enabled.
// Create JAX-RS application.
final Application application = new ResourceConfig()
        // The line below that registers JSON-Processing feature can be
        // omitted if FEATURE_AUTO_DISCOVERY_DISABLE is not disabled.
        .register(JsonProcessingFeature.class)
        .packages("org.glassfish.jersey.examples.jsonp")
.property(JsonGenerator.PRETTY_PRINTING, true);Jersey provides a JSON Processing example on how to use JSON-Processing to consume/produce JSON.
To use Jackson 2.x as your JSON provider you need to add jersey-media-json-jackson module to your
pom.xml file:
<dependency>
    <groupId>org.glassfish.jersey.media</groupId>
    <artifactId>jersey-media-json-jackson</artifactId>
    <version>2.29.1</version>
</dependency>
To use Jackson 1.x it'll look like:
<dependency>
    <groupId>org.glassfish.jersey.media</groupId>
    <artifactId>jersey-media-json-jackson1</artifactId>
    <version>2.29.1</version>
</dependency>
If you're not using Maven make sure to have all needed dependencies (see jersey-media-json-jackson or jersey-media-json-jackson1) on the classpath.
Note
Note that there is a difference in namespaces between Jackson 1.x (org.codehaus.jackson)
and Jackson 2.x (com.fasterxml.jackson).
Jackson JSON processor could be controlled via providing a custom Jackson 2 ObjectMapper (or
ObjectMapper for Jackson 1) instance.
This could be handy if you need to redefine the default Jackson behaviour and to fine-tune how your JSON data
structures look like. Detailed description of all Jackson features is out of scope of this guide. The example
below gives you a hint on how to wire your ObjectMapper (ObjectMapper)
instance into your Jersey application.
In order to use Jackson as your JSON (JAXB/POJO) provider you need to register JacksonFeature
(Jackson1Feature) and a ContextResolver<T> for ObjectMapper,
if needed, in your Configurable (client/server).
Example 9.14. ContextResolver<ObjectMapper>
@Provider
public class MyObjectMapperProvider implements ContextResolver<ObjectMapper> {

    final ObjectMapper defaultObjectMapper;

    public MyObjectMapperProvider() {
        defaultObjectMapper = createDefaultMapper();
    }

    @Override
    public ObjectMapper getContext(Class<?> type) {
            return defaultObjectMapper;
        }
    }

    private static ObjectMapper createDefaultMapper() {
        final ObjectMapper result = new ObjectMapper();
        result.configure(Feature.INDENT_OUTPUT, true);

        return result;
    }

    // ...
}
To view the complete example source code, see MyObjectMapperProvider class from the JSON-Jackson example.
Example 9.15. Building client with Jackson JSON feature enabled.
final Client client = ClientBuilder.newBuilder()
        .register(MyObjectMapperProvider.class)  // No need to register this provider if no special configuration is required.
        .register(JacksonFeature.class)
        .build();
Example 9.16. Creating JAX-RS application with Jackson JSON feature enabled.
// Create JAX-RS application.
final Application application = new ResourceConfig()
        .packages("org.glassfish.jersey.examples.jackson")
        .register(MyObjectMapperProvider.class)  // No need to register this provider if no special configuration is required.
        .register(JacksonFeature.class);
Jersey provides JSON Jackson (2.x) example and JSON Jackson (1.x) example showing how to use Jackson to consume/produce JSON.
JAXB approach for (de)serializing JSON in Jettison module provides, in addition to using pure JAXB,
configuration options that could be set on an JettisonConfig instance. The instance could be then
further used to create a JettisonJaxbContext, which serves as a main configuration point in this
area.
To pass your specialized JettisonJaxbContext to Jersey, you will finally need to implement
a JAXBContext ContextResolver<T> (see below).
To use Jettison as your JSON provider you need to add jersey-media-json-jettison module to your
pom.xml file:
<dependency>
    <groupId>org.glassfish.jersey.media</groupId>
    <artifactId>jersey-media-json-jettison</artifactId>
    <version>2.29.1</version>
</dependency>
If you're not using Maven make sure to have all needed dependencies (see jersey-media-json-jettison) on the classpath.
JettisonConfig allows you to use two JSON notations. Each of these notations serializes
JSON in a different way. Following is a list of supported notations:
JETTISON_MAPPED (default notation)
BADGERFISH
You might want to use one of these notations, when working with more complex XML documents. Namely when you deal with multiple XML namespaces in your JAXB beans.
Individual notations and their further configuration options are described below. Rather then explaining rules for mapping XML constructs into JSON, the notations will be described using a simple example. Following are JAXB beans, which will be used.
Example 9.17. JAXB beans for JSON supported notations description, simple address bean
@XmlRootElement
public class Address {
    public String street;
    public String town;

    public Address(){}

    public Address(String street, String town) {
        this.street = street;
        this.town = town;
    }
}
Example 9.18. JAXB beans for JSON supported notations description, contact bean
@XmlRootElement
public class Contact {

    public int id;
    public String name;
    public List<Address> addresses;

    public Contact() {};

    public Contact(int id, String name, List<Address> addresses) {
        this.name = name;
        this.id = id;
        this.addresses =
            (addresses != null) ? new LinkedList<Address>(addresses) : null;
    }
}
Following text will be mainly working with a contact bean initialized with:
Example 9.19. JAXB beans for JSON supported notations description, initialization
Address[] addresses = {new Address("Long Street 1", "Short Village")};
Contact contact = new Contact(2, "Bob", Arrays.asList(addresses));
I.e. contact bean with id=2, name="Bob" containing
a single address (street="Long Street 1", town="Short Village").
All below described configuration options are documented also in api-docs at JettisonConfig.
If you need to deal with various XML namespaces, you will find Jettison mapped
notation pretty useful. Lets define a particular namespace for id item:
...
@XmlElement(namespace="http://example.com")
public int id;
...
Then you simply configure a mapping from XML namespace into JSON prefix as follows:
Example 9.20.
XML namespace to JSON mapping configuration for Jettison based mapped notation
Map<String,String> ns2json = new HashMap<String, String>();
ns2json.put("http://example.com", "example");
context = new JettisonJaxbContext(
    JettisonConfig.mappedJettison().xml2JsonNs(ns2json).build(),
    types);
Resulting JSON will look like in the example below.
Example 9.21. JSON expression with XML namespaces mapped into JSON
{
   "contact":{
      "example.id":2,
      "name":"Bob",
      "addresses":{
         "street":"Long Street 1",
         "town":"Short Village"
      }
   }
}
Please note, that id item became example.id based on the XML namespace mapping.
If you have more XML namespaces in your XML, you will need to configure appropriate mapping for all of
them.
Another configurable option introduced in Jersey version 2.2 is related to serialization of JSON arrays with Jettison's mapped notation. When serializing elements representing single item lists/arrays, you might want to utilise the following Jersey configuration method to explicitly name which elements to treat as arrays no matter what the actual content is.
Example 9.22.
JSON Array configuration for Jettison based mapped notation
context = new JettisonJaxbContext(
    JettisonConfig.mappedJettison().serializeAsArray("name").build(),
    types);
Resulting JSON will look like in the example below, unimportant lines removed for sanity.
Example 9.23. JSON expression with JSON arrays explicitly configured via Jersey
{
   "contact":{
      ...
      "name":["Bob"],
      ...
   }
}
From JSON and JavaScript perspective, this notation is definitely the worst readable one. You will probably not want to use it, unless you need to make sure your JAXB beans could be flawlessly written and read back to and from JSON, without bothering with any formatting configuration, namespaces, etc.
JettisonConfig instance using badgerfish notation could be built
with
JettisonConfig.badgerFish().build()
and the JSON output JSON will be as follows.
Example 9.24. JSON expression produced using badgerfish notation
{
   "contact":{
      "id":{
         "$":"2"
      },
      "name":{
         "$":"Bob"
      },
      "addresses":{
         "street":{
            "$":"Long Street 1"
         },
         "town":{
            "$":"Short Village"
         }
      }
   }
}
In order to use Jettison as your JSON (JAXB/POJO) provider you need to register JettisonFeature
and a ContextResolver<T> for JAXBContext (if needed) in your Configurable
(client/server).
Example 9.25. ContextResolver<ObjectMapper>
@Provider
public class JaxbContextResolver implements ContextResolver<JAXBContext> {

    private final JAXBContext context;
    private final Set<Class<?>> types;
    private final Class<?>[] cTypes = {Flights.class, FlightType.class, AircraftType.class};

    public JaxbContextResolver() throws Exception {
        this.types = new HashSet<Class<?>>(Arrays.asList(cTypes));
        this.context = new JettisonJaxbContext(JettisonConfig.DEFAULT, cTypes);
    }

    @Override
    public JAXBContext getContext(Class<?> objectType) {
        return (types.contains(objectType)) ? context : null;
    }
}
Example 9.26. Building client with Jettison JSON feature enabled.
final Client client = ClientBuilder.newBuilder()
        .register(JaxbContextResolver.class)  // No need to register this provider if no special configuration is required.
        .register(JettisonFeature.class)
        .build();
Example 9.27. Creating JAX-RS application with Jettison JSON feature enabled.
// Create JAX-RS application.
final Application application = new ResourceConfig()
        .packages("org.glassfish.jersey.examples.jettison")
        .register(JaxbContextResolver.class)  // No need to register this provider if no special configuration is required.
        .register(JettisonFeature.class);
Jersey provides an JSON Jettison example on how to use Jettison to consume/produce JSON.
Jersey provides out-of-the-box support for JSONP - JSON with padding. The following conditions has to be met to take advantage of this capability:
Resource method, which should return wrapped JSON, needs to be annotated with @JSONP annotation.
MessageBodyWriter<T> for
application/jsonmedia type, which also accepts the return type of the resource method, needs to be registered (see JSON section of this chapter).User's request has to contain
Acceptheader with one of the JavaScript media types defined (see below).
Acceptable media types compatible with @JSONP are: application/javascript,
application/x-javascript, application/ecmascript,
text/javascript, text/x-javascript, text/ecmascript,
text/jscript.
Example 9.28. Simplest case of using @JSONP
@GET
@JSONP
@Produces({"application/json", "application/javascript"})
public JaxbBean getSimpleJSONP() {
    return new JaxbBean("jsonp");
}
Assume that we have registered a JSON providers and that the JaxbBean looks like:
Example 9.29. JaxbBean for @JSONP example
@XmlRootElement
public class JaxbBean {

    private String value;

    public JaxbBean() {}

    public JaxbBean(final String value) {
        this.value = value;
    }

    public String getValue() {
        return value;
    }

    public void setValue(final String value) {
        this.value = value;
    }
}
When you send a GET request with Accept header set to
application/javascript you'll get a result entity that look like:
callback({
    "value" : "jsonp",
})
There are, of course, ways to configure wrapping method of the returned entity which defaults to
callback as you can see in the previous example.
@JSONP has two parameters that can be configured: callback and
queryParam.
callback stands for the name of the JavaScript callback function defined by the application.
The second parameter, queryParam, defines the name of the query parameter holding the name of
the callback function to be used (if present in the request). Value of queryParam defaults to
__callback so even if you do not set the name of the query parameter yourself, client can
always affect the result name of the wrapping JavaScript callback method.
Note
queryParam value (if set) always takes precedence over callback
value.
Lets modify our example a little bit:
Example 9.30. Example of @JSONP with configured parameters.
@GET
@Produces({"application/json", "application/javascript"})
@JSONP(callback = "eval", queryParam = "jsonpCallback")
public JaxbBean getSimpleJSONP() {
    return new JaxbBean("jsonp");
}
And make two requests:
curl -X GET http://localhost:8080/jsonp
will return
eval({
    "value" : "jsonp",
})
and the
curl -X GET http://localhost:8080/jsonp?jsonpCallback=alert
will return
alert({
    "value" : "jsonp",
})
Example. You can take a look at a provided JSON with Padding example.
As you probably already know, Jersey uses MessageBodyWriter<T>s and MessageBodyReader<T>s to
parse incoming requests and create outgoing responses. Every user can create its own representation but... this is not
recommended way how to do things. XML is proven standard for interchanging information, especially in web services.
Jerseys supports low level data types used for direct manipulation and JAXB XML entities.
Jersey currently support several low level data types: StreamSource, SAXSource, DOMSource and Document. You can use these types as the return type or as a method (resource) parameter. Lets say we want to test this feature and we have helloworld example as a starting point. All we need to do is add methods (resources) which consumes and produces XML and types mentioned above will be used.
Example 9.31. Low level XML test - methods added to HelloWorldResource.java
@POST
@Path("StreamSource")
public StreamSource getStreamSource(StreamSource streamSource) {
    return streamSource;
}

@POST
@Path("SAXSource")
public SAXSource getSAXSource(SAXSource saxSource) {
    return saxSource;
}

@POST
@Path("DOMSource")
public DOMSource getDOMSource(DOMSource domSource) {
    return domSource;
}

@POST
@Path("Document")
public Document getDocument(Document document) {
    return document;
}
Both MessageBodyWriter<T> and MessageBodyReader<T> are used in this case, all we need is
a POST request with some XML document as a request entity. To keep this as simple as possible only root
element with no content will be sent: "<test />". You can create JAX-RS client to do that
or use some other tool, for example curl:
curl -v http://localhost:8080/base/helloworld/StreamSource -d "<test/>"
You should get exactly the same XML from our service as is present in the request; in this case, XML headers are added to response but content stays. Feel free to iterate through all resources.
Good start for people which already have some experience with JAXB annotations is JAXB example. You can see various use-cases there. This text is mainly meant for those who don't have prior experience with JAXB. Don't expect that all possible annotations and their combinations will be covered in this chapter, JAXB (JSR 222 implementation) is pretty complex and comprehensive. But if you just want to know how you can interchange XML messages with your REST service, you are looking at the right chapter.
Lets start with simple example. Lets say we have class Planet and service which produces
"Planets".
Example 9.32. Planet class
@XmlRootElement
public class Planet {
    public int id;
    public String name;
    public double radius;
}
Example 9.33. Resource class
@Path("planet")
public class Resource {

    @GET
    @Produces(MediaType.APPLICATION_XML)
    public Planet getPlanet() {
        final Planet planet = new Planet();

        planet.id = 1;
        planet.name = "Earth";
        planet.radius = 1.0;

        return planet;
    }
}
You can see there is some extra annotation declared on Planet class, particularly
@XmlRootElement. This is an JAXB annotation which maps java classes
to XML elements. We don't need to specify anything else, because Planet is very simple class
and all fields are public. In this case, XML element name will be derived from the class name or
you can set the name property: @XmlRootElement(name="yourName").
Our resource class will respond to GET /planet with
<?xml version="1.0" encoding="UTF-8" standalone="yes"?>
<planet>
    <id>1</id>
    <name>Earth</name>
    <radius>1.0</radius>
</planet>
which might be exactly what we want... or not. Or we might not really care, because we can use JAX-RS client for making requests to this resource and this is easy as:
Planet planet = webTarget.path("planet").request(MediaType.APPLICATION_XML_TYPE).get(Planet.class);
There is pre-created WebTarget object which points to our applications context root and
we simply add path (in our case its planet), accept header (not mandatory, but service could
provide different content based on this header; for example text/html can be served for web
browsers) and at the end we specify that we are expecting Planet class via GET
request.
There may be need for not just producing XML, we might want to consume it as well.
Example 9.34. Method for consuming Planet
@POST
@Consumes(MediaType.APPLICATION_XML)
public void setPlanet(Planet planet) {
    System.out.println("setPlanet " + planet);
}
After valid request is made, service will print out string representation of Planet, which can
look like Planet{id=2, name='Mars', radius=1.51}. With JAX-RS client you can do:
webTarget.path("planet").request().post(Entity.xml(planet));
If there is a need for some other (non default) XML representation, other JAXB annotations would
need to be used. This process is usually simplified by generating java source from XML Schema which is
done by xjc which is XML to java compiler and it is part of JAXB.
Sometimes you can't / don't want to add JAXB annotations to source code and you still want to have resources
consuming and producing XML representation of your classes. In this case, JAXBElement class should help
you. Let's redo planet resource but this time we won't have an @XmlRootElement annotation on
Planet class.
Example 9.35. Resource class - JAXBElement
@Path("planet")
public class Resource {

    @GET
    @Produces(MediaType.APPLICATION_XML)
    public JAXBElement<Planet> getPlanet() {
        Planet planet = new Planet();

        planet.id = 1;
        planet.name = "Earth";
        planet.radius = 1.0;

        return new JAXBElement<Planet>(new QName("planet"), Planet.class, planet);
    }

    @POST
    @Consumes(MediaType.APPLICATION_XML)
    public void setPlanet(JAXBElement<Planet> planet) {
        System.out.println("setPlanet " + planet.getValue());
    }
}
As you can see, everything is little more complicated with JAXBElement. This is because now you need
to explicitly set element name for Planet class XML representation. Client side is even more
complicated than server side because you can't do JAXBElement<Planet> so JAX-RS client
API provides way how to workaround it by declaring subclass of GenericType<T>.
Example 9.36. Client side - JAXBElement
// GET
GenericType<JAXBElement<Planet>> planetType = new GenericType<JAXBElement<Planet>>() {};
Planet planet = (Planet) webTarget.path("planet").request(MediaType.APPLICATION_XML_TYPE).get(planetType).getValue();
System.out.println("### " + planet);
// POST
planet = new Planet();
// ...
webTarget.path("planet").post(new JAXBElement<Planet>(new QName("planet"), Planet.class, planet));In some scenarios you can take advantage of using custom JAXBContext. Creating
JAXBContext is an expensive operation and if you already have one created, same instance
can be used by Jersey. Other possible use-case for this is when you need to set some specific things
to JAXBContext, for example to set a different class loader.
Example 9.37. PlanetJAXBContextProvider
@Provider
public class PlanetJAXBContextProvider implements ContextResolver<JAXBContext> {
private JAXBContext context = null;
public JAXBContext getContext(Class<?> type) {
if (type != Planet.class) {
return null; // we don't support nothing else than Planet
}
if (context == null) {
try {
context = JAXBContext.newInstance(Planet.class);
} catch (JAXBException e) {
// log warning/error; null will be returned which indicates that this
// provider won't/can't be used.
}
}
return context;
}
}
Sample above shows simple JAXBContext creation, all you need to do is put
this @Provider annotated class somewhere where Jersey can find it. Users sometimes
have problems with using provider classes on client side, so just to reminder - you have to
declare them in the client config (client does not do anything like package scanning done by server).
Example 9.38. Using Provider with JAX-RS client
ClientConfig config = new ClientConfig();
config.register(PlanetJAXBContextProvider.class);
Client client = ClientBuilder.newClient(config);
If you want to use MOXy as your JAXB
implementation instead of JAXB RI you have two options. You can either use the standard JAXB mechanisms to define
the JAXBContextFactory from which a JAXBContext instance would be obtained (for more
on this topic, read JavaDoc on JAXBContext) or you can add jersey-media-moxy module to
your project and register/configure
MoxyXmlFeature class/instance in
the Configurable.
Example 9.39. Add jersey-media-moxy dependency.
<dependency>
<groupId>org.glassfish.jersey.media</groupId>
<artifactId>jersey-media-moxy</artifactId>
<version>2.29.1</version>
</dependency>Example 9.40. Register the MoxyXmlFeature class.
final ResourceConfig config = new ResourceConfig()
.packages("org.glassfish.jersey.examples.xmlmoxy")
.register(MoxyXmlFeature.class);Example 9.41. Configure and register an MoxyXmlFeature instance.
// Configure Properties.
final Map<String, Object> properties = new HashMap<String, Object>();
// ...
// Obtain a ClassLoader you want to use.
final ClassLoader classLoader = Thread.currentThread().getContextClassLoader();
final ResourceConfig config = new ResourceConfig()
.packages("org.glassfish.jersey.examples.xmlmoxy")
.register(new MoxyXmlFeature(
properties,
classLoader,
true, // Flag to determine whether eclipselink-oxm.xml file should be used for lookup.
CustomClassA.class, CustomClassB.class // Classes to be bound.
));
The classes in this module provide an integration of multipart/* request and response bodies
in a JAX-RS runtime environment. The set of registered providers is leveraged, in that the content type for a body
part of such a message reuses the same MessageBodyReader<T>/MessageBodyWriter<T>
implementations as would be used for that content type as a standalone entity.
The following list of general MIME MultiPart features is currently supported:
The
MIME-Version: 1.0HTTP header is included on generated responses. It is accepted, but not required, on processed requests.A MessageBodyReader<T> implementation for consuming MIME MultiPart entities.
A
MessageBodyWriter<T>implementation for producing MIME MultiPart entities. The appropriate@Provideris used to serialize each body part, based on its media type.Optional creation of an appropriate
boundaryparameter on a generatedContent-Typeheader, if not already present.
For more information refer to Multi Part.
To use multipart features you need to add jersey-media-multipart module to your pom.xml file:
<dependency>
<groupId>org.glassfish.jersey.media</groupId>
<artifactId>jersey-media-multipart</artifactId>
<version>2.29.1</version>
</dependency>If you're not using Maven make sure to have all needed dependencies (see jersey-media-multipart) on the class-path.
Before you can use capabilities of the jersey-media-multipart module in your client/server code, you
need to register MultiPartFeature.
Example 9.42. Building client with MultiPart feature enabled.
final Client client = ClientBuilder.newBuilder()
.register(MultiPartFeature.class)
.build();
Example 9.43. Creating JAX-RS application with MultiPart feature enabled.
// Create JAX-RS application.
final Application application = new ResourceConfig()
.packages("org.glassfish.jersey.examples.multipart")
.register(MultiPartFeature.class)
Jersey provides a Multipart Web Application Example on how to use multipart features.
MultiPart class (or it's subclasses) can be used as an entry point to using
jersey-media-multipart module on the client side. This class represents a
MIME multipart message and is able
to hold an arbitrary number of BodyParts. Default media type is
multipart/mixed
for MultiPart entity and text/plain for
BodyPart.
Example 9.44. MultiPart entity
final MultiPart multiPartEntity = new MultiPart()
.bodyPart(new BodyPart().entity("hello"))
.bodyPart(new BodyPart(new JaxbBean("xml"), MediaType.APPLICATION_XML_TYPE))
.bodyPart(new BodyPart(new JaxbBean("json"), MediaType.APPLICATION_JSON_TYPE));
final WebTarget target = // Create WebTarget.
final Response response = target
.request()
.post(Entity.entity(multiPartEntity, multiPartEntity.getMediaType()));
If you send a multiPartEntity to the server the entity with Content-Type
header in HTTP message would look like (don't forget to register a JSON provider):
Example 9.45. MultiPart entity in HTTP message.
Content-Type: multipart/mixed; boundary=Boundary_1_829077776_1369128119878
--Boundary_1_829077776_1369128119878
Content-Type: text/plain
hello
--Boundary_1_829077776_1369128119878
Content-Type: application/xml
<?xml version="1.0" encoding="UTF-8" standalone="yes"?><jaxbBean><value>xml</value></jaxbBean>
--Boundary_1_829077776_1369128119878
Content-Type: application/json
{"value":"json"}
--Boundary_1_829077776_1369128119878--
When working with forms (e.g. media type multipart/form-data) and various fields in them,
there is a more convenient class to be used - FormDataMultiPart. It automatically sets
the media type for the FormDataMultiPart entity to
multipart/form-data and Content-Disposition header to
FormDataBodyPart body parts.
Example 9.46. FormDataMultiPart entity
final FormDataMultiPart multipart = new FormDataMultiPart()
.field("hello", "hello")
.field("xml", new JaxbBean("xml"))
.field("json", new JaxbBean("json"), MediaType.APPLICATION_JSON_TYPE);
final WebTarget target = // Create WebTarget.
final Response response = target.request().post(Entity.entity(multipart, multipart.getMediaType()));
To illustrate the difference when using FormDataMultiPart instead of
FormDataBodyPart you can take a look at the
FormDataMultiPart entity from HTML message:
Example 9.47. FormDataMultiPart entity in HTTP message.
Content-Type: multipart/form-data; boundary=Boundary_1_511262261_1369143433608
--Boundary_1_511262261_1369143433608
Content-Type: text/plain
Content-Disposition: form-data; name="hello"
hello
--Boundary_1_511262261_1369143433608
Content-Type: application/xml
Content-Disposition: form-data; name="xml"
<?xml version="1.0" encoding="UTF-8" standalone="yes"?><jaxbBean><value>xml</value></jaxbBean>
--Boundary_1_511262261_1369143433608
Content-Type: application/json
Content-Disposition: form-data; name="json"
{"value":"json"}
--Boundary_1_511262261_1369143433608--
A common use-case for many users is sending files from client to server. For this purpose you can use classes from
org.glassfish.jersey.jersey.media.multipart package, such as
FileDataBodyPart or StreamDataBodyPart.
Example 9.48. Multipart - sending files.
// MediaType of the body part will be derived from the file.
final FileDataBodyPart filePart = new FileDataBodyPart("my_pom", new File("pom.xml"));
final FormDataMultiPart multipart = new FormDataMultiPart()
.field("foo", "bar")
.bodyPart(filePart);
final WebTarget target = // Create WebTarget.
final Response response = target.request()
.post(Entity.entity(multipart, multipart.getMediaType()));
Warning
Do not use ApacheConnectorProvider nor GrizzlyConnectorProvider
neither JettyConnectorProvider connector implementations with Jersey Multipart
features. See Header modification issue warning for more details.
Returning a multipart response from server to client is not much different from the parts described in the client section above. To obtain a multipart entity, sent by a client, in the application you can use two approaches:
Injecting the whole MultiPart entity.
Injecting particular parts of a
form-datamultipart request via @FormDataParam annotation.
Working with MultiPart types is no different from injecting/returning other
entity types.
Jersey provides MessageBodyReader<T> for reading the request entity and injecting this entity
into a method parameter of a resource method and MessageBodyWriter<T> for writing output entities.
You can expect that either MultiPart or
FormDataMultiPart (multipart/form-data media type) object
to be injected into a resource method.
Example 9.49. Resource method using MultiPart as input parameter / return value.
@POST
@Produces("multipart/mixed")
public MultiPart post(final FormDataMultiPart multiPart) {
return multiPart;
}
If you just need to bin the named body part(s) of a multipart/form-data request
entity body to a resource method parameter you can use @FormDataParam annotation.
This annotation in conjunction with the media type multipart/form-data should be used for
submitting and consuming forms that contain files, non-ASCII data, and binary data.
The type of the annotated parameter can be one of the following (for more detailed description see javadoc to @FormDataParam):
FormDataBodyPart- The value of the parameter will be the first named body part ornullif such a named body part is not present.A
ListorCollectionofFormDataBodyPart. The value of the parameter will one or more named body parts with the same name ornullif such a named body part is not present.FormDataContentDisposition- The value of the parameter will be the content disposition of the first named body part part ornullif such a named body part is not present.A
ListorCollectionofFormDataContentDisposition. The value of the parameter will one or more content dispositions of the named body parts with the same name ornullif such a named body part is not present.A type for which a message body reader is available given the media type of the first named body part. The value of the parameter will be the result of reading using the message body reader given the type
T, the media type of the named part, and the bytes of the named body part as input.If there is no named part present and there is a default value present as declared by @DefaultValue then the media type will be set to
text/plain. The value of the parameter will be the result of reading using the message body reader given the typeT, the media typetext/plain, and the UTF-8 encoded bytes of the default value as input.If there is no message body reader available and the type
Tconforms to a type specified by @FormParam then processing is performed as specified by@FormParam, where the values of the form parameter areStringinstances produced by reading the bytes of the named body parts utilizing a message body reader for theStringtype and the media typetext/plain.If there is no named part present then processing is performed as specified by
@FormParam.
Example 9.50. Use of @FormDataParam annotation
@POST
@Consumes(MediaType.MULTIPART_FORM_DATA)
public String postForm(
@DefaultValue("true") @FormDataParam("enabled") boolean enabled,
@FormDataParam("data") FileData bean,
@FormDataParam("file") InputStream file,
@FormDataParam("file") FormDataContentDisposition fileDisposition) {
// ...
}
In the example above the server consumes a multipart/form-data request entity body that
contains one optional named body part enabled and two required named body parts
data and file.
The optional part enabled is processed
as a boolean value, if the part is absent then the value will be true.
The part data is processed as a JAXB bean and contains some meta-data about the following
part.
The part file is a file that is uploaded, this is processed as an
InputStream. Additional information about the file from the
Content-Disposition header can be accessed by the parameter
fileDisposition.
Tip
@FormDataParam annotation can be also used on fields.
Table of Contents
This chapter describes filters, interceptors and their configuration. Filters and interceptors can be used on both sides, on the client and the server side. Filters can modify inbound and outbound requests and responses including modification of headers, entity and other request/response parameters. Interceptors are used primarily for modification of entity input and output streams. You can use interceptors for example to zip and unzip output and input entity streams.
Filters can be used when you want to modify any request or response parameters like headers. For example you would like to add a response header "X-Powered-By" to each generated response. Instead of adding this header in each resource method you would use a response filter to add this header.
There are filters on the server side and the client side.
Server filters:
| ContainerRequestFilter |
| ContainerResponseFilter |
Client filters:
| ClientRequestFilter |
| ClientResponseFilter |
Example 10.1. Container response filter
import java.io.IOException;
import javax.ws.rs.container.ContainerRequestContext;
import javax.ws.rs.container.ContainerResponseContext;
import javax.ws.rs.container.ContainerResponseFilter;
import javax.ws.rs.core.Response;
public class PoweredByResponseFilter implements ContainerResponseFilter {
@Override
public void filter(ContainerRequestContext requestContext, ContainerResponseContext responseContext)
throws IOException {
responseContext.getHeaders().add("X-Powered-By", "Jersey :-)");
}
}
In the example above the PoweredByResponseFilter
always adds a header "X-Powered-By" to the
response. The filter must inherit from the ContainerResponseFilter and must be registered
as a provider. The filter will be executed for every response which is in most cases after the resource method
is executed. Response filters are executed even if the resource method is not run, for example when
the resource method is not found and 404 "Not found" response code is returned by the Jersey runtime. In this case
the filter will be executed and will process the 404 response.
The filter() method has two arguments, the container request and container response. The
ContainerRequestContext is accessible only for read only purposes as the filter is executed already
in response phase. The modifications can be done in the ContainerResponseContext.
The following example shows the usage of a request filter.
Example 10.2. Container request filter
import java.io.IOException;
import javax.ws.rs.container.ContainerRequestContext;
import javax.ws.rs.container.ContainerRequestFilter;
import javax.ws.rs.core.Response;
import javax.ws.rs.core.SecurityContext;
public class AuthorizationRequestFilter implements ContainerRequestFilter {
@Override
public void filter(ContainerRequestContext requestContext)
throws IOException {
final SecurityContext securityContext =
requestContext.getSecurityContext();
if (securityContext == null ||
!securityContext.isUserInRole("privileged")) {
requestContext.abortWith(Response
.status(Response.Status.UNAUTHORIZED)
.entity("User cannot access the resource.")
.build());
}
}
}The request filter is similar to the response filter but does not have access to the ContainerResponseContext as no response is accessible yet. Response filter inherits from ContainerResponseFilter. Request filter is executed before the resource method is run and before the response is created. The filter has possibility to manipulate the request parameters including request headers or entity.
The AuthorizationRequestFilter in the example checks whether the
authenticated user is in the privileged role. If it is not then the request is aborted
by calling ContainerRequestContext.abortWith(Response response) method. The method
is intended to be called from the request filter in situation when the request should not be processed further in the standard processing chain.
When the filter method is finished the response passed as a parameter to the
abortWith method is used to respond to the request. Response filters, if any are registered,
will be executed and will have possibility to process the aborted response.
All the request filters shown above was implemented as post-matching filters. It means that the filters would be applied only after a suitable resource method has been selected to process the actual request i.e. after request matching happens. Request matching is the process of finding a resource method that should be executed based on the request path and other request parameters. Since post-matching request filters are invoked when a particular resource method has already been selected, such filters can not influence the resource method matching process.
To overcome the above described limitation, there is a possibility to mark a server request filter as a pre-matching filter, i.e. to annotate the filter class with the @PreMatching annotation. Pre-matching filters are request filters that are executed before the request matching is started. Thanks to this, pre-matching request filters have the possibility to influence which method will be matched. Such a pre-matching request filter example is shown here:
Example 10.3. Pre-matching request filter
...
import javax.ws.rs.container.ContainerRequestContext;
import javax.ws.rs.container.ContainerRequestFilter;
import javax.ws.rs.container.PreMatching;
...
@PreMatching
public class PreMatchingFilter implements ContainerRequestFilter {
@Override
public void filter(ContainerRequestContext requestContext)
throws IOException {
// change all PUT methods to POST
if (requestContext.getMethod().equals("PUT")) {
requestContext.setMethod("POST");
}
}
}
The PreMatchingFilter is a simple pre-matching filter which changes all PUT HTTP
methods to POST. This might be useful when you want to always handle these PUT and POST HTTP methods
with the same Java code. After the PreMatchingFilter has been invoked, the rest
of the request processing will behave as if the POST HTTP method was originally used.
You cannot do this in post-matching filters
(standard filters without @PreMatching annotation)
as the resource method is already matched (selected). An attempt to tweak the original HTTP method in
a post-matching filter would cause an IllegalArgumentException.
As written above, pre-matching filters can fully influence the request matching process, which means
you can even modify request URI in a pre-matching filter by invoking
the setRequestUri(URI) method of ContainerRequestFilter
so that a different resource would be matched.
Like in post-matching filters you can abort a response in pre-matching filters too.
Client filters are similar to container filters. The response can also be aborted
in the ClientRequestFilter which would cause that no request will actually be sent to the server at all.
A new response is passed to the abort method. This response will be used and delivered
as a result of the request invocation. Such a response goes through the client response filters.
This is similar to what happens on the server side. The process is shown in the following example:
Example 10.4. Client request filter
public class CheckRequestFilter implements ClientRequestFilter {
@Override
public void filter(ClientRequestContext requestContext)
throws IOException {
if (requestContext.getHeaders(
).get("Client-Name") == null) {
requestContext.abortWith(
Response.status(Response.Status.BAD_REQUEST)
.entity("Client-Name header must be defined.")
.build());
}
}
}
The CheckRequestFilter validates the outgoing request. It is checked for presence of
a Client-Name header. If the header is not present the request will be aborted
with a made up response with an appropriate code and message in the entity body. This will cause that
the original request will not be effectively sent to the server but the actual invocation
will still end up with a response as if it would be generated by the
server side. If there would be any client response filter it would be executed on this response.
To summarize the workflow, for any client request invoked from the client API the client request filters (ClientRequestFilter) are executed that could manipulate the request. If not aborted, the outcoming request is then physically sent over to the server side and once a response is received back from the server the client response filters (ClientResponseFilter) are executed that might again manipulate the returned response. Finally the response is passed back to the code that invoked the request. If the request was aborted in any client request filter then the client/server communication is skipped and the aborted response is used in the response filters.
Interceptors share a common API for the server and the client side. Whereas filters are primarily intended to manipulate request and response parameters like HTTP headers, URIs and/or HTTP methods, interceptors are intended to manipulate entities, via manipulating entity input/output streams. If you for example need to encode entity body of a client request then you could implement an interceptor to do the work for you.
There are two kinds of interceptors, ReaderInterceptor and WriterInterceptor. Reader interceptors are used to manipulate inbound entity streams. These are the streams coming from the "wire". So, using a reader interceptor you can manipulate request entity stream on the server side (where an entity is read from the client request) and response entity stream on the client side (where an entity is read from the server response). Writer interceptors are used for cases where entity is written to the "wire" which on the server means when writing out a response entity and on the client side when writing request entity for a request to be sent out to the server. Writer and reader interceptors are executed before message body readers or writers are executed and their primary intention is to wrap the entity streams that will be used in message body reader and writers.
The following example shows a writer interceptor that enables GZIP compression of the whole entity body.
Example 10.5. GZIP writer interceptor
public class GZIPWriterInterceptor implements WriterInterceptor {
@Override
public void aroundWriteTo(WriterInterceptorContext context)
throws IOException, WebApplicationException {
final OutputStream outputStream = context.getOutputStream();
context.setOutputStream(new GZIPOutputStream(outputStream));
context.proceed();
}
}
The interceptor gets a output stream from the WriterInterceptorContext and sets
a new one which is a GZIP wrapper of the original output stream. After all interceptors are executed the
output stream lastly set to the WriterInterceptorContext will be used for serialization of the entity. In the
example above the entity bytes will be written to the GZIPOutputStream which will compress the stream data
and write them to the original output stream. The original stream is always the stream which writes the data to
the "wire". When the interceptor is used on the server, the original output stream is the stream into which writes
data to the underlying server container stream that sends the response to the client.
The interceptors wrap the streams and they itself work as wrappers. This means that each interceptor is a wrapper
of another interceptor and it is responsibility of each interceptor implementation to call the wrapped interceptor.
This is achieved by calling the proceed() method on the WriterInterceptorContext.
This method will call the next registered interceptor in the chain, so effectivelly this will call all remaining registered interceptors. Calling proceed() from the last
interceptor in the chain will call the appropriate message body reader. Therefore every interceptor must call the
proceed() method otherwise the entity would not be written. The wrapping principle is reflected
also in the method name, aroundWriteTo, which says that the method is wrapping the writing of the entity.
The method aroundWriteTo() gets WriterInterceptorContext as a parameter. This context contains getters
and setters for header parameters, request properties, entity, entity stream and other properties. These are the
properties which will be passed to the final MessageBodyWriter<T>. Interceptors are allowed to modify
all these properties. This could influence writing of an entity by MessageBodyWriter<T> and even
selection of such a writer. By changing media type (WriterInterceptorContext.setMediaType())
the interceptor can cause that different message body writer will be chosen. The interceptor can also
completely replace the entity if it is needed. However, for modification of headers, request
properties and such, the filters are usually more preferable choice. Interceptors are executed
only when there is any entity and when the entity is to be written. So, when you always want to add a new
header to a response no matter what, use filters as interceptors might not be executed when no entity is
present. Interceptors should modify properties only for entity serialization
and deserialization purposes.
Let's now look at an example of a ReaderInterceptor
Example 10.6. GZIP reader interceptor
public class GZIPReaderInterceptor implements ReaderInterceptor {
@Override
public Object aroundReadFrom(ReaderInterceptorContext context)
throws IOException, WebApplicationException {
final InputStream originalInputStream = context.getInputStream();
context.setInputStream(new GZIPInputStream(originalInputStream));
return context.proceed();
}
}
The GZIPReaderInterceptor wraps the original input stream with the
GZIPInputStream. All further reads from the entity stream will cause that data will be decompressed
by this stream. The interceptor method aroundReadFrom() must return an entity. The entity
is returned from the proceed method of the ReaderInterceptorContext. The
proceed method internally calls the wrapped interceptor which must also return an entity.
The proceed method invoked from the last interceptor in the chain calls message body reader which deserializes
the entity end returns it. Every interceptor can change this entity if there is a need but in the most cases
interceptors will just return the entity as returned from the proceed method.
As already mentioned above, interceptors should be primarily used to manipulate entity body.
Similar to methods exposed by WriterInterceptorContext the ReaderInterceptorContext
introduces a set of methods for modification of request/response properties like HTTP headers,
URIs and/or HTTP methods (excluding getters and setters for entity as entity has not been read yet).
Again the same rules as for WriterInterceptor applies for changing these properties (change only
properties in order to influence reading of an entity).
Let's look closer at the context of execution of filters and interceptors. The following steps describes scenario where a JAX-RS client makes a POST request to the server. The server receives an entity and sends a response back with the same entity. GZIP reader and writer interceptors are registered on the client and the server. Also filters are registered on client and server which change the headers of request and response.
- Client request invoked: The POST request with attached entity is built on the client and invoked.
- ClientRequestFilters: client request filters are executed on the client and they manipulate the request headers.
- Client
WriterInterceptor: As the request contains an entity, writer interceptor registered on the client is executed before a MessageBodyWriter is executed. It wraps the entity output stream with the GZipOutputStream. - Client MessageBodyWriter: message body writer is executed on the client which serializes the entity into the new GZipOutput stream. This stream zips the data and sends it to the "wire".
- Server: server receives a request. Data of entity is compressed which means that pure read from the entity input stream would return compressed data.
- Server pre-matching ContainerRequestFilters: ContainerRequestFilters are executed that can manipulate resource method matching process.
- Server: matching: resource method matching is done.
- Server: post-matching ContainerRequestFilters: ContainerRequestFilters post matching filters are executed. This include execution of all global filters (without name binding) and filters name-bound to the matched method.
- Server
ReaderInterceptor: reader interceptors are executed on the server. The GZIPReaderInterceptor wraps the input stream (the stream from the "wire") into the GZipInputStream and set it to context. - Server MessageBodyReader: server message body reader is executed and it deserializes the entity from new GZipInputStream (get from the context). This means the reader will read unzipped data and not the compressed data from the "wire".
- Server resource method is executed: the deserialized entity object is passed to the matched resource method as a parameter. The method returns this entity as a response entity.
- Server ContainerResponseFilters are executed: response filters are executed on the server and they manipulate the response headers. This include all global bound filters (without name binding) and all filters name-bound to the resource method.
- Server
WriterInterceptor: is executed on the server. It wraps the original output stream with a new GZIPOuptutStream. The original stream is the stream that "goes to the wire" (output stream for response from the underlying server container). - Server MessageBodyWriter: message body writer is executed on the server which serializes the entity into the GZIPOutputStream. This stream compresses the data and writes it to the original stream which sends this compressed data back to the client.
- Client receives the response: the response contains compressed entity data.
- Client ClientResponseFilters: client response filters are executed and they manipulate the response headers.
- Client response is returned: the javax.ws.rs.core.Response is returned from the request invocation.
- Client code calls response.readEntity(): read entity is executed on the client to extract the entity from the response.
- Client
ReaderInterceptor: the client reader interceptor is executed when readEntity(Class) is called. The interceptor wraps the entity input stream with GZIPInputStream. This will decompress the data from the original input stream. - Client MessageBodyReaders: client message body reader is invoked which reads decompressed data from GZIPInputStream and deserializes the entity.
- Client: The entity is returned from the readEntity().
It is worth to mention that in the scenario above the reader and writer interceptors are invoked only if the entity is present (it does not make sense to wrap entity stream when no entity will be written). The same behaviour is there for message body readers and writers. As mentioned above, interceptors are executed before the message body reader/writer as a part of their execution and they can wrap the input/output stream before the entity is read/written. There are exceptions when interceptors are not run before message body reader/writers but this is not the case of simple scenario above. This happens for example when the entity is read many times from client response using internal buffering. Then the data are intercepted only once and kept 'decoded' in the buffer.
Filters and interceptors can be name-bound. Name binding is a concept that allows to say to a JAX-RS runtime that a specific filter or interceptor will be executed only for a specific resource method. When a filter or an interceptor is limited only to a specific resource method we say that it is name-bound. Filters and interceptors that do not have such a limitation are called global.
Filter or interceptor can be assigned to a resource method using the @NameBinding annotation. The annotation is used as meta annotation for other user implemented annotations that are applied to a providers and resource methods. See the following example:
Example 10.7. @NameBinding example
...
import java.lang.annotation.Retention;
import java.lang.annotation.RetentionPolicy;
import java.util.zip.GZIPInputStream;
import javax.ws.rs.GET;
import javax.ws.rs.NameBinding;
import javax.ws.rs.Path;
import javax.ws.rs.Produces;
...
// @Compress annotation is the name binding annotation
@NameBinding
@Retention(RetentionPolicy.RUNTIME)
public @interface Compress {}
@Path("helloworld")
public class HelloWorldResource {
@GET
@Produces("text/plain")
public String getHello() {
return "Hello World!";
}
@GET
@Path("too-much-data")
@Compress
public String getVeryLongString() {
String str = ... // very long string
return str;
}
}
// interceptor will be executed only when resource methods
// annotated with @Compress annotation will be executed
@Compress
public class GZIPWriterInterceptor implements WriterInterceptor {
@Override
public void aroundWriteTo(WriterInterceptorContext context)
throws IOException, WebApplicationException {
final OutputStream outputStream = context.getOutputStream();
context.setOutputStream(new GZIPOutputStream(outputStream));
context.proceed();
}
}
The example above defines a new @Compress annotation which is a name binding annotation as
it is annotated with @NameBinding. The @Compress is applied on the
resource method getVeryLongString() and on the interceptor
GZIPWriterInterceptor. The interceptor will be executed only if any resource method
with such a annotation will be executed. In our example case the interceptor will be executed only for
the getVeryLongString() method. The interceptor will not be executed for method
getHello(). In this example the reason is probably clear. We would like to compress
only long data and we do not need to compress the short response of "Hello World!".
Name binding can be applied on a resource class. In the example HelloWorldResource
would be annotated with @Compress. This would mean that all resource
methods will use compression in this case.
There might be many name binding annotations defined in an application. When any provider (filter
or interceptor) is annotated with more than one name binding annotation, then it will be executed for
resource methods which contain ALL these annotations. So, for example if our interceptor would be
annotated with another name binding annotation @GZIP then the resource method would need to have both annotations attached,
@Compress and @GZIP, otherwise the interceptor would not be executed. Based on the previous paragraph we can
even use the combination when the
resource method getVeryLongString() would be annotated with @Compress and resource class
HelloWorldResource would be annotated from with @GZIP. This would also trigger the interceptor as
annotations of resource methods are aggregated from resource method and from resource class. But this is probably
just an edge case which will not be used so often.
Note that global filters are executed always, so even for resource methods which have any name binding annotations.
Dynamic binding is a way how to assign filters and interceptors to the resource methods in a dynamic manner. Name binding from the previous chapter uses a static approach and changes to binding require source code change and recompilation. With dynamic binding you can implement code which defines bindings during the application initialization time. The following example shows how to implement dynamic binding.
Example 10.8. Dynamic binding example
...
import javax.ws.rs.core.FeatureContext;
import javax.ws.rs.container.DynamicFeature;
...
@Path("helloworld")
public class HelloWorldResource {
@GET
@Produces("text/plain")
public String getHello() {
return "Hello World!";
}
@GET
@Path("too-much-data")
public String getVeryLongString() {
String str = ... // very long string
return str;
}
}
// This dynamic binding provider registers GZIPWriterInterceptor
// only for HelloWorldResource and methods that contain
// "VeryLongString" in their name. It will be executed during
// application initialization phase.
public class CompressionDynamicBinding implements DynamicFeature {
@Override
public void configure(ResourceInfo resourceInfo, FeatureContext context) {
if (HelloWorldResource.class.equals(resourceInfo.getResourceClass())
&& resourceInfo.getResourceMethod()
.getName().contains("VeryLongString")) {
context.register(GZIPWriterInterceptor.class);
}
}
}
The example contains one HelloWorldResource which is known from the previous name binding example.
The difference is in the getVeryLongString method, which now does not define
the @Compress name binding annotations. The binding is done
using the provider which implements DynamicFeature interface. The interface defines
one configure
method with two arguments, ResourceInfo and FeatureContext.
ResourceInfo contains information about the resource and method to which the binding can be done.
The configure method will be executed once for each resource method that is defined in the application.
In the example above the provider will be executed twice, once for the getHello() method
and once for getVeryLongString() (
once the resourceInfo will contain information about getHello() method and once it will point to
getVeryLongString()). If a dynamic binding provider wants to register any provider for the actual resource method
it will do that using provided FeatureContext which extends
JAX-RS Configurable API. All methods for registration of filter or interceptor classes or instances can be used.
Such dynamically registered filters or interceptors will be bound only to the actual resource method. In the example above the
GZIPWriterInterceptor will be bound only to the method getVeryLongString()
which will cause that data will be compressed only for this method and not for the method
getHello(). The code of GZIPWriterInterceptor is in the examples above.
Note that filters and interceptors registered using dynamic binding are only additional filters run for the resource method. If there are any name bound providers or global providers they will still be executed.
In case you register more filters and interceptors you might want to define an exact order in which
they should be invoked. The order can be controlled by the @Priority annotation defined
by the javax.annotation.Priority class. The annotation accepts an integer parameter of priority.
Providers used in request processing (ContainerRequestFilter,
ClientRequestFilter) as well as entity interceptors (ReaderInterceptor,
WriterInterceptor) are sorted based on the priority in an ascending manner. So, a request filter with
priority defined with @Priority(1000)
will be executed before another request filter with priority defined as @Priority(2000). Providers
used during response processing (ContainerResponseFilter,
ClientResponseFilter) are executed
in the reverse order (using descending manner), so a provider with the priority defined with
@Priority(2000) will be executed before another provider with
priority defined with @Priority(1000).
It's a good practice to assign a priority to filters and interceptors. Use Priorities class which
defines standardized priorities in JAX-RS for different usages, rather than inventing your
own priorities. So, when you for example write an authentication filter you would assign a priority 1000 which
is the value of Priorities.AUTHENTICATION. The following example
shows the filter from the beginning
of this chapter with a priority assigned.
Example 10.9. Priorities example
...
import javax.annotation.Priority;
import javax.ws.rs.Priorities;
...
@Priority(Priorities.HEADER_DECORATOR)
public class ResponseFilter implements ContainerResponseFilter {
@Override
public void filter(ContainerRequestContext requestContext,
ContainerResponseContext responseContext)
throws IOException {
responseContext.getHeaders().add("X-Powered-By", "Jersey :-)");
}
}
As this is a response filter and response filters are executed in the reverse order,
any other filter with priority lower than 3000 (Priorities.HEADER_DECORATOR is 3000) will be executed after
this filter. So, for example AUTHENTICATION filter (priority 1000) would be run after this filter.
Table of Contents
This chapter describes the usage of asynchronous API on the client and server side. The term async will be sometimes used interchangeably with the term asynchronous in this chapter.
Request processing on the server works by default in a synchronous processing mode, which means that a client connection of a request is processed in a single I/O container thread. Once the thread processing the request returns to the I/O container, the container can safely assume that the request processing is finished and that the client connection can be safely released including all the resources associated with the connection. This model is typically sufficient for processing of requests for which the processing resource method execution takes a relatively short time. However, in cases where a resource method execution is known to take a long time to compute the result, server-side asynchronous processing model should be used. In this model, the association between a request processing thread and client connection is broken. I/O container that handles incoming request may no longer assume that a client connection can be safely closed when a request processing thread returns. Instead a facility for explicitly suspending, resuming and closing client connections needs to be exposed. Note that the use of server-side asynchronous processing model will not improve the request processing time perceived by the client. It will however increase the throughput of the server, by releasing the initial request processing thread back to the I/O container while the request may still be waiting in a queue for processing or the processing may still be running on another dedicated thread. The released I/O container thread can be used to accept and process new incoming request connections.
The following example shows a simple asynchronous resource method defined using the new JAX-RS async API:
Example 11.1. Simple async resource
@Path("/resource")
public class AsyncResource {
@GET
public void asyncGet(@Suspended final AsyncResponse asyncResponse) {
new Thread(new Runnable() {
@Override
public void run() {
String result = veryExpensiveOperation();
asyncResponse.resume(result);
}
private String veryExpensiveOperation() {
// ... very expensive operation
}
}).start();
}
}
In the example above, a resource AsyncResource
with one GET method asyncGet is defined. The asyncGet method
injects a JAX-RS AsyncResponse instance using a JAX-RS @Suspended annotation.
Please note that AsyncResponse must be injected by the @Suspended
annotation and not by @Context as @Suspended does not only inject response but also
says that the method is executed in the asynchronous mode. By the AsyncResponse parameter into
a resource method we tell the Jersey runtime that the method is supposed to be invoked using the asynchronous
processing mode, that is the client connection should not be automatically closed by the underlying I/O container
when the method returns. Instead, the injected AsyncResponse instance (that represents the
suspended client request connection) will be used to explicitly send the response back to the client using some other
thread. In other words, Jersey runtime knows that when the asyncGet method completes, the response
to the client may not be ready yet and the processing must be suspended and wait to be explictly resumed with a
response once it becomes available. Note that the method asyncGet returns void
in our example. This is perfectly valid in case of an asynchronous JAX-RS resource method, even for a @GET
method, as the response is never returned directly from the resource method as its return value. Instead, the response
is later returned using AsyncResponse instance as it is demonstrated in the example. The
asyncGet resource method starts a new thread and exits from the method. In that state the
request processing is suspended and the container thread (the one which entered the resource method) is returned back
to the container's thread pool and it can process other requests. New thread started in the resource method may
execute an expensive operation which might take a long time to finish. Once a result is ready it is resumed using
the resume() method on the AsyncResponse instance.
The resumed response is then processed in the new thread by Jersey in a same way as any other synchronous response,
including execution of filters and interceptors, use of exception mappers as necessary and sending the response
back to the client.
It is important to note that the asynchronous response (asyncResponse in the example)
does not need to be resumed from the thread started from the resource method. The asynchronous
response can be resumed even from different request processing thread as it is shown in the
the example of the AsyncResponse javadoc. In the javadoc example the
async response suspended from the GET method is resumed later on from
the POST method. The suspended async response is passed between requests using
a static field and is resumed from the other resource method running on a different request processing thread.
Imagine now a situation when there is a long delay between two requests and you would not like to let the client wait for the response "forever" or at least for an unacceptable long time. In asynchronous processing model, occurrences of such situations should be carefully considered with client connections not being automatically closed when the processing method returns and the response needs to be resumed explicitly based on an event that may actually even never happen. To tackle these situations asynchronous timeouts can be used.
The following example shows the usage of timeouts:
Example 11.2. Simple async method with timeout
@GET
public void asyncGetWithTimeout(@Suspended final AsyncResponse asyncResponse) {
asyncResponse.setTimeoutHandler(new TimeoutHandler() {
@Override
public void handleTimeout(AsyncResponse asyncResponse) {
asyncResponse.resume(Response.status(Response.Status.SERVICE_UNAVAILABLE)
.entity("Operation time out.").build());
}
});
asyncResponse.setTimeout(20, TimeUnit.SECONDS);
new Thread(new Runnable() {
@Override
public void run() {
String result = veryExpensiveOperation();
asyncResponse.resume(result);
}
private String veryExpensiveOperation() {
// ... very expensive operation that typically finishes within 20 seconds
}
}).start();
}
By default, there is no timeout defined on the suspended AsyncResponse instance.
A custom timeout and timeout event handler may be defined using setTimeoutHandler(TimeoutHandler)
and setTimeout(long, TimeUnit) methods. The setTimeoutHandler(TimeoutHandler)
method defines the handler that will be invoked when timeout is reached. The handler resumes the response with the
response code 503 (from Response.Status.SERVICE_UNAVAILABLE).
A timeout interval can be also defined without specifying a custom timeout handler (using just the
setTimeout(long, TimeUnit) method).
In such case the default behaviour of Jersey runtime is to throw a ServiceUnavailableException
that gets mapped into 503, "Service Unavailable" HTTP error response, as defined by the JAX-RS specification.
As operations in asynchronous cases might take long time and they are not always finished within a single resource method invocation, JAX-RS offers facility to register callbacks to be invoked based on suspended async response state changes. In Jersey you can register two JAX-RS callbacks:
- CompletionCallback that is executed when request finishes or fails, and
- ConnectionCallback executed when a connection to a client is closed or lost.
Example 11.3. CompletionCallback example
@Path("/resource")
public class AsyncResource {
private static int numberOfSuccessResponses = 0;
private static int numberOfFailures = 0;
private static Throwable lastException = null;
@GET
public void asyncGetWithTimeout(@Suspended final AsyncResponse asyncResponse) {
asyncResponse.register(new CompletionCallback() {
@Override
public void onComplete(Throwable throwable) {
if (throwable == null) {
// no throwable - the processing ended successfully
// (response already written to the client)
numberOfSuccessResponses++;
} else {
numberOfFailures++;
lastException = throwable;
}
}
});
new Thread(new Runnable() {
@Override
public void run() {
String result = veryExpensiveOperation();
asyncResponse.resume(result);
}
private String veryExpensiveOperation() {
// ... very expensive operation
}
}).start();
}
}
A completion callback is registered using register(...) method
on the AsyncResponse instance. A registered completion callback is bound only
to the response(s) to which it has been registered. In the example the CompletionCallback
is used to calculate successfully processed responses, failures and to store last exception. This is only a
simple case demonstrating the usage of the callback. You can use completion callback to release the resources,
change state of internal resources or representations or handle failures. The method has an argument
Throwable which is set only in case of an error. Otherwise the parameter
will be null, which means that the response was successfully written. The callback is executed
only after the response is written to the client (not immediately after the response is resumed).
The AsyncResponse register(...) method is overloaded and offers options
to register a single callback as an Object (in the example), as a Class or
multiple callbacks using varags.
As some async requests may take long time to process the client may decide to terminate it's connection to the
server before the response has been resumed or before it has been fully written to the client. To deal with these
use cases a ConnectionCallback can be used. This callback will be executed only if the
connection was prematurely terminated or lost while the response is being written to the back client. Note that
this callback will not be invoked when a response is written successfully and the client connection is closed
as expected. See javadoc of ConnectionCallback for more information.
Jersey offers a facility for sending response to the client in multiple more-or-less independent chunks using a chunked output. Each response chunk usually takes some (longer) time to prepare before sending it to the client. The most important fact about response chunks is that you want to send them to the client immediately as they become available without waiting for the remaining chunks to become available too. The first bytes of each chunked response consists of the HTTP headers that are sent to the client. As noted above, the entity of the response is then sent in chunks as they become available. Client knows that the response is going to be chunked, so it reads each chunk of the response separately, processes it, and waits for more chunks to arrive on the same connection. After some time, the server generates another response chunk and send it again to the client. Server keeps on sending response chunks until it closes the connection after sending the last chunk when the response processing is finished.
In Jersey you can use ChunkedOutput to send response to a client in chunks. Chunks are strictly
defined pieces of a response body can be marshalled as a separate entities using Jersey/JAX-RS
MessageBodyWriter<T> providers. A chunk can be String, Long or JAXB bean serialized to XML or JSON or
any other dacustom type for which a MessageBodyWriter<T> is available.
The resource method
that returns ChunkedOutput informs the Jersey runtime that the response will be chunked
and that the processing works asynchronously as such. You do not need to inject
AsyncResponse to start the asynchronous processing mode in this case.
Returning a ChunkedOutput instance from the method is enough to indicate the asynchronous
processing. Response headers will be sent to a client when the resource method returns and the client will wait
for the stream of chunked data which you will be able to write from different thread using the same
ChunkedOutput instance returned from the resource method earlier. The following example
demonstrates this use case:
Example 11.4. ChunkedOutput example
@Path("/resource")
public class AsyncResource {
@GET
public ChunkedOutput<String> getChunkedResponse() {
final ChunkedOutput<String> output = new ChunkedOutput<String>(String.class);
new Thread() {
public void run() {
try {
String chunk;
while ((chunk = getNextString()) != null) {
output.write(chunk);
}
} catch (IOException e) {
// IOException thrown when writing the
// chunks of response: should be handled
} finally {
output.close();
// simplified: IOException thrown from
// this close() should be handled here...
}
}
}.start();
// the output will be probably returned even before
// a first chunk is written by the new thread
return output;
}
private String getNextString() {
// ... long running operation that returns
// next string or null if no other string is accessible
}
}
The example above defines a GET method that returns a ChunkedOutput instance.
The generic type of ChunkedOutput defines the chunk types (in this case chunks are Strings).
Before the instance is returned a new thread is started that writes individual chunks into
the chunked output instance named output. Once the original
thread returns from the resource method, Jersey runtime writes headers to the container response but does not
close the client connection yet and waits for the response data to be written to the chunked
output.
New thread in a loop calls the method getNextString() which returns a
next String or null if no other String exists (the method could for example load latest data
from the database). Returned Strings are written to the chunked output. Such a written
chunks are internally written to the container response and client can read them. At the end the
chunked output is closed which determines the end of the chunked response. Please note that you must close
the output explicitly in order to close the client connection as Jersey does not implicitly know when
you are finished with writing the chunks.
A chunked output can be processed also from threads created from another request as it is explained in the
sections above. This means that one resource method may e.g. only return a ChunkedOutput
instance and other resource method(s) invoked from another request thread(s) can write data into the chunked
output and/or close the chunked response.
The client API supports asynchronous processing too. Simple usage of asynchronous client API is shown in the following example:
Example 11.5. Simple client async invocation
final AsyncInvoker asyncInvoker = target().path("http://example.com/resource/")
.request().async();
final Future<Response> responseFuture = asyncInvoker.get();
System.out.println("Request is being processed asynchronously.");
final Response response = responseFuture.get();
// get() waits for the response to be ready
System.out.println("Response received.");
The difference against synchronous invocation is that the http method call get()
is not called on SyncInvoker but on AsyncInvoker. The
AsyncInvoker is returned from the call of method
Invocation.Builder.async() as shown above. AsyncInvoker
offers methods similar to SyncInvoker only these methods do not return a response
synchronously. Instead a Future<...> representing response data is returned.
These method calls also return immediately without waiting for the actual request to complete.
In order to get the response of the invoked get() method, the
responseFuture.get() is invoked which waits for the response to be finished
(this call is blocking as defined by the Java SE Future contract).
Asynchronous Client API in JAX-RS is fully integrated in the fluent JAX-RS Client API flow, so that the async client-side invocations can be written fluently just like in the following example:
Example 11.6. Simple client fluent async invocation
final Future<Response> responseFuture = target().path("http://example.com/resource/")
.request().async().get();
To work with asynchronous results on the client-side, all standard Future API facilities
can be used. For example, you can use the isDone() method
to determine whether a response has finished to avoid the use of a blocking call to Future.get().
Similarly to the server side, in the client API you can register asynchronous callbacks too. You can use
these callbacks to be notified when a response arrives instead of waiting for the
response on Future.get() or checking the status by Future.isDone() in
a loop.
A client-side asynchronous invocation callback can be registered as shown in the following example:
Example 11.7. Client async callback
final Future<Response> responseFuture = target().path("http://example.com/resource/")
.request().async().get(new InvocationCallback<Response>() {
@Override
public void completed(Response response) {
System.out.println("Response status code "
+ response.getStatus() + " received.");
}
@Override
public void failed(Throwable throwable) {
System.out.println("Invocation failed.");
throwable.printStackTrace();
}
});
The registered callback is expected to implement the InvocationCallback interface that defines
two methods.
First method completed(Response) gets invoked when an invocation successfully
finishes. The result response is passed as a parameter to the callback method. The second method
failed(Throwable) is invoked in case the invocation fails and the exception describing
the failure is passed to the method as a parameter. In this case since the callback generic type is
Response, the failed(Throwable) method would only invoked in case
the invocation fails because of an internal client-side processing error. It would not be invoked
in case a server responds with an HTTP error code, for example if the requested resource
is not found on the server and HTTP 404 response code is returned. In such case
completed(Response) callback method would be invoked and the response passed to the method
would contain the returned error response with HTTP 404 error code. This is a special
behavior in case the generic callback return type is Response. In the next example an
exception is thrown (or failed(Throwable) method on the invocation callback is invoked)
even in case a non-2xx HTTP error code is returned.
As with the synchronous client API, you can retrieve the response entity as a Java type directly without
requesting a Response first. In case of an InvocationCallback, you need
to set its generic type to the expected response entity type instead of using the Response
type as demonstrated in the example below:
Example 11.8. Client async callback for specific entity
final Future<String> entityFuture = target().path("http://example.com/resource/")
.request().async().get(new InvocationCallback<String>() {
@Override
public void completed(String response) {
System.out.println("Response entity '" + response + "' received.");
}
@Override
public void failed(Throwable throwable) {
System.out.println("Invocation failed.");
throwable.printStackTrace();
}
});
System.out.println(entityFuture.get());
Here, the generic type of the invocation callback information is used to unmarshall the HTTP response content
into a desired Java type.
Important
Please note that in this case the method failed(Throwable throwable) would be invoked even
for cases when a server responds with a non HTTP-2xx HTTP error code. This is because in this
case the user does not have any other means of finding out that the server returned an error response.
In an earlier section the ChunkedOutput was
described. It was shown how to use a chunked output on the server. In order to read chunks on the client the
ChunkedInput can be used to complete the story.
You can, of course, process input on the client as a standard input stream but if you would like to
leverage Jersey infrastructure to provide support of translating message chunk data into Java types
using a ChunkedInput is much more straightforward. See the usage of the
ChunkedInput in the following example:
Example 11.9. ChunkedInput example
final Response response = target().path("http://example.com/resource/")
.request().get();
final ChunkedInput<String> chunkedInput =
response.readEntity(new GenericType<ChunkedInput<String>>() {});
String chunk;
while ((chunk = chunkedInput.read()) != null) {
System.out.println("Next chunk received: " + chunk);
}
The response is retrieved in a standard way from the server. The entity is read as a
ChunkedInput entity. In order to do that the GenericEntity<T> is used to preserve
a generic information at run time. If you would not use GenericEntity<T>, Java language generic type
erasure would cause that the generic information would get lost at compile time and an exception would be thrown
at run time complaining about the missing chunk type definition.
In the next lines in the example, individual chunks are being read from the response. Chunks can come with some
delay, so they will be written to the console as they come from the server. After receiving last chunk the
null will be returned from the read() method. This will mean that the server has sent
the last chunk and closed the connection. Note that the read() is a blocking operation and the
invoking thread is blocked until a new chunk comes.
Writing chunks with ChunkedOutput is simple, you only call method write()
which writes exactly one chunk to the output. With the input reading it is slightly more complicated. The
ChunkedInput does not know how to distinguish chunks in the byte stream unless being told by
the developer. In order to define custom chunks boundaries,
the ChunkedInput offers possibility to register a ChunkParser which
reads chunks from the input stream and separates them. Jersey provides several chunk parser implementation and
you can implement your own parser to separate your chunks if you need. In our example above the default parser
provided by Jersey is used that separates chunks based on presence of a \r\n delimiting
character sequence.
Each incoming input stream is firstly parsed by the ChunkParser, then each chunk is processed
by the proper MessageBodyReader<T>.
You can define the media type of chunks to aid the selection of a proper MessageBodyReader<T> in
order to read chunks correctly into the requested entity types (in our case into Strings).
Table of Contents
A very important aspect of REST is hyperlinks, URIs, in representations that clients can use to transition the Web service to new application states (this is otherwise known as "hypermedia as the engine of application state"). HTML forms present a good example of this in practice.
Building URIs and building them safely is not easy with URI, which is why JAX-RS has the
UriBuilder class that makes it simple and easy to build URIs safely.
UriBuilder can be used to build new URIs or build from existing URIs. For resource
classes it is more than likely that URIs will be built from the base URI the web service is deployed at
or from the request URI. The class UriInfo provides such information (in addition to further
information, see next section).
The following example shows URI building with UriInfo and UriBuilder
from the bookmark example:
Example 12.1. URI building
@Path("/users/")
public class UsersResource {
@Context
UriInfo uriInfo;
...
@GET
@Produces("application/json")
public JSONArray getUsersAsJsonArray() {
JSONArray uriArray = new JSONArray();
for (UserEntity userEntity : getUsers()) {
UriBuilder ub = uriInfo.getAbsolutePathBuilder();
URI userUri = ub.
path(userEntity.getUserId()).
build();
uriArray.put(userUri.toASCIIString());
}
return uriArray;
}
}
UriInfo is obtained using the @Context annotation, and in this particular example injection onto
the field of the root resource class is performed, previous examples showed the use of @Context on resource method
parameters.
UriInfo can be used to obtain URIs and associated UriBuilder instances for
the following URIs: the base URI the application is deployed at; the request URI; and the absolute path URI, which
is the request URI minus any query components.
The getUsersAsJsonArray method constructs a JSONArrray, where each element
is a URI identifying a specific user resource. The URI is built from the absolute path of the request URI by
calling
UriInfo.getAbsolutePathBuilder().
A new path segment is added, which is the user ID, and then the URI is built. Notice that it is not necessary to
worry about the inclusion of '/' characters or that the user ID may contain characters that need
to be percent encoded. UriBuilder takes care of such details.
UriBuilder can be used to build/replace query or matrix parameters. URI templates can also be
declared, for example the following will build the URI "http://localhost/segment?name=value":
Example 12.2. Building URIs using query parameters
UriBuilder.fromUri("http://localhost/")
.path("{a}")
.queryParam("name", "{value}")
.build("segment", "value");
JAX-RS 2.0 introduced additional URI resolution and relativization methods in the UriBuilder:
Resolve and relativize methods in UriInfo are essentially counterparts to the methods listed above - UriInfo.resolve(java.net.URI) resolves given relative URI to an absolute URI using application context URI as the base URI; UriInfo.relativize(java.net.URI) then transforms an absolute URI to a relative one, using again the applications context URI as the base URI.
UriBuilder also introduces a set of methods that provide ways of resolving URI templates by replacing
individual templates with a provided value(s). A short example:
final URI uri = UriBuilder.fromUri("http://{host}/{path}?q={param}")
.resolveTemplate("host", "localhost")
.resolveTemplate("path", "myApp")
.resolveTemplate("param", "value").build();
uri.toString(); // returns "http://localhost/myApp?q=value"See the UriBuilder javadoc for more details.
JAX-RS 2.0 introduces Link class, which serves as a representation of Web Link defined in
RFC 5988.
The JAX-RS Link class adds API support for providing additional metadata in HTTP messages,
for example, if you are consuming a REST interface of a public library, you might have a resource returning
description of a single book. Then you can include links to related resources, such as a book category,
author, etc. to make the produced response concise but complete at the same time. Clients are then able to
query all the additional information they are interested in and are not forced to consume details they are
not interested in. At the same time, this approach relieves the server resources as only the information that
is truly requested is being served to the clients.
A Link can be serialized to an HTTP message (tyically a response) as additional HTTP header
(there might be multiple Link headers provided, thus multiple links can be served in a single
message). Such HTTP header may look like:
Link: <http://example.com/TheBook/chapter2>; rel="prev"; title="previous chapter"
Producing and consuming Links with JAX-RS API is demonstrated in the following example:
// server side - adding links to a response:
Response r = Response.ok().
link("http://oracle.com", "parent").
link(new URI("http://jersey.java.net"), "framework").
build();
...
// client-side processing:
final Response response = target.request().get();
URI u = response.getLink("parent").getUri();
URI u = response.getLink("framework").getUri();
Instances of Link can be also created directly by invoking one of the factory methods on the
Link API that returns a Link.Builder that can be used to configure and produce new
links.
Table of Contents
RESTful APIs must be hypertext-driven. JAX-RS currently offers UriBuilder to simplify URI creation but Jersey adds an additional annotation-based alternative that is described here.
Important
This API is currently under development and experimental so it is subject to change at any time.
To use Declarative Linking you need to add jersey-declarative-linking module to your pom.xml file:
<dependency>
<groupId>org.glassfish.jersey.ext</groupId>
<artifactId>jersey-declarative-linking</artifactId>
<version>2.29.1</version>
</dependency>Additionally you will need to add the following dependencies, if you are not deploying into a container that is already including them:
<dependency>
<groupId>javax.el</groupId>
<artifactId>javax.el-api</artifactId>
<version>3.0.3</version>
</dependency>
<dependency>
<groupId>org.glassfish.web</groupId>
<artifactId>javax.el</artifactId>
<version>3.0.2</version>
</dependency>If you're not using Maven make sure to have all needed dependencies (see jersey-declarative-linking) on the classpath.
Links are added to representations using the @InjectLink annotation on
entity class fields. The Jersey runtime is responsible for injecting the appropriate URI
into the field prior to serialization by a message body writer. E.g. consider the
following resource and entity classes:
@Path("widgets")
public class WidgetsResource {
@GET
public Widgets get() {
return new Widgets();
}
}
public class Widgets {
@InjectLink(resource=WidgetsResource.class)
URI u;
}
After a call toWidgetsResource#get, the Jersey runtime will inject the value
"/context/widgets"
[1]
into the returned Widgets instance. If an absolute URI is
desired instead of an absolute path then the annotation can be changed to
@InjectLink(resource=WidgetsResource.class, style=ABSOLUTE).
The above usage works nicely when there's already a URI template on a class that you
want to reuse. If there's no such template available then you can use a literal value
instead of a reference. E.g. the following is equivalent to the earlier example:
@InjectLink(value="widgets", style=ABSOLUTE).
You can inject multiple links into an array or a List collection type. E.g.:
@InjectLinks({@InjectLink(resource=WidgetsResource.class, rel = "self")})
List<Link> linksThe field doesn't need to be initialized. However, if it already contains a collection with manually created links, then it will merge those with the generated links into a new collection which then replaces the field value.
As an alternative to defining the links in the entity class, they can also be defined in the resource classes by
annotating the resource methods with @ProvideLink. This has the benefit, that the target
method is already known and doesn't need to be referenced. Other than that it has the same parameters and behaviors
as @InjectLink. The entity classes need to have a field annotated with
@InjectLinks, which can be empty.
The @ProvideLink annotation can be repeated to add links to different entities using different
options. Entities are defined via the value property. If the entities are similar in structure they
can also declared as an array. @ProvideLink also works with class hierarchies, e.g., contributions
defined for a superclass will also be injected into the derived classes (interfaces are not supported).
@ProvideLink(value = Order.class,rel = "self",
bindings = @Binding(name = "orderId", value = "${instance.id}"))
@ProvideLink(value = PaymentConfirmation.class, rel = "order",
bindings = @Binding(name = "orderId", value = "${instance.orderId}"))
@GET
@Path("/{orderId}")
public Response get(@PathParam("orderId") String orderId)
Referenced or literal templates may contain parameters. Two forms of parameters are supported:
URI template parameters, e.g.
widgets/{id}where{id}represents a variable part of the URI.EL expressions, e.g.
widgets/${instance.id}where${instance.id}is an EL expression.
Parameter values can be extracted from three implicit beans:
-
instance Represents the instance of the class that contains the annotated field.
-
entity Represents the entity class instance returned by the resource method.
-
resource Represents the resource class instance that returned the entity.
By default URI template parameter values are extracted from the implicit instance bean,
i.e. the following two annotations are equivalent:
@InjectLink("widgets/{id}")
@InjectLink("widgets/${instance.id}")
The source for URI template parameter values can be changed using the @Binding
annotation, E.g. the following three annotations are equivalent:
@InjectLink(value="widgets/{id}", bindings={
@Binding(name="id" value="${resource.id}"}
)
@InjectLink(value="widgets/{value}", bindings={
@Binding("${resource.id}")})
@InjectLink("widgets/${resource.id}")
Link value injection can be made conditional by use of the condition property.
The value of this property is a boolean EL expression and a link will only be injected if the condition
expression evaluates to true. E.g.:
@InjectLink(value="widgets/${instance.id}/offers",
condition="${instance.offers}")
URI offers;
In the above, a URI will only be injected into the offers field if the
offers property of the instance is true.
HTTP Link headers can also be added
to responses using annotations. Instead of annotating the fields of an entity class with
@InjectLink, you instead annotate the entity class itself with
@InjectLinks. E.g.:
@InjectLinks(
@InjectLink(value="widgets/${resource.nextId}", rel="next")
)
The above would insert a HTTP Link header into any response whose entity was thus annotated.
The @InjectLink annotation contains properties that map to the parameters
of the HTTP Link header. The above specifies the link relation as next.
All properties of the @InjectLink annotation may be used as described above.
Multiple link headers can be added by use of the @InjectLinks annotation
which can contain multiple @InjectLink annotations.
Resource links via @ProvideLink are currently not supported for link headers.
By default, Jersey will try to recursively find all @InjectionLink annotations in
the members of your object unless this member is annotated with @XmlTransient.
But in some cases, you might want to control which member will be introspected regardless of the
@XmlTransient annotation.
You can prevent Jersey to look into an object by adding @InjectLinkNoFollow to a field.
@InjectLinkNoFollow Context context;
The @ProvideLink annotation can be used as a meta-annotation, i.e., annotating your own annotation.
This enables you to create custom annotations to reuse @ProvideLink configurations instead of
copy pasting them on each method. There is a special marker class ProvideLink.InheritFromAnnotation
that can be used in place of the actual entity class, this indicates that the Class<?> value()
from the custom annotation should be used instead.
Repeated annotations are currently unsupported for this feature. Also the Class<?> value()
method must return a single class and not an array of classes.
Here is an example (getter/setter omitted for brevity) of how a meta annotation can be used.
The example app uses a Page class as a base class for all entities that contain paged data.
public class Page {
private int number;
private int size;
private boolean isPreviousPageAvailable;
private boolean isNextPageAvailable;
@InjectLinks
private List<Link> links;
}
Instead of duplicating the @ProvideLink annotations for the next and previous links on every
method, we create the following @PageLinks annotation.
@ProvideLink(value = ProvideLink.InheritFromAnnotation.class, rel = "next",
bindings = {
@Binding(name = "page", value = "${instance.number + 1}"),
@Binding(name = "size", value = "${instance.size}"),
}, condition = "${instance.nextPageAvailable}")
@ProvideLink(value = ProvideLink.InheritFromAnnotation.class, rel = "prev",
bindings = {
@Binding(name = "page", value = "${instance.number - 1}"),
@Binding(name = "size", value = "${instance.size}"),
}, condition = "${instance.previousPageAvailable}")
@Target({ElementType.METHOD})
@Retention(RetentionPolicy.RUNTIME)
@Documented
public @interface PageLinks {
Class<?> value();
}
The annotation can the then be used on the resource methods with the actual entity class as value.
@PageLinks(OrderPage.class)
@GET
public Response list(@QueryParam("page") @DefaultValue("0") int page,
@QueryParam("size") @DefaultValue("20") int size)
The entity just extends from Page and declares its content. It is necessary to use distinct classes
instead of just a generic page to have a unique target for @ProvideLink, otherwise every method
annotated with @ProvideLink(value=Page.class) would contribute to the entity.
public class OrderPage extends Page {
private List<Order> orders;
}
In order to add the Declarative Linking feature register DeclarativeLinkingFeature
Example 13.1. Creating JAX-RS application with Declarative Linking feature enabled.
// Create JAX-RS application.
final Application application = new ResourceConfig()
.packages("org.glassfish.jersey.examples.linking")
.register(DeclarativeLinkingFeature.class);
Table of Contents
A standard approach of developing JAX-RS application is to implement resource classes annotated with @Path with resource methods annotated with HTTP method annotations like @GET or @POST and implement needed functionality. This approach is described in the chapter JAX-RS Application, Resources and Sub-Resources. Besides this standard JAX-RS approach, Jersey offers an API for constructing resources programmatically.
Imagine a situation where a deployed JAX-RS application consists of many resource classes. These resources implement
standard HTTP methods like @GET, @POST, @DELETE. In some situations it would be useful to add
an @OPTIONS method which would return some kind of meta data about the deployed resource. Ideally, you would
want to expose the functionality as an additional feature and you want to decide at the deploy time whether you want
to add your custom OPTIONS method. However, when custom OPTIONS method are not
enabled you would like to be OPTIONS requests handled in the standard way by JAX-RS runtime. To
achieve this you would need to modify the code to add or remove custom OPTIONS methods before
deployment. Another way would be to use programmatic API to build resource according to your needs.
Another use case of programmatic resource builder API is when you build any generic RESTful interface which depends on lot of configuration parameters or for example database structure. Your resource classes would need to have different methods, different structure for every new application deploy. You could use more solutions including approaches where your resource classes would be built using Java byte code manipulation. However, this is exactly the case when you can solve the problem cleanly with the programmatic resource builder API. Let's have a closer look at how the API can be utilized.
Jersey Programmatic API was designed to fully support JAX-RS resource model. In other words, every resource that can be designed using standard JAX-RS approach via annotated resource classes can be also modelled using Jersey programmatic API. Let's try to build simple hello world resource using standard approach first and then using the Jersey programmatic resource builder API.
The following example shows standard JAX-RS "Hello world!" resource class.
Example 14.1. A standard resource class
@Path("helloworld")
public class HelloWorldResource {
@GET
@Produces("text/plain")
public String getHello() {
return "Hello World!";
}
}
This is just a simple resource class with one GET method returning "Hello World!" string that will be serialized
as text/plain media type.
Now we will design this simple resource using programmatic API.
Example 14.2. A programmatic resource
package org.glassfish.jersey.examples.helloworld;
import javax.ws.rs.container.ContainerRequestContext;
import javax.ws.rs.core.Application;
import javax.ws.rs.core.Response;
import org.glassfish.jersey.process.Inflector;
import org.glassfish.jersey.server.ResourceConfig;
import org.glassfish.jersey.server.model.Resource;
import org.glassfish.jersey.server.model.ResourceMethod;
public static class MyResourceConfig extends ResourceConfig {
public MyResourceConfig() {
final Resource.Builder resourceBuilder = Resource.builder();
resourceBuilder.path("helloworld");
final ResourceMethod.Builder methodBuilder = resourceBuilder.addMethod("GET");
methodBuilder.produces(MediaType.TEXT_PLAIN_TYPE)
.handledBy(new Inflector<ContainerRequestContext, String>() {
@Override
public String apply(ContainerRequestContext containerRequestContext) {
return "Hello World!";
}
});
final Resource resource = resourceBuilder.build();
registerResources(resource);
}
}
First, focus on the content of the MyResourceConfig constructor in the example.
The Jersey programmatic resource model is constructed from Resources that contain
ResourceMethods. In the example, a single resource would be constructed from a
Resource containing one GET resource method that returns "Hello World!".
The main entry point for building programmatic resources in Jersey is the
Resource.Builder class. Resource.Builder contains just
a few methods like the path method used in the example, which sets the name of the path. Another
useful method is a addMethod(String path) which adds a new method to the resource builder and
returns a resource method builder for the new method. Resource method builder contains methods which
set consumed and produced media type, define name bindings, timeout for asynchronous executions, etc. It is always
necessary to define a resource method handler (i.e. the code of the resource method that will return "Hello World!").
There are more options how a resource method can be handled. In the example the implementation of
Inflector is used. The Jersey Inflector interface defines a simple contract for
transformation of a request into a response. An inflector can either return a Response or directly
an entity object, the way it is shown in the example. Another option is to setup a Java method handler using
handledBy(Class<?> handlerClass, Method method) and pass it the chosen
java.lang.reflect.Method instance together with the enclosing class.
A resource method model construction can be explicitly completed by invoking build() on the
resource method builder. It is however not necessary to do so as the new resource method model will be built
automatically once the parent resource is built. Once a resource model is built, it is registered
into the resource config at the last line of the MyResourceConfig constructor in the example.
Let's now look at how a programmatic resources are deployed.
The easiest way to setup your application as well as register any programmatic resources in Jersey
is to use a Jersey ResourceConfig utility class, an extension of Application
class.
If you deploy your Jersey application into a Servlet container you will need to provide a Application
subclass that will be used for configuration. You may use a web.xml where you would define a
org.glassfish.jersey.servlet.ServletContainer Servlet entry there and specify initial parameter
javax.ws.rs.Application with the class name of your JAX-RS Application that you
wish to deploy. In the example above, this application will be MyResourceConfig class. This is
the reason why MyResourceConfig extends the ResourceConfig (which, if you
remember extends the javax.ws.rs.Application).
The following example shows a fragment of web.xml that can be used to deploy the
ResourceConfig JAX-RS application.
Example 14.3. A programmatic resource
...
<servlet>
<servlet-name>org.glassfish.jersey.examples.helloworld.MyApplication</servlet-name>
<servlet-class>org.glassfish.jersey.servlet.ServletContainer</servlet-class>
<init-param>
<param-name>javax.ws.rs.Application</param-name>
<param-value>org.glassfish.jersey.examples.helloworld.MyResourceConfig</param-value>
</init-param>
<load-on-startup>1</load-on-startup>
</servlet>
<servlet-mapping>
<servlet-name>org.glassfish.jersey.examples.helloworld.MyApplication</servlet-name>
<url-pattern>/*</url-pattern>
</servlet-mapping>
...
If you use another deployment options and you have accessible instance of ResourceConfig which you use
for configuration, you can register programmatic resources directly by registerResources()
method called on the ResourceConfig. Please note that the method registerResources() replaces all the previously
registered resources.
Because Jersey programmatic API is not a standard JAX-RS feature the ResourceConfig must be
used to register programmatic resources as shown above. See deployment chapter
for more information.
Example 14.4. A programmatic resource
final Resource.Builder resourceBuilder = Resource.builder(HelloWorldResource.class);
resourceBuilder.addMethod("OPTIONS")
.handledBy(new Inflector<ContainerRequestContext, Response>() {
@Override
public Response apply(ContainerRequestContext containerRequestContext) {
return Response.ok("This is a response to an OPTIONS method.").build();
}
});
final Resource resource = resourceBuilder.build();
In the example above the Resource is built from
a HelloWorldResource resource class. The resource model built this way
contains a GET method producing 'text/plain' responses with "Hello World!" entity.
This is quite important as it allows you to whatever Resource objects based on introspecting
existing JAX-RS resources and use builder API to enhance such these standard resources.
In the example we used already implemented HelloWorldResource resource class
and enhanced it by OPTIONS method. The OPTIONS method is handled by an Inflector which
returns Response.
The following sample shows how to define sub-resource methods (methods that contains sub-path).
Example 14.5. A programmatic resource
final Resource.Builder resourceBuilder = Resource.builder("helloworld");
final Resource.Builder childResource = resourceBuilder.addChildResource("subresource");
childResource.addMethod("GET").handledBy(new GetInflector());
final Resource resource = resourceBuilder.build();
Sub-resource methods are defined using so called child resource models. Child
resource models (or child resources) are programmatic resources build in the same way as any other
programmatic resource but they are registered as a child resource of a parent resource. The child resource
in the example is build directly from the parent builder using method
addChildResource(String path).
However, there is also an option to build a child resource model separately as a standard resource and then
add it as a child resource to a selected parent resource. This means that child resource objects
can be reused to define child resources in different parent resources (you just build a single child resource
and then register it in multiple parent resources). Each child resource groups methods with the same sub-resource
path. Note that a child resource cannot have any child resources as there is nothing like sub-sub-resource
method concept in JAX-RS. For example if a sub resource method contains more path segments in its path
(e.g. "/root/sub/resource/method" where "root" is a path of the resource and "sub/resource/method" is the sub
resource method path) then parent resource will have path "root" and child resource will have path
"sub/resource/method" (so, there will not be any separate nested sub-resources for "sub", "resource" and "method").
See the javadocs of the resource builder API for more information.
Jersey gives you an option to register so called model processor providers. These providers
are able to modify or enhance the application resource model during application deployment. This is an advanced
feature and will not be needed in most use cases. However, imagine you would like to add OPTIONS resource
method to each deployed resource as it is described at the top of this chapter. You would want to do it for every
programmatic resource that is registered as well as for all standard JAX-RS resources.
To do that, you first need to register a model processor provider in your application, which implements
org.glassfish.jersey.server.model.ModelProcessor extension contract. An example of
a model processor implementation is shown here:
Example 14.6. A programmatic resource
import javax.ws.rs.GET;
import javax.ws.rs.Path;
import javax.ws.rs.Produces;
import javax.ws.rs.container.ContainerRequestContext;
import javax.ws.rs.core.Application;
import javax.ws.rs.core.Configuration;
import javax.ws.rs.core.MediaType;
import javax.ws.rs.core.Response;
import javax.ws.rs.ext.Provider;
import org.glassfish.jersey.process.Inflector;
import org.glassfish.jersey.server.model.ModelProcessor;
import org.glassfish.jersey.server.model.Resource;
import org.glassfish.jersey.server.model.ResourceMethod;
import org.glassfish.jersey.server.model.ResourceModel;
@Provider
public static class MyOptionsModelProcessor implements ModelProcessor {
@Override
public ResourceModel processResourceModel(ResourceModel resourceModel, Configuration configuration) {
// we get the resource model and we want to enhance each resource by OPTIONS method
ResourceModel.Builder newResourceModelBuilder = new ResourceModel.Builder(false);
for (final Resource resource : resourceModel.getResources()) {
// for each resource in the resource model we create a new builder which is based on the old resource
final Resource.Builder resourceBuilder = Resource.builder(resource);
// we add a new OPTIONS method to each resource
// note that we should check whether the method does not yet exist to avoid failures
resourceBuilder.addMethod("OPTIONS")
.handledBy(new Inflector<ContainerRequestContext, String>() {
@Override
public String apply(ContainerRequestContext containerRequestContext) {
return "On this path the resource with " + resource.getResourceMethods().size()
+ " methods is deployed.";
}
}).produces(MediaType.TEXT_PLAIN)
.extended(true); // extended means: not part of core RESTful API
// we add to the model new resource which is a combination of the old resource enhanced
// by the OPTIONS method
newResourceModelBuilder.addResource(resourceBuilder.build());
}
final ResourceModel newResourceModel = newResourceModelBuilder.build();
// and we return new model
return newResourceModel;
};
@Override
public ResourceModel processSubResource(ResourceModel subResourceModel, Configuration configuration) {
// we just return the original subResourceModel which means we do not want to do any modification
return subResourceModel;
}
}
The MyOptionsModelProcessor from the example is a relatively simple model processor which
iterates over all registered resources and for all of them builds a new resource that is equal to the old resource
except it is enhanced with a new OPTIONS method.
Note that you only need to register such a ModelProcessor as your custom extension provider in the same way as you would register any standard JAX-RS extension provider. During an application deployment, Jersey will look for any registered model processor and execute them. As you can seem, model processors are very powerful as they can do whatever manipulation with the resource model they like. A model processor can even, for example, completely ignore the old resource model and return a new custom resource model with a single "Hello world!" resource, which would result in only the "Hello world!" resource being deployed in your application. Of course, it would not not make much sense to implement such model processor, but the scenario demonstrates how powerful the model processor concept is. A better, real-life use case scenario would, for example, be to always add some custom new resource to each application that might return additional metadata about the deployed application. Or, you might want to filter out particular resources or resource methods, which is another situation where a model processor could be used successfully.
Also note that processSubResource(ResourceModel subResourceModel, Configuration configuration)
method is executed for each sub resource returned from the sub resource locator. The example is simplified and does
not do any manipulation but probably in such a case you would want to enhance all sub resources with
a new OPTIONS method handlers too.
It is important to remember that any model processor must always return valid resource model. As you might have
already noticed, in the example above this important rule is not followed. If any of the resources in the original
resource model would already have an OPTIONS method handler defined, adding another handler would cause
the application fail during the deployment in the resource model validation phase. In order to retain the consistency
of the final model, a model processor implementation would have to be more robust than what is shown in the example.
Table of Contents
In a standard HTTP request-response scenario a client opens a connection, sends a HTTP request to the server (for
example a HTTP GET request), then receives a HTTP response back and the server closes the connection once
the response is fully sent/received. The initiative always comes from a client when the client
requests all the data. In contrast, Server-Sent Events (SSE) is a mechanism that allows server
to asynchronously push the data from the server to the client once the client-server connection is established by the
client. Once the connection is established by the client, it is the server who provides the data and decides
to send it to the client whenever new "chunk" of data is available. When a new data event occurs on the server,
the data event is sent by the server to the client. Thus the name Server-Sent Events. Note that at high level there
are more technologies working on this principle, a short overview of the technologies supporting server-to-client
communication is in this list:
- Polling
With polling a client repeatedly sends new requests to a server. If the server has no new data, then it send appropriate indication and closes the connection. The client then waits a bit and sends another request after some time (after one second, for example).
- Long-polling
With long-polling a client sends a request to a server. If the server has no new data, it just holds the connection open and waits until data is available. Once the server has data (message) for the client, it uses the connection and sends it back to the client. Then the connection is closed.
- Server-Sent events
SSE is similar to the long-polling mechanism, except it does not send only one message per connection. The client sends a request and server holds a connection until a new message is ready, then it sends the message back to the client while still keeping the connection open so that it can be used for another message once it becomes available. Once a new message is ready, it is sent back to the client on the same initial connection. Client processes the messages sent back from the server individually without closing the connection after processing each message. So, SSE typically reuses one connection for more messages (called events). SSE also defines a dedicated media type that describes a simple format of individual events sent from the server to the client. SSE also offers standard javascript client API implemented most modern browsers. For more information about SSE, see the SSE API specification.
- WebSocket
WebSocket technology is different from previous technologies as it provides a real full duplex connection. The initiator is again a client which sends a request to a server with a special HTTP header that informs the server that the HTTP connection may be "upgraded" to a full duplex TCP/IP WebSocket connection. If server supports WebSocket, it may choose to do so. Once a WebSocket connection is established, it can be used for bi-directional communication between the client and the server. Both client and server can then send data to the other party at will whenever it is needed. The communication on the new WebSocket connection is no longer based on HTTP protocol and can be used for example for for online gaming or any other applications that require fast exchange of small chunks of data in flowing in both directions.
As explained above, SSE is a technology that allows clients to subscribe to event notifications that originate on a server. Server generates new events and sends these events back to the clients subscribed to receive the notifications. In other words, SSE offers a solution for a one-way publish-subscribe model.
A good example of the use case where SSE can be used is a simple message exchange RESTful service. Clients
POST new messages to the service and subscribe to receive messages from other clients.
Let's call the resource messages. While POSTing a new message to this resource involves
a typical HTTP request-response communication between a client and the messages resource,
subscribing to receive all new message notifications would be hard and impractical to model with a sequence of
standard request-response message exchanges. Using Server-sent events provides a much more practical approach here.
You can use SSE to let clients subscribe to the messages resource via standard GET
request (use a SSE client API, for example javascript API or Jersey Client SSE API) and let the server broadcast
new messages to all connected clients in the form of individual events (in our case using Jersey Server SSE API).
Note that with Jersey a SSE support is implemented as an usual JAX-RS resource method. There's no need to do anything
special to provide a SSE support in your Jersey/JAX-RS applications, your SSE-enabled resources are a standard part of
your RESTful Web application that defines the REST API of your application. The following chapters describes SSE
support in Jersey in more details.
In previous JAX-RS versions, no standard API for server-sent events was defined. The SSE support bundled with
Jersey was Jersey-specific. With JAX-RS 2.1, situation changed and SSE API is well defined in the
javax.ws.rs.sse
package.
Following chapters will describe the new SSE API. For backwards compatibility reasons, the original Jersey-specific API remains valid and will be described in Section 15.6, “Jersey-specific Server-Sent Events API”
Jersey contains support for SSE for both - server and client. SSE in Jersey is implemented as an extension
supporting a new media type using existing "chunked" messages support. However, in contrast to the original API,
the instances of SSE related classes are not to be obtained manually by invoking constructors, nor to be directly
returned from the resource methods.
Actually, the implementing classes in the jersey.media.sse.internal package should never be needed
to be imported. The only API to be used is directly in the JAX-RS package (javax.ws.rs.sse).
Only builders in the API along with dependency injection should be used and provides access to the entire
functionality.
In order to take advantage of the SSE support, the jersey-media-sse module has to be on classpath.
In maven, this can be achieved by adding the dependency to the SSE media type module:
Example 15.1. Adding the SSE dependency
<dependency>
<groupId>org.glassfish.jersey.media</groupId>
<artifactId>jersey-media-sse</artifactId>
</dependency>
The Feature defined in the module is (forced) auto-discoverable, which means having the module on
classpath is sufficient, no need to further register it in the code.
Example 15.2. Simple SSE resource method
...
import javax.ws.rs.sse.Sse;
import javax.ws.rs.sse.SseEventSink;
import javax.ws.rs.sse.OutboundSseEvent;
...
@Path("events")
public static class SseResource {
@GET
@Produces(MediaType.SERVER_SENT_EVENTS)
public void getServerSentEvents(@Context SseEventSink eventSink, @Context Sse sse) {
new Thread(() -> {
for (int i = 0; i < 10; i++) {
// ... code that waits 1 second
final OutboundSseEvent event = sse.newEventBuilder()
.name("message-to-client")
.data(String.class, "Hello world " + i + "!")
.build();
eventSink.onNext(event);
}
}).start();
}
}
The code above defines the resource deployed on URI "/events". This resource has a single
@GET
resource method which returns void. This is an imported difference
against the original API. It is Jersey's responsibility to bind the injected SseEventSink to
the output chain.
After the SseEventInput is "returned" from the method, the Jersey runtime recognizes that this
is a ChunkedOutput extension and does not close the client connection immediately. Instead, it
writes the HTTP headers to the response stream and waits for more chunks (SSE events) to be sent. At this point
the client can read headers and starts listening for individual events.
In theExample 15.2, “Simple SSE resource method”, the resource method creates a new thread that sends a
sequence of 10 events. There is a 1 second delay between two subsequent events as indicated in a comment. Each
event is represented by javax.ws.rs.sse.OutboundSseEvent type and is built with a help of a
provided Builder. The Builder is obtain via the injected instance
(actually, it is a singleton) of javax.ws.rs.sse.Sse (the
newEventBuilder()
method. The OutboundSseEvent implementation reflects the standardized format of
SSE messages and contains properties that represent name (for named events),
comment, data or id. The code also sets the
event data media type using the mediaType(MediaType) method on the
eventBuilder. The media type, together with the data type set by the
data(Class, Object>
method (in our case String.class), is used
for serialization of the event data. Note that the event data media type will not be written to any headers as
the response Content-type header is already defined by the @Produces and set to
"text/event-stream"
using constant from the MediaType.
The event media type is used for serialization of event data. Event data media type and Java
type are used to select the proper MessageBodyWriter<T> for event data serialization and are passed
to the selected writer that serializes the event data content. In our case the string
"Hello world " + i + "!"
is serialized as "text/plain". In event
data
you can send any Java entity and associate it with any media type that you would be able
to serialize with an available MessageBodyWriter<T>. Typically, you may want to send e.g. JSON data,
so you would fill the data with a JAXB annotated bean instance and define media type to JSON.
Note
If the event media type is not set explicitly, the "text/plain" media type is used
by default.
Once an outbound event is ready, it can be written to the EventSink. At that point the event
is serialized by internal OutboundEventWriter which uses an appropriate
MessageBodyWriter<T> to serialize the "Hello world " + i + "!" string. You can
send as many messages as you like. At the end of the thread execution the response is closed which also closes
the connection to the client. After that, no more messages can be sent to the client on this connection. If the
client would like to receive more messages, it would have to send a new request to the server to initiate a
new SSE streaming connection.
A client connecting to our SSE-enabled resource will receive the following data from the entity stream:
event: message-to-client
data: Hello world 0!
event: message-to-client
data: Hello world 1!
event: message-to-client
data: Hello world 2!
event: message-to-client
data: Hello world 3!
event: message-to-client
data: Hello world 4!
event: message-to-client
data: Hello world 5!
event: message-to-client
data: Hello world 6!
event: message-to-client
data: Hello world 7!
event: message-to-client
data: Hello world 8!
event: message-to-client
data: Hello world 9!
Each message is received with a delay of one second.
Note
If you have worked with streams in JAX-RS, you may wonder what is the difference between ChunkedOutput and StreamingOutput.
ChunkedOutput is Jersey-specific API. It lets you send "chunks" of data without closing
the client connection using series of convenient calls to ChunkedOutput.write methods
that take POJO + chunk media type as an input and then use the configured JAX-RS
MessageBodyWriter<T> providers to figure out the proper way of serializing each chunk POJO
to bytes. Additionally, ChunkedOutput writes can be invoked multiple times on the same
outbound response connection, i.e. individual chunks are written in each write, not the full response entity.
StreamingOutput is, on the other hand, a low level JAX-RS API that works with bytes
directly. You have to implement StreamingOutput interface yourself. Also, its
write(OutputStream)
method will be invoked by JAX-RS runtime only once per response
and the call to this method is blocking, i.e. the method is expected to write the entire entity body
before returning.
JAX-RS SSE API defines SseBroadcaster which allows to broadcast individual events to multiple clients. A simple broadcasting implementation is shown in the following example:
Example 15.3. Broadcasting SSE messages (with JAX-RS 2.1 API)
...
import javax.ws.rs.sse.Sse;
import javax.ws.rs.sse.SseEventSink;
import javax.ws.rs.sse.SseBroadcaster;
...
@Singleton
@Path("broadcast")
public static class BroadcasterResource {
private Sse sse;
private SseBroadcaster broadcaster;
public BroadcasterResource(@Context final Sse sse) {
this.sse = sse;
this.broadcaster = sse.newBroadcaster();
}
@POST
@Produces(MediaType.TEXT_PLAIN)
@Consumes(MediaType.TEXT_PLAIN)
public String broadcastMessage(String message) {
final OutboundSseEvent event = sse.newEventBuilder()
.name("message")
.mediaType(MediaType.TEXT_PLAIN_TYPE)
.data(String.class, message)
.build();
broadcaster.broadcast(event);
return "Message '" + message + "' has been broadcast.";
}
@GET
@Produces(MediaType.SERVER_SENT_EVENTS)
public void listenToBroadcast(@Context SseEventSink eventSink) {
this.broadcaster.subscribe(eventSink);
}
}
Let's explore the example together. The BroadcasterResource resource class is annotated with
@Singleton annotation which tells Jersey runtime that only a single instance of the resource
class should be used to serve all the incoming requests to /broadcast path. This is needed as
we want to keep an application-wide single reference to the private broadcaster field so that
we can use the same instance for all requests. Clients that want to listen to SSE events first send a
GET request to the BroadcasterResource, that is handled by the
listenToBroadcast()
resource method.
The method is injected with a new SseEventSink representing the connection to the
requesting client and registers this eventSink instance with the singleton
broadcaster
by calling its subscribe() method.
The method then, as already explained returns void and Jersey runtime is responsible for
binding the injected EventSink instance so as it would have been returned from the resource
method (note that really returning the EventSink from the resource method will cause
failure) and to bind the eventSink instance with the requesting client and send the
response HTTP headers to the client. The client connection remains open and the client is now waiting ready to
receive new SSE events. All the events are written to the eventSink by
broadcaster
later on. This way developers can conveniently handle sending new events to
all the clients that subscribe to them.
When a client wants to broadcast new message to all the clients listening on their SSE connections,
it sends a POST request to BroadcasterResource resource with the message content.
The method broadcastMessage(String) is invoked on
BroadcasterResource
resource with the message content as an input parameter. A new SSE outbound event is built in the standard way
and passed to the broadcaster. The broadcaster internally invokes write(OutboundEvent) on all
registered EventSinks. After that the method just returns a standard text response
to the POSTing client to inform the client that the message was successfully broadcast. As you can see,
the broadcastMessage(String) resource method is just a simple JAX-RS resource method.
In order to implement such a scenario, you may have noticed, that the
SseBroadcaster
is not mandatory to complete the use case. Individual EventSinks can be just stored in
a collection and iterated over in the broadcastMessage method. However, the
SseBroadcaster
internally identifies and handles also client disconnects. When a client
closes the connection, the broadcaster detects this and removes the stale connection from the internal collection
of the registered EventSinks as well as it frees all the server-side resources associated with
the stale connection.
Additionally, the SseBroadcaster is implemented to be thread-safe, so that clients can connect
and disconnect in any time and SseBroadcaster will always broadcast messages to the most recent
collection of registered and active set of clients.
On the client side, push programming model is used (event consumer / client) gets asynchronously notified about
incoming events by subscribing custom listener to javax.ws.rs.sse.SseEventSource. This happens by
invoking one of its subscribe() methods.
The usage of SseEventSource is shown in the following example.
Example 15.4. Consuming SSE events with SseEventSource
import javax.ws.rs.sse.SseEventSource;
...
Client client = ClientBuilder.newBuilder().build();
WebTarget target = client.target("http://example.com/events");
SseEventSource sseEventSource = SseEventSource.target(target).build();
sseEventSource.subscribe((event) -> System.out.println(event.getName() + "; "
+ event.readData(String.class)));
sseEventSource.open();
// do other stuff, block here and continue when done
sseEventSource.close();
In this example, the client code connects to the server where the SseResource from the
Example 15.2, “Simple SSE resource method”
is deployed. The Client instance
is created (and initialized with SseFeature automatically). Then the WebTarget is built.
In this case a request to the web target is not made directly in the code, instead, the web target instance
is used to initialize a new SseEventSource.Builder instance that is used to build a new
SseEventSource. The choice of build() method is important, as it tells
the SseEventSource.Builder to create a new SseEventSource that is not
automatically connected to the target. The connection is established only later by manually
invoking the sseEventSource.open() method. A custom
java.util.function.Consumer<InboundSseEvent>
implementation is used to listen to and
process incoming SSE events. The method readData(Class) says that the
event data should be de-serialized from a received InboundSseEvent instance into a
String
Java type. This method call internally executes MessageBodyReader<T> which
de-serializes the event data. This is similar to reading an entity from the Response by
readEntity(Class). The method readData can throw a
ProcessingException.
After a connection to the server is opened by calling the open() method on the event source,
the eventSource starts listening to events. When an event comes, the listener will be executed
by the event source. Once the client is done with processing and does not want to receive events the connection by
calling the close() method on the event source.
The listener from the example above will print the following output:
message-to-client; Hello world 0!
message-to-client; Hello world 1!
message-to-client; Hello world 2!
message-to-client; Hello world 3!
message-to-client; Hello world 4!
message-to-client; Hello world 5!
message-to-client; Hello world 6!
message-to-client; Hello world 7!
message-to-client; Hello world 8!
message-to-client; Hello world 9!
There are other events than the incoming data that also may occur. The SseEventSource for
instance always signals, that it has finished processing events, or there might also be an error while processing the
messages. SseEventSource. There are total of four overloaded
subscribe()
methods defined in the API.
Example 15.5. SseEventSource subscribe() methods
// 1. basic one - the one we used in the example
void subscribe(Consumer<InboundSseEvent> onEvent);
// 2. with an error callback
void subscribe(Consumer<InboundSseEvent> onEvent, Consumer<Throwable> onError);
// 3. with an error callback and completion callback
void subscribe(Consumer<InboundSseEvent> onEvent, Consumer<Throwable> onError, Runnable onComplete)
// 4. complete one - with error callback, completion callback an onSubscribe callback
void subscribe(Consumer<SseSubscription> onSubscribe, Consumer<InboundSseEvent> onEvent, Consumer<Throwable>
onError,
Runnable
onComplete);
Few notes to the subscribe() methods:
All the overloaded methods have the
onEventhandler. As shown in the example, this parameter is used to consume the SSE events with data.Except the basic one-arg method, all the others contain an
onErrorhandler. In case of error, theSseEventSourceinvokes theonErrormethod of all its subscribers, that registered the handler. This makes it possible to react to the error conditions in a custom manner.Another possible argument is the
onCompletehandler. If registered (used an appropriatesubscribe()method, that has theonCompleteargument), it is invoked (for all the subscribers) every time when theSseEventSourceterminates normally. EitheronCompleteoronErrorshould be called every time.The complete
subscribe()method adds theonSubscribe()callback. This gives the subscriber a tool to manage the load and do a back-pressure by incrementaly requesting only certain amount of items. WhenSseEventSourceregisters a new subscriber, it calls itsonSubscribehandler and hands over thejavax.ws.rs.sse.SseSubscriptioninstance. This class only has two methods -request(long)for asking for a certain amount of events (often used asrequest(Long.MAX_VALUE)when no back-pressure is needed) andcancel()to stop receiving further events.When using the full-arg version of
subscribe(), it is the caller's responsibility to manage the amount of data it can handle. ThesseSubscription.request()method MUST be called, otherwise the subscriber will not receive ANY data. Furthermore, in the currentSseEventSourceimplementation, such a subscriber will block a threadm and will occasionally lead to overflow of an internal buffer inSseEventSource. As mentioned, callingsubscription.request(Long.MAX_VALUE), e.g. in the registeredonSubscribehandler is sufficient (and is also a default behaviour for all the other overloaded methods).
The SseEventSource implementation supports automated recuperation
from a connection loss, including negotiation of delivery of any missed events based on the last received
SSE event id field value, provided this field is set by the server and the negotiation
facility is supported by the server. In case of a connection loss, the last received SSE event
id
field value is sent in the Last-Event-ID HTTP request
header as part of a new connection request sent to the SSE endpoint. Upon a receipt of such reconnect request,
the SSE endpoint that supports this negotiation facility is expected to replay all missed events.
Note
Note, that SSE lost event negotiation facility is a best-effort mechanism which does not provide any guarantee that all events would be delivered without a loss. You should therefore not rely on receiving every single event and design your client application code accordingly.
By default, when a connection the the SSE endpoint is lost, the event source will use a default delay
before attempting to reconnect to the SSE endpoint. The SSE endpoint can however control the client-side
retry delay by including a special retry field value in any event sent to the client.
Jersey SseEventSource implementation automatically tracks any received SSE event
retry
field values set by the endpoint and adjusts the reconnect delay accordingly,
using the last received retry field value as the new reconnect delay.
In addition to handling the standard connection losses, Jersey SseEventSource automatically
deals with any HTTP 503 Service Unavailable responses received from the SSE endpoint,
that include a Retry-After HTTP header with a valid value. The
HTTP 503 + Retry-After
technique is often used by HTTP endpoints as a means of
connection and traffic throttling. In case a HTTP 503 + Retry-After response is received
in return to a connection request from SSE endpoint, Jersey SseEventSource will automatically
schedule a reconnect attempt and use the received Retry-After HTTP header value as a
one-time override of the reconnect delay.
Important
Prior to JAX-RS 2.1, server-sent events was not standardized and was optional and implementation-specific. Jersey provided its own, specific version of SSE implementation, that remains valid and functional to achieve backwards compatibility. This implementation is a Jersey-specific extension of JAX-RS (2.0) standard. It works with common JAX-RS resources the same way as the JAX-RS 2.1 based implementation does.
Both implementations are compatible, which means client based on Jersey-specific SSE implementation can "talk" to server resource implemetned using JAX-RS 2.1 based implementation and vice versa.
This chapter briefly describes the Jersey-specific support for SSE, focusing on the differences against the new SSE implementation described in ???
The API contains support SSE support for both - server and client. To use the Jersey-specific SSE API, you need to add the dependency to the
In order to add support for this SSE implementation, you also need to include the dependency to the SSE media type module the same way as for the JAX-RS SSE implementation.
Example 15.6. Add jersey-media-sse dependency.
<dependency>
<groupId>org.glassfish.jersey.media</groupId>
<artifactId>jersey-media-sse</artifactId>
</dependency>
Note
Prior to Jersey 2.8, you had to manually register SseFeature in your application.
(The SseFeature is a feature that can be registered for both, the client and the server.)
Since Jersey 2.8, the feature gets automatically discovered and registered when Jersey SSE module is
put on the application's classpath. The automatic discovery and registration of SSE feature can be suppressed
by setting DISABLE_SSE property to true.
The behavior can also be selectively suppressed in either client or server runtime by setting
DISABLE_SSE_CLIENT or DISABLE_SSE_SERVER property
respectively.
Example 15.7. Simple SSE resource method
...
import org.glassfish.jersey.media.sse.EventOutput;
import org.glassfish.jersey.media.sse.OutboundEvent;
import org.glassfish.jersey.media.sse.SseFeature;
...
@Path("events")
public static class SseResource {
@GET
@Produces(SseFeature.SERVER_SENT_EVENTS)
public EventOutput getServerSentEvents() {
final EventOutput eventOutput = new EventOutput();
new Thread(new Runnable() {
@Override
public void run() {
try {
for (int i = 0; i < 10; i++) {
// ... code that waits 1 second
final OutboundEvent.Builder eventBuilder = new OutboundEvent.Builder();
eventBuilder.name("message-to-client");
eventBuilder.data(String.class, "Hello world " + i + "!");
final OutboundEvent event = eventBuilder.build();
eventOutput.write(event);
}
} catch (IOException e) {
throw new RuntimeException("Error when writing the event.", e);
} finally {
try {
eventOutput.close();
} catch (IOException ioClose) {
throw new RuntimeException("Error when closing the event output.", ioClose);
}
}
}
}).start();
return eventOutput;
}
}
The code above defines the resource deployed on URI "/events". This resource has a single
@GET resource method which returns as an entity EventOutput - an extension of generic
Jersey
ChunkedOutput API for output chunked message processing.
In theExample 15.7, “Simple SSE resource method”, the resource method creates a new thread that sends a sequence of
10 events. There is a 1 second delay between two subsequent events as indicated in a comment. Each event is
represented by OutboundEvent type and is built with a help of an outbound event
Builder. The OutboundEvent reflects the standardized format of SSE
messages
and contains properties that represent name (for named
events), comment, data or id. The code also sets the
event data media type using the mediaType(MediaType) method on the
eventBuilder. The media type, together with the data type set by the
data(Class, Object>
method (in our case String.class), is used
for serialization of the event data. Note that the event data media type will not be written to any headers as
the response Content-type header is already defined by the @Produces and set to
"text/event-stream"
using constant from the SseFeature.
The event media type is used for serialization of event data. Event data media type and
Java
type are used to select the proper MessageBodyWriter<T> for event data serialization and are passed
to the selected writer that serializes the event data content. In our case the string
"Hello world " + i + "!"
is serialized as "text/plain". In event
data
you can send any Java entity and associate it with any media type that you would be able
to serialize with an available MessageBodyWriter<T>. Typically, you may want to send e.g. JSON
data,
so you would fill the data with a JAXB annotated bean instance and define media type to
JSON.
Note
If the event media type is not set explicitly, the "text/plain" media type is used
by default.
Once an outbound event is ready, it can be written to the eventOutput. At that point the
event
is serialized by internal OutboundEventWriter which uses an appropriate
MessageBodyWriter<T> to serialize the "Hello world " + i + "!" string. You can
send as many messages as you like. At the end of the thread execution the response is closed which also closes
the connection to the client. After that, no more messages can be sent to the client on this connection. If
the
client would like to receive more messages, it would have to send a new request to the server to initiate a
new SSE streaming connection.
A client connecting to our SSE-enabled resource will receive the exact same output as in the corresponding example in the JAX-RS implementation example.
event: message-to-client
data: Hello world 0!
event: message-to-client
data: Hello world 1!
...
Jersey SSE server API defines SseBroadcaster which allows to broadcast individual events to multiple clients. A simple broadcasting implementation is shown in the following example:
Example 15.8. Broadcasting SSE messages
...
import org.glassfish.jersey.media.sse.SseBroadcaster;
...
@Singleton
@Path("broadcast")
public static class BroadcasterResource {
private SseBroadcaster broadcaster = new SseBroadcaster();
@POST
@Produces(MediaType.TEXT_PLAIN)
@Consumes(MediaType.TEXT_PLAIN)
public String broadcastMessage(String message) {
OutboundEvent.Builder eventBuilder = new OutboundEvent.Builder();
OutboundEvent event = eventBuilder.name("message")
.mediaType(MediaType.TEXT_PLAIN_TYPE)
.data(String.class, message)
.build();
broadcaster.broadcast(event);
return "Message '" + message + "' has been broadcast.";
}
@GET
@Produces(SseFeature.SERVER_SENT_EVENTS)
public EventOutput listenToBroadcast() {
final EventOutput eventOutput = new EventOutput();
this.broadcaster.add(eventOutput);
return eventOutput;
}
}
The example is similar to its relevant JAX-RS counterpart. The listenToBroadcast() resource
method creates a new EventOutput representing the connection to the requesting client
and registers this eventOutput instance with the singleton broadcaster,
using its add(EventOutput) method. The method then returns the
eventOutput
which causes Jersey to bind the eventOutput instance with the requesting client and send
the
response HTTP headers to the client. The client connection remains open and the client is now waiting ready to
receive new SSE events. All the events are written to the eventOutput by
broadcaster
later on.
When a client wants to broadcast new message to all the clients listening on their SSE connections,
it sends a POST request to BroadcasterResource resource with the message
content.
The method broadcastMessage(String) is invoked on
BroadcasterResource
resource with the message content as an input parameter. A new SSE outbound event is built in the standard way
and passed to the broadcaster. The broadcaster internally invokes write(OutboundEvent) on
all
registered EventOutputs. After that the method just return a standard text response
to the POSTing client to inform the client that the message was successfully broadcast.
On the client side, Jersey exposes APIs that support receiving and processing SSE events using two programming models:
| Pull model - pulling events from a EventInput, or |
Push model - listening for asynchronous notifications of EventSource
|
The push model is similar to what is implemented in the JAX-RS SSE API. The pull model does not have a direct counterpart in the JAX-RS API and has to be implemented by the developer, if required.
The events can be read on the client side from a EventInput. See the following code:
Client client = ClientBuilder.newBuilder()
.register(SseFeature.class).build();
WebTarget target = client.target("http://localhost:9998/events");
EventInput eventInput = target.request().get(EventInput.class);
while (!eventInput.isClosed()) {
final InboundEvent inboundEvent = eventInput.read();
if (inboundEvent == null) {
// connection has been closed
break;
}
System.out.println(inboundEvent.getName() + "; " + inboundEvent.readData(String.class));
}
In this example, a client connects to the server where the SseResource from the
Example 15.7, “Simple SSE resource method”
is deployed. At first, a new JAX-RS/Jersey
client
instance is created with a SseFeature registered. Then a WebTarget instance is
retrieved from the client and is used to invoke a HTTP request. The returned response
entity
is directly read as a EventInput Java type, which is an extension of Jersey
ChunkedInput that provides generic support for consuming chunked message payloads. The
code in the example then process starts a loop to process the inbound SSE events read from the
eventInput
response stream. Each chunk read from the input is a InboundEvent.
The method InboundEvent.readData(Class) provides a way for the client to indicate what Java
type
should be used for the event data de-serialization. In our example, individual events are de-serialized as
String
Java type instances. This method internally finds and executes a proper
MessageBodyReader<T> which is the used to do the actual de-serialization. This is similar to reading
an
entity from the Response by readEntity(Class). The method
readData
can also throw a ProcessingException.
The null check on inboundEvent is necessary to make sure that the chunk was properly
read and connection has not been closed by the server. Once the connection is closed, the loop terminates and
the program completes execution. The client code produces the following console output:
message-to-client; Hello world 0!
message-to-client; Hello world 1!
message-to-client; Hello world 2!
message-to-client; Hello world 3!
message-to-client; Hello world 4!
message-to-client; Hello world 5!
message-to-client; Hello world 6!
message-to-client; Hello world 7!
message-to-client; Hello world 8!
message-to-client; Hello world 9!
The main Jersey-specific SSE client API component used to read SSE events asynchronously is
EventSource. The usage of the EventSource is shown on the following example.
Example 15.9. Registering EventListener with EventSource
Client client = ClientBuilder.newBuilder()
.register(SseFeature.class).build();
WebTarget target = client.target("http://example.com/events");
EventSource eventSource = EventSource.target(target).build();
EventListener listener = new EventListener() {
@Override
public void onEvent(InboundEvent inboundEvent) {
System.out.println(inboundEvent.getName() + "; " + inboundEvent.readData(String.class));
}
};
eventSource.register(listener, "message-to-client");
eventSource.open();
...
eventSource.close();
In this example, the client code again connects to the server where the SseResource from
the
Example 15.7, “Simple SSE resource method”
is deployed. The Client instance
is again created and initialized with SseFeature. Then the WebTarget is built.
In this case a request to the web target is not made directly in the code, instead, the web target instance
is used to initialize a new EventSource.Builder instance that is used to build a new
EventSource. The choice of build() method is important, as it tells
the EventSource.Builder to create a new EventSource that is not
automatically
connected to the target. The connection is established only later by manually invoking
the eventSource.open() method. A custom EventListener
implementation is used to listen to and process incoming SSE events. The method readData(Class) says that the
event data should be de-serialized from a received InboundEvent instance into a
String
Java type. This method call internally executes MessageBodyReader<T> which
de-serializes the event data. This is similar to reading an entity from the Response by
readEntity(Class). The method readData can throw a
ProcessingException.
The custom event source listener is registered in the event source via
EventSource.register(EventListener, String)
method. The next method
arguments define the names of the events to receive and can be omitted. If names are defined, the listener
will be associated with the named events and will only invoked for events with a name from the set of defined
event names. It will not be invoked for events with any other name or for events without a name.
Important
It is a common mistake to think that unnamed events will be processed by listeners that are registered to process events from a particular name set. That is NOT the case! Unnamed events are only processed by listeners that are not name-bound. The same limitation applied to HTML5 Javascript SSE Client API supported by modern browsers.
After a connection to the server is opened by calling the open() method on the event
source,
the eventSource starts listening to events. When an event named
"message-to-client"
comes, the listener will be executed by the event source. If any other
event comes (with a name different from "message-to-client"), the registered listener is
not
invoked. Once the client is done with processing and does not want to receive events anymore, it closes the
connection by calling the close() method on the event source.
The listener from the example above will print the following output:
message-to-client; Hello world 0!
message-to-client; Hello world 1!
message-to-client; Hello world 2!
message-to-client; Hello world 3!
message-to-client; Hello world 4!
message-to-client; Hello world 5!
message-to-client; Hello world 6!
message-to-client; Hello world 7!
message-to-client; Hello world 8!
message-to-client; Hello world 9!
When browsing through the Jersey SSE API documentation, you may have noticed that the EventSource
implements EventListener and provides an empty implementation for the
onEvent(InboundEvent inboundEvent)
listener method. This adds more flexibility to the
Jersey client-side SSE API. Instead of defining and registering a separate event listener, in simple scenarios
you can also choose to derive directly from the EventSource and override the empty listener
method to handle the incoming events. This programming model is shown in the following example:
Example 15.10. Overriding EventSource.onEvent(InboundEvent) method
Client client = ClientBuilder.newBuilder()
.register(SseFeature.class).build();
WebTarget target = client.target("http://example.com/events");
EventSource eventSource = new EventSource(target) {
@Override
public void onEvent(InboundEvent inboundEvent) {
if ("message-to-client".equals(inboundEvent.getName())) {
System.out.println(inboundEvent.getName() + "; " + inboundEvent.readData(String.class));
}
}
};
...
eventSource.close();
The code above is very similar to the code inExample 15.9, “Registering EventListener with EventSource
”. In this example
however, the EventSource is constructed directly using a single-parameter constructor.
This way, the connection to the SSE endpoint is by default automatically opened at the event source
creation. The implementation of the EventListener has been moved into the overridden
EventSource.onEvent(...)
method. However, this time, the listener method will be executed for
all events - unnamed as well as with any name. Therefore the code checks the name whether
it is
an event with the name "message-to-client" that we want to handle. Note that you can still register
additional EventListeners later on. The overridden method on the event source allows you to
handle messages even when no additional listeners are registered yet.
Table of Contents
Security information of a request is available by injecting a JAX-RS SecurityContext instance
using @Context
annotation. The injected security context instance provides the equivalent of the functionality available on
HttpServletRequest API.
The injected security context depends on the actual Jersey application deployment. For example, for a
Jersey application deployed in a Servlet container, the Jersey SecurityContext will
encapsulate information from a security context retrieved from the Servlet request.
In case of a Jersey application deployed on a Grizzly server,
the SecurityContext will return information retrieved from the Grizzly request.
SecurityContext can be used in conjunction with sub-resource locators to return different
resources based on the specific roles a user principal is included in. For example, a sub-resource locator could
return a different resource if a user is a preferred customer:
Example 16.1. Using SecurityContext for a Resource Selection
@Path("basket")
public ShoppingBasketResource get(@Context SecurityContext sc) {
if (sc.isUserInRole("PreferredCustomer") {
return new PreferredCustomerShoppingBasketResource();
} else {
return new ShoppingBasketResource();
}
}
SecurityContext is inherently request-scoped, yet can be also injected into fields of singleton
resources and JAX-RS providers. In such case the proxy of the request-scoped SecurityContext
will be injected.
Example 16.2. Injecting SecurityContext into a singleton resource
@Path("resource")
@Singleton
public static class MyResource {
// Jersey will inject proxy of Security Context
@Context
SecurityContext securityContext;
@GET
public String getUserPrincipal() {
return securityContext.getUserPrincipal().getName();
}
}
As described above, the SecurityContext by default (if not overwritten by
a request filter) only exposes security information from the underlying container.
In the case you deploy a Jersey application in a Servlet container, you need to configure the
Servlet container security aspects (<security-constraint>,
<auth-constraint> and user to roles mappings)
in order to be able to secure requests via calls to to the JAX-RS SecurityContext.
The SecurityContext can be directly retrieved from ContainerRequestContext via
getSecurityContext() method. You can also replace the default
SecurityContext in a request context with a custom one using the
setSecurityContext(SecurityContext) method. If you set a custom
SecurityContext instance in your ContainerRequestFilter,
this security context instance will be used for injection into JAX-RS resource class fields.
This way you can implement a custom authentication filter that may setup your own
SecurityContext to be used. To ensure the early execution of your custom
authentication request filter, set the filter priority to AUTHENTICATION
using constants from Priorities. An early execution of you authentication filter will ensure that
all other filters, resources, resource methods and sub-resource locators will execute with your custom
SecurityContext instance.
In cases where a Jersey application is deployed in a Servlet container you can rely only on
the standard Java EE Web application security mechanisms offered by the Servlet container and
configurable via application's web.xml descriptor.
You need to define the <security-constraint> elements in the
web.xml and assign roles which are able to access these resources. You can also
define HTTP methods that are allowed to be executed. See the following example.
Example 16.3. Securing resources using web.xml
<security-constraint>
<web-resource-collection>
<url-pattern>/rest/admin/*</url-pattern>
</web-resource-collection>
<auth-constraint>
<role-name>admin</role-name>
</auth-constraint>
</security-constraint>
<security-constraint>
<web-resource-collection>
<url-pattern>/rest/orders/*</url-pattern>
</web-resource-collection>
<auth-constraint>
<role-name>customer</role-name>
</auth-constraint>
</security-constraint>
<login-config>
<auth-method>BASIC</auth-method>
<realm-name>my-default-realm</realm-name>
</login-config>
The example secures two kinds of URI namespaces using the HTTP Basic Authentication.
rest/admin/* will be accessible only for user group "admin" and
rest/orders/* will be accessible for "customer" user group. This security configuration
does not use JAX-RS or Jersey features at all as it is enforced by the Servlet container even before
a request reaches the Jersey application. Keeping these security constrains up to date with your
JAX-RS application might not be easy as whenever you change the @Path annotations on your resource
classes you may need to update also the web.xml
security configurations to reflect the changed JAX-RS resource paths. Therefore Jersey offers a
more flexible solution
based on placing standard Java EE security annotations directly on JAX-RS resource classes and methods.
With Jersey you can define the access to resources based on the user group using annotations. You can, for example, define that only a user group "admin" can execute specific resource method. To do that you firstly need to register RolesAllowedDynamicFeature as a provider. The following example shows how to register the feature if your deployment is based on a ResourceConfig.
Example 16.4. Registering RolesAllowedDynamicFeature using ResourceConfig
final ResourceConfig resourceConfig = new ResourceConfig(MyResource.class);
resourceConfig.register(RolesAllowedDynamicFeature.class);
Alternatively, typically when deploying your application to a Servlet container, you can implement your JAX-RS
Application subclass by extending from the Jersey ResourceConfig and
registering the RolesAllowedDynamicFeature in the constructor:
Example 16.5. Registering RolesAllowedDynamicFeature by extending ResourceConfig
public class MyApplication extends ResourceConfig {
public MyApplication() {
super(MyResource.class);
register(RolesAllowedDynamicFeature.class);
}
}
Once the feature is registered, you can use annotations from package
javax.annotation.security defined by JSR-250. See the following example.
Example 16.6. Applying javax.annotation.security to JAX-RS resource methods.
@Path("/")
@PermitAll
public class Resource {
@RolesAllowed("user")
@GET
public String get() { return "GET"; }
@RolesAllowed("admin")
@POST
public String post(String content) { return content; }
@Path("sub")
public SubResource getSubResource() {
return new SubResource();
}
}
The resource class Resource defined in the example is annotated with a
@PermitAll annotation. This means that all methods in the class which do not
override this
annotation will be permitted for all user groups (no restrictions are defined). In our example, the
annotation will only apply to the getSubResource() method as it is the only method
that does not override the annotation by defining custom role-based security settings using the
@RolesAllowed annotation.
@RolesAllowed annotations present on the other methods define a role or a set of
roles that are allowed to execute a particular method.
These Java EE security annotations are processed internally in the request filter registered using
the Jersey RolesAllowedDynamicFeature. The roles defined in the annotations are
tested against current roles set in the SecurityContext using
the SecurityContext.isUserInRole(String role) method. In case the caller
is not in the role specified by the annotation, the HTTP 403 (Forbidden)
error response is returned.
For details about client security please see the Client chapter. Jersey
client allows to define parameters of SSL communication using HTTPS protocol.
You can also use jersey built-in authentication filters which perform HTTP Basic Authentication
or HTTP Digest Authentication. See the client chapter for more details.
OAuth is a specification that defines secure authentication model on behalf of another user. Two versions of OAuth exists at the moment - OAuth 1 defined by OAuth 1.0 specification and OAuth 2 defined by OAuth 2.0 specification. OAuth 2 is the latest version and it is not backward compatible with OAuth 1 specification. OAuth in general is widely used in popular social Web sites in order to grant access to a user account and associated resources for a third party consumer (application). The consumer then usually uses RESTful Web Services to access the user data. The following example describes a use case of the OAuth (similar for OAuth 1 and OAuth 2). The example is simple and probably obvious for many developers but introduces terms that are used in this documentation as well as in Jersey OAuth API documentation.
Three parties act in an OAuth scenario.
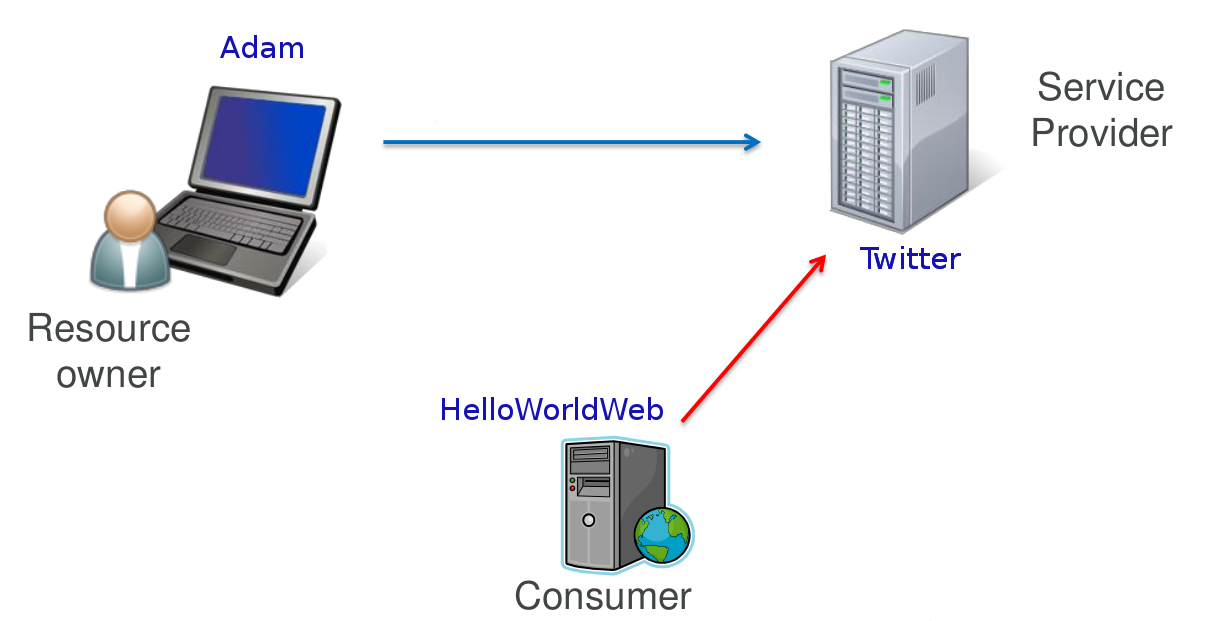 |
The first party represents a user, in our case Adam,
who is called in the OAuth terminology a Resource Owner. Adam has an account on
Twitter. Twitter represents the second party. This party is called a
Service Provider. Twitter offers a web interface
that Adam uses to create new tweets, read tweets of others etc. Now, Adam uses our new web site,
HelloWorldWeb, which is a very simple web site that says Hello World but it additionally
displays the last tweet of the logged in user.
To do so, our web site needs to have access to the Twitter account of Adam. Our web site is a 3rd party
application that wants to connect to Twitter and get Adam's tweets. In OAuth, such party is called
Consumer.
Our Consumer would like to use Twitter's RESTful APIs to get some data associated with Adam's Twitter account.
In order to solve this situation Adam could directly give his Twitter password to the HelloWorldWeb.
This would however be rather unsafe, especially if we do not know much about the authors of the application.
If Adam would give his password to HelloWorldWeb, he would have to deal with the associated security risks.
First of all, Adam would have to fully trust HelloWorldWeb
that it will not misuse the full access to his Twitter account. Next, if Adam would change his password,
he would need to remember to give the new password also to the HelloWorldWeb application.
And at last, if Adam would like to revoke the HelloWorldWeb's access to his Twitter account,
he would need to change his password again. The OAuth protocol has been devised to address all these challenges.
With OAuth, a resource owner (Adam) grants an access to a consumer (HelloWorldWeb) without giving it his password. This access grant is achieved by a procedure called authorization flow. Authorization flow is out of the scope of this documentation and its description can be found in the OAuth specification linked above. The result of the authorization flow is an Access Token which is later used by the consumer to authenticate against the service provider. While this brief description applies to both OAuth 1 and 2, note that there are some differences in details between these two specifications.
Jersey OAuth is currently supported for the following use cases and OAuth versions:
OAuth 1: Client (consumer) and server (service provider)
OAuth 2: Client (consumer)
With client and server support there are two supported scenarios:
Authorization flow
Authentication with Access Token (support for authenticated requests)
OAuth 1 protocol is based on message signatures that are calculated using specific
signature methods. Signatures are quite complex and therefore are implemented in a separate
module. The OAuth 1 Jersey modules are (groupId:artifactId:description):
org.glassfish.jersey.security:oauth1-client: provides client OAuth 1 support for authorization flow and authenticationorg.glassfish.jersey.security:oauth1-server: provides server OAuth 1 support for authorization flow, SPI for token management including authentication filter.org.glassfish.jersey.security:oauth1-signature: provides support for OAuth1 request signatures. This module is a dependency of previous two modules and as such it will be implicitly included in your maven project. The module can be used as a standalone module but this will not be needed in most of the use cases. You would do that if you wanted to implement your own OAuth support and would not want to deal with implementing the complex signature algorithms.
To add support for OAuth into your server-side application, add the following dependency to your
pom.xml:
<dependency>
<groupId>org.glassfish.jersey.security</groupId>
<artifactId>oauth1-server</artifactId>
<version>2.29.1</version>
</dependency>Again, there is no need to add a direct dependency to the signature module, it will be transitively included.
Let's now briefly go over the most important server Jersey OAuth APIs and SPIs:
OAuth1ServerFeature: The feature which enables the OAuth 1 support on the server and registers
OAuth1Providerexplained in the following point.OAuth1Provider: Implementation of this SPI must be registered to the server runtime as a standard provider. The implementation will be used to create request and access token, get consumer by consumer key, etc. You can either implement your provider or use the default implementation provided by Jersey by DefaultOAuth1Provider.
OAuth1ServerProperties: properties that can be used to configure the OAuth 1 support.
OAuth1Consumer, OAuth1Token: classes that contain consumer key, request and access tokens. You need to implement them only if you also implement the interface
OAuth1Provider.
First step in enabling Jersey OAuth 1 support is to register a
OAuth1ServerFeature instance
initialized with an instance of OAuth1Provider. Additionally, you may
configure the Request Token URI and Access Token URI -
the endpoints accessible on the OAuth server that issue Request and Access Tokens. These endpoints
are defined in the OAuth 1 specification and are contacted as part of the OAuth authorization flow.
Next, when a client initiates the OAuth authorization flow, the provided implementation of
OAuth1Provider will be invoked as to create new tokens,
get tokens and finally to store the issued Access Token. If a consumer already has a valid Access Token
and makes Authenticated Requests (with OAuth 1 Authorization information in the HTTP header),
the provider will be invoked to provide the OAuth1Token for the
Access Token information in the header.
Note
OAuth client support in Jersey is almost identical for OAuth 1 and OAuth 2. As such, this chapter provides useful information even for users that use OAuth 2 client support.
To add support for OAuth into your Jersey client application, add the following dependency to your
pom.xml:
<dependency>
<groupId>org.glassfish.jersey.security</groupId>
<artifactId>oauth1-client</artifactId>
<version>2.29.1</version>
</dependency>As mentioned earlier, there is no need to add a direct dependency to the signature module, it will be transitively included.
OAuth 1 client support initially started as a code migration from Jersey 1.x.
During the migration however the API of was significantly revised.
The high level difference compared to Jersey 1.x OAuth client API is that the authorization flow
is no longer part of a client OAuth filter. Authorization flow is now a standalone utility
and can be used without a support for subsequent authenticated requests.
The support for authenticated requests stays in the
ClientRequestFilter but is not part of a public API
anymore and is registered by a Jersey OAuth Feature.
The most important parts of the Jersey client OAuth API and SPI are explained here:
OAuth1ClientSupport: The main class which contains builder methods to build features that enable the OAuth 1 support. Start with this class every time you need to add any OAuth 1 support to the Jersey Client (build an Authorization flow or initialize client to perform authenticated requests). The class contains a static method that returns an instance of OAuth1Builder and also the class defines request properties to influence behaviour of the authenticated request support.
OAuth1AuthorizationFlow: API that allows to perform the Authorization flow against service provider. Implementation of this interface is a class that is used as a standalone utility and is not part of the JAX-RS client. In other words, this is not a feature that should be registered into the client.
AccessToken, ConsumerCredentials: Interfaces that define Access Token classes and Consumer Credentials. Interfaces contain getters for public keys and secret keys of token and credentials.
An example of how Jersey OAuth 1 client API is used can be found in the OAuth 1 Twitter Client Example. The following code snippets are extracted from the example and explain how to use the Jersey OAuth client API.
Before we start with any interaction with Twitter, we need to register our application
on Twitter. See the example README.TXT file for the instructions.
As a result of the registration, we get the consumer credentials that identify our application.
Consumer credentials consist of consumer key and consumer secret.
As a first step in our code, we need to perform the authorization flow, where the user grants us an access to his/her Twitter client.
Example 16.7. Build the authorization flow utility
ConsumerCredentials consumerCredentials = new ConsumerCredentials(
"a846d84e68421b321a32d, "f13aed84190bc");
OAuth1AuthorizationFlow authFlow = OAuth1ClientSupport.builder(consumerCredentials)
.authorizationFlow(
"http://api.twitter.com/oauth/request_token",
"http://api.twitter.com/oauth/access_token",
"http://api.twitter.com/oauth/authorize")
.build();
Here we have built a OAuth1AuthorizationFlow utility component representing the
OAuth 1 authorization flow, using OAuth1ClientSupport and
OAuth1Builder API. The static builder method accepts
mandatory parameter with ConsumerCredentials. These
are credentials earlier issued by Twitter for our application.
We have specified the Twitter OAuth endpoints where Request Token, Access Token will be retrieved and
Authorization URI to which we will redirect the user in order to grant user's consent.
Twitter will present an HTML page on this URI and it will ask the user whether he/she would like us
to access his/her account.
Now we can proceed with the OAuth authorization flow.
Example 16.8. Perform the OAuth Authorization Flow
String authorizationUri = authFlow.start(); // here we must direct the user to authorization uri to approve // our application. The result will be verifier code (String). AccessToken accessToken = authFlow.finish(verifier);
In the first line, we start the authorization flow. The method internally makes a request to the
http://api.twitter.com/oauth/request_token URL
and retrieves a Request Token. Details of this request can be found in the OAuth 1 specification.
It then constructs a URI to which we must redirect the user. The URI is based on Twitter's
authorization URI (http://api.twitter.com/oauth/authorize) and contains
a Request Token as a query parameter. In the Twitter example, we have a simple console application therefore
we print the URL to the console and ask the user to open the URL in a browser to approve the authorization
of our application.
Then the user gets a verifier and enters it back to the console. However, if our application would be a
web application, we would need to return a redirection response to the user in order to redirect the user
automatically to the authorizationUri. For more information about server deployment,
check our OAuth 2 Google Client Web Application Example, where the client is part of the
web application (the client API for OAuth 2 is similar to OAuth 1).
Once we have a verifier, we invoke the method finish()
on our OAuth1AuthorizationFlow instance, which internally
sends a request to an access token service URI (http://api.twitter.com/oauth/access_token)
and exchanges the supplied verifier for a new valid Access Token.
At this point the authorization flow is finished and we can start using the retrieved
AccessToken to make authenticated requests.
We can now create an instance of an OAuth 1 client Feature using
OAuth1ClientSupport and pass it our accessToken.
Another way is to use authFlow that already contains the information about access token
to create the feature instance for us:
Example 16.9. Authenticated requests
Feature feature = authFlow.getOAuth1Feature();
Client client = ClientBuilder.newBuilder()
.register(feature)
.build();
Once the feature is configured in the JAX-RS Client (or WebTarget),
all requests invoked from such Client (or WebTarget) instance
will automatically include an OAuth Authorization HTTP header (that contains also the OAuth signature).
Note that if you already have a valid Access Token (for example stored in the database for each of your users),
then you can skip the authorization flow steps and directly create the OAuth Feature
configured to use your Access Token.
Example 16.10. Build feature from Access Token
AccessToken storedToken = ...;
Feature filterFeature = OAuth1ClientSupport.builder(consumerCredentials)
.feature()
.accessToken(storedToken)
.build();
Here, the storedToken represents an AccessToken that your client
application keeps stored e.g. in a database.
Note that the OAuth feature builder API does not require the access token to be set.
The reason for it is that you might want to build a feature which would register the internal Jersey
OAuth ClientRequestFilter and other related providers but which would not
initialize the OAuth providers with a single fixed AccessToken instance.
In such case you would need to specify a token for every single request in the request properties.
Key names and API documentation of these properties can be found in
OAuth1ClientSupport.
Using this approach, you can have a single, OAuth enabled instance of a JAX-RS Client
(or WebTarget) and use it to make authenticated requests on behalf of multiple users.
Note that you can use the aforementioned request properties even if the feature has been initialized
with an AccessToken to override the default access token information for
particular requests, even though it is probably not a common use case.
The following code shows how to set an access token on a single request using the Jersey OAuth properties.
Example 16.11. Specifying Access Token on a Request.
Response resp =
client.target("http://my-serviceprovider.org/rest/foo/bar")
.request()
.property(OAuth1ClientSupport.OAUTH_PROPERTY_ACCESS_TOKEN, storedToken)
.get();
OAuth1AuthorizationFlow internally uses
a Client instance to communicate with the OAuth server. For this a
new client instance is automatically created by default. You can supply your instance of
a Client to be used for the authorization flow requests (for performance
and/or resource management reasons) using OAuth1Builder methods.
Follow the steps below in case the outgoing requests sent from client to server have to be signed with RSA-SHA1 signature method instead of the default one (HMAC-SHA1).
Example 16.12. Creating Public/Private RSA-SHA1 keys
$ # Create the private key. $ openssl genrsa -out private.key 2048 $ # Convert the key into PKCS8 format. $ openssl pkcs8 -topk8 -in private.key -nocrypt $ # Extract the public key. $ openssl rsa -in private.key -pubout
The output of the second command can be used as a consumer secret to sign the outgoing request:
new ConsumerCredentials("consumer-key", CONSUMER_PRIVATE_KEY). Public key obtained from
the third command can be then used on the service provider to verify the signed data.
For more advanced cases (i.e. other formats of keys) a custom OAuth1SignatureMethod
should be implemented and used.
At the moment Jersey supports OAuth 2 only on the client side.
Note
Note: It is suggested to read the section Section 16.3.1.2, “Client” before this section. Support for OAuth on the client is very similar for both OAuth 1 and OAuth 2 and general principles are valid for both OAuth versions as such.
Note
OAuth 2 support is in a Beta state and as such the API is subject to change.
To add support for Jersey OAuth 2 Client API into your application, add the following dependency
to your pom.xml:
<dependency>
<groupId>org.glassfish.jersey.security</groupId>
<artifactId>oauth2-client</artifactId>
<version>2.29.1</version>
</dependency>
OAuth 2, in contrast with OAuth 1, is not a strictly defined protocol, rather a framework.
OAuth 2 specification defines many extension points and it is up to service providers to
implement these details and document these implementations for the service consumers.
Additionally, OAuth 2 defines more than one authorization flow.
The authorization flow similar to the flow from OAuth 1 is called
the Authorization Code Grant Flow.
This is the flow currently supported by Jersey (Jersey currently does not support other flows).
Please refer to the OAuth 2.0 specification for more details about authorization flows.
Another significant change compared to OAuth 1 is that OAuth 2 is not based on signatures and
secret keys and therefore for most of the communication SSL needs to be used
(i.e. the requests must be made through HTTPS). This means that all OAuth 2 endpoint URIs must use
the https scheme.
Due to the fact that OAuth 2 does not define a strict protocol, it is not possible to provide a single, universal pre-configured tool interoperable with all providers. Jersey OAuth 2 APIs allows a lot of extensibility via parameters sent in each requests. Jersey currently provides two pre-configured authorization flow providers - for Google and Facebook.
The most important entry points of Jersey client OAuth 2 API and SPI are explained below:
OAuth2ClientSupport: The main class which contains builder methods to build features that enable the OAuth 2 support. Start with this class every time you need to add any OAuth 2 support to the Jersey Client (build an Authorization flow or initialize client to perform authenticated requests). The class contains also methods to get authorization flow utilities adjusted for Facebook or Google.
OAuth2CodeGrantFlow: API that allows to perform the authorization flow defined as Authorization Code Grant Flow in the OAuth 2 specification. Implementation of this interface is a class that is used as a standalone utility and is not part of the JAX-RS client. In other words, this is not a feature that should be registered into the client.
ClientIdentifier: Identifier of the client issued by the Service Provider for the client. Similar to ConsumerCredentials from OAuth 1 client support.
OAuth2Parameters: Defines parameters that are used in requests during the authorization flow. These parameters can be used to override some of the parameters used in different authorization phases.
TokenResult: Contains result of the authorization flow. One of the result values is the Access Token. It can additionally contain the expiration time of the Access Token and Refresh Token that can be used to get new Access Token.
The principle of performing the authorization flow with Jersey is similar to OAuth 1. Check the OAuth 1 Twitter Client Example which utilizes Jersey client support for OAuth 2 to get Google Tasks of the user. The application is a web application that uses redirection to forward the user to the authorization URI.
The following code is an example of how to build and use OAuth 2 authorization flow.
Example 16.13. Building OAuth 2 Authorization Flow.
OAuth2CodeGrantFlow.Builder builder =
OAuth2ClientSupport.authorizationCodeGrantFlowBuilder(clientId,
"https://example.com/oauth/authorization",
"https://example.com/oauth/token");
OAuth2CodeGrantFlow flow = builder
.property(OAuth2CodeGrantFlow.Phase.AUTHORIZATION, "readOnly", "true")
.scope("contact")
.build();
String authorizationUri = flow.start();
// Here we must redirect the user to the authorizationUri
// and let the user approve an access for our app.
...
// We must handle redirection back to our web resource
// and extract code and state from the request
final TokenResult result = flow.finish(code, state);
System.out.println("Access Token: " + result.get);
In the code above we create an OAuth2CodeGrantFlow from an
authorization URI and an access token URI. We have additionally set a
readOnly parameter to true and assigned the parameter
to the authorization phase. This is the way, how you can extend the standard flow with
additional service provider-specific parameters. In this case, the readOnly=true
parameter will be added as a query parameter to the authorization uri returned from the method
flow.start().
If we would specify ACCESS_TOKEN_REQUEST as a phase, then the parameter
would have been added to the request when flow.finish()
is invoked. See javadocs for more information. The parameter readOnly
is not part of the OAuth 2 specification and is used in the example
for demonstration of how to configure the flow for needs of specific service providers (in this
case, the readOnly
param would be described in the service provider's documentation).
Between the calls to flow.start() and flow.finish(), a user
must be redirected to the authorization URI. This means that the code will not be executed in
a single method and the finish part will be invoked as a handler of redirect request back to our web from
authorization URI. Check the OAuth 2 Google Client Web Application Example for more details on
this approach.
Jersey contains support for Web Application Description Language (WADL). WADL is a XML description of a deployed RESTful web application. It contains model of the deployed resources, their structure, supported media types, HTTP methods and so on. In a sense, WADL is a similar to the WSDL (Web Service Description Language) which describes SOAP web services. WADL is however specifically designed to describe RESTful Web resources.
Important
Since Jersey 2.5.1 the WADL generated by default is WADL in shorter form without
additional extension resources (OPTIONS methods, WADL resource).
In order to get full WADL use the query parameter detail=true.
Let's start with the simple WADL example. In the example there is a simple CountryResource
deployed and we request a wadl of this resource. The context root path of the application is
http://localhost:9998.
Example 17.1. A simple WADL example - JAX-RS resource definition
@Path("country/{id}")
public static class CountryResource {
private CountryService countryService;
public CountryResource() {
// init countryService
}
@GET
@Produces(MediaType.APPLICATION_XML)
public Country getCountry(@PathParam("countryId") int countryId) {
return countryService.getCountry(countryId);
}
}
The WADL of a Jersey application that contains the resource above can be requested by a
HTTP GET request to http://localhost:9998/application.wadl.
The Jersey will return a response with a WADL content similar to the one in the following example:
<?xml version="1.0" encoding="UTF-8" standalone="yes"?>
<application xmlns="http://wadl.dev.java.net/2009/02">
<doc xmlns:jersey="http://jersey.java.net/" jersey:generatedBy="Jersey: 2.5-SNAPSHOT 2013-12-20 17:14:21"/>
<grammars/>
<resources base="http://localhost:9998/">
<resource path="country/{id}">
<param xmlns:xs="http://www.w3.org/2001/XMLSchema" type="xs:int" style="template" name="countryId"/>
<method name="GET" id="getCountry">
<response>
<representation mediaType="application/xml"/>
</response>
</method>
</resource>
</resources>
</application>
The returned WADL is a XML that contains element resource
with path country/{id}. This resource has one inner method element
with http method as attribute, name of java method and its produced representation. This description
corresponds to defined java resource. Now let's look at more complex example.
The previous WADL does not actually contain all resources exposed in our API. There are other
resources that are available and are hidden in the previous WADL. The previous WADL shows only resources
that are provided by the user. In the following example, the WADL
is generated using query parameter detail:
http://localhost:9998/application.wadl?detail. Note that usage of
http://localhost:9998/application.wadl?detail=true is also valid.
This will produce the WADL with all resource available in the application:
Example 17.2. A simple WADL example - WADL content
<?xml version="1.0" encoding="UTF-8" standalone="yes"?>
<application xmlns="http://wadl.dev.java.net/2009/02">
<doc xmlns:jersey="http://jersey.java.net/" jersey:generatedBy="Jersey: 2.5-SNAPSHOT 2013-12-20 17:14:21"/>
<doc xmlns:jersey="http://jersey.java.net/" jersey:hint="To get simplified WADL with user's resources only use the query parameter 'simple=true'. Link: http://localhost:9998/application.wadl?detail=true&simple=true"/>
<grammars/>
<resources base="http://localhost:9998/">
<resource path="country/{id}">
<param xmlns:xs="http://www.w3.org/2001/XMLSchema" type="xs:int" style="template" name="countryId"/>
<method name="GET" id="getCountry">
<response>
<representation mediaType="application/xml"/>
</response>
</method>
<method name="OPTIONS" id="apply">
<request>
<representation mediaType="*/*"/>
</request>
<response>
<representation mediaType="application/vnd.sun.wadl+xml"/>
</response>
<jersey:extended xmlns:jersey="http://jersey.java.net/">true</jersey:extended>
</method>
<method name="OPTIONS" id="apply">
<request>
<representation mediaType="*/*"/>
</request>
<response>
<representation mediaType="text/plain"/>
</response>
<jersey:extended xmlns:jersey="http://jersey.java.net/">true</jersey:extended>
</method>
<method name="OPTIONS" id="apply">
<request>
<representation mediaType="*/*"/>
</request>
<response>
<representation mediaType="*/*"/>
</response>
<jersey:extended xmlns:jersey="http://jersey.java.net/">true</jersey:extended>
</method>
</resource>
<resource path="application.wadl">
<method name="GET" id="getWadl">
<response>
<representation mediaType="application/vnd.sun.wadl+xml"/>
<representation mediaType="application/xml"/>
</response>
<jersey:extended xmlns:jersey="http://jersey.java.net/">true</jersey:extended>
</method>
<method name="OPTIONS" id="apply">
<request>
<representation mediaType="*/*"/>
</request>
<response>
<representation mediaType="text/plain"/>
</response>
<jersey:extended xmlns:jersey="http://jersey.java.net/">true</jersey:extended>
</method>
<method name="OPTIONS" id="apply">
<request>
<representation mediaType="*/*"/>
</request>
<response>
<representation mediaType="*/*"/>
</response>
<jersey:extended xmlns:jersey="http://jersey.java.net/">true</jersey:extended>
</method>
<resource path="{path}">
<param xmlns:xs="http://www.w3.org/2001/XMLSchema" type="xs:string" style="template" name="path"/>
<method name="GET" id="geExternalGrammar">
<response>
<representation mediaType="application/xml"/>
</response>
<jersey:extended xmlns:jersey="http://jersey.java.net/">true</jersey:extended>
</method>
<method name="OPTIONS" id="apply">
<request>
<representation mediaType="*/*"/>
</request>
<response>
<representation mediaType="text/plain"/>
</response>
<jersey:extended xmlns:jersey="http://jersey.java.net/">true</jersey:extended>
</method>
<method name="OPTIONS" id="apply">
<request>
<representation mediaType="*/*"/>
</request>
<response>
<representation mediaType="*/*"/>
</response>
<jersey:extended xmlns:jersey="http://jersey.java.net/">true</jersey:extended>
</method>
<jersey:extended xmlns:jersey="http://jersey.java.net/">true</jersey:extended>
</resource>
<jersey:extended xmlns:jersey="http://jersey.java.net/">true</jersey:extended>
</resource>
</resources>
</application>
In the example above the returned application WADL is shown in full. WADL schema is defined by the
WADL specification, so let's look at it in more details. The root WADL document element is
the application. It contains global
information about the deployed JAX-RS application. Under this element there is a nested element
resources which contains zero or more resource elements. Each
resource element describes a single deployed resource. In our example, there are only two root
resources - "country/{id}" and "application.wadl". The
"application.wadl" resource is the resource that was just requested in order to receive the
application WADL document. Even though WADL support is an additional feature in Jersey it is still
a resource deployed in the resource model and therefore it is itself present in the returned WADL document.
The first resource element with the path="country/{id}" is the element that describes our
custom deployed resource.
This resource contains a GET method and three OPTIONS methods.
The GET method is our getCountry() method defined in the sample. There is a method name
in the id attribute and @Produces is described in the
response/representation WADL element. OPTIONS methods are the methods that
are automatically added by Jersey to each resource. There is an OPTIONS method
returning "text/plain" media type, that will return a response with a string entity containing
the list of methods deployed on this resource (this means that instead of WADL you can use this OPTIONS
method to get similar information in a textual representation).
Another OPTIONS method returning */* will return a response with no entity
and Allow header that will contain list of methods as a String.
The last OPTIONS method producing "application/vnd.sun.wadl+xml" returns a
WADL description of the resource "country/{id}". As you can see, all OPTIONS methods
return information about the resource to which the HTTP OPTIONS request is made.
Second resource with a path "application.wadl" has, again, similar OPTIONS methods
and one GET method which return this WADL. There is also
a sub-resource with a path defined by path param {path}. This means that you can request
a resource on the URI http://localhost:9998/application.wadl/something.
This is used only to return an external grammar if there is any attached. Such a external grammar can be
for example an XSD schema of the response entity which if the response entity is a JAXB bean.
An external grammar support via Jersey extended WADL support is described in sections below.
All resource that were added in this second example into the WADL contains
element extended. This means that this resource is not a part of a core RESTful API and
is rather a helper resource. If you need to mark any your own resource are extended, annotate
is with @ExtendedResource. Note that there might be methods visible in the default simple
WADL even the user has not added them. This is for example the case of MVC added methods which were added
by ModelProcessor but are still intended to be used by the client to achieve their
primary use case of getting formatted data.
Let's now send an HTTP OPTIONS request to "country/{id}" resource using the the
curl command:
curl -X OPTIONS -H "Allow: application/vnd.sun.wadl+xml" \
-v http://localhost:9998/country/15We should see a WADL returned similar to this one:
Example 17.3. OPTIONS method returning WADL
<?xml version="1.0" encoding="UTF-8" standalone="yes"?>
<application xmlns="http://wadl.dev.java.net/2009/02">
<doc xmlns:jersey="http://jersey.java.net/"
jersey:generatedBy="Jersey: 2.0-SNAPSHOT ${buildNumber}"/>
<grammars/>
<resources base="http://localhost:9998/">
<resource path="country/15">
<method name="GET" id="getCountry">
<response>
<representation mediaType="application/xml"/>
</response>
</method>
<method name="OPTIONS" id="apply">
<request>
<representation mediaType="*/*"/>
</request>
<response>
<representation mediaType="application/vnd.sun.wadl+xml"/>
</response>
</method>
<method name="OPTIONS" id="apply">
<request>
<representation mediaType="*/*"/>
</request>
<response>
<representation mediaType="text/plain"/>
</response>
</method>
<method name="OPTIONS" id="apply">
<request>
<representation mediaType="*/*"/>
</request>
<response>
<representation mediaType="*/*"/>
</response>
</method>
</resource>
</resources>
</application>
The returned WADL document has the standard WADL structure that we saw in the WADL document returned for the
whole Jersey application earlier. The main difference here is that the only resource is the
resource to which the OPTIONS HTTP request was sent. The resource has now path
"country/15" and not "country/{id}" as the path parameter
{id} was already specified in the request to this concrete resource.
Another, a more complex WADL example is shown in the next example.
Example 17.4. More complex WADL example - JAX-RS resource definition
@Path("customer/{id}")
public static class CustomerResource {
private CustomerService customerService;
@GET
public Customer get(@PathParam("id") int id) {
return customerService.getCustomerById(id);
}
@PUT
public Customer put(Customer customer) {
return customerService.updateCustomer(customer);
}
@Path("address")
public CustomerAddressSubResource getCustomerAddress(@PathParam("id") int id) {
return new CustomerAddressSubResource(id);
}
@Path("additional-info")
public Object getAdditionalInfoSubResource(@PathParam("id") int id) {
return new CustomerAddressSubResource(id);
}
}
public static class CustomerAddressSubResource {
private final int customerId;
private CustomerService customerService;
public CustomerAddressSubResource(int customerId) {
this.customerId = customerId;
this.customerService = null; // init customer service here
}
@GET
public String getAddress() {
return customerService.getAddressForCustomer(customerId);
}
@PUT
public void updateAddress(String address) {
customerService.updateAddressForCustomer(customerId, address);
}
@GET
@Path("sub")
public String getDeliveryAddress() {
return customerService.getDeliveryAddressForCustomer(customerId);
}
}
The GET request to http://localhost:9998/application.wadl will
return the following WADL document:
Example 17.5. More complex WADL example - WADL content
<?xml version="1.0" encoding="UTF-8" standalone="yes"?>
<application xmlns="http://wadl.dev.java.net/2009/02">
<doc xmlns:jersey="http://jersey.java.net/"
jersey:generatedBy="Jersey: 2.0-SNAPSHOT ${buildNumber}"/>
<grammars/>
<resources base="http://localhost:9998/">
<resource path="customer/{id}">
<param xmlns:xs="http://www.w3.org/2001/XMLSchema"
type="xs:int" style="template" name="id"/>
<method name="GET" id="get">
<response/>
</method>
<method name="PUT" id="put">
<response/>
</method>
<method name="OPTIONS" id="apply">
<request>
<representation mediaType="*/*"/>
</request>
<response>
<representation mediaType="application/vnd.sun.wadl+xml"/>
</response>
</method>
<method name="OPTIONS" id="apply">
<request>
<representation mediaType="*/*"/>
</request>
<response>
<representation mediaType="text/plain"/>
</response>
</method>
<method name="OPTIONS" id="apply">
<request>
<representation mediaType="*/*"/>
</request>
<response>
<representation mediaType="*/*"/>
</response>
</method>
<resource path="additional-info">
<param xmlns:xs="http://www.w3.org/2001/XMLSchema"
type="xs:int" style="template" name="id"/>
</resource>
<resource path="address">
<param xmlns:xs="http://www.w3.org/2001/XMLSchema"
type="xs:int" style="template" name="id"/>
<method name="GET" id="getAddress">
<response/>
</method>
<method name="PUT" id="updateAddress"/>
<resource path="sub">
<method name="GET" id="getDeliveryAddress">
<response/>
</method>
</resource>
</resource>
</resource>
<resource path="application.wadl">
<method name="GET" id="getWadl">
<response>
<representation mediaType="application/vnd.sun.wadl+xml"/>
<representation mediaType="application/xml"/>
</response>
</method>
<method name="OPTIONS" id="apply">
<request>
<representation mediaType="*/*"/>
</request>
<response>
<representation mediaType="text/plain"/>
</response>
</method>
<method name="OPTIONS" id="apply">
<request>
<representation mediaType="*/*"/>
</request>
<response>
<representation mediaType="*/*"/>
</response>
</method>
<resource path="{path}">
<param xmlns:xs="http://www.w3.org/2001/XMLSchema"
type="xs:string" style="template" name="path"/>
<method name="GET" id="geExternalGrammar">
<response>
<representation mediaType="application/xml"/>
</response>
</method>
<method name="OPTIONS" id="apply">
<request>
<representation mediaType="*/*"/>
</request>
<response>
<representation mediaType="text/plain"/>
</response>
</method>
<method name="OPTIONS" id="apply">
<request>
<representation mediaType="*/*"/>
</request>
<response>
<representation mediaType="*/*"/>
</response>
</method>
</resource>
</resource>
</resources>
</application>
The resource with path="customer/{id}" is similar to the
country resource from the previous example. There is a path parameter which identifies the customer
by id. The resource contains 2 user-declared methods and again auto-generated
OPTIONS methods added by Jersey. THe resource declares 2 sub-resource locators which are
represented in the returned WADL document as nested resource elements. Note that the sub-resource
locator getCustomerAddress() returns a type CustomerAddressSubResource in the
method declaration and also in the WADL there is a resource element for such
a sub resource with full internal description. The second method
getAdditionalInfoSubResource() returns only an Object in the method declaration.
While this is correct from the JAX-RS perspective as the real returned type can be computed from a request
information, it creates a problem for WADL generator because WADL is generated based on the static configuration
of the JAX-RS application resources. The WADL generator does not know what type would be actually returned to
a request at run time.
That is the reason why the nested resource element with path="additional-info"
does not contain any information about the supported resource representations.
The CustomerAddressSubResource sub-resource described in the nested element
<resource path="address"> does not contain an OPTIONS method.
While these methods are in fact generated by Jersey for the sub-resource, Jersey WADL generator does not currently
support adding these methods to the sub-resource description. This should be addressed in the near future.
Still, there are two user-defined resource methods handling HTTP GET and PUT requests.
The sub-resource method getDeliveryAddress() is represented as a separate nested resource with
path="sub". Should there be more sub-resource methods defined with path="sub",
then all these method descriptions would be placed into the same resource element.
In other words, sub-resource methods are grouped in WADL as sub-resources based on their path
value.
WADL generation is enabled in Jersey by default. This means that OPTIONS
methods are added by default to each resource and an auto-generated /application.wadl
resource is deployed too. To override this default behavior and disable WADL generation in Jersey, setup the
configuration property in your application:
jersey.config.server.wadl.disableWadl=true
This property can be setup in a web.xml if the Jersey application is deployed
in the servlet with web.xml or the property can be returned from the Application.
getProperties(). See Deployment chapter for more information
on setting the application configuration properties in various deployments.
WADL support in Jersey is implemented via ModelProcessor extension. This implementation enhances
the application resource model by adding the WADL providing resources. WADL ModelProcessor
priority value is high (i.e. the priority is low) as it should be executed as one of the last model processors.
Therefore, any ModelProcessor executed before will not see WADL extensions in the resource model.
WADL handling resource model extensions (resources and OPTIONS resource methods) are not added to the
application resource model if there is already a matching resource or a resource method detected in the model.
In other words, if you define for example your own OPTIONS method that would produce
"application.wadl" response content, this method will not be overridden by WADL model processor.
See Resource builder chapter for more information on
ModelProcessor extension mechanism.
Please note that the API of extended WADL support is going to be changed in one of the future releases of Jersey 2.x (see below).
Jersey supports extension of WADL generation called extended WADL. Using the extended WADL support you can enhance the generated WADL document with additional information, such as resource method javadoc-based documentation of your REST APIs, adding general documentation, adding external grammar support, or adding any custom WADL extension information.
The documentation of the existing extended WADL can be found here: Extended WADL in Jersey 1. This contains description of an extended WADL generation in Jersey 1.x that is currently supported also by Jersey 2.x.
Again, note that the extended WADL in Jersey 2.x is NOT the intended final version and
API is going to be changed. The existing set of features and functionality will be preserved but the
APIs will be significantly re-designed to support additional use cases. This impacts mainly the APIs of
WadlGenerator, WadlGeneratorConfig as well as any related classes. The API changes
may impact your code if you are using a custom WadlGenerator or plan to implement one.
Table of Contents
Validation is a process of verifying that some data obeys one or more pre-defined constraints. This chapter describes support for Bean Validation in Jersey in terms of the needed dependencies, configuration, registration and usage. For more detailed description on how JAX-RS provides native support for validating resource classes based on the Bean Validation refer to the chapter in the JAX-RS spec.
Bean Validation support in Jersey is provided as an extension module and needs to be mentioned explicitly in your
pom.xml file (in case of using Maven):
<dependency>
<groupId>org.glassfish.jersey.ext</groupId>
<artifactId>jersey-bean-validation</artifactId>
<version>2.29.1</version>
</dependency>
Note
If you're not using Maven make sure to have also all the transitive dependencies (see jersey-bean-validation) on the classpath.
This module depends directly on Hibernate Validator which provides a most commonly used implementation of the Bean Validation API spec.
If you want to use a different implementation of the Bean Validation API, use standard Maven mechanisms to exclude Hibernate Validator from the modules dependencies and add a dependency of your own.
<dependency>
<groupId>org.glassfish.jersey.ext</groupId>
<artifactId>jersey-bean-validation</artifactId>
<version>2.29.1</version>
<exclusions>
<exclusion>
<groupId>org.hibernate</groupId>
<artifactId>hibernate-validator</artifactId>
</exclusion>
</exclusions>
</dependency>
As stated in Section 4.3, “Auto-Discoverable Features”, Jersey Bean Validation is one of the modules where you
don't need to explicitly register it's Features (ValidationFeature) on the
server as it's features are automatically discovered and registered when you add the
jersey-bean-validation module to your classpath.
There are three Jersey specific properties that could disable automatic discovery and registration of Jersey Bean
Validation integration module:
Note
Jersey does not support Bean Validation on the client at the moment.
Configuration of Bean Validation support in Jersey is twofold - there are few specific properties that affects Jersey behaviour (e.g. sending validation error entities to the client) and then there is ValidationConfig class that configures Validator used for validating resources in JAX-RS application.
To configure Jersey specific behaviour you can use the following properties:
- ServerProperties.BV_DISABLE_VALIDATE_ON_EXECUTABLE_OVERRIDE_CHECK
Disables
@ValidateOnExecutioncheck. More on this is described in Section 18.5, “@ValidateOnExecution”.- ServerProperties.BV_SEND_ERROR_IN_RESPONSE
Enables sending validation errors in response entity to the client. More on this in Section 18.7.1, “ValidationError”.
Example 18.1. Configuring Jersey specific properties for Bean Validation.
new ResourceConfig()
// Now you can expect validation errors to be sent to the client.
.property(ServerProperties.BV_SEND_ERROR_IN_RESPONSE, true)
// @ValidateOnExecution annotations on subclasses won't cause errors.
.property(ServerProperties.BV_DISABLE_VALIDATE_ON_EXECUTABLE_OVERRIDE_CHECK, true)
// Further configuration of ResourceConfig.
.register( ... );
Customization of the Validator used in validation of resource classes/methods can be done using
ValidationConfig class and exposing it via ContextResolver<T> mechanism as shown in
Example 18.2, “Using ValidationConfig to configure Validator.”. You can set custom instances for the following interfaces from
the Bean Validation API:
MessageInterpolator - interpolates a given constraint violation message.
TraversableResolver - determines if a property can be accessed by the Bean Validation provider.
ConstraintValidatorFactory - instantiates a
ConstraintValidatorinstance based off its class. Note that by setting a customConstraintValidatorFactoryyou may loose injection of available resources/providers at the moment. See Section 18.6, “Injecting” how to handle this.ParameterNameProvider - provides names for method and constructor parameters.
Example 18.2. Using ValidationConfig to configure Validator.
/**
* Custom configuration of validation. This configuration defines custom:
* <ul>
* <li>ConstraintValidationFactory - so that validators are able to inject Jersey providers/resources.</li>
* <li>ParameterNameProvider - if method input parameters are invalid, this class returns actual parameter names
* instead of the default ones ({@code arg0, arg1, ..})</li>
* </ul>
*/
public class ValidationConfigurationContextResolver implements ContextResolver<ValidationConfig> {
@Context
private ResourceContext resourceContext;
@Override
public ValidationConfig getContext(final Class<?> type) {
final ValidationConfig config = new ValidationConfig();
config.setConstraintValidatorFactory(resourceContext.getResource(InjectingConstraintValidatorFactory.class));
config.setParameterNameProvider(new CustomParameterNameProvider());
return config;
}
/**
* See ContactCardTest#testAddInvalidContact.
*/
private class CustomParameterNameProvider implements ParameterNameProvider {
private final ParameterNameProvider nameProvider;
public CustomParameterNameProvider() {
nameProvider = Validation.byDefaultProvider().configure().getDefaultParameterNameProvider();
}
@Override
public List<String> getParameterNames(final Constructor<?> constructor) {
return nameProvider.getParameterNames(constructor);
}
@Override
public List<String> getParameterNames(final Method method) {
// See ContactCardTest#testAddInvalidContact.
if ("addContact".equals(method.getName())) {
return Arrays.asList("contact");
}
return nameProvider.getParameterNames(method);
}
}
}Register this class in your app:
final Application application = new ResourceConfig()
// Validation.
.register(ValidationConfigurationContextResolver.class)
// Further configuration.
.register( ... );Note
This code snippet has been taken from Bean Validation example.
JAX-RS specification states that constraint annotations are allowed in the same locations as the following
annotations: @MatrixParam, @QueryParam, @PathParam, @CookieParam,
@HeaderParam and @Context, except in class constructors and property
setters. Specifically, they are allowed in resource method parameters, fields and property getters as well as
resource classes, entity parameters and resource methods (return values).
Jersey provides support for validation (see following sections) annotated input parameters and return value of the
invoked resource method as well as validation of resource class (class constraints, field constraints) where this
resource method is placed.
Jersey does not support, and doesn't validate, constraints placed on constructors and Bean Validation groups (only
Default group is supported at the moment).
The JAX-RS Server API provides support for extracting request values and mapping them into Java fields, properties and parameters using annotations such as @HeaderParam, @QueryParam, etc. It also supports mapping of the request entity bodies into Java objects via non-annotated parameters (i.e., parameters without any JAX-RS annotations).
The Bean Validation specification supports the use of constraint annotations as a way of declaratively validating beans, method parameters and method returned values. For example, consider resource class from Example 18.3, “Constraint annotations on input parameters” augmented with constraint annotations.
Example 18.3. Constraint annotations on input parameters
@Path("/")
class MyResourceClass {
@POST
@Consumes("application/x-www-form-urlencoded")
public void registerUser(
@NotNull @FormParam("firstName") String firstName,
@NotNull @FormParam("lastName") String lastName,
@Email @FormParam("email") String email) {
...
}
}
The annotations @NotNull and @Email impose additional constraints on the form parameters
firstName, lastName and email. The @NotNull
constraint is built-in to the Bean Validation API; the @Email
constraint is assumed to be user defined in the example above. These constraint annotations are not restricted to
method parameters, they can be used in any location in which JAX-RS binding annotations are allowed with the
exception of constructors and property setters.
Rather than using method parameters, the MyResourceClass shown above could have been written
as in Example 18.4, “Constraint annotations on fields”.
Example 18.4. Constraint annotations on fields
@Path("/")
class MyResourceClass {
@NotNull
@FormParam("firstName")
private String firstName;
@NotNull
@FormParam("lastName")
private String lastName;
private String email;
@FormParam("email")
public void setEmail(String email) {
this.email = email;
}
@Email
public String getEmail() {
return email;
}
...
}
Note that in this version, firstName and lastName are fields initialized
via injection and email is a resource class property. Constraint annotations on properties are
specified in their corresponding getters.
Constraint annotations are also allowed on resource classes. In addition to annotating fields and properties, an
annotation can be defined for the entire class. Let us assume that @NonEmptyNames validates
that one of the two name fields in MyResourceClass is provided. Using
such an annotation, the example above can be extended to look like Example 18.5, “Constraint annotations on class”
Example 18.5. Constraint annotations on class
@Path("/")
@NonEmptyNames
class MyResourceClass {
@NotNull
@FormParam("firstName")
private String firstName;
@NotNull
@FormParam("lastName")
private String lastName;
private String email;
...
}
Constraint annotations on resource classes are useful for defining cross-field and cross-property constraints.
Annotation constraints and validators are defined in accordance with the Bean Validation specification.
The @Email annotation used in Example 18.4, “Constraint annotations on fields” is defined using the
Bean Validation @Constraint meta-annotation, see Example 18.6, “Definition of a constraint annotation”.
Example 18.6. Definition of a constraint annotation
@Target({ METHOD, FIELD, PARAMETER })
@Retention(RUNTIME)
@Constraint(validatedBy = EmailValidator.class)
public @interface Email {
String message() default "{com.example.validation.constraints.email}";
Class<?>[] groups() default {};
Class<? extends Payload>[] payload() default {};
}
The @Constraint annotation must include a reference to the validator class that will be used to validate
decorated values. The EmailValidator class must implement
ConstraintValidator<Email, T> where T is the type of values being
validated, as described in Example 18.7, “Validator implementation.”.
Example 18.7. Validator implementation.
public class EmailValidator implements ConstraintValidator<Email, String> {
public void initialize(Email email) {
...
}
public boolean isValid(String value, ConstraintValidatorContext context) {
...
}
}
Thus, EmailValidator applies to values annotated with @Email that are of type
String. Validators for other Java types can be defined for the same constraint annotation.
Request entity bodies can be mapped to resource method parameters. There are two ways in which these entities can be validated. If the request entity is mapped to a Java bean whose class is decorated with Bean Validation annotations, then validation can be enabled using @Valid as in Example 18.8, “Entity validation”.
Example 18.8. Entity validation
@StandardUser
class User {
@NotNull
private String firstName;
...
}
@Path("/")
class MyResourceClass {
@POST
@Consumes("application/xml")
public void registerUser(@Valid User user) {
...
}
}
In this case, the validator associated with @StandardUser (as well as those for non-class
level constraints like @NotNull) will be called to verify the request entity mapped to
user.
Alternatively, a new annotation can be defined and used directly on the resource method parameter (Example 18.9, “Entity validation 2”).
Example 18.9. Entity validation 2
@Path("/")
class MyResourceClass {
@POST
@Consumes("application/xml")
public void registerUser(@PremiumUser User user) {
...
}
}
In the example above, @PremiumUser rather than @StandardUser will be used
to validate the request entity. These two ways in which validation of entities can be triggered can also be
combined by including @Valid in the list of constraints. The presence of @Valid will trigger
validation of all the constraint annotations decorating a Java bean class.
Response entity bodies returned from resource methods can be validated in a similar manner by annotating the
resource method itself. To exemplify, assuming both @StandardUser and
@PremiumUser are required to be checked before returning a user, the
getUser method can be annotated as shown in
Example 18.10, “Response entity validation”.
Example 18.10. Response entity validation
@Path("/")
class MyResourceClass {
@GET
@Path("{id}")
@Produces("application/xml")
@Valid @PremiumUser
public User getUser(@PathParam("id") String id) {
User u = findUser(id);
return u;
}
...
}
Note that @PremiumUser is explicitly listed and @StandardUser is triggered
by the presence of the @Valid annotation - see definition of User class earlier in
this section.
The rules for inheritance of constraint annotation are defined in Bean Validation specification. It is worth noting that these rules are incompatible with those defined by JAX-RS. Generally speaking, constraint annotations in Bean Validation are cumulative (can be strengthen) across a given type hierarchy while JAX-RS annotations are inherited or, overridden and ignored.
For Bean Validation annotations Jersey follows the constraint annotation rules defined in the Bean Validation specification.
According to Bean Validation specification, validation is enabled by default only for the so called
constrained methods. Getter
methods as defined by the Java Beans specification are not constrained methods, so they will not be validated by
default. The special annotation @ValidateOnExecution can be used to selectively enable
and disable validation. For example, you can enable validation on method getEmail shown in
Example 18.11, “Validate getter on execution”.
Example 18.11. Validate getter on execution
@Path("/")
class MyResourceClass {
@Email
@ValidateOnExecution
public String getEmail() {
return email;
}
...
}
The default value for the type attribute of @ValidateOnExecution is
IMPLICIT which results in method getEmail being validated.
Note
According to Bean Validation specification @ValidateOnExecution cannot be overridden once is
declared on a method (i.e. in subclass/sub-interface) and in this situations a
ValidationException should be raised. This default behaviour can be suppressed by
setting ServerProperties.BV_DISABLE_VALIDATE_ON_EXECUTABLE_OVERRIDE_CHECK
property (Jersey specific) to true.
Jersey allows you to inject registered resources/providers into your ConstraintValidator implementation and you can inject Configuration, ValidatorFactory and Validator as required by Bean Validation spec.
Note
Injected Configuration, ValidatorFactory and Validator do not inherit configuration provided by ValidationConfig and need to be configured manually.
Injection of JAX-RS components into ConstraintValidators is supported via a custom
ConstraintValidatorFactory provided by Jersey. An example is shown in
Example 18.12, “Injecting UriInfo into a ConstraintValidator”.
Example 18.12. Injecting UriInfo into a ConstraintValidator
public class EmailValidator implements ConstraintValidator<Email, String> {
@Context
private UriInfo uriInfo;
public void initialize(Email email) {
...
}
public boolean isValid(String value, ConstraintValidatorContext context) {
// Use UriInfo.
...
}
}
Using a custom ConstraintValidatorFactory of your own disables registration of the one provided by Jersey and injection support for resources/providers (if needed) has to be provided by this new implementation. Example 18.13, “Support for injecting Jersey's resources/providers via ConstraintValidatorFactory.” shows how this can be achieved.
Example 18.13. Support for injecting Jersey's resources/providers via ConstraintValidatorFactory.
public class InjectingConstraintValidatorFactory implements ConstraintValidatorFactory {
@Context
private ResourceContext resourceContext;
@Override
public <T extends ConstraintValidator<?, ?>> T getInstance(final Class<T> key) {
return resourceContext.getResource(key);
}
@Override
public void releaseInstance(final ConstraintValidator<?, ?> instance) {
// NOOP
}
}
Note
This behaviour may likely change in one of the next version of Jersey to remove the need of
manually providing support for injecting resources/providers from Jersey in your own
ConstraintValidatorFactory implementation code.
Bean Validation specification defines a small hierarchy of exceptions (they all inherit from
ValidationException) that could be thrown during initialization of validation engine or (for our case more
importantly) during validation of input/output values (ConstraintViolationException).
If a thrown exception is a subclass of ValidationException except
ConstraintViolationException then this exception is mapped to a HTTP response with status code 500
(Internal Server Error).
On the other hand, when a ConstraintViolationException is throw two different status code would be returned:
500 (Internal Server Error)
If the exception was thrown while validating a method return type.
400 (Bad Request)
Otherwise.
By default, (during mapping ConstraintViolationExceptions) Jersey doesn't return any entities that would
include validation errors to the client. This default behaviour could be changed by enabling
ServerProperties.BV_SEND_ERROR_IN_RESPONSE property in your application
(Example 18.1, “Configuring Jersey specific properties for Bean Validation.”).
When this property is enabled then our custom ExceptionMapper<E extends Throwable> (that is handling
ValidationExceptions) would transform ConstraintViolationException(s) into
ValidationError(s) and set this object (collection) as the new response entity which Jersey is
able to sent to the client.
Four MediaTypes are currently supported when sending ValidationErrors to the
client:
text/plaintext/htmlapplication/xmlapplication/jsonNote
Note: You need to register one of the JSON (JAXB) providers (e.g. MOXy) to marshall validation errors to JSON.
Let's take a look at ValidationError class to see which properties are send to the client:
@XmlRootElement
public final class ValidationError {
private String message;
private String messageTemplate;
private String path;
private String invalidValue;
...
}
The message property is the interpolated error message, messageTemplate
represents a non-interpolated error message (or key from your constraint definition e.g.
{javax.validation.constraints.NotNull.message}), path contains information
about the path in the validated object graph to the property holding invalid value and
invalidValue is the string representation of the invalid value itself.
Here are few examples of ValidationError messages sent to client:
Example 18.14. ValidationError to text/plain
HTTP/1.1 500 Internal Server Error Content-Length: 114 Content-Type: text/plain Vary: Accept Server: Jetty(6.1.24) Contact with given ID does not exist. (path = ContactCardResource.getContact.<return value>, invalidValue = null)
Example 18.15. ValidationError to text/html
HTTP/1.1 500 Internal Server Error
Content-Length: ...
Content-Type: text/plain
Vary: Accept
Server: Jetty(6.1.24)
<div class="validation-errors">
<div class="validation-error">
<span class="message">Contact with given ID does not exist.</span>
(
<span class="path">
<strong>path</strong>
= ContactCardResource.getContact.<return value>
</span>
,
<span class="invalid-value">
<strong>invalidValue</strong>
= null
</span>
)
</div>
</div>
Example 18.16. ValidationError to application/xml
HTTP/1.1 500 Internal Server Error
Content-Length: ...
Content-Type: text/plain
Vary: Accept
Server: Jetty(6.1.24)
<?xml version="1.0" encoding="UTF-8"?>
<validationErrors>
<validationError>
<message>Contact with given ID does not exist.</message>
<messageTemplate>{contact.does.not.exist}</messageTemplate>
<path>ContactCardResource.getContact.<return value></path>
</validationError>
</validationErrors>
Example 18.17. ValidationError to application/json
HTTP/1.1 500 Internal Server Error
Content-Length: 174
Content-Type: application/json
Vary: Accept
Server: Jetty(6.1.24)
[ {
"message" : "Contact with given ID does not exist.",
"messageTemplate" : "{contact.does.not.exist}",
"path" : "ContactCardResource.getContact.<return value>"
} ]
To see a complete working example of using Bean Validation (JSR-349) with Jersey refer to the Bean Validation Example.
Table of Contents
- 19.1. Enabling and configuring Entity Filtering in your application
- 19.2. Components used to describe Entity Filtering concepts
- 19.3. Using custom annotations to filter entities
- 19.4. Role-based Entity Filtering using (
javax.annotation.security) annotations - 19.5. Entity Filtering based on dynamic and configurable query parameters
- 19.6. Defining custom handling for entity-filtering annotations
- 19.7. Supporting Entity Data Filtering in custom entity providers or frameworks
- 19.8. Modules with support for Entity Data Filtering
- 19.9. Examples
Support for Entity Filtering in Jersey introduces a convenient facility for reducing the amount of data exchanged over the wire between client and server without a need to create specialized data view components. The main idea behind this feature is to give you APIs that will let you to selectively filter out any non-relevant data from the marshalled object model before sending the data to the other party based on the context of the particular message exchange. This way, only the necessary or relevant portion of the data is transferred over the network with each client request or server response, without a need to create special facade models for transferring these limited subsets of the model data.
Entity filtering feature allows you to define your own entity-filtering rules for your entity classes based on the current context (e.g. matched resource method) and keep these rules in one place (directly in your domain model). With Jersey entity filtering facility it is also possible to assign security access rules to entity classes properties and property accessors.
We will first explain the main concepts and then we will explore the entity filtering feature topics from a perspective of basic use-cases,
as well as some more complex ones.
Note
Jersey entity filtering feature is supported via Jersey extension modules listed in Section 19.8, “Modules with support for Entity Data Filtering”.
Entity Filtering support in Jersey is provided as an extension module and needs to be mentioned explicitly in your
pom.xml file (in case of using Maven):
<dependency>
<groupId>org.glassfish.jersey.ext</groupId>
<artifactId>jersey-entity-filtering</artifactId>
<version>2.29.1</version>
</dependency>
Note
If you're not using Maven make sure to have also all the transitive dependencies (see jersey-entity-filtering) on the classpath.
The entity-filtering extension module provides three Features which you can register into server/client
runtime in prior to use Entity Filtering in an application:
Filtering based on entity-filtering annotations (or i.e. external configuration file) created using @EntityFiltering meta-annotation.
SecurityEntityFilteringFeature
Filtering based on security (
javax.annotation.security) and entity-filtering annotations.SelectableEntityFilteringFeature
Filtering based on dynamic and configurable query parameters.
If you want to use both entity-filtering annotations and security annotations for entity data filtering it is enough
to register SecurityEntityFilteringFeature as this feature registers also
EntityFilteringFeature.
Entity-filtering currently recognizes one property that can be passed into the Configuration instance (client/server):
EntityFilteringFeature.ENTITY_FILTERING_SCOPE - "
jersey.config.entityFiltering.scope"Defines one or more annotations that should be used as entity-filtering scope when reading/writing an entity.
Note
Processing of entity-filtering annotations to create an entity-filtering scope is defined by
following: "Request/Resource entity annotations" >
"Configuration" > "Resource method/class annotations"
(on server).
You can configure entity-filtering on server (basic + security examples) as follows:
Example 19.1. Registering and configuring entity-filtering feature on server.
new ResourceConfig()
// Set entity-filtering scope via configuration.
.property(EntityFilteringFeature.ENTITY_FILTERING_SCOPE, new Annotation[] {ProjectDetailedView.Factory.get()})
// Register the EntityFilteringFeature.
.register(EntityFilteringFeature.class)
// Further configuration of ResourceConfig.
.register( ... );
Example 19.2. Registering and configuring entity-filtering feature with security annotations on server.
new ResourceConfig()
// Set entity-filtering scope via configuration.
.property(EntityFilteringFeature.ENTITY_FILTERING_SCOPE, new Annotation[] {SecurityAnnotations.rolesAllowed("manager")})
// Register the SecurityEntityFilteringFeature.
.register(SecurityEntityFilteringFeature.class)
// Further configuration of ResourceConfig.
.register( ... );
Example 19.3. Registering and configuring entity-filtering feature based on dynamic and configurable query parameters.
new ResourceConfig()
// Set query parameter name for dynamic filtering
.property(SelectableEntityFilteringFeature.QUERY_PARAM_NAME, "select")
// Register the SelectableEntityFilteringFeature.
.register(SelectableEntityFilteringFeature.class)
// Further configuration of ResourceConfig.
.register( ... );
Use similar steps to register entity-filtering on client:
Example 19.4. Registering and configuring entity-filtering feature on client.
final ClientConfig config = new ClientConfig()
// Set entity-filtering scope via configuration.
.property(EntityFilteringFeature.ENTITY_FILTERING_SCOPE, new Annotation[] {ProjectDetailedView.Factory.get()})
// Register the EntityFilteringFeature.
.register(EntityFilteringFeature.class)
// Further configuration of ClientConfig.
.register( ... );
// Create new client.
final Client client = ClientClientBuilder.newClient(config);
// Use the client.
In the next section the entity-filtering features will be illustrated on a project-tracking application that
contains three classes in it's domain model and few resources (only Project resource will be
shown in this chapter). The full source code for the example application can be found in Jersey
Entity Filtering example.
Suppose there are three domain model classes (or entities) in our model:
Project, User and Task (getters/setter are omitted for
brevity).
Example 19.5. Project
public class Project {
private Long id;
private String name;
private String description;
private List<Task> tasks;
private List<User> users;
// getters and setters
}
Example 19.6. User
public class User {
private Long id;
private String name;
private String email;
private List<Project> projects;
private List<Task> tasks;
// getters and setters
}
Example 19.7. Task
public class Task {
private Long id;
private String name;
private String description;
private Project project;
private User user;
// getters and setters
}
To retrieve the entities from server to client, we have created also a couple of JAX-RS resources from whose the
ProjectsResource is shown as example.
Example 19.8. ProjectsResource
@Path("projects")
@Produces("application/json")
public class ProjectsResource {
@GET
@Path("{id}")
public Project getProject(@PathParam("id") final Long id) {
return getDetailedProject(id);
}
@GET
public List<Project> getProjects() {
return getDetailedProjects();
}
}
Entity filtering via annotations is based on an @EntityFiltering meta-annotation. This meta-annotation is used to identify entity-filtering annotations that can be then attached to
domain model classes (supported on both, server and client sides), and
resource methods / resource classes (only on server side)
An example of entity-filtering annotation applicable to a class, field or method can be seen in Example 19.9, “ProjectDetailedView” below.
Example 19.9. ProjectDetailedView
@Target({ElementType.TYPE, ElementType.METHOD, ElementType.FIELD})
@Retention(RetentionPolicy.RUNTIME)
@Documented
@EntityFiltering
public @interface ProjectDetailedView {
/**
* Factory class for creating instances of {@code ProjectDetailedView} annotation.
*/
public static class Factory
extends AnnotationLiteral<ProjectDetailedView>
implements ProjectDetailedView {
private Factory() {
}
public static ProjectDetailedView get() {
return new Factory();
}
}
}
Since creating annotation instances directly in Java code is not trivial, it is a good practice to provide an inner
annotation Factory class in each custom filtering annotation, through which new instances of
the annotation can be directly created. The annotation factory class can be created by extending the HK2
AnnotationLiteral class and implementing the annotation interface itself. It should also provide
a static factory method that will create and return a new instance of the Factory class when
invoked. Such annotation instances can be then passed to the client and server run-times to define or override
entity-filtering scopes.
By placing an entity-filtering annotation on an entity (class, fields, getters or setters) we define a so-called entity-filtering scope for the entity. The purpose of entity-filtering scope is to identify parts of the domain model that should be processed when the model is to be sent over the wire in a particular entity-filtering scope. We distinguish between:
global entity-filtering scope (defined by placing filtering annotation on a class itself), and
local entity-filtering scope (defined by placing filtering annotation on a field, getter or setter)
Unannotated members of a domain model class are automatically added to all existing global entity-filtering scopes. If there is no explicit global entity-filtering scope defined on a class a default scope is created for this class to group these members.
Creating entity-filtering scopes using custom entity-filtering annotations in domain model classes is illustrated in the following examples.
Example 19.10. Annotated Project
public class Project {
private Long id;
private String name;
private String description;
@ProjectDetailedView
private List<Task> tasks;
@ProjectDetailedView
private List<User> users;
// getters and setters
}
Example 19.11. Annotated User
public class User {
private Long id;
private String name;
private String email;
@UserDetailedView
private List<Project> projects;
@UserDetailedView
private List<Task> tasks;
// getters and setters
}
Example 19.12. Annotated Task
public class Task {
private Long id;
private String name;
private String description;
@TaskDetailedView
private Project project;
@TaskDetailedView
private User user;
// getters and setters
}
As you can see in the examples above, we have defined 3 separate scopes using @ProjectDetailedView,
@UserDetailedView and @TaskDetailedView annotations and we have applied
these scopes selectively to certain fields in the domain model classes.
Once the entity-filtering scopes are applied to the parts of a domain model, the entity filtering facility (when enabled) will check the active scopes when the model is being sent over the wire, and filter out all parts from the model for which there is no active scope set in the given context. Therefore, we need a way how to control the scopes active in any given context in order to process the model data in a certain way (e.g. expose the detailed view). We need to tell the server/client runtime which entity-filtering scopes we want to apply. There are 2 ways how to do this for client-side and 3 ways for server-side:
Out-bound client request or server response programmatically created with entity-filtering annotations that identify the scopes to be applied (available on both, client and server)
Property identifying the applied scopes passed through Configuration (available on both, client and server)
Entity-filtering annotations identifying the applied scopes attached to a resource method or class (server-side only)
When the multiple approaches are combined, the priorities of calculating the applied scopes are as follows:
Entity annotations in request or response >
Property passed through Configuration >
Annotations applied to a resource method or class.
In a graph of domain model objects, the entity-filtering scopes are applied to the root node as well as transitively to all the child nodes. Fields and child nodes that do not match at least a single active scope are filtered out. When the scope matching is performed, annotations applied to the domain model classes and fields are used to compute the scope for each particular component of the model. If there are no annotations on the class or it's fields, the default scope is assumed. During the filtering, first, the annotations on root model class and it's fields are considered. For all composite fields that have not been filtered out, the annotations on the referenced child class and it's fields are considered next, and so on.
To pass entity-filtering annotations via Response returned from a resource method you can leverage the Response.ResponseBuilder#entity(Object, Annotation[]) method. The next example illustrates this approach. You will also see why every custom entity-filtering annotation should contain a factory for creating instances of the annotation.
Example 19.13. ProjectsResource - Response entity-filtering annotations
@Path("projects")
@Produces("application/json")
public class ProjectsResource {
@GET
public Response getProjects(@QueryParam("detailed") final boolean isDetailed) {
return Response
.ok()
.entity(new GenericEntity<List<Project>>(EntityStore.getProjects()) {},
isDetailed ? new Annotation[]{ProjectDetailedView.Factory.get()} : new Annotation[0])
.build();
}
}
Annotating a resource method / class is typically easier although it is less flexible and may require more
resource methods to be created to cover all the alternative use case scenarios. For example:
Example 19.14. ProjectsResource - Entity-filtering annotations on methods
@Path("projects")
@Produces("application/json")
public class ProjectsResource {
@GET
public List<Project> getProjects() {
return getDetailedProjects();
}
@GET
@Path("detailed")
@ProjectDetailedView
public List<Project> getDetailedProjects() {
return EntityStore.getProjects();
}
}
To see how entity-filtering scopes can be applied using a Configuration property,
see the Example 19.1, “Registering and configuring entity-filtering feature on server.” example.
When a Project model from the example above is requested in a scope represented by
@ProjectDetailedView entity-filtering annotation, the Project model
data sent over the wire would contain:
Project-id,name,description,tasks,usersTask-id,name,descriptionUser-id,name,email
Or, to illustrate this in JSON format:
{
"description" : "Jersey is the open source (under dual EPL+GPL license) JAX-RS 2.1 (JSR 370) production quality Reference Implementation for building RESTful Web services.",
"id" : 1,
"name" : "Jersey",
"tasks" : [ {
"description" : "Entity Data Filtering",
"id" : 1,
"name" : "ENT_FLT"
}, {
"description" : "OAuth 1 + 2",
"id" : 2,
"name" : "OAUTH"
} ],
"users" : [ {
"email" : "very@secret.com",
"id" : 1,
"name" : "Jersey Robot"
} ]
}For the default entity-filtering scope the filtered model would look like:
Project-id,name,description
Or in JSON format:
{
"description" : "Jersey is the open source (under dual EPL+GPL license) JAX-RS 2.1 (JSR 370) production quality Reference Implementation for building RESTful Web services.",
"id" : 1,
"name" : "Jersey"
}
As mentioned above you can define applied entity-filtering scopes using a property set either in the client
run-time Configuration (see Example 19.4, “Registering and configuring entity-filtering feature on client.”) or by
passing the entity-filtering annotations during a creation of an individual request to be sent to server.
Example 19.15. Client - Request entity-filtering annotations
ClientBuilder.newClient(config)
.target(uri)
.request()
.post(Entity.entity(project, new Annotation[] {ProjectDetailedView.Factory.get()}));
You can use the mentioned method with client injected into a resource as well.
Example 19.16. Client - Request entity-filtering annotations
@Path("clients")
@Produces("application/json")
public class ClientsResource {
@Uri("projects")
private WebTarget target;
@GET
public List<Project> getProjects() {
return target.request()
.post(Entity.entity(project, new Annotation[] {ProjectDetailedView.Factory.get()}));
}
}
Filtering the content sent to the client (or server) based on the authorized security roles is a commonly
required use case. By registering SecurityEntityFilteringFeature you can
leverage the Jersey Entity Filtering facility in connection with standard
javax.annotation.security annotations exactly the same way as you would with custom
entity-filtering annotations described in previous chapters. Supported security annotations are:
Although the mechanics of the Entity Data Filtering feature used for the security annotation-based filtering is the same as with the entity-filtering annotations, the processing of security annotations differs in a few important aspects:
Custom SecurityContext should be set by a container request filter in order to use
@RolesAllowedfor role-based filtering of domain model data (server-side)There is no need to provide entity-filtering (or security) annotations on resource methods in order to define entity-filtering scopes for
@RolesAllowedthat is applied to the domain model components, as all the available roles for the current user are automatically determined using the information from the providedSecurityContext(server-side only).
Note
Instances of security annotations (to be used for programmatically defined scopes either on client or server) can be created using one of the methods in the SecurityAnnotations factory class that is part of the Jersey Entity Filtering API.
Filtering the content sent to the client (or server) dynamically based on query parameters is another commonly required use case. By registering SelectableEntityFilteringFeature you can leverage the Jersey Entity Filtering facility in connection with query parameters exactly the same way as you would with custom entity-filtering annotations described in previous chapters.
Example 19.17. Sever - Query Parameter driven entity-filtering
@XmlRootElement
public class Address {
private String streetAddress;
private String region;
private PhoneNumber phoneNumber;
}
Query parameters are supported in comma delimited "dot notation" style similar to BeanInfo objects
and Spring path expressions. As an example, the following URL:
http://jersey.example.com/addresses/51234?select=region,streetAddress may render only the address's
region and street address properties as in the following example:
To create a custom entity-filtering annotation with special handling, i.e. an field aggregator annotation used to annotate classes like the one in Example 19.19, “Entity-filtering annotation with custom meaning” it is, in most cases, sufficient to implement and register the following SPI contracts:
Implementations of this SPI are invoked to process entity class and it's members. Custom implementations can extend from AbstractEntityProcessor.
Implementations of this SPI are invoked to retrieve entity-filtering scopes from an array of provided annotations.
Example 19.19. Entity-filtering annotation with custom meaning
@Target({ElementType.TYPE})
@Retention(RetentionPolicy.RUNTIME)
@EntityFiltering
public @interface FilteringAggregator {
/**
* Entity-filtering scope to add given fields to.
*/
Annotation filteringScope();
/**
* Fields to be a part of the entity-filtering scope.
*/
String[] fields();
}
To support Entity Data Filtering in custom entity providers (e.g. as in Example 19.20, “Entity Data Filtering support in MOXy JSON binding provider”), it is sufficient in most of the cases to implement and register the following SPI contracts:
To be able to obtain an instance of a filtering object model your provider understands and can act on. The implementations can extend AbstractObjectProvider.
To transform a read-only generic representation of a domain object model graph to be processed into an entity-filtering object model your provider understands and can act on. The implementations can extend AbstractObjectProvider.
Example 19.20. Entity Data Filtering support in MOXy JSON binding provider
@Singleton
public class FilteringMoxyJsonProvider extends ConfigurableMoxyJsonProvider {
@Inject
private Provider<ObjectProvider<ObjectGraph>> provider;
@Override
protected void preWriteTo(final Object object, final Class<?> type, final Type genericType, final Annotation[] annotations,
final MediaType mediaType, final MultivaluedMap<String, Object> httpHeaders,
final Marshaller marshaller) throws JAXBException {
super.preWriteTo(object, type, genericType, annotations, mediaType, httpHeaders, marshaller);
// Entity Filtering.
if (marshaller.getProperty(MarshallerProperties.OBJECT_GRAPH) == null) {
final Object objectGraph = provider.get().getFilteringObject(genericType, true, annotations);
if (objectGraph != null) {
marshaller.setProperty(MarshallerProperties.OBJECT_GRAPH, objectGraph);
}
}
}
@Override
protected void preReadFrom(final Class<Object> type, final Type genericType, final Annotation[] annotations,
final MediaType mediaType, final MultivaluedMap<String, String> httpHeaders,
final Unmarshaller unmarshaller) throws JAXBException {
super.preReadFrom(type, genericType, annotations, mediaType, httpHeaders, unmarshaller);
// Entity Filtering.
if (unmarshaller.getProperty(MarshallerProperties.OBJECT_GRAPH) == null) {
final Object objectGraph = provider.get().getFilteringObject(genericType, false, annotations);
if (objectGraph != null) {
unmarshaller.setProperty(MarshallerProperties.OBJECT_GRAPH, objectGraph);
}
}
}
}
List of modules from Jersey workspace that support Entity Filtering:
In order to use Entity Filtering in mentioned modules you need to explicitly register either EntityFilteringFeature, SecurityEntityFilteringFeature or SelectableEntityFilteringFeature to activate Entity Filtering for particular module.
To see a complete working examples of entity-filtering feature refer to the:
Table of Contents
Jersey provides an extension to support the Model-View-Controller (MVC) design pattern. In the context of Jersey components, the Controller from the MVC pattern corresponds to a resource class or method, the View to a template bound to the resource class or method, and the model to a Java object (or a Java bean) returned from a resource method (Controller).
Note
Some of the passages/examples from this chapter have been taken from MVCJ blog article written by Paul Sandoz.
In Jersey 2, the base MVC API consists of two classes (org.glassfish.jersey.server.mvc package)
that can be used to bind model to view (template), namely Viewable and @Template.
These classes determine which approach (explicit/implicit) you would be taking when working with Jersey MVC
templating support.
In this approach a resource method explicitly returns a reference to a view template and the data model to be
used. For this purpose the Viewable class has been introduced in Jersey 1 and is also
present (under a different package) in Jersey 2. A simple example of usage can be seen in
Example 20.1, “Using Viewable in a resource class”.
Example 20.1. Using Viewable in a resource class
package com.example;
@Path("foo")
public class Foo {
@GET
public Viewable get() {
return new Viewable("index.foo", "FOO");
}
}
In this example, the Foo JAX-RS resource class is the controller and the
Viewable instance encapsulates the provided data model (FOO string)
and a named reference to the associated view template (index.foo).
Tip
All HTTP methods may return Viewable instances. Thus a POST method may
return a template reference to a template that produces a view as a result of processing an
HTML Form.
There is no need to use Viewable every time you want to bind a model to a template. To
make the resource method more readable (and to avoid verbose wrapping of a template reference and model into
Viewable) you can simply annotate a resource method with @Template
annotation. An updated example, using @Template, from previous section is shown in
Example 20.2, “Using @Template on a resource method” example.
Example 20.2. Using @Template on a resource method
package com.example;
@Path("foo")
public class Foo {
@GET
@Template(name = "index.foo")
public String get() {
return "FOO";
}
}
In this example, the Foo JAX-RS resource class is still the controller as in previous
section but the MVC model is now represented by the return value of annotated resource method.
The processing of such a method is then essentially the same as if the return type of the method was an
instance of the Viewable class. If a method is annotated with
@Template and is also returning a
Viewable instance then the values from the
Viewable instance take precedence over those defined in the annotation. Producible
media types are for both cases, Viewable and @Template,
determined by the method or class level @Produces annotation.
A resource class can have templates implicitly associated with it via @Template annotation.
For example, take a look at the resource class listing in Example 20.3, “Using @Template on a resource class”.
Example 20.3. Using @Template on a resource class
@Path("foo")
@Template
public class Foo {
public String getFoo() {
return "FOO";
}
}
The example relies on Jersey MVC conventions a lot and requires more explanation as such. First of all, you may
have noticed that there is no resource method defined in this JAX-RS resource. Also, there is no template
reference defined.
In this case, since the @Template annotation placed on the resource class does not
contain any information, the default relative template reference index will be used (for more
on this topic see Section 20.3, “Absolute vs. Relative template reference”).
As for the missing resource methods, a default @GET method will be automatically generated by Jersey
for the Foo resource (which is the MVC Controller now). The implementation of the generated
resource method performs the equivalent of the following explicit resource method:
@GET
public Viewable get() {
return new Viewable("index", this);
}
You can see that the resource class serves in this case also as the model. Producible media types are determined
based on the @Produces annotation declared on the resource class, if any.
Note
In case of "resource class"-based implicit MVC view templates, the controller is also the model. In such
case the template reference index is special, it is the template reference
associated with the controller instance itself.
In the following example, the MVC controller represented by a JAX-RS @GET sub-resource method,
is also generated in the resource class annotated with @Template:
@GET
@Path("{implicit-view-path-parameter}")
public Viewable get(@PathParameter("{implicit-view-path-parameter}") String template) {
return new Viewable(template, this);
}
This allows Jersey to support also implicit sub-resource templates. For example, a JAX-RS resource at path
foo/bar will try to use relative template reference bar that resolves to an
absolute template reference /com/foo/Foo/bar.
In other words, a HTTP GET request to a /foo/bar would be handled by this
auto-generated method in the Foo resource and would delegate the request to a registered
template processor supports processing of the absolute template reference
/com/foo/Foo/bar, where the model is still an instance of the same JAX-RS resource class
Foo.
As discussed in the previous section, both @Template and Viewable provide means to define a reference to a template. We will now discuss how these values are interpreted and how the concrete template is found.
Relative reference is any path that does not start with a leading '/' (slash) character (i.e.
index.foo). This kind of references is resolved into absolute ones by pre-pending a given value
with a fully qualified name of the last matched resource.
Consider the Example 20.3, “Using @Template on a resource class” from the previous section,
the template name reference index is a relative value that Jersey will resolve to its
absolute template reference using a fully qualified class name of Foo (more on resolving
relative template name to the absolute one can be found in the JavaDoc of Viewable class),
which, in our case, is:
"/com/foo/Foo/index"
Jersey will then search all the registered template processors (see Section 20.7, “Writing Custom Templating Engines”) to find a template processor that can resolve the absolute template reference further to a "processable" template reference. If a template processor is found then the "processable" template is processed using the supplied data model.
Note
If none or empty template reference is provided (either in Viewable or via
@Template) then the index reference is assumed and all further
processing is done for this value.
Let's change the resource GET method in our Foo resource a little:
Example 20.4. Using absolute path to template in Viewable
@GET
public Viewable get() {
return new Viewable("/index", "FOO");
}
In this case, since the template reference begins with "/", Jersey will consider the reference
to be absolute already and will not attempt to absolutize it again. The reference will be used "as is" when
resolving it to a "processable" template reference as described earlier.
Absolute template references start with leading '/' (i.e. /com/example/index.foo)
character and are not further resolved (with respect to the resolving resource class) which means that the
template is looked for at the provided path directly.
Note, however, that template processors for custom templating engines may modify (and the supported ones do)
absolute template reference by pre-pending 'base template path' (if defined) and appending template suffix (i.e.
foo) if the suffix is not provided in the reference.
For example assume that we want to use Mustache templates for our views and we have defined 'base template path'
as pages. For the absolute template reference /com/example/Foo/index the template
processor will transform the reference into the following path: /pages/com/example/Foo/index.mustache.
In addition to @Template a @ErrorTemplate annotation has been introduced in Jersey 2.3. The purpose of this annotation is to bind the model to an error view in case an exception has been raised during processing of a request. This is true for any exception thrown after the resource matching phase (i.e. this not only applies to JAX-RS resources but providers and even Jersey runtime as well). The model in this case is the thrown exception itself.
Example 20.5, “Using @ErrorTemplate on a resource method” shows how to use @ErrorTemplate on a resource method.
If all goes well with the method processing, then the /short-link template is used to as page sent
to the user. Otherwise if an exception is raised then the /error-form template is shown to the user.
Example 20.5. Using @ErrorTemplate on a resource method
@POST
@Produces({"text/html”})
@Consumes(MediaType.APPLICATION_FORM_URLENCODED)
@Template(name = "/short-link")
@ErrorTemplate(name = "/error-form")
public ShortenedLink createLink(@FormParam("link") final String link) {
// ...
}Note that @ErrorTemplate can be used on a resource class or a resource method to merely handle error states. There is no need to use @Template or Viewable with it.
The annotation is handled by custom ExceptionMapper<E extends Throwable> which creates an instance of
Viewable that is further processed by Jersey. This exception mapper is registered automatically
with a MvcFeature.
@ErrorTemplate can be used in also with Bean Validation to display specific error pages in
case the validation of input/output values fails for some reason. Everything works as described above except the
model is not the thrown exception but rather a list of ValidationErrors. This list can be iterated in
the template and all the validation errors can be shown to the user in a desirable way.
Example 20.6. Using @ErrorTemplate with Bean Validation
@POST
@Produces({"text/html”})
@Consumes(MediaType.APPLICATION_FORM_URLENCODED)
@Template(name = "/short-link”) @ErrorTemplate(name = "/error-form")
@Valid
public ShortenedLink createLink(@NotEmpty @FormParam("link") final String link) {
// ...
}Example 20.7. Iterating through ValidationError in JSP
<c:forEach items="${model}" var="error">
${error.message} "<strong>${error.invalidValue}</strong>"<br/>
</c:forEach>
Support for Bean Validation in Jersey MVC Templates is provided by a jersey-mvc-bean-validation
extension module. The JAX-RS Feature provided by this module
(MvcBeanValidationFeature) has to be registered in order to use this
functionality (see Section 20.5, “Registration and Configuration”).
Maven users can find this module at coordinates
<dependency>
<groupId>org.glassfish.jersey.ext</groupId>
<artifactId>jersey-mvc-bean-validation</artifactId>
<version>2.29.1</version>
</dependency>and for non-Maven users the list of dependencies is available at jersey-mvc-bean-validation.
To use the capabilities of Jersey MVC templating support in your JAX-RS/Jersey application you need to register
specific JAX-RS Features provided by the MVC modules. For jersey-mvc module it is
MvcFeature for others it could be, for example, FreemarkerMvcFeature
(jersey-mvc-freemarker).
Example 20.8. Registering MvcFeature
new ResourceConfig()
.register(org.glassfish.jersey.server.mvc.MvcFeature.class)
// Further configuration of ResourceConfig.
.register( ... );
Example 20.9. Registering FreemarkerMvcFeature
new ResourceConfig()
.register(org.glassfish.jersey.server.mvc.freemarker.FreemarkerMvcFeature.class)
// Further configuration of ResourceConfig.
.register( ... );
Note
Modules that uses capabilities of the base Jersey MVC module register MvcFeature
automatically, so you don't need to register this feature explicitly in your code.
Almost all of the MVC modules are further configurable and either contain a *Properties
(e.g. FreemarkerMvcProperties) class describing all the available properties which could be
set in a JAX-RS Application / ResourceConfig. Alternatively, the properties
are listed directly in the module *Feature class.
Example 20.10. Setting MvcFeature.TEMPLATE_BASE_PATH value in ResourceConfig
new ResourceConfig()
.property(MvcFeature.TEMPLATE_BASE_PATH, "templates")
.register(MvcFeature.class)
// Further configuration of ResourceConfig.
.register( ... );
Example 20.11. Setting FreemarkerMvcProperties.TEMPLATE_BASE_PATH value in web.xml
<servlet>
<servlet-name>org.glassfish.jersey.examples.freemarker.MyApplication</servlet-name>
<servlet-class>org.glassfish.jersey.servlet.ServletContainer</servlet-class>
<init-param>
<param-name>javax.ws.rs.Application</param-name>
<param-value>org.glassfish.jersey.examples.freemarker.MyApplication</param-value>
</init-param>
<init-param>
<param-name>jersey.config.server.mvc.templateBasePath.freemarker</param-name>
<param-value>freemarker</param-value>
</init-param>
<load-on-startup>1</load-on-startup>
</servlet>
Jersey provides extension modules that enable support for several templating engines. This section lists all the supported engines and their modules as well as discusses any module-specific details.
An integration module for Mustache-based templating engine.
Mustache template processor resolves absolute template references to processable template references represented as Mustache templates as follows:
Procedure 20.1. Resolving Mustache template reference
if the absolute template reference does not end in
.mustacheappend this suffix to the reference; andif
ServletContext.getResource,Class.getResourceorFile.existsreturns a non-nullvalue for the reference then return the reference as the processable template reference otherwise returnnull(to indicate the absolute reference has not been resolved by the Mustache template processor).
Thus the absolute template reference /com/foo/Foo/index would be resolved as
/com/foo/Foo/index.mustache, provided there exists a
/com/foo/Foo/index.mustache
Mustache template in the application.
Available configuration properties:
MustacheMvcFeature.TEMPLATE_BASE_PATH-jersey.config.server.mvc.templateBasePath.mustacheThe base path where Mustache templates are located.
MustacheMvcFeature.CACHE_TEMPLATES-jersey.config.server.mvc.caching.mustacheEnables caching of Mustache templates to avoid multiple compilation.
MustacheMvcFeature.TEMPLATE_OBJECT_FACTORY-jersey.config.server.mvc.factory.mustacheProperty used to pass user-configured
MustacheFactory.MustacheMvcFeature.ENCODING-jersey.config.server.mvc.encoding.mustacheProperty used to configure a default encoding that will be used if none is specified in @Produces annotation. If property is not defined the UTF-8 encoding will be used as a default value.
Maven users can find this module at coordinates
<dependency>
<groupId>org.glassfish.jersey.ext</groupId>
<artifactId>jersey-mvc-mustache</artifactId>
<version>2.29.1</version>
</dependency>and for non-Maven users the list of dependencies is available at jersey-mvc-mustache.
An integration module for Freemarker-based templating engine.
Freemarker template processor resolves absolute template references to processable template references represented as Freemarker templates as follows:
Procedure 20.2. Resolving Freemarker template reference
if the absolute template reference does not end in
.ftlappend this suffix to the reference; andif
ServletContext.getResource,Class.getResourceorFile.existsreturns a non-nullvalue for the reference then return the reference as the processable template reference otherwise returnnull(to indicate the absolute reference has not been resolved by the Freemarker template processor).
Thus the absolute template reference /com/foo/Foo/index would be resolved to
/com/foo/Foo/index.ftl, provided there exists a /com/foo/Foo/index.ftl
Freemarker template in the application.
Jersey will assign the model instance to an attribute named model.
So it is possible to reference the foo key from the provided Map (MVC Model)
resource from the Freemarker template as follows:
<h1>${model.foo}</h1>
Available configuration properties:
FreemarkerMvcFeature.TEMPLATE_BASE_PATH-jersey.config.server.mvc.templateBasePath.freemarkerThe base path where Freemarker templates are located.
FreemarkerMvcFeature.CACHE_TEMPLATES-jersey.config.server.mvc.caching.freemarkerEnables caching of Freemarker templates to avoid multiple compilation.
FreemarkerMvcFeature.TEMPLATE_OBJECT_FACTORY-jersey.config.server.mvc.factory.freemarkerProperty used to pass user-configured
FreemarkerFactory.FreemarkerMvcFeature.ENCODING-jersey.config.server.mvc.encoding.freemarkerProperty used to configure a default encoding that will be used if none is specified in @Produces annotation. If property is not defined the UTF-8 encoding will be used as a default value.
Maven users can find this module at coordinates
<dependency>
<groupId>org.glassfish.jersey.ext</groupId>
<artifactId>jersey-mvc-freemarker</artifactId>
<version>2.29.1</version>
</dependency>and for non-Maven users the list of dependencies is available at jersey-mvc-freemarker.
An integration module for JSP-based templating engine.
Limitations of Jersey JSP MVC Templates
Jersey web applications that want to use JSP templating support should be registered as Servlet
filters rather than Servlets in the application's web.xml. The
web.xml-less deployment style introduced in Servlet 3.0 is not supported at the moment
for web applications that require use of Jersey MVC templating support.
JSP template processor resolves absolute template references to processable template references represented as JSP pages as follows:
Procedure 20.3. Resolving JSP template reference
if the absolute template reference does not end in
.jspappend this suffix to the reference; andif
ServletContext.getResourcereturns a non-nullvalue for the reference then return the reference as the processable template reference otherwise returnnull(to indicate the absolute reference has not been resolved by the JSP template processor).
Thus the absolute template reference /com/foo/Foo/index would be resolved to
/com/foo/Foo/index.jsp, provided there exists a /com/foo/Foo/index.jsp
JSP page in the web application.
Jersey will assign the model instance to the attribute named model or it.
So it is possible to reference the foo property on the Foo resource
from the JSP template as follows:
<h1>${model.foo}</h1>or
<h1>${it.foo}</h1>
To include another JSP page in the currently processed one a custom include tag can be used.
Mandatory parameter page represents a relative template name which would be absolutized using
the same resolving resource class as the parent JSP page template.
Example 20.12. Including JSP page into JSP page
<%@page contentType="text/html"%>
<%@page pageEncoding="UTF-8"%>
<%@taglib prefix="rbt" uri="urn:org:glassfish:jersey:servlet:mvc" %>
<html>
<body>
<rbt:include page="include.jsp"/>
</body>
</html>
Available configuration properties:
JspMvcFeature.TEMPLATE_BASE_PATH-jersey.config.server.mvc.templateBasePath.jspThe base path where JSP templates are located.
Maven users can find this module at coordinates
<dependency>
<groupId>org.glassfish.jersey.ext</groupId>
<artifactId>jersey-mvc-jsp</artifactId>
<version>2.29.1</version>
</dependency>and for non-Maven users the list of dependencies is available at jersey-mvc-jsp.
To add support for other (custom) templating engines into Jersey MVC Templating facility, you need to implement the TemplateProcessor and register this class into your application.
Tip
When writing template processors it is recommend that you use an appropriate unique suffix for the processable template references, in which case it is then possible to easily support mixing of multiple templating engines in a single application without conflicts.
Example 20.13. Custom TemplateProcessor
@Provider
class MyTemplateProcessor implements TemplateProcessor<String> {
@Override
public String resolve(String path, final MediaType mediaType) {
final String extension = ".testp";
if (!path.endsWith(extension)) {
path = path + extension;
}
final URL u = this.getClass().getResource(path);
return u == null ? null : path;
}
@Override
public void writeTo(String templateReference,
Viewable viewable,
MediaType mediaType,
OutputStream out) throws IOException {
final PrintStream ps = new PrintStream(out);
ps.print("path=");
ps.print(templateReference);
ps.println();
ps.print("model=");
ps.print(viewable.getModel().toString());
ps.println();
}
}
Example 20.14. Registering custom TemplateProcessor
new ResourceConfig()
.register(MyTemplateProcessor.class)
// Further configuration of ResourceConfig.
.register( ... );
Note
In a typical set-up projects using the Jersey MVC templating support would depend on the base module that
provides the API and SPI and a single templating engine module for the templating engine of your choice.
These modules need to be mentioned explicitly in your pom.xml file.
If you want to use just templating API infrastructure provided by Jersey for the MVC templating support in order to implement your custom support for a templating engine other than the ones provided by Jersey, you will need to add the base jersey-mvc module into the list of your dependencies:
<dependency>
<groupId>org.glassfish.jersey.ext</groupId>
<artifactId>jersey-mvc</artifactId>
<version>2.29.1</version>
</dependency>
To see an example of MVC (JSP) templating support in Jersey refer to the MVC (Bookstore) Example.
Jersey Logging supports the logging request and response via internal client and server filters, which are
configured and registered by LoggingFeature 's properties. LoggingFeature
has been introduced in Jersey 2.23 version and deprecates an older LoggingFilter.
LoggingFeature might be discovered by
auto-discoverable mechanism
or initialized by registering on client or server components. Client or server logging filter is initialized
depending on which context is LoggingFeature registered with.
Configurable options
Logger nameDefines a logger used to log request and response messages.
Default value is LoggingFeature.DEFAULT_LOGGER_NAME.
Logger levelDefines level that will be used to log messages by logging filters. Messages will be logged only if the effective level of the logger allows it.
Default value is LoggingFeature.DEFAULT_LOGGER_LEVEL.
VerbosityVerbosity determines how detailed message will be logged. See LoggingFeature.Verbosity javadoc.
The lowest verbosity LoggingFeature.Verbosity.HEADERS_ONLY will log only request/response headers.
The medium verbosity (LoggingFeature.Verbosity.PAYLOAD_TEXT) will log request/response headers, as well as an entity if considered a readable text. The entity is considered a readable text, if MediaType is
text/*or is one ofapplication/atom+xmlapplication/jsonapplication/svg+xmlapplication/x-www-form-urlencodedapplication/xhtml+xmlapplication/xml
The highest verbosity LoggingFeature.Verbosity.PAYLOAD_ANY will log all types of an entity (besides the request/response headers.
Note that the entity is logged up to the specified maximum number of bytes (see LoggingFeature.LOGGING_FEATURE_MAX_ENTITY_SIZE).
Default value is LoggingFeature.DEFAULT_VERBOSITY.
Maximum entity sizeMaximum number of entity bytes to be logged (and buffered) - if the entity is larger, logging filter will print (and buffer in memory) only the specified number of bytes and print "...more..." string at the end. Negative values are interpreted as zero.
Default value LoggingFeature.DEFAULT_MAX_ENTITY_SIZE.
The feature is enabled on when auto-discoverable mechanism is not disabled and at least one of the feature's
property is set. For enabling client or server logging filter one of the
common properties or
_CLIENT
suffixed properties, or
_SERVER properties
respectively.
An example of initializing server-side logging with the highest verbosity.
Example 21.1. Logging on the client side
ClientConfig clientConfig = new ClientConfig();
clientConfig.property(LoggingFeature.LOGGING_FEATURE_VERBOSITY_CLIENT, LoggingFeature.Verbosity.PAYLOAD_ANY);
Client client = ClientBuilder.newClient(clientConfig);
The LoggingFeature might be registered explicitly on ResourceConfig for
server-side logging or on Client for client-side logging.
Example 21.2. Register LoggingFeature via constructor
ResourceConfig config = new ResourceConfig(HelloWorldResource.class);
config.register(new LoggingFeature(LOGGER, LoggingFeature.Verbosity.PAYLOAD_ANY));
Following examples demonstrate registering LoggingFeature on server-side with default
values and values defined by one of the public constructors (see LoggingFeature).
Example 21.3. Register LoggingFeature class
ResourceConfig config = new ResourceConfig(HelloWorldResource.class);
config.register(LoggingFeature.class);
An example of server-side logging with entity
Hello World!
1 May 09, 2016 2:55:33 PM org.glassfish.jersey.logging.LoggingInterceptor log 2 INFO: 1 * Server has received a request on thread grizzly-http-server-0 3 1 > GET http://localhost:9998/helloworld 4 1 > accept: text/plain 5 1 > accept-encoding: gzip,deflate 6 1 > connection: Keep-Alive 7 1 > host: localhost:9998 8 1 > user-agent: Jersey/3.0-SNAPSHOT (Apache HttpClient 4.5) 9 10 May 09, 2016 2:55:33 PM org.glassfish.jersey.logging.LoggingInterceptor log 11 INFO: 1 * Server responded with a response on thread grizzly-http-server-0 12 1 < 200 13 1 < Content-Type: text/plain 14 Hello World!
Table of Contents
Important
Jersey monitoring support has been released as a beta release in Jersey 2.1 version. As such, the exposed monitoring public APIs and functionality described in this section may change in the future Jersey releases.
Jersey provides functionality for monitoring JAX-RS/Jersey applications. Application monitoring is useful in cases when you need to identify the performance hot-spots in your JAX-RS application, observe execution statistics of particular resources or listen to application or request lifecycle events. Note that this functionality is Jersey-specific extension to JAX-RS API.
Jersey monitoring support is divided into three functional areas:
- Event Listeners
Event listeners allow users to receive and process a predefined set of events that occur during a application lifecycle (such as application initialization, application destroy) as well as request processing lifecycle events (request started, resource method finished, exception thrown, etc.). This feature is always enabled in Jersey server runtime and is leveraged by the other monitoring features.
- Monitoring Statistics
Jersey can be configured to process lifecycle events in order to expose a wide range of runtime monitoring statistics to the end user. The statistics are accessible trough an injectable MonitoringStatistics interface. The statistics provide general information about the application as well as fine-grained execution statistics on particular resources and sub resources and exposed URIs. For performance reasons, this functionality must be explicitly enabled prior using.
- JMX MBeans with statistics
In addition to the injectable
MonitoringStatisticsdata, Jersey is able to expose the statistics as JMX MBeans (for example ApplicationMXBean). Jersey monitoring MXBeans can be accessed programmatically using JMX APIs or browsed via JMX-enabled tool (JConsolefor example). This functionality is, too, by default disabled for performance reasons and must be enabled if needed.
All monitoring related APIs (beta!) can be found in the jersey-server module in
org.glassfish.jersey.server.monitoring package. Monitoring in Jersey is currently supported on
the server side.
Jersey defines two types of event listeners that you can implement and register with your application:
ApplicationEventListener for listening to application events, and
RequestEventListener for listening to events of request processing.
Only the first type, ApplicationEventListener
can be directly registered as an application-wide provider. The RequestEventListener
is designed to be specific to every request and can be only returned from the
ApplicationEventListener as such.
Let's start with an example. The following examples show simple implementations of Jersey event listeners as well as a test JAX-RS resource that will be monitored.
Example 22.1. Application event listener
public class MyApplicationEventListener
implements ApplicationEventListener {
private volatile int requestCnt = 0;
@Override
public void onEvent(ApplicationEvent event) {
switch (event.getType()) {
case INITIALIZATION_FINISHED:
System.out.println("Application "
+ event.getResourceConfig().getApplicationName()
+ " was initialized.");
break;
case DESTROY_FINISHED:
System.out.println("Application "
+ event.getResourceConfig().getApplicationName() destroyed.");
break;
}
}
@Override
public RequestEventListener onRequest(RequestEvent requestEvent) {
requestCnt++;
System.out.println("Request " + requestCnt + " started.");
// return the listener instance that will handle this request.
return new MyRequestEventListener(requestCnt);
}
}
Example 22.2. Request event listener
public class MyRequestEventListener implements RequestEventListener {
private final int requestNumber;
private final long startTime;
public MyRequestEventListener(int requestNumber) {
this.requestNumber = requestNumber;
startTime = System.currentTimeMillis();
}
@Override
public void onEvent(RequestEvent event) {
switch (event.getType()) {
case RESOURCE_METHOD_START:
System.out.println("Resource method "
+ event.getUriInfo().getMatchedResourceMethod()
.getHttpMethod()
+ " started for request " + requestNumber);
break;
case FINISHED:
System.out.println("Request " + requestNumber
+ " finished. Processing time "
+ (System.currentTimeMillis() - startTime) + " ms.");
break;
}
}
}
Example 22.3. Event listener test resource
@Path("resource")
public class TestResource {
@GET
public String getSomething() {
return "get";
}
@POST
public String postSomething(String entity) {
return "post";
}
}
Once the listeners and the monitored resource is defined, it's time to initialize our application. The following
piece of code shows a ResourceConfig that is used to initialize the application (please
note that only ApplicationEventListener is registered as provider).
ResourceConfig resourceConfig =
new ResourceConfig(TestResource.class, MyApplicationEventListener.class)
.setApplicationName("my-monitored-application");
Our example application now contains a simple resource TestResource that defines resource methods
for GET and POST and a custom MyApplicationEventListener event listener.
The registered MyApplicationEventListener implements two methods defined by the
ApplicationEventListener interface. A method onEvent() handles
all application lifecycle events. In our case the method handles only 2 application events - initialization
and destroy. Other event types are ignored. All application event types are defined
in ApplicationEvent.Type. The second method onRequest
is invoked by Jersey runtime every time a new request is received. The request event type passed to the method
is always START. If you want to listen to any other request lifecycle events for the new request,
you are expected to return an instance of RequestEventListener that will handle the
request. It is important to understand, that the instance will handle only the request for which it has been returned
from an ApplicationEventListener.onRequest method and not any other requests. In our case the
returned request event listener keeps information about the request number of the current request and a start time of
the request which is later used to print out the request processing times statistics. This demonstrates the principle
of listening to request events: for one request there is a one instance which can be used to hold all the information
about the particular request. In other words, RequestEventListener is designed to be
implicitly request-scoped.
Jersey represents lifecycle events via RequestEvent and
ApplicationEvent types. Instances of these classes contain information
about respective events. The most important information is the event type Type retrievable via
getType() method,
which identifies the type of the event. Events contain also additional information that is dependent on a particular
event type. This information can be retrieved via event getters. Again, some getters return valid information for all
event types, some are specific to a sub-set of event types. For example, in the
RequestEvent, the getExceptionCause() method returns valid
information only when event type is ON_EXCEPTION. On the other hand,
a getContainerRequest() can be used to return current request context for any request event type.
See javadoc of events and event types to get familiar with event types and information valid for each event type.
Our MyRequestEventListener implementation is focused on processing 2 request events. First,
it listens for an event that is triggered before a resource method is executed. Also, it hooks to a "request finished"
event. As mentioned earlier, the request event START is handled only in the
MyApplicationEventListener. The START event type will never be invoked on
RequestEventListener. Therefore the logic for measuring the startTime is in the
constructor which is invoked from MyApplicationEventListener.onRequest(). An attempt to handling
the request START event in a RequestEventListener.onEvent() method would be a
mistake.
Let's deploy the application and use a simple test client code to produce some activity in order to spawn new events:
target.path("resource").request()
.post(Entity.entity("post", MediaType.TEXT_PLAIN_TYPE));
target.path("resource").request().get();
In the code above, the target is a WebTarget instance pointing to the application
context root path. Using the Chapter 5, Client API, we invoke GET and POST methods
on the MyResource JAX-RS resource class that we implemented earlier.
When we start the application, run the test client and then stop the application, the console output for the deployed server-side application would contain the following output:
Application my-monitored-application was initialized. Request 1 started. Resource method POST started for request 1 Request 1 finished. Processing time 330 ms. Request 2 started. Resource method GET started for request 2 Request 2 finished. Processing time 4 ms. Application my-monitored-application destroyed.
Implement event listeners as thread safe. While individual events will be arriving serially, individual listener invocations may occur from different threads. Thus make sure that your listeners are processing data safely with respect to their Java Memory Model visibility (in the example above the fields
requestNumber,startTimeofMyRequestEventListenerare final and therefore the same value is visible for all threads executing theonEvent()method).Do not block the thread executing the event listeners by performing long-running tasks. Execution of event listeners is a part of the standard application and request processing and as such needs to finish as quickly as possible to avoid negative impact on overall application performance.
Do not try to modify mutable objects returned from
ApplicationEventandRequestEventgetters to avoid experiencing undefined behavior. Events listeners should use the information for read only purposes only. Use different techniques like filters, interceptors or other providers to modify the processing of requests and applications. Even though modification might be possible and might work as desired now, your code is in risk of producing intermittent failures or unexpected behaviour (for example after migrating to new Jersey version).If you do not want to listen to request events, do not return an empty listener in the
onRequest()method. Returnnullinstead. Returning empty listener might have a negative performance impact. Do not rely on JIT optimizing out the empty listener invocation code.If you miss any event type or any detail in the events, let us know via Jersey user mailing list.
Event listeners described in the previous section are all-purpose facility. For example, you may decide to use them to measure various execution statistics of your application. While this might be an easy task for simple statistics like "how much time was spent on execution of each Java method?", nevertheless, if you want to measure statistics based on URIs and individual resources, the implementation might get rather complex soon, especially when considering sub-resources and sub-resource locators. To save you the trouble, Jersey provides feature for collecting events and calculating a pre-defined set of monitoring and execution statistics, including application configuration, exception mappers execution, minimum/maximum/average execution times for individual resource methods as well as entire request processing etc.
Calculating the monitoring statistics has obviously a performance impact, therefore this feature is
disabled by default. To enable the feature, set the following configuration property to true:
jersey.config.server.monitoring.statistics.enabled=true
The property description can be found in ServerProperties.MONITORING_STATISTICS_ENABLED This will calculate the statistics. The easiest way how to get statistics is to let Jersey to inject them. See the following example:
Example 22.4. Injecting MonitoringStatistics
@Path("resource")
public static class StatisticsResource {
@Inject
Provider<MonitoringStatistics> monitoringStatisticsProvider;
@GET
public String getSomething() {
final MonitoringStatistics snapshot
= monitoringStatisticsProvider.get().snapshot();
final TimeWindowStatistics timeWindowStatistics
= snapshot.getRequestStatistics()
.getTimeWindowStatistics().get(0l);
return "request count: " + timeWindowStatistics.getRequestCount()
+ ", average request processing [ms]: "
+ timeWindowStatistics.getAverageDuration();
}
}}
MonitoringStatistics are
injected into the resource using an @Inject annotation.
Please note the usage of the Provider for injection (it will be discussed later).
Firstly, the snapshot of statistics is retrieved by the snapshot() method.
The snapshot of statistics is an immutable copy of statistics which does not change over the time.
Additionally, data in a snapshot are consistent. It's recommended to create snapshots before working with
the statistics data and then process the snapshot data.
Working with original non-snapshot data makes sense when data consistency is not important and
performance is of highest concern. While it is currently not the case, the injected non-snapshot data may
be implemented as mutable for performance reasons in a future release of Jersey.
The injected monitoring statistics represent the root of the collected statistics hierarchy. The hierarchy
can be traversed to retrieve any partial statistics data. In the example, we retrieve certain request
TimeWindowStatistics data. In our case, those are the request execution statistics
for a time window defined by long value 0 which means unlimited time window. This means we are retrieving
the global request execution statistics measured since a start of the application.
Finally, request count and average duration from the statistics are used to produce the String response.
When we invoke few GET requests on the StatisticsResource, we get the
following console output:
request count: 1, average request processing [ms]: 260 request count: 2, average request processing [ms]: 135 request count: 3, average request processing [ms]: 93 request count: 4, average request processing [ms]: 73
Let's look closer at MonitoringStatistics interface.
MonitoringStatistics interface defines getters by which other nested
statistics can be retrieved. All statistics are in the same package and ends with
Statistics postfix. Statistics interfaces are the following:
- MonitoringStatistics
main top level statistics
- ResponseStatistics
response statistics (eg. response status codes and their count)
- ResourceStatistics
statistics of execution of resources (resource classes or resource URIs)
- ResourceMethodStatistics
statistics of execution of resource methods
- ExecutionStatistics
statistic of execution of a target (resource, request, resource method)
- TimeWindowStatistics
statistics of execution time in specific interval (eg. executions in last 5 minutes)
Each time-monitored target contains ExecutionStatistics. So, for example
resource method contains execution statistics of its execution. Each
ExecutionStatistics contains multiple
TimeWindowStatistics. Currently, each
ExecutionStatistics contains
TimeWindowStatistics for these time windows:
0: unlimited=> all execution since start of the application
1000: 1s => stats measured in last 1 second
15000: 15s => stats measured in last 15 seconds
60000: 1min => stats measured in last 1 minute
900000: 15min => stats measured in last 15 minutes
3600000: 1hour => stats measured in last hour minutes
All the time window statistics can be retrieved from a Map<Long, TimeWindowStatistics>
map returned from ExecutionStatistics.getTimeWindowStatistics(). Key of the map
is the number of milliseconds of interval (so, for example key 60000 points
to statistics for last one minute).
Note, that snapshot() method was called in the example only on the top level
MonitoringStatistics. This produced a snapshot of the entire
tree of statistics and therefore we do not need to call snapshot()
on TimeWindowStatistics again.
Statistics are injected using the Provider. This is preferred way of
injecting statistics. The reason is simple. Statistics might change over time and contract
of MonitoringStatistics does not make any assumptions about mutability of
monitoring statistics instances (to allow future optimizations and changes in implementation strategy). In
order to get always latest statistics, we recommend injecting a Provider rather than a
direct reference and use it's get() method to retrieve the latest statistics. For example,
in singleton resources the use of the technique is very important otherwise statistics might correspond
to the time when singleton was firstly created and might not update since that time.
Statistics are not calculated for each request or each change. Statistics are calculated only from the collected data in regular intervals for performance reasons (for example once per second). If you want to be notified about new statistics, register an implementation of MonitoringStatisticsListener as one of your custom application providers. Your listener will be called every time the new statistics are calculated and the updated statistics data will be passed to the listener method. This is another way of receiving statistics. See the linked listener API documentation for more information.
Note
Jersey examples contains a Monitoring Web Application Example which demonstrates usage of MBean statistics.
Jersey provides feature to expose monitoring statistics as JMX MXBeans.
In order to enable monitoring statistics MXBeans exposure, the
ServerProperties.MONITORING_STATISTICS_MBEANS_ENABLED must be set to true.
jersey.config.server.monitoring.statistics.mbeans.enabled=true
Note that enabling exposure of monitoring MXBeans causes that also the calculation of
MonitoringStatistics is automatically enabled as the exposed
MXBean statistics are extracted from MonitoringStatistics.
The easiest way is to browse the MXBeans in the JConsole. Open the JConsole
($JAVA_HOME/bin/jconsole). Then connect to the process where JAX-RS application is running
(server on which the application is running). Switch to a MBean tab and in the MBean tree on the left side
find a group org.glassfish.jersey. All deployed Jersey applications are located under this
group. If you don't see such this group, then MBeans are not exposed (check the configuration property and
logs if they not contain any exceptions or errors). The following figure is an example of an output from the
JConsole:
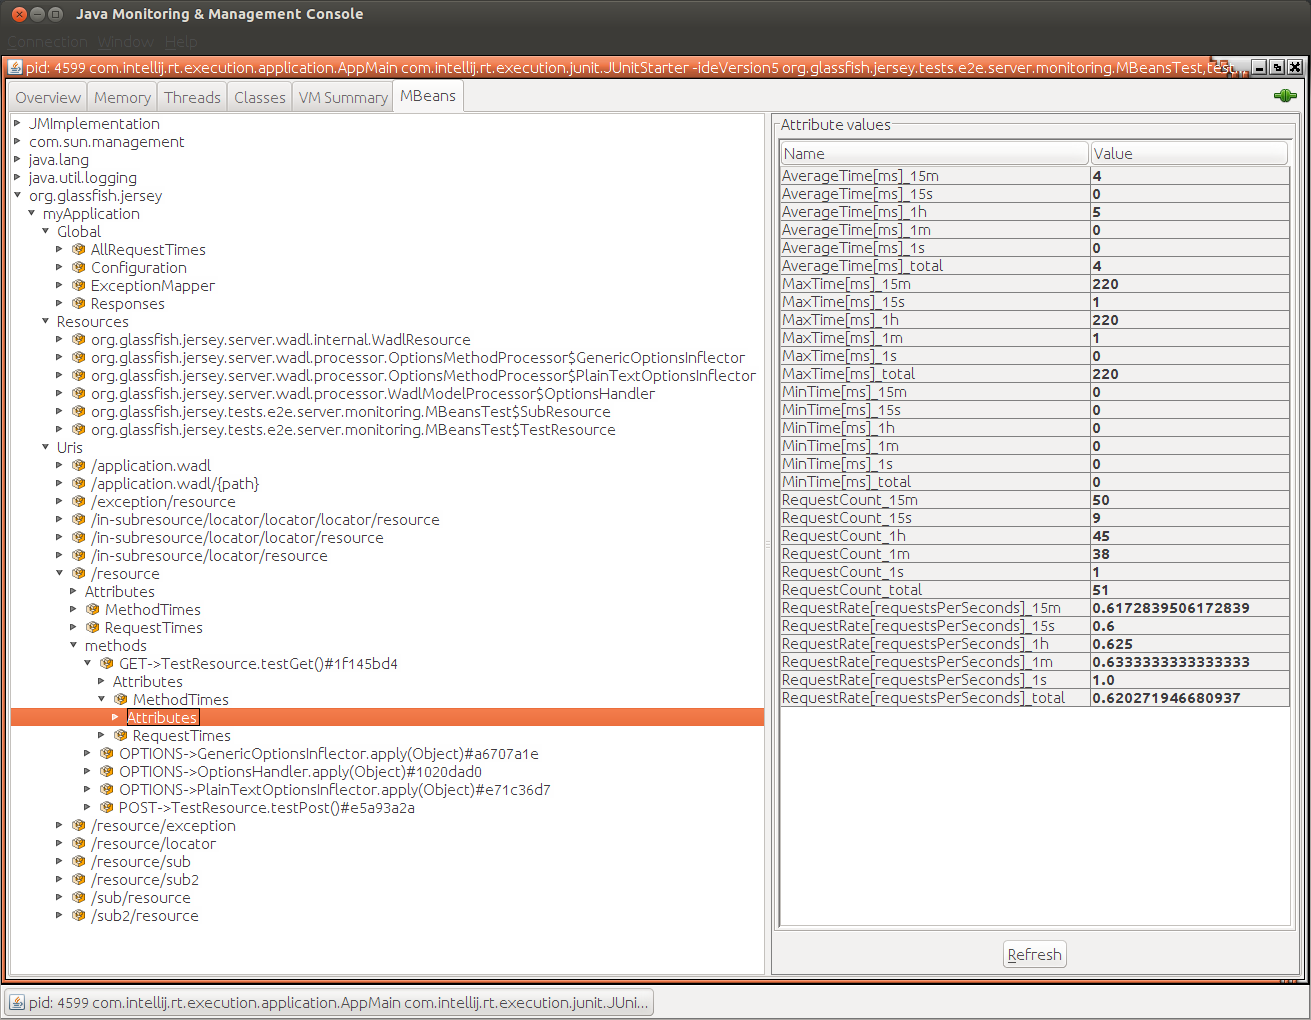 |
Under the root org.glassfish.jersey Jersey MBean group you can find your application.
If the server contains more Jersey application, all will be present under the root Jersey the group. In the
screen-shot, the deployed JAX-RS application is named myApplication (the name can be defined
via ResourceConfig directly or by setting the ServerProperties.APPLICATION_NAME
property).
Each application contains Global, Resource and
Uris sub-groups. The Global group contains all global
statistics like overall requests statistics of the entire application (AllRequestTimes),
configuration of the JAX-RS application (Configuration), statistics about
ExceptionMapper<E extends Throwable> execution (ExceptionMapper) and statistics about
produced responses (Responses).
Resources and Uris groups contains monitoring statistics specific to
individual resources.
Statistics in Resources are bound to the JAX-RS resource Java classes loaded by the
application. Uris contains statistics of resources based on the matched application Uris
(one URI entry represents all methods bound to the particular URI, e.g. /resource/exception).
As Jersey provides programmatic resource builders (described in the chapter
"Programmatic API for Building Resources"), one Java resource class
can be an endpoint for resource methods on many different URIs. And also one URI can be served by method from
many different Java classes. Therefore both views are not to be compared 1:1. Instead they provide
different loggical views on your JAX-RS application. This monitoring feature can also help when designing
the JAX-RS APIs as it provides nice view on available root application URIs.
Both logical views on the resources exposed by application share few common principles. A single resource entry
is always a set of resource methods which are available under the methods sub-group. Statistics
can be found in MBeans MethodTimes and RequestTimes.
MethodTimes contains statistics measured on on resource methods (duration of execution of a
code of the a resource method), whereas RequestTimes contains statistics of an entire request
execution (not only a time of the execution of the resource method but the overall time of the execution of whole
request by Jersey runtime). Another useful information is that statistics directly under resource (not under
the methods sub-group) contains summary of statistics for all resource methods grouped in the
resource entry.
Additional useful details that about statistics
Global->Configuration->Registered(Classes/Instances): registered resource classes and instances by the user (i.e., not added by ModelProcessor during deployment for example).Global->ExceptionMapper->ExceptionMapperCount: map that contains exception mapper classes as keys and number of their execution as values.Global->Responses->ResponseCodesToCountMap: map that contains response codes as keys and their total occurrence in responses as values.Resource groups contain also entries for resources that were added by Jersey at deployment time using
ModelProcessor(for example allOPTIONSmethods,WADL).HEADmethods are not present in the MXBeans view (even HEAD methods are in resources).Execution statistics for different time windows have different update intervals. The shorter the time window, the shorter the update interval. This causes that immediately after the application start, the shorter time windows (such as 15 seconds) may contain higher values than longer ones (e.g. 1 hour time window). The reason is that 1 hour interval will show information that is not up to date and therefore has smaller value. This inconsistency is not so much significant when application is running longer time. Total unlimited time windows contains always up-to-date data. This inconsistency will get fixed in a future Jersey release.
MXBeans can be also accessed using JMX. To do so, you would need to use the interfaces of MXBeans.
These interfaces are even useful when working with MXBeans only trough JConsole as
they contain Javadocs for each MXBean and attribute. Monitoring MBeans are defined by following interfaces:
ApplicationMXBean: contains configuration statistics
ExceptionMapperMXBean: contains statistics of exception mappers
ResourceMethodMXBean: contains statistics of resource method
ResourceMXBean: contains statistics of resource
ResponseMXBean: contains statistics of responses
The list does not contain MXBean for the execution and time window statistics. The reason is that this bean is defined as a DynamicMBean. Attributes of this dynamic MBean contains statistics for all time windows available.
MXBeans do not reference each other but can be retrieved by their ObjectNames which
are designed in the way, that final MBean tree looks nicely organized in JConsole.
Each MXBean is uniquely identified by its ObjectName and properties of
ObjectName are structured hierarchically, so that each MXBean can be identified to which
parent it belong to (e.g. execution statistics dynamic MXBean belongs to resource method MXBean, which
belongs to resource and which belongs to application). Check the ObjectNames of
exposed MXBeans to investigate the structure (for example through JConsole).
To reiterate, exposing Jersey MXBeans and the calculating monitoring statistics may have an performance impact on your application and therefore should be enabled only when needed. Also, please note, that it Jersey monitoring is exposing quite a lot of information about the monitored application which might be viewed as problematic in some cases (e.g. in production server deployments).
Apart from monitoring and collecting application statistics described in Section 22.1, “Monitoring Jersey Applications”, Jersey
can also provide tracing or diagnostic information about server-side processing of individual requests.
This facility may provide vital information when troubleshooting your misbehaving Jersey or JAX-RS application.
When enabled, Jersey tracing facility collects useful information from all parts of JAX-RS server-side request
processing pipeline:
PreMatchRequestFilter, ResourceMatching, RequestFilter,
ReadIntercept, MBR, Invoke,
ResponseFilter, WriteIntercept, MBW, as well as
ExceptionHandling.
The collected tracing information related to a single request is returned to the requesting client in the HTTP headers of a response for the request. The information is also logged on the server side using a dedicated Java Logger instance.
Tracing support is disabled by default. You can enable it either "globally" for all application requests
or selectively per request. The tracing support activation is controlled by setting the
jersey.config.server.tracing.type application configuration property. The property value
is expected to be one of the following:
OFF- tracing support is disabled (default value).ON_DEMAND- tracing support is in a stand-by mode; it is enabled selectively per request, via a specialX-Jersey-Tracing-AcceptHTTP request header.ALL- tracing support is enabled for all request.
The level of detail of the information provided by Jersey tracing facility - the tracing threshold - can be
customized. The tracing threshold can be set at the application level via
jersey.config.server.tracing.threshold application configuration property,
or at a request level, via X-Jersey-Tracing-Threshold HTTP request header. The request level
configuration overrides any application level setting. There are 3 supported levels of detail for Jersey tracing:
SUMMARY- very basic summary information about the main request processing stages.TRACE- detailed information about activities in all the main request processing stages (default threshold value).VERBOSE- most verbose mode that provides extended information similar toTRACElevel, however with details on entity providers (MBR/MBW) that were skipped during the provider selection phase for any reason (lower priority, pattern matching, etc). Additionally, in this mode all received request headers are echoed as part of the tracing information.
As mentioned earlier, all tracing information is also logged using a dedicated Java Logger. The individual
tracing messages are logged immediately as the tracing events occur. The default name of the tracing logger
is prefixed org.glassfish.jersey.tracing. with a default suffix general.
This logger name can be customized per request by including a X-Jersey-Tracing-Logger
HTTP request header as will be shown later.
Whenever the tracing support is active (ON_DEMAND or ALL) you
can customize the tracing behaviour by including one or more of the following request HTTP headers in your
individual requests:
X-Jersey-Tracing-Accept- used to enable the tracing support for the particular request. It is applied only when the application-level tracing support is configured toON_DEMANDmode. The value of the header is not used by the Jersey tracing facility and as such it can be any arbitrary (even empty) string.X-Jersey-Tracing-Threshold- used to override the tracing level of detail. Allowed values are:SUMMARY,TRACE,VERBOSE.X-Jersey-Tracing-Logger- used to override the tracing Java logger name suffix.
At the end of request processing all tracing messages are appended to the HTTP response as individual
headers named X-Jersey-Tracing-nnn where
nnn is index number of message starting at 0.
Each tracing message is in the following format: CATEGORY [TIME] TEXT, e.g.
X-Jersey-Tracing-007: WI [85.95 / 183.69 ms | 46.77 %] WriteTo summary: 4 interceptors
The CATEGORY is used to categorize tracing events according to the following
event types:
START- start of request processing informationPRE-MATCH- pre-matching request filter processingMATCH- matching request URI to a resource methodREQ-FILTER- request filter processingRI- entity reader interceptor processingMBR- message body reader selection and invocationINVOKE- resource method invocationRESP-FILTER- response filter processingWI- write interceptor processingMBW- message body writer selection and invocationMVC- template engine integrationEXCEPTION- exception mappingFINISHED- processing finish summary
The TIME, if present, is a composite value that consists of 3 parts
[ duration / time_from_start | total_req_ratio ]:
duration- the duration of the current trace event [milliseconds]; e.g. duration of filter processingtime_from_start- the end time of the current event with respect to the request processing start time [milliseconds]total_req_ratio- the duration of the current event with respect to the total request processing time [percentage]; this value tells you how significant part of the whole request processing time has been spent in the processing phase described by the current event
There are certain tracing events that do not have any duration. In such case, duration values are not set
(---- literal).
The tracing event TEXT is a free-form detailed text information about the
current diagnostic event.
Tip
For better identification, instances of JAX-RS components are represented by class name,
identity hash code and @Priority value if set, e.g.
[org.glassfish.jersey.tests.integration.tracing.ContainerResponseFilter5001 @494a8227 #5001].
Example of SUMMARY level messages
from tests/integration/tracing-support module:
Example 22.5. Summary level messages
1 $ curl -i http://localhost:9998/ALL/root/sub-resource-locator/sub-resource-method -H content-type:application/x-jersey-test --data '-=#[LKR]#=-' -H X-Jersey-Tracing-Threshold:SUMMARY -H accept:application/x-jersey-test -X POST 2 3 X-Jersey-Tracing-000: START [ ---- / ---- ms | ---- %] baseUri=[http://localhost:9998/ALL/] requestUri=[http://localhost:9998/ALL/root/sub-resource-locator/sub-resource-method] method=[POST] authScheme=[n/a] accept=[application/x-jersey-test] accept-encoding=n/a accept-charset=n/a accept-language=n/a content-type=[application/x-jersey-test] content-length=[11] 4 X-Jersey-Tracing-001: PRE-MATCH [ 0.01 / 0.68 ms | 0.01 %] PreMatchRequest summary: 2 filters 5 X-Jersey-Tracing-002: MATCH [ 8.44 / 9.15 ms | 4.59 %] RequestMatching summary 6 X-Jersey-Tracing-003: REQ-FILTER [ 0.01 / 9.20 ms | 0.00 %] Request summary: 2 filters 7 X-Jersey-Tracing-004: RI [86.14 / 95.49 ms | 46.87 %] ReadFrom summary: 3 interceptors 8 X-Jersey-Tracing-005: INVOKE [ 0.04 / 95.70 ms | 0.02 %] Resource [org.glassfish.jersey.tests.integration.tracing.SubResource @901a4f3] method=[public org.glassfish.jersey.tests.integration.tracing.Message org.glassfish.jersey.tests.integration.tracing.SubResource.postSub(org.glassfish.jersey.tests.integration.tracing.Message)] 9 X-Jersey-Tracing-006: RESP-FILTER [ 0.01 / 96.55 ms | 0.00 %] Response summary: 2 filters 10 X-Jersey-Tracing-007: WI [85.95 / 183.69 ms | 46.77 %] WriteTo summary: 4 interceptors 11 X-Jersey-Tracing-008: FINISHED [ ---- / 183.79 ms | ---- %] Response status: 200/SUCCESSFUL|OK
Example TRACE level messages of jersey-mvc-jsp integration,
from examples/bookstore-webapp module:
Example 22.6. On demand request, snippet of MVC JSP forwarding
1 $ curl -i http://localhost:9998/items/3/tracks/0 -H X-Jersey-Tracing-Accept:whatever 2 3 ... 4 X-Jersey-Tracing-033: WI [ 0.00 / 23.39 ms | 0.02 %] [org.glassfish.jersey.server.mvc.internal.TemplateMethodInterceptor @141bcd49 #4000] BEFORE context.proceed() 5 X-Jersey-Tracing-034: WI [ 0.01 / 23.42 ms | 0.02 %] [org.glassfish.jersey.filter.LoggingFilter @2d427def #-2147483648] BEFORE context.proceed() 6 X-Jersey-Tracing-035: MBW [ ---- / 23.45 ms | ---- %] Find MBW for type=[org.glassfish.jersey.server.mvc.internal.ImplicitViewable] genericType=[org.glassfish.jersey.server.mvc.internal.ImplicitViewable] mediaType=[[javax.ws.rs.core.MediaType @7bfbfeae]] annotations=[] 7 X-Jersey-Tracing-036: MBW [ ---- / 23.52 ms | ---- %] [org.glassfish.jersey.server.mvc.internal.ViewableMessageBodyWriter @78b353d4] IS writeable 8 X-Jersey-Tracing-037: MVC [ ---- / 24.05 ms | ---- %] Forwarding view to JSP page [/org/glassfish/jersey/examples/bookstore/webapp/resource/Track/index.jsp], model [org.glassfish.jersey.examples.bookstore.webapp.resource.Track @3937f594] 9 X-Jersey-Tracing-038: MBW [ 1.09 / 24.63 ms | 4.39 %] WriteTo by [org.glassfish.jersey.server.mvc.internal.ViewableMessageBodyWriter @78b353d4] 10 X-Jersey-Tracing-039: WI [ 0.00 / 24.67 ms | 0.01 %] [org.glassfish.jersey.filter.LoggingFilter @2d427def #-2147483648] AFTER context.proceed() 11 X-Jersey-Tracing-040: WI [ 0.00 / 24.70 ms | 0.01 %] [org.glassfish.jersey.server.mvc.internal.TemplateMethodInterceptor @141bcd49 #4000] AFTER context.proceed() 12 ...
Table of Contents
Since version 2.0, Jersey uses HK2 library for component life cycle management and dependency injection. Rather than spending a lot of effort in maintaining Jersey specific API (as it used to be before Jersey 2.0 version), Jersey defines several extension points where end-user application can directly manipulate Jersey HK2 bindings using the HK2 public API to customize life cycle management and dependency injection of application components.
Jersey user guide can by no means supply an exhaustive documentation of HK2 API in it's entire scope. This chapter only points out the most common scenarios related to dependency injection in Jersey and suggests possible options to implement these scenarios. It is highly recommended to check out the HK2 website and read HK2 documentation in order to get better understanding of suggested approaches. HK2 documentation should also help in resolving use cases that are not discussed in this writing.
There are typically three main use cases, where your application may consider dealing with HK2 APIs exposed in Jersey:
- Implementing a custom injection provider that allows an application to define additional types to be injectable into Jersey-managed JAX-RS components.
- Defining a custom injection annotation (other than @Inject or @Context) to mark application injection points.
- Specifying a custom component life cycle management for your application components.
Relying on Servlet HTTP session concept is not very RESTful. It turns the originally state-less HTTP
communication schema into a state-full manner. However, it could serve
as a good example that will help me demonstrate implementation of the use cases described above.
The following examples should work on top of Jersey Servlet integration module. The approach that will be
demonstrated could be further generalized.
Bellow i will show how to make actual Servlet HttpSession injectable into JAX-RS components
and how to make this injection work with a custom inject annotation type. Finally, i will demonstrate
how you can write HttpSession-scoped JAX-RS resources.
Jersey implementation allows you to directly inject HttpServletRequest instance into
your JAX-RS components.
It is quite straight forward to get the appropriate HttpSession instance out of the
injected request instance.
Let say, you want to get HttpSession instance directly injected into your JAX-RS
types like in the code snippet below.
@Path("di-resource")
public class MyDiResource {
@Inject HttpSession httpSession;
...
}
To make the above injection work, you will need to define an additional HK2 binding in your
application ResourceConfig.
Let's start with a custom HK2 Factory implementation that knows how to extract
HttpSession out of given HttpServletRequest.
import org.glassfish.hk2.api.Factory;
...
public class HttpSessionFactory implements Factory<HttpSession> {
private final HttpServletRequest request;
@Inject
public HttpSessionFactory(HttpServletRequest request) {
this.request = request;
}
@Override
public HttpSession provide() {
return request.getSession();
}
@Override
public void dispose(HttpSession t) {
}
}
Please note that the factory implementation itself relies on having the actual
HttpServletRequest instance injected.
In your implementation, you can of course depend on other types (and inject them conveniently)
as long as these other types are bound to the actual HK2 service locator by Jersey or by your
application. The key notion to remember here is that your HK2 Factory implementation
is responsible for implementing the provide() method that is used by HK2
runtime to retrieve the injected instance. Those of you who worked with Guice binding API in the
past will most likely find this concept very familiar.
Once implemented, the factory can be used in a custom HK2 Binder to define the
new injection binding for HttpSession. Finally, the implemented binder
can be registered in your ResourceConfig:
import org.glassfish.hk2.utilities.binding.AbstractBinder;
...
public class MyApplication extends ResourceConfig {
public MyApplication() {
...
register(new AbstractBinder() {
@Override
protected void configure() {
bindFactory(HttpSessionFactory.class).to(HttpSession.class)
.proxy(true).proxyForSameScope(false).in(RequestScoped.class);
}
});
}
}Note that we did not define any explicit injection scope for the new injection binding. By default, HK2 factories are bound in a HK2 PerLookup scope, which is in most cases a good choice and it is suitable also in our example.
To summarize the approach described above, here is a list of steps to follow when implementing custom injection provider in your Jersey application :
- Implement your own HK2
Factoryto provide the injectable instances. - Use the HK2
Factoryto define an injection binding for the injected instance via custom HK2Binder. - Register the custom HK2
Binderin your applicationResourceConfig.
While the Factory-based approach is quite straight-forward and should help you to
quickly prototype or even implement final solutions, you should bear in mind, that your
implementation does not need to be based on factories. You can for instance bind your own
types directly, while still taking advantage of HK2 provided dependency injection.
Also, in your implementation you may want to pay more attention to defining or managing
injection binding scopes for the sake of performance or correctness of your custom injection
extension.
Important
While the individual injection binding implementations vary and depend on your use case, to enable your custom injection extension in Jersey, you must register your custom HK2 Binder implementation in your application ResourceConfig!
Java annotations are a convenient way for attaching metadata to various elements of Java code. Sometimes you may even decide to combine the metadata with additional functionality, such as ability to automatically inject the instances based on the annotation-provided metadata. The described scenario is one of the use cases where having means of defining a custom injection annotation in your Jersey application may prove to be useful. Obviously, this use case applies also to re-used existing, 3rd-party annotation types.
In the following example, we will describe how a custom injection annotation can be supported.
Let's start with defining a new custom SessionInject injection annotation
that we will specifically use to inject instances of HttpSession
(similarly to the previous example):
@Retention(RetentionPolicy.RUNTIME)
@Target(ElementType.FIELD)
public @interface SessionInject { }
The above @SessionInject annotation should be then used as follows:
@Path("di-resource")
public class MyDiResource {
@SessionInject HttpSession httpSession;
...
}
Again, the semantics remains the same as in the example described in the previous section.
You want to have the actual HTTP Servlet session instance injected into your
MyDiResource instance. This time however, you expect that the
httpSession field to be injected must be annotated with
a custom @SessionInject annotation. Obviously, in this simplistic case
the use of a custom injection annotation is an overkill, however, the simplicity of the
use case will help us to avoid use case specific distractions and allow us better focus on
the important aspects of the job of defining a custom injection annotation.
If you remember from the previous section, to make the injection in the code snippet above work,
you first need to implement the injection provider (HK2 Factory) as well as define the
injection binding for the HttpSession type. That part we have already
done in the previous section.
We will now focus on what needs to be done to inform the HK2 runtime about our @SessionInject
annotation type that we want to support as a new injection point marker annotation. To do that,
we need to implement our own HK2 InjectionResolver for the annotation as demonstrated
in the following listing:
import javax.inject.Inject;
import javax.inject.Named;
import javax.servlet.http.HttpSession;
import org.glassfish.hk2.api.InjectionResolver;
import org.glassfish.hk2.api.ServiceHandle;
...
public class SessionInjectResolver implements InjectionResolver<SessionInject> {
@Inject
@Named(InjectionResolver.SYSTEM_RESOLVER_NAME)
InjectionResolver<Inject> systemInjectionResolver;
@Override
public Object resolve(Injectee injectee, ServiceHandle<?> handle) {
if (HttpSession.class == injectee.getRequiredType()) {
return systemInjectionResolver.resolve(injectee, handle);
}
return null;
}
@Override
public boolean isConstructorParameterIndicator() {
return false;
}
@Override
public boolean isMethodParameterIndicator() {
return false;
}
}
The SessionInjectResolver above just delegates to the default
HK2 system injection resolver to do the actual work.
You again need to register your injection resolver with your Jersey application,
and you can do it the same was as in the previous case. Following listing includes
HK2 binder that registers both, the injection provider from the previous step
as well as the new HK2 inject resolver with Jersey application ResourceConfig.
Note that in this case we're explicitly binding the SessionInjectResolver
to a @Singleton scope to avoid the unnecessary proliferation of
SessionInjectResolver instances in the application:
import org.glassfish.hk2.api.TypeLiteral;
import org.glassfish.hk2.utilities.binding.AbstractBinder;
import javax.inject.Singleton;
...
public class MyApplication extends ResourceConfig {
public MyApplication() {
...
register(new AbstractBinder() {
@Override
protected void configure() {
bindFactory(HttpSessionFactory.class).to(HttpSession.class);
bind(SessionInjectResolver.class)
.to(new TypeLiteral<InjectionResolver<SessionInject>>(){})
.in(Singleton.class);
}
});
}
}
The last use case discussed in this chapter will cover managing custom-scoped components within a Jersey application. If not configured otherwise, then all JAX-RS resources are by default managed on a per-request basis. A new instance of given resource class will be created for each incoming request that should be handled by that resource class. Let say you want to have your resource class managed in a per-session manner. It means a new instance of your resource class should be created only when a new Servlet HttpSession is established. (As with previous examples in the chapter, this example assumes the deployment of your application to a Servlet container.)
Following is an example of such a resource class that builds on the support for
HttpSession injection from the earlier examples described in this chapter.
The PerSessionResource class allows you to count the number of requests made within
a single client session and provides you a handy sub-resource method to obtain the number via
a HTTP GET method call:
@Path("session")
public class PerSessionResource {
@SessionInject HttpSession httpSession;
AtomicInteger counter = new AtomicInteger();
@GET
@Path("id")
public String getSession() {
counter.incrementAndGet();
return httpSession.getId();
}
@GET
@Path("count")
public int getSessionRequestCount() {
return counter.incrementAndGet();
}
}
Should the above resource be per-request scoped (default option), you would never be able to obtain
any other number but 1 from it's getReqs sub-resource method, because then for each request
a new instance of our PerSessionResource class would get created with a fresh
instance counter field set to 0.
The value of this field would get incremented to 1 in the the getSessionRequestCount
method before this value is returned.
In order to achieve what we want, we have to find a way how to bind the instances of
our PerSessionResource class to HttpSession instances and
then reuse those bound instances whenever new request bound to the same HTTP client session arrives.
Let's see how to achieve this.
To get better control over your Jersey component instantiation and life cycle, you need to implement a custom Jersey ComponentProvider SPI, that would manage your custom components. Although it might seem quite complex to implement such a thing, the component provider concept in Jersey is in fact very simple. It allows you to define your own HK2 injection bindings for the types that you are interested in, while informing the Jersey runtime at the same time that it should back out and leave the component management to your provider in such a case. By default, if there is no custom component provider found for any given component type, Jersey runtime assumes the role of the default component provider and automatically defines the default HK2 binding for the component type.
Following example shows a simple ComponentProvider implementation,
for our use case. Some comments on the code follow.
import javax.inject.Inject;
import javax.inject.Provider;
import javax.servlet.http.HttpServletRequest;
import javax.servlet.http.HttpSession;
...
import org.glassfish.hk2.api.DynamicConfiguration;
import org.glassfish.hk2.api.DynamicConfigurationService;
import org.glassfish.hk2.api.Factory;
import org.glassfish.hk2.api.PerLookup;
import org.glassfish.hk2.api.ServiceLocator;
import org.glassfish.hk2.utilities.binding.BindingBuilderFactory;
import org.glassfish.jersey.server.spi.ComponentProvider;
@javax.ws.rs.ext.Provider
public class PerSessionComponentProvider implements ComponentProvider {
private ServiceLocator locator;
static class PerSessionFactory implements Factory<PerSessionResource>{
static ConcurrentHashMap<String, PerSessionResource> perSessionMap
= new ConcurrentHashMap<String, PerSessionResource>();
private final Provider<HttpServletRequest> requestProvider;
private final ServiceLocator locator;
@Inject
public PerSessionFactory(
Provider<HttpServletRequest> request,
ServiceLocator locator) {
this.requestProvider = request;
this.locator = locator;
}
@Override
@PerLookup
public PerSessionResource provide() {
final HttpSession session = requestProvider.get().getSession();
if (session.isNew()) {
PerSessionResource newInstance = createNewPerSessionResource();
perSessionMap.put(session.getId(), newInstance);
return newInstance;
} else {
return perSessionMap.get(session.getId());
}
}
@Override
public void dispose(PerSessionResource r) {
}
private PerSessionResource createNewPerSessionResource() {
final PerSessionResource perSessionResource = new PerSessionResource();
locator.inject(perSessionResource);
return perSessionResource;
}
}
@Override
public void initialize(ServiceLocator locator) {
this.locator = locator;
}
@Override
public boolean bind(Class<?> component, Set<Class<?>> providerContracts) {
if (component == PerSessionResource.class) {
final DynamicConfigurationService dynamicConfigService =
locator.getService(DynamicConfigurationService.class);
final DynamicConfiguration dynamicConfiguration =
dynamicConfigService.createDynamicConfiguration();
BindingBuilderFactory
.addBinding(BindingBuilderFactory.newFactoryBinder(PerSessionFactory.class)
.to(PerSessionResource.class), dynamicConfiguration);
dynamicConfiguration.commit();
return true;
}
return false;
}
@Override
public void done() {
}
}
The first and very important aspect of writing your own ComponentProvider
in Jersey is to store the actual HK2 ServiceLocator instance that will be passed to you as
the only argument of the provider initialize method.
Your component provider instance will not get injected at all so this is more less your only chance
to get access to the HK2 runtime of your application. Please bear in mind, that at the time when
your component provider methods get invoked, the ServiceLocator is not fully configured yet.
This limitation applies to all component provider methods, as the main goal of any component provider
is to take part in configuring the application's ServiceLocator.
Now let's examine the bind method, which is where your provider tells the HK2
how to bind your component.
Jersey will invoke this method multiple times, once for each type that is registered with the
actual application.
Every time the bind method is invoked, your component provider needs to decide
if it is taking control over the component or not. In our case we know exactly which Java type
we are interested in (PerSessionResource class),
so the logic in our bind method is quite straightforward. If we see our
PerSessionResource class it is our turn to provide our custom binding for the class,
otherwise we just return false to make Jersey poll other providers and, if no provider kicks in,
eventually provide the default HK2 binding for the component.
Please, refer to the HK2 documentation for the details of the concrete HK2 APIs used in
the bind method implementation above. The main idea behind the code is that
we register a new HK2 Factory (PerSessionFactory), to provide
the PerSessionResource instances to HK2.
The implementation of the PerSessionFactory is is also included above.
Please note that as opposed to a component provider implementation that should never itself rely
on an injection support, the factory bound by our component provider would get injected just fine,
since it is only instantiated later, once the Jersey runtime for the application is fully
initialized including the fully configured HK2 runtime.
Whenever a new session is seen, the factory instantiates and injects
a new PerSessionResource instance. The instance is then stored in the perSessionMap for later use
(for future calls).
In a real life scenario, you would want to pay more attention to possible synchronization issues. Also, we do not consider a mechanism that would clean-up any obsolete resources for closed, expired or otherwise invalidated HTTP client sessions. We have omitted those considerations here for the sake of brevity of our example.
Table of Contents
At the time of this writing, Java SE support is being discussed as one of important additions to CDI 2.0 specification. Existing CDI implementations brought this feature already, only container bootstrapping has not yet been standardized. In Jersey version 2.15 we introduced Weld SE support, so that people could take advantage of CDI features also when running in Java SE environment. As part of this work, the old Jersey CDI module has been refactored so that it supports CDI integration in any CDI-enabled HTTP container.
Note
This chapter is mainly focused on server-side Jersey Weld SE support. We will mention other containers that are known to be working with Jersey CDI integration modules. We will also describe features demonstrated in Jersey HelloWorld Weld example and provide some hints on how to enable Java SE support for other (non Weld) CDI implementations.
To stick with JAX-RS specification, Jersey has to support JAX-RS/CDI integration in Java EE environment. The two containers supporting JAX-RS/CDI integration out of the box are Oracle GlassFish and Oracle WebLogic application server.
Apache Tomcat is another Servlet container that is known to work fine with Jersey CDI support.
However, things do not work there out of the box. You need to enable CDI support in Tomcat e.g. using Weld.
Jersey CDI example shows how a WAR application could be packaged
(see tomcat-packaging profile in the pom file) in order to enable JAX-RS/CDI integration
in Tomcat with Jersey using Weld.
If not bundled already with underlying Servlet container, the following Jersey module needs to be packaged with the application or otherwise included in the container class-path:
<dependency>
<groupId>org.glassfish.jersey.ext.cdi</groupId>
<artifactId>jersey-cdi1x</artifactId>
<version>2.29.1</version>
</dependency>
There is a common pattern for all above mentioned containers. Jersey CDI integration builds upon existing CDI/Servlet integration there. In other words, in all above cases, Jersey application must be deployed as a Servlet, where the underlying Servlet container has CDI integrated already and CDI container bootstrapped properly.
The key feature in CDI/Servlet integration is proper request scope binding. If this feature was missing, you would not be able to use any request scoped CDI beans in your Jersey application. To make Jersey work with CDI in containers that do not have request scope binding resolved, some extra work is required.
To allow smooth integration with Jersey request scope a new SPI, ExternalRequestScope, was introduced in Jersey version 2.15.
An SPI implementation should be registered via the standard META-INF/services mechanism
and needs to make sure CDI implentation request scope has been properly managed and request scoped data kept in the right context.
For performance reasons, at most a single external request scope provider is allowed by Jersey runtime.
The extra work to align HTTP request with CDI request scope was already done by Jersey team for Weld 2.x implementation. In order to utilize Jersey/Weld request scope binding, you need to use the following module:
<dependency>
<groupId>org.glassfish.jersey.ext.cdi</groupId>
<artifactId>jersey-weld2-se</artifactId>
<version>2.29.1</version>
</dependency>
Then you could use your CDI backed JAX-RS components in a Jersey application running in Grizzly HTTP container bootstrapped as follows:
Example 24.1. Bootstrapping Jersey application with Weld support on Grizzly
Weld weld = new Weld();
weld.initialize();
final HttpServer server = GrizzlyHttpServerFactory.createHttpServer(URI.create("http://localhost:8080/weld/"), jerseyResourceConfig);
// ...
server.shutdownNow();
weld.shutdown();
The above pattern could be applied also for other Jersey supported HTTP containers as long as you stick with CDI Weld 2.x implementation.
You simply add the above mentioned jersey-weld2-se module into you class-path and bootstrap the Weld container manually
before starting the HTTP container.
Table of Contents
Jersey provides an extension to support Spring DI. This enables Jersey to use Spring beans as JAX-RS components (e.g. resources and providers) and also allows Spring to inject into Jersey managed components.
The Spring extension module configuration is based on annotations. Spring beans are injected and JAX-RS classes are made Spring managed using annotations. Injected Spring beans can have further dependencies injected using Spring XML configuration. Spring singleton and request scopes are supported.
To enable JAX-RS resources to work Spring functionality that requires proxying, such as Spring transaction management
(with @Transactional), Spring Security and aspect oriented programming (such as @Aspect), the resources
must themselves be managed by Spring, by annotating with @Component, @Service,
@Controller or @Repository:
import javax.ws.rs.GET;
import javax.ws.rs.Path;
import org.springframework.stereotype.Component;
@Component
@Path("/")
public class SomeResource {
@Transactional
@GET
public void updateResource() {
// ...
}
}
Limitations:
Spring beans can't be injected directly into JAX-RS classes by using Spring XML configuration
If you want to use Jersey Spring DI support
you will need to add the jersey-spring4 module into the list of your dependencies:
<dependency>
<groupId>org.glassfish.jersey.ext</groupId>
<artifactId>jersey-spring4</artifactId>
<version>2.29.1</version>
</dependency>
The above module adds transitive dependencies on Spring modules. See jersey-spring4 module dependencies for more details about list and scope of dependencies. Please note the module depends on The Spring/HK2 Bridge that is used to inject Spring services into HK2 services or inject HK2 services into Spring services.
To use capabilities of Jersey Spring 3 DI support in your JAX-RS/Jersey application you need to have the above mentioned module on your class-path.
To see an example of Spring DI support in Jersey refer to the Spring DI Example.
Table of Contents
Jersey Test Framework originated as an internal tool used for verifying the correct implementation of server-side components. Testing RESTful applications became a more pressing issue with "modern" approaches like test-driven development and users started to look for a tool that could help with designing and running the tests as fast as possible but with many options related to test execution environment.
Current implementation of Jersey Test Framework supports the following set of features:
pre-configured client to access deployed application
support for multiple containers - grizzly, in-memory, jdk, simple, jetty
able to run against any external container
automated configurable traffic logging
Jersey Test Framework is primarily based on JUnit but you can run tests using TestNG as well. It works almost out-of-the box and it is easy to integrate it within your Maven-based project. While it is usable on all environments where you can run JUnit, we support primarily the Maven-based setups.
public class SimpleTest extends JerseyTest {
@Path("hello")
public static class HelloResource {
@GET
public String getHello() {
return "Hello World!";
}
}
@Override
protected Application configure() {
return new ResourceConfig(HelloResource.class);
}
@Test
public void test() {
final String hello = target("hello").request().get(String.class);
assertEquals("Hello World!", hello);
}
}
If you want to develop a test using Jersey Test Framework, you need to subclass JerseyTest and
configure the set of resources and/or providers that will be deployed as part of the test application. This short
code snippet shows basic resource class HelloResource used in tests defined as part of the
SimpleTest class. The overridden configure method returns
a ResourceConfig of the test application,that contains only the HelloResource
resource class. ResourceConfig is a sub-class of JAX-RS Application. It is a Jersey
convenience class for configuring JAX-RS applications. ResourceConfig also implements JAX-RS
Configurable interface to make the application configuration more flexible.
JerseyTest supports deploying applications on various containers, all (except the external container
wrapper) need to have some "glue" code to be supported. Currently Jersey Test Framework provides support for
Grizzly, In-Memory, JDK (com.sun.net.httpserver.HttpServer), Simple HTTP container
(org.simpleframework.http) and Jetty HTTP container (org.eclipse.jetty).
A test container is selected based on various inputs.
JerseyTest#getTestContainerFactory()
is always executed, so if you override it and provide your own version of
TestContainerFactory, nothing else will be considered.
Setting a system variable
TestProperties#CONTAINER_FACTORY
has similar effect. This way you may defer the decision on which containers you want to run your tests
from the compile time to the test execution time.
Default implementation of TestContainerFactory looks for container factories on classpath.
If more than one instance is found and there is a Grizzly test container factory among them, it will be used; if not,
a warning will be logged and the first found factory will be instantiated.
Following is a brief description of all container factories supported in Jersey Test Framework.
Jersey provides 2 different test container factories based on Grizzly. The
GrizzlyTestContainerFactorycreates a container that can run as a light-weight, plain HTTP container. Almost all Jersey tests are using Grizzly HTTP test container factory. Second factory isGrizzlyWebTestContainerFactorythat is Servlet-based and supports Servlet deployment context for tested applications. This factory can be useful when testing more complex Servlet-based application deployments.<dependency> <groupId>org.glassfish.jersey.test-framework.providers</groupId> <artifactId>jersey-test-framework-provider-grizzly2</artifactId> <version>2.29.1</version> </dependency>In-Memory container is not a real container. It starts Jersey application and directly calls internal APIs to handle request created by client provided by test framework. There is no network communication involved. This containers does not support servlet and other container dependent features, but it is a perfect choice for simple unit tests.
<dependency> <groupId>org.glassfish.jersey.test-framework.providers</groupId> <artifactId>jersey-test-framework-provider-inmemory</artifactId> <version>2.29.1</version> </dependency>HttpServerfrom Oracle JDK is another supported test container.<dependency> <groupId>org.glassfish.jersey.test-framework.providers</groupId> <artifactId>jersey-test-framework-provider-jdk-http</artifactId> <version>2.29.1</version> </dependency>Simple container (
org.simpleframework.http) is another light-weight HTTP container that integrates with Jersey and is supported by Jersey Test Framework.<dependency> <groupId>org.glassfish.jersey.test-framework.providers</groupId> <artifactId>jersey-test-framework-provider-simple</artifactId> <version>2.29.1</version> </dependency>Jetty container (
org.eclipse.jetty) is another high-performance, light-weight HTTP server that integrates with Jersey and is supported by Jersey Test Framework.<dependency> <groupId>org.glassfish.jersey.test-framework.providers</groupId> <artifactId>jersey-test-framework-provider-jetty</artifactId> <version>2.29.1</version> </dependency>
It is possible to run not only JUnit tests but also tests based on TestNG. In order to do this you need to make sure the following 2 steps are fulfilled:
Extend JerseyTestNg, or one of it's inner classes JerseyTestNg.ContainerPerClassTest / JerseyTestNg.ContainerPerMethodTest, instead of JerseyTest.
Add TestNG to your class-patch, i.e.:
<dependency> <groupId>org.glassfish.jersey.test-framework</groupId> <artifactId>jersey-test-framework-core</artifactId> <version>2.29.1</version> </dependency> <dependency> <groupId>org.testng</groupId> <artifactId>testng</artifactId> <version>...</version> </dependency>
To discuss the former requirement in more depth we need to take a look at the differences between JUnit and TestNG.
JUnit creates a new instance of a test class for every test present in that class which, from the point of view of
Jersey Test Framework, means that new test container and client is created for each test of a test class. However,
TestNG creates only one instance of a test class and the initialization of the test container depends more on
setup/teardown methods (driven by @BeforeXXX and @AfterXXX annotations) than in
JUnit. This means that, basically, you can start one instance of test container for all tests present in a test class
or separate test container for each and every test. For this reason a separate subclasses of JerseyTestNg
have been created:
JerseyTestNg.ContainerPerClassTest creates one container to run all the tests in. Setup method is annotated with
@BeforeClass, teardown method with@AfterClass.For example take a look at
ContainerPerClassTesttest. It contains two test methods (firstandsecond), one singleton resource that returns an increasing sequence of number. Since we spawn only one instance of a test container for the whole class the value expected in the first test is1and in the second it's2.public class ContainerPerClassTest extends JerseyTestNg.ContainerPerClassTest { @Path("/") @Singleton @Produces("text/plain") public static class Resource { private int i = 1; @GET public int get() { return i++; } } @Override protected Application configure() { return new ResourceConfig(Resource.class); } @Test(priority = 1) public void first() throws Exception { test(1); } @Test(priority = 2) public void second() throws Exception { test(2); } private void test(final Integer expected) { final Response response = target().request().get(); assertEquals(response.getStatus(), 200); assertEquals(response.readEntity(Integer.class), expected); } }JerseyTestNg.ContainerPerMethodTest creates separate container for each test. Setup method is annotated with
@BeforeMethod, teardown method with@AfterMethod.We can create a similar test to the previous one. Take a look at
ContainerPerMethodTesttest. It looks the same except the expected values and extending class: it contains two test methods (firstandsecond), one singleton resource that returns an increasing sequence of number. In this case we create a separate test container for each test so value expected in the first test is1and in the second it's also1.public class ContainerPerMethodTest extends JerseyTestNg.ContainerPerMethodTest { @Path("/") @Singleton @Produces("text/plain") public static class Resource { private int i = 1; @GET public int get() { return i++; } } @Override protected Application configure() { return new ResourceConfig(Resource.class); } @Test public void first() throws Exception { test(1); } @Test public void second() throws Exception { test(1); } private void test(final Integer expected) { final Response response = target().request().get(); assertEquals(response.getStatus(), 200); assertEquals(response.readEntity(Integer.class), expected); } }
If you need more complex setup of your test you can achieve this by directly extending the JerseyTestNg
class create setup/teardown methods suited to your needs and provide a strategy for storing and handling a test
container / client instance (see JerseyTestNg.configureStrategy(TestNgStrategy) method).
JerseyTest provide
enable(...),
forceEnable(...)
and disable(...)
methods, that give you control over configuring values of the properties defined and described in the
TestProperties class. A typical code that overrides the default property values is listed
below:
public class SimpleTest extends JerseyTest {
// ...
@Override
protected Application configure() {
enable(TestProperties.LOG_TRAFFIC);
enable(TestProperties.DUMP_ENTITY);
// ...
}
}The code in the example above enables test traffic logging (inbound and outbound headers) as well as dumping the HTTP message entity as part of the traffic logging.
Complicated test scenarios may require fully started containers with complex setup configuration, that is not easily doable with current Jersey container support. To address these use cases, Jersey Test Framework providers general fallback mechanism - an External Test Container Factory. Support of this external container "wrapper" is provided as the following module:
<dependency>
<groupId>org.glassfish.jersey.test-framework.providers</groupId>
<artifactId>jersey-test-framework-provider-external</artifactId>
<version>2.29.1</version>
</dependency>As indicated, the "container" exposed by this module is just a wrapper or stub, that redirects all request to a configured host and port. Writing tests for this container is same as for any other but you have to provide the information about host and port during the test execution:
mvn test -Djersey.test.host=myhost.org -Djersey.config.test.container.port=8080
Tests might require some advanced client configuration. This is possible by overriding configureClient(ClientConfig clientConfig) method. Typical use case for this is registering more providers, such as MessageBodyReader<T>s or MessageBodyWriter<T>s, or enabling additional features.
Sometimes you might need to check a logged message as part of your test assertions. For this purpose Jersey Test Framework provides convenient access to the logged records via JerseyTest#getLastLoggedRecord() and JerseyTest#getLoggedRecords() methods. Note that this feature is not enabled by default, see TestProperties#RECORD_LOG_LEVEL for more information.
For a purpose of running multiple test containers in parallel you need to set the
TestProperties.CONTAINER_PORT
to 0 value. This will tell Jersey Test Framework (and the underlying test container) to use the
first available port.
You can set the value as a system property (via command line option) or directly in the test (to not affect ports of other tests):
@Override
protected Application configure() {
// Find first available port.
forceSet(TestProperties.CONTAINER_PORT, "0");
return new ResourceConfig(Resource.class);
}
The easiest way to setup your JUnit or TestNG tests to run in parallel is to configure Maven Surefire plugin. You can
do this via configuration options parallel and threadCount, i.e.:
...
<configuration>
<parallel>methods</parallel>
<threadCount>5</threadCount>
...
</configuration>
...For more information about this topic consult the following Maven Surefire articles:
Table of Contents
Jersey source code is available on GitHub. You can browse the sources at https://github.com/jersey/jersey.
In case you are not familiar with Git, we recommend reading some of the many "Getting Started with Git" articles you can find on the web. For example this DZone RefCard.
To clone the Jersey repository you can execute the following command on the command-line (provided you have a command-line Git client installed on your machine):
git clone git://github.com/jersey/jersey.git
This creates read-only copy of Jersey workspace. If you want to contribute, please use "pull request": https://help.github.com/articles/creating-a-pull-request.
Milestones and releases of Jersey are tagged. You can list the tags by executing the standard Git command in the repository directory:
git tag -l
or by visiting https://github.com/jersey/jersey/tags.
Jersey source code requires Java SE 7 or higher. The build is based on Maven.
Maven 3.1 or higher is highly recommended. Also it is recommended you use the following
Maven options when building the workspace (can be set in MAVEN_OPTS environment
variable):
-Xmx1048m -XX:PermSize=64M -XX:MaxPermSize=128M
It is recommended to build all of Jersey after you cloned the source code repository. To do that execute the following commands in the directory where jersey source repository was cloned (typically the directory named "jersey"):
mvn -Dmaven.test.skip=true clean install
This command will build Jersey, but skip the test execution. If you don't want to skip the tests, execute the following instead:
mvn clean install
Building the whole Jersey project including tests could take significant amount of time.
Jersey contains many tests. Unit tests are in the individual Jersey modules,
integration and end-to-end tests are in jersey/tests/e2e directory.
You can run tests related to a particular area using the following command:
mvn -Dtest=<pattern> test
where
pattern
may be a comma separated set of names matching tests classes or individual methods (like
LinkTest#testDelimiters).
NetBeans IDE has excellent maven support. The Jersey maven modules can be loaded, built and tested in NetBeans without any additional NetBeans-specific project files.
Table of Contents
- 28.1. Migrating from Jersey 2.23 to 2.27
- 28.2. Migrating from Jersey 2.22.1 to 2.23
- 28.3. Breaking Changes
- 28.4. Migrating from Jersey 2.22 to 2.22.1
- 28.5. Migrating from Jersey 2.21 to 2.22
- 28.6. Migrating from Jersey 2.19 to 2.20
- 28.7. Migrating from Jersey 2.18 to 2.19
- 28.8. Migrating from Jersey 2.17 to 2.18
- 28.9. Migrating from Jersey 2.16 to 2.17
- 28.10. Migrating from Jersey 2.15 to 2.16
- 28.11. Migrating to 2.15
- 28.12. Migrating from Jersey 2.11 to 2.12
- 28.13. Migrating from Jersey 2.10 to 2.11
- 28.14. Migrating from Jersey 2.9 to 2.10
- 28.15. Migrating from Jersey 2.8 to 2.9
- 28.16. Migrating from Jersey 2.7 to 2.8
- 28.17. Migrating from Jersey 2.6 to 2.7
- 28.18. Migrating from Jersey 2.5.1 to 2.6
- 28.19. Migrating from Jersey 2.5 to 2.5.1
- 28.20. Migrating from Jersey 2.4.1 to 2.5
- 28.21. Migrating from Jersey 2.4 to 2.4.1
- 28.22. Migrating from Jersey 2.3 to 2.4
- 28.23. Migrating from Jersey 2.0, 2.1 or 2.2 to 2.3
- 28.24. Migrating from Jersey 1.x to 2.0
The most fundamental change in Jersey 2.26 and later is that all the modules (including the client module) are now being built with Java SE 8 and with 1.8 language level.
As a consequential change, one of the modules was dropped, the
rx-client-jsr166e. This implementation relied on theConcurrentHashMapV8and was made redundant by the JDK upgrade. Please userx-client-java8instead.Spring version used in the extension module was upgraded to 4.2.1.RELEASE. The reason for that is lack of Java 8 support with Spring 3.x versions.
Jersey proprietary reactive client API has beed dropped and replaced by JAX-RS 2.1 Reactive Client API. The backwards compatibility rule couldn't be respected in this case, since the JAX-RS API are based on what was done in Jersey and there were unresolvable code incompatibilities.
Following breaking changes are caused by removing and replacing HK2 (ServiceLocator) by
InjectionManager. Jersey injection API is considered as an internal API (except
InjectionManager)
Classes in which
HK2 ServiceLocatorwas simply replaced by InjectionManager and the replacing influenced their public methods:MethodHandler ComponentProvider ExternalRequestScope WadlGeneratorConfig RequestScopedInitializer Support for
HK2 Binderin the case of using HK2 Injection Module was implemented but Jersey newly supports a registration its own AbstractBinder and Binder in Application to easily switch from HK2 classes to Jersey ones just by adjusting the imports.InjectionManagercontains a mechanism for registering DI specific injection bindings, in case the application uses CDI, developers should use CDI mechanism, in case the application uses HK2, developers should configure HK2 - ideally via configuring a parent locator that is then passed to Jersey. The custom bindings can be also registered through Application ifInjectionManagersupports the bindings type that means thatInjectionManager#isRegistrablereturnstrue;In ResourceConfig and ClientConfig configuration methods for auto-discoverable components and meta-components (e.g.
Feature) acceptInjectionManagerand moreover the meta-components acceptManagedObjectFinalizerwhich ensures a pre-destroy method invocation on registered components.Method
getTemplateObjectFactoryin AbstractTemplateProcessor accepts a function that initializes a retrieved template factory from a configuration, usually this function is just a wrapper with underlyingInjectionManagerinvocation.HK2 Factorysupport is replaced byjava.util.function.Supplierand Jersey-specific DisposableSupplier.HK2-specific annotations
@Optional,@Immediate,@Unqualifiedare no longer supported directly in Jersey but can be used if HK2 Injection Module is used.HK2-specific annotations
@PerLookupand@PerThreadare migrated to Jersey with an adjusted package.
Following, already deprecated, APIs were removed:
LoggingFilterhas been removed. Use LoggingFeature instead. See Logging chapter.
From version 2.23 onwards, LoggingFilter has been replaced
with LoggingFeature.
Following APIs were deprecated:
LoggingFilterhas been marked as deprecated and will be removed in a subsequent release. Use LoggingFeature instead. See chapter logging.
Last version contained a change in relative URI resolution in the location header. Even though the change was fixing the discrepancy between the real behaviour and RFC7231, it also caused JAX-RS spec incompatibility in some cases. Furthermore, there was no way to preserve backwards compatibility.
Therefore, the default behaviour was rollbacked and a new configuration property was introduced to switch to the RFC7231 compliant behaviour: ServerProperties.LOCATION_HEADER_RELATIVE_URI_RESOLUTION_RFC7231. Also, the possibility to switch the URI resolution completely off remains with the ServerProperties.LOCATION_HEADER_RELATIVE_URI_RESOLUTION_DISABLED disabled switch. Both properties are false by default.
In previous Jersey versions, if the resource method created a response containing relative URI in the
Locationhttp header, the URI was resolved against base uri of the application. This behaviour was not correct, as pointed out by JERSEY-2838. With this change, the URI is, by default, resolved againstrequest base uri.For example, having a resource at
http://server.com/api/management/user, that returns response withLocation: foo, while the root of the app ishttp://server.com/api, the resulting URI will be:with Jersey 2.21 and earlier: http://server.com/api/foowith Jersey 2.22: http://server.com/api/management/fooPlease note, that the trailing slash is significant, so that if the URI ends with a slash (
http://server.com/api/management/user/), the output will be:with Jersey 2.21 and earlier: http://server.com/api/foowith Jersey 2.22: http://server.com/api/management/user/fooAlternatively, the entire URI resolving logic can be switched off by newly introduced ServerProperties.LOCATION_HEADER_RELATIVE_URI_RESOLUTION_DISABLED property. If the value is
true, Jersey will not change the URI contained in theLocationheader at all (even if this behaviour may not match with behaviour described in JavaDoc).
New parameter,
org.glassfish.hk2.api.ServiceLocator, has been added to ExternalRequestScope methods. This is to allow 3rd party component providers to hook up with the actual HK2 locator in case of multiple Jersey applications are running in paralell within a single 3rd party component container. The change was driven by CDI/Servlet requirements.
New method,
close, has been added to ResourceFinder. It's intention is to release allocated/opened resources (such as streams) without a need to iterate through the wholeResourceFinder.
Jersey has updated version of MOXy (XML/JSON provider) to version 2.6. Among some bug fixes there are other notable changes (some of them breaking) that you should be aware of:
Redesign of type property in JSON processing - Special handling of JSON
typeproperty is deprecated. If there is need to identify type of JSON object - due to missing root element or some special inheritance requirements, it is necessary to specify fully qualified type property withhttp://www.w3.org/2001/XMLSchema-instancenamespace.
Several experimental Jersey APIs have matured enough and as such we have decided to promote them from Beta status, namely:
Jersey Reactive Client API. Also Reactive Client moved from incubator to extension (umbrella) module.
Jersey client-side ClientLifecycleListener SPI.
Jersey server-side ContainerLifecycleListener SPI.
Jersey server-side (MVC) @ErrorTemplate annotation.
Jersey test framework (client-side) LoopBackConnectorProvider connector.
Jersey test framework (server-side) ContainerRequestBuilder class.
These APIs are now part of the official public Jersey 2.x API.
Following, already deprecated, APIs were removed:
org.glassfish.jersey.apache.connector.ApacheClientProperties- constantSSL_CONFIGhas been removed. Use ClientBuilder methods to configure SSL in a Client instance.org.glassfish.jersey.jetty.connector.JettyClientProperties- constantSSL_CONFIGhas been removed. Use ClientBuilder methods to configure SSL in a Client instance.FreemarkerMvcFeature.TEMPLATES_BASE_PATH- constant has been unified across MVC modules and the deprecated one has been removed. UseFreemarkerMvcFeature.TEMPLATE_BASE_PATHor propertyjersey.config.server.mvc.templateBasePath.freemarkerinstead.JspMvcFeature.TEMPLATES_BASE_PATH- constant has been unified across MVC modules and the deprecated one has been removed. UseJspMvcFeature.TEMPLATE_BASE_PATHor propertyjersey.config.server.mvc.templateBasePath.jspinstead.
Integration of executor providers for Jersey runtime has been unified and refactored. As a result, the
org.glassfish.jersey.spi.RequestExecutorProviderandorg.glassfish.jersey.spi.RuntimeThreadProviderSPIs have been removed from Jersey. A new, common & generic executor service providers have been introduced instead: ExecutorServiceProvider and ScheduledExecutorServiceProvider. These new providers are used to support custom qualified executor service injection, including the refactored use cases of client asynchronous request execution, server-side managed asynchronous request processing as well as server-side background task scheduler.
From version 2.17 onwards, it's possible to use CDI with JAX-RS web-applications packaged in EAR. All
supported HK2/CDI injections now work as expected for JAX-RS application deployed in the mentioned fashion.
One need to make sure that modules
jersey-cdi1x
and
jersey-cdi1x-servlet
are present in Servlet container (that supports EARs).
From version 2.16 onwards, all JAX-B providers are being bundled in a separate module.
We improved the performance for using sub-resource locators in an Jersey application. The performance gains
are available for cases when the sub-resource locator method returns either a resource class (return value is
e.g.
Class<?>
orClass<MySubResource>) or a (non-proxied) resource instance (when return value is an
instance of
MySubResource
class).
Jetty connector and Apache connector have been previously using their own custom properties to set SSL context on a connector. These properties have been deprecated and the code has been updated to read the SSL context information from the JAX-RS client configuration. This means that all Jersey connectors now properly accept SSL configuration as configured via standard JAX-RS ClientBuilder methods.
Previously, all Jersey connectors have been using their own default chunk size when HTTP chunked coding was used. Since Jersey 2.16, there is a new default chunk size value used by all connectors, if a custom chunk size is not set. The new default value is stored under ClientProperties.DEFAULT_CHUNK_SIZE client property.
Following APIs were deprecated:
org.glassfish.jersey.apache.connector.ApacheClientProperties- constantSSL_CONFIGhas been marked as deprecated and will be removed in a subsequent release. Use ClientBuilder methods to configure SSL in a Client instance.org.glassfish.jersey.jetty.connector.JettyClientProperties- constantSSL_CONFIGhas been marked as deprecated and will be removed in a subsequent release. Use ClientBuilder methods to configure SSL in a Client instance.
JAX-B support modularization might cause breaking changes for those users relying on JAX-B and directly referring to the Jersey core-common module:
<dependency> <groupId>org.glassfish.jersey.core</groupId> <artifactId>jersey-common</artifactId> <version>${pre-2.16-version}</version> </dependency>The following needs to be included in addition from version 2.16 on:
<dependency> <groupId>org.glassfish.jersey.media</groupId> <artifactId>jersey-media-jaxb</artifactId> <version>2.29.1</version> </dependency>MediaType's quality source parameters (qs) reuse the same parsing as quality parameters. This means that values higher than1.0throw ParseException. I.e. following example is not allowed any more:@Path("/") @Produces("text/html;qs=5") // wrong 'qs' value public class Bookstore { ... }
Before 2.15, CDI integration was supported primarily in Java EE containers with built-in CDI support. From version 2.15 onwards, it is possible to leverage CDI integration also outside of Java EE environment. A new example, helloworld-weld, has been introduced to demonstrate the new feature using Grizzly HTTP server. Another example application, cdi-webapp, has been updated so that it enables Apache Tomcat Server deployment.
CDI support improvement caused breaking changes for those users directly referring to the following CDI supporting Jersey module in maven:
<dependency> <groupId>org.glassfish.jersey.containers.glassfish</groupId> <artifactId>jersey-gf-cdi</artifactId> <version>${pre-2.15-version}</version> </dependency>The above dependency needs to be replaced with:
<dependency> <groupId>org.glassfish.jersey.ext.cdi</groupId> <artifactId>jersey-cdi1x</artifactId> <version>2.29.1</version> </dependency>The following needs to be included in addition if you want to leverage CDI JTA support:
<dependency> <groupId>org.glassfish.jersey.ext.cdi</groupId> <artifactId>jersey-cdi1x-transaction</artifactId> <version>2.29.1</version> </dependency>
Following experimental APIs have been promoted to become part of public Jersey API:
Jersey client-side HttpAuthenticationFeature API.
Jersey server-side DestroyListener (formerly
ExtendedMonitoringStatisticsListener), which has been slightly refactored and is now a separate interface (e.g. not extendingMonitoringStatisticsListener), hence providing better compatibility with lambdas.
These APIs are now part of the official public Jersey 2.x API.
Because of a bug fix for issue JERSEY-2602, we re-generate WADL classes from
wadl.xsdto make sure the getters for boolean properties starts withisinstead ofgetas in Jersey 1 and Jersey <= 2.6.For performance purposes a new server property ServerProperties.MONITORING_ENABLED has been introduced. It is possible to enable just basic almost static monitoring information using the property. It allows to inject ApplicationInfo object, renamed original class
gitcorg.glassfish.jersey.server.monitoring.ApplicationStatistics. And MonitoringStatistics no more have a reference toApplicationStatistics, methodgetApplicationStatistics()has been removed.
Several experimental Jersey APIs have matured enough and as such we have decided to promote them from Beta status, namely:
Jersey client-side ConnectorProvider SPI.
Jersey server-side ResponseErrorMapper SPI.
These APIs are now part of the official public Jersey 2.x API.
Jersey is now preventing message body providers (MBR, MBW) from closing given input/output stream. With this change Jersey is enforcing the JavaDoc statements present in message body providers.
We have reintroduced support for JSON processing via Jackson 1.x JSON provider (1.9.11). In order to use
Jackson 1 in your application you need to add
jersey-media-json-jackson1
module (+ it's dependencies) to your class-path and register
Jackson1Feature
in your application (server or client).
Client-side providers (such asClientRequestFilters) implementing the new
org.glassfish.jersey.client.ClientLifecycleListener
interface will be notified when various lifecycle events occur. Currently client runtime initialization
triggers the
onInit()
method and client closing triggers
onClose()
method. Such providers implementing the
ClientLifecycleListener
can be registered in a common way, e.g. into a
JerseyClient
or
JerseyWebTarget
instance, or into a (potentially) auto discoverable feature context.
Gerard updated the Declarative Linking extension module which has been ported to Jersey 2 in version 2.6. You can read more about what Declarative Linking does and what it's capable of in the following blog posts:
Our media module that supports working with JSON via Jackson library has been updated to use Jackson 2.x
(2.3.2). All samples and tests have been rewritten to use Jackson 2 as well. In order to use Jackson 2 in your
application you need to add jersey-media-json-jackson (+ it's Jackson dependencies) to your class-path and
register
JacksonFeature
in your application.
We dropped automatic registration of message body providers (MessageBodyWriter, MessageBodyReader) and
exception mappers via META-INF/services mechanism. This functionality can be restored by adding
jersey-metainf-services
module to the class-path of your application.
Note: This change may affect 3rd party libraries (e.g. Jackson 2.x) in a way their provider would not be
registered in an JAX-RS app. You need to either register them manually or use mentioned
jersey-metainf-services
module.
Jersey Test Framework now supports TestNG to run the tests (in addition to the JUnit, which is supported by default). You can now run the tests in parallel using either JUnit or TestNG. See chapters dedicated to TestNG and parallel testing for more information: Section 26.3, “Running TestNG Tests” andSection 26.5, “Parallel Testing with Jersey Test Framework”.
Some of the feature specific configuration properties (disable WADL, disable BV, disable JSON-Processing, enable Monitoring), and their server/client counterparts, are no longer affected by a value of properties
CommonProperties.FEATURE_AUTO_DISCOVERY_DISABLEorCommonProperties.METAINF_SERVICES_LOOKUP_DISABLE. The specific properties have to be used to change default behaviour of mentioned features (e.g.ServerProperties.WADL_FEATURE_DISABLE).Automatic registration of
MessageBodyWriter,MessageBodyReadersandExceptionMappersviaMETA-INF/servicesmechanism has been removed. Disabling the automatic registration of providers viaMETA-INF/servicesmay affect 3rd party libraries (i.e. Jackson 2.x) that are using this mechanism to register it's providers. In order to restore this functionality theorg.glassfish.jersey.ext:jersey-metainf-serviceshas to be added on the classpath. Otherwise such providers has to be registered manually.The Jackson JSON Jersey module has been updated to use Jackson 2.x instead of Jackson 1.x. This means that all the code that has been using Jackson 1.x for JSON (de)serialization has to be migrated to Jackson 2.x.
Because of a bug fix for issue JERSEY-2458, there has been a slight change in the behavior of UriInfo
getPathandgetPathSegmentsmethods. ThegetPathmethods no longer return a path prefixed with a slash ('/'), instead they now correctly return a request path relative to the base request URI. Also, theUriInfonow correctly handles requests which URI contains empty path segments (e.g.http://localhost///a/b//c). These empty path segments are now correctly included in the lists returned by theUriInfo.getPathSegmentsmethods.SseFeature now gets automatically discovered and enabled if the SSE module is present on the class path. This behavior can be suppressed by setting DISABLE_SSE property to
true. The behavior can also be selectively suppressed in either client or server runtime by setting the DISABLE_SSE_CLIENT or DISABLE_SSE_SERVER property respectively.Deprecated
getDestroyTimemethod has been removed fromorg.glassfish.jersey.server.monitoring.ApplicationStatistics. To get the application shutdown information, a ContainerLifecycleListener should be registered and itsonShutdownmethod implemented to listen to and process the application shutdown event.Method
triggerEvent(RequestEvent.Type)has been removed from the public ContainerRequest API. This method has never been intended for public, application-level use.In Jersey 2.7 and earlier it was (under certain conditions) possible to supply custom TestContainerFactory as part of the tested JAX-RS / Jersey application. This factory would be picked and used by JerseyTest to instantiate TestContainer that will host the tested application. This feature was unreliable and redundant. As such, support for the feature has been removed. To specify a custom
TestContainerFactoryto be used by yourJerseyTestsubclass, please override theJerseyTest.getTestContainerFactorymethod instead. OverridinggetTestContainerFactorynow remains the only reliable way of specifying customTestContainerFactoryimplementation to be used in your tests.Protected method
setTestContainerFactoryhas been removed from theJerseyTestAPI as calling the method had no effect on theTestContainerFactoryinstance used by theJerseyTestsubclass.Protected method
getClienthas been removed from theJerseyTestAPI. To configure test client instances, please override theconfigureClientmethod instead.Utility methods
JerseyTestthat provide access to pre-configured Client and WebTarget instances (client(),target(...)) have been made final to prevent overriding in subclasses and thus ensure consistency of the jersey test framework functionality.JerseyTestconstructorJerseyTest(Class<? extends Application>)has been made deprecated and will be removed in the subsequent Jersey release.It was previously possible to pass in a custom ContainerProvider that was supposed to deploy and run the application as one of the JAX-RS / Jersey application providers. This ability has been removed without any substitute as the concept was fundamentally flawed. Typical use cases should not be affected by this change.
Factory methods
createHttpServerwhich take Jersey ApplicationHandler as one of the input parameters have been removed from the Jersey container factory API as inherently broken. This impacts GrizzlyHttpServerFactory, JdkHttpServerFactory, JettyHttpContainerFactory and SimpleContainerFactory implementations. The methods that take ResourceConfig as input parameter should be used instead. Typical use cases should not be affected by this change.Method
registerAdditionalBinderson ApplicationHandler has been removed from the public API. Please use the specificApplicationHandlerconstructor that accepts custom HK2 binders instead.Several configuration properties were renamed, especially those having client and server versions along with the common version in
CommonProperties. Please see following table for complete reference:Table 28.1. List of changed configuration properties:
Constant Old value (Jersey 2.7 and before) New value (Jersey 2.8+) ClientProperties.FEATURE_AUTO_DISCOVERY_DISABLE jersey.config.disableAutoDiscovery.clientjersey.config.client.disableAutoDiscoveryServerProperties.FEATURE_AUTO_DISCOVERY_DISABLE jersey.config.disableAutoDiscovery.serverjersey.config.server.disableAutoDiscoveryClientProperties.JSON_PROCESSING_FEATURE_DISABLE jersey.config.disableJsonProcessing.clientjersey.config.client.disableJsonProcessingServerProperties.JSON_PROCESSING_FEATURE_DISABLE jersey.config.disableJsonProcessing.serverjersey.config.server.disableJsonProcessingClientProperties.METAINF_SERVICES_LOOKUP_DISABLE jersey.config.disableMetainfServicesLookup.clientjersey.config.client.disableMetainfServicesLookupServerProperties.METAINF_SERVICES_LOOKUP_DISABLE jersey.config.disableMetainfServicesLookup.serverjersey.config.server.disableMetainfServicesLookupClientProperties.MOXY_JSON_FEATURE_DISABLE jersey.config.disableMoxyJson.clientjersey.config.client.disableMoxyJsonServerProperties.MOXY_JSON_FEATURE_DISABLE jersey.config.disableMoxyJson.serverjersey.config.server.disableMoxyJsonClientProperties.OUTBOUND_CONTENT_LENGTH_BUFFER jersey.config.contentLength.buffer.clientjersey.config.client.contentLength.bufferServerProperties.OUTBOUND_CONTENT_LENGTH_BUFFER jersey.config.contentLength.buffer.serverjersey.config.server.contentLength.bufferServerProperties.TRACING jersey.config.server.tracingjersey.config.server.tracing.type
The old names are still working for now, but are deprecated. There is a fallback mechanism implemented while reading the property and each get, that resolves the value from the old-named property, will log aCONFIGlevel warning.
Until version 2.6, Jersey was compiled with Java SE 6. This has changes in Jersey 2.7. Now almost all Jersey components are compiled with Java SE 7 target. It means, that you will need at least Java SE 7 to be able to compile and run your application that is using latest Jersey. Only
core-commonandcore-clientmodules are still compiled with Java class version runnable with Java SE 6.MVC support: method
writeToof TemplateProcessor was modified by adding an argumentMultivaluedMap<String, Object> httpHeaders. This is an incompatible change (the method was modified directly in the interface). All Jersey provided MVC implementation were adjusted but if you have your own MVC implementation then you need to modify the method signature of the implementation.A minor JAX-RS incompatibility issue has been recently discovered and reported (seeJERSEY-2387). As part of the fix, minor breaking changes related to URI resolving and creation have been introduced in the behavior of UriBuilder, Link.Builder and WebTarget classes. It is no longer possible to successfully build a new
URIinstance from aUriBuilderthat contains unresolved template parameters. AnIllegalArgumentExceptionwill be thrown in such case, as mandated by JAX-RS API javadoc. Similarly, it is not possible to successfully create a Link instance from a URI template with unresolved template parameters. Also, it is not possible to successfully send a request on aWebTargetthat represents a URI template that does not have all the template parameters properly resolved. Any attempt to do so will fail with an exception. Note that this also applies to any managed clients injected into JAX-RS server-side components using Uri annotation.In Jersey 2.6 and earlier, producing a URI from an incompletely resolved URI template would succeed and all unresolved template parameter locations would be encoded without change into the resulting URI, for example
"/path/{param}"would be implicitly encoded as"/path/%7Bparam%7D". While we do not expect our users to depend on this functionality, if the former behavior is desired for some reason,UriComponent.encodeTemplateNamesmethod can be used instead:URI.create(UriComponent.encodeTemplateNames(UriBuilder.fromUri("/path/{param}").toTemplate()));or simply
URI.create(UriComponent.encodeTemplateNames("/path/{param}"));
Jersey no longer depend directly on Guava and ASM artifacts which means that users are free to use their own versions of mentioned libraries.
New bundle has been created for Guava (bundles/repackaged/jersey-guava), with Maven
coordinates:
org.glassfish.jersey.bundles.repackaged:jersey-guava
(Repackaged) ASM is now part of Jersey Server. Jersey currently uses ASM 5 for package-scanning capabilities.
Following APIs were deprecated:
org.glassfish.jersey.message.internal.HttpDateFormat- methodgetPreferedDateFormat()has been marked as deprecated due to typo in the name. New methodgetPreferredDateFormat()should be used instead.
Following, already deprecated, APIs were removed:
org.glassfish.jersey.client.filter.HttpBasicAuthFilterandorg.glassfish.jersey.client.filter.HttpDigestAuthFilter(use HttpAuthenticationFeature instead)org.glassfish.jersey.apache.connector.ApacheClientProperties.HTTP_PARAMS(useorg.glassfish.jersey.apache.connector.ApacheClientProperties#REQUEST_CONFIGinstead),org.glassfish.jersey.apache.connector.ApacheClientProperties.PROXY_URI,org.glassfish.jersey.apache.connector.ApacheClientProperties.PROXY_USERNAME,org.glassfish.jersey.apache.connector.ApacheClientProperties.PROXY_PASSWORD(use corresponding ClientProperties instead.org.glassfish.jersey.server.validation.ValidationConfig.setMessageInterpolatororg.glassfish.jersey.server.validation.ValidationConfig.setTraversableResolverorg.glassfish.jersey.server.validation.ValidationConfig.setConstraintValidatorFactoryorg.glassfish.jersey.server.validation.ValidationConfig.setParameterNameProvider(use corresponding methods of the same class without"set"prefix in the method names).org.glassfish.jersey.server.mvc.MvcProperties(use properties oforg.glassfish.jersey.server.mvc.MvcFeatureinstead).MVC does not allow to specify the resolving class. Resolving class is used to create a path of the template. Changes are:
Annotation attribute
Class<?> org.glassfish.jersey.server.mvc.Template.resolvingClass()(the attribute was obsolete and therefore removed. Resolving class now always the resource class in which the MVC resource method is defined).resolvingClasswas removed from Viewable. The constructor no longer accepts this argument and there is no getter for this field.org.glassfish.jersey.server.mvc.freemarker.FreemarkerProperties(use FreemarkerMvcFeature instead)org.glassfish.jersey.server.mvc.jsp.JspProperties(use JspMvcFeature instead)org.glassfish.jersey.server.model.RuntimeResource.getFirstParentResource()(use Resource.getParent() instead).
WADL is by default displayed in the simplified form. It does not contain supporting resources like OPTIONS methods or
/application.wadlitself. In order to get the full WADL use query paramdetail=true. For example make a GET request tohttp://localhost:8080/application.wadl?detail=true.
WADL is by default displayed in the simplified form. It does not contain supporting resources like OPTIONS methods or
/application.wadlitself. In order to get the full WADL use query paramdetail=true. For example make a GET request tohttp://localhost:8080/application.wadl?detail=true.
Client chunked encoding configuration behaviour has changed:
Jersey client uses chunked encoding (streaming) for serialization of the entity as a default option. Before Jersey 2.5 release entity buffering has been used by default. The size of the chunk can still be controlled by ClientProperties.CHUNKED_ENCODING_SIZE property, this property however no longer enforces the use of chunked encoding. To control request entity buffering and chunked transfer coding selection, please utilize use the new ClientProperties.REQUEST_ENTITY_PROCESSING property. The behaviour of the property is however not unified across the available Connector implementations and depends on the connector implementation configured for the Client instance. Default connector produced by HttpUrlConnectorProvider still uses buffering as default options due to bugs in
HttpURLConnection. On the other hand, Jetty HTTP Client based connectors produced by JettyConnectorProvider do not support chunked encoding at all.Please note that this is not a newly introduced limitation - it's merely an official acknowledgement of the fact that different connectors have different capabilities and limitations - something that has always been part of the individual connector implementations, it just was not publicly acknowledged.
New ConnectorProvider SPI has been introduced to decouple Connector instantiation from Client instance boot-strapping. As such, the
connector(Connector)method has been removed from ClientConfig API. It has been replaced with a newly introducedconnectorProvider(ConnectorProvider)method.org.glassfish.jersey.client.HttpUrlConnectorhas been removed from the public API. HttpUrlConnectorProvider should be used to produce HttpURLConnection connector instances instead.ClientProperties.HTTP_URL_CONNECTION_SET_METHOD_WORKAROUNDproperty has been moved to the new HttpUrlConnectorProvider has been introduced in Jersey 2.4) has been moved to the new HttpUrlConnectorProvider class as this property is specific to the connector instances created byHttpUrlConnectorProvideronly. The property has been also renamed to HttpUrlConnector.SET_METHOD_WORKAROUND. The name of the property remains the same -jersey.config.client.httpUrlConnection.setMethodWorkaround.ClientProperties.HTTP_URL_CONNECTOR_FIX_LENGTH_STREAMINGproperty (that class as this property is specific to the connector instances created byHttpUrlConnectorProvideronly. The property has been also renamed to HttpUrlConnectorProvider.USE_FIXED_LENGTH_STREAMING and the new property name isjersey.config.client.httpUrlConnector.useFixedLengthStreaming.org.glassfish.jersey.grizzly.connector.GrizzlyConnectorhas been removed from the public API. GrizzlyConnectorProvider should be used to produce Grizzly Asynchronous HTTP Client connector instances instead.Public constructor has been removed from the
org.glassfish.jersey.apache.connector.ApacheConnector; API. ApacheConnectorProvider should be used to provide Apache HTTP Client connector instances instead.Public constructor has been removed from the
org.glassfish.jersey.jetty.connector.JettyConnector; API. JettyConnectorProvider should be used to provide Jetty HTTP Client connector instances instead.Renamed property
CACHING_TEMPLATES_ENABLEDin MustacheMvcFeature fromjersey.config.server.mvc.caching.mustache.enabledtojersey.config.server.mvc.caching.mustache.Authentication filters
org.glassfish.jersey.client.filter.HttpBasicAuthFilterandorg.glassfish.jersey.client.filter.HttpDigestAuthFilterwere deprecated and replaced by HttpAuthenticationFeature.
The ContainerLifecycleListener invokes event
onStartupandonShutdownalso when application is being started or stopped because of application redeploy. The interface was marked as a Beta now.The monitoring statistics method
ApplicationStatistics.getDestroyTime()is deprecated and returns always null. Use ContainerLifecycleListener to listen on application destroy and get the destroy time.org.glassfish.jersey.spi.ResponseExecutorsProvidercontract has been completely removed from the Jersey SPI as it was inconsistently used by Jersey runtime and we did not find a suitable use case where a custom response executor would make sense. While we have no indication that the removed SPI is used in the Jersey community, please do not hesitate to contact us in case you think that you have a valid use case where the use of a custom response executor makes sense.org.glassfish.jersey.spi.RequestsExecutorsProvidercontract has been renamed toorg.glassfish.jersey.spi.RequestsExecutorsProvider. It has been also extended with an additionalreleaseRequestingExecutormethod to address executor shutdown handling issues reported inJERSEY-2205. As such, any custom implementation of the SPI is now required to implement the new method. (Note that the SPI has been removed in Jersey 2.18 - see the Jersey 2.18 release migration guide section for more details.)
The unsupported
ClientProperties.BUFFER_RESPONSE_ENTITY_ON_EXCEPTIONproperty, with value ofjersey.config.client.bufferResponseEntityOnException, has been removed from the API. Since Jersey 2.4 where JERSEY-2157 issue has been fixed, Jersey client runtime automatically buffers error response entities. This behavior is automatic and there is no need to set any property.
All deprecated SSE InboundEvent
getData(...)methods have been removed from the API. Use the newreadData(...)methods have been introduced instead in Jersey 2.3 for consistency with other parts of client-side JAX-RS API. Access to the raw SSE event data content is provided via aInboundEvent'sbyte[] getRawData()method that has been too introduced in Jersey 2.3.All EJB and CDI integration classes have been moved into internal Jersey packages, to clearly state the integration code should not be used as a public API.
All existing SSE InboundEvent
getData(...)methods have been made deprecated and newreadData(...)methods have been introduced instead for consistency with other parts of client-side JAX-RS API. The deprecatedgetData(...)methods will be removed in Jersey 2.4. A new SSE InboundEventbyte[] getRawData()method has been introduced to provide access to the raw SSE event data content.Generic Broadcaster methods for adding/removing BroadcasterListener registrations have been renamed from
addBroadcasterListener/removeBroadcasterListenerto simplyadd/remove.Generic Broadcaster (and transitively, SseBroadcaster)
add/removemethods - that are responsible for adding/removing BroadcasterListener and ChunkedOutput (or EventOutput) registrations - no longer try to avoid duplicate registrations by comparing hash code of the added/removed instance with the hash codes of already registered instances. This behavior has been identified as a potential source of hard to discover bugs and was removed as such. The issue with the former behavior was that hash codes as integer values provide only a very limited value space that could lead to false-positive duplicate registration rejections, especially with larger number of simultaneously connected SSE clients (represented byChunkedOutputorEventOutputbroadcaster registrations). Consequently, users who rely on the old registration behavior in their application code need to adapt the code to the revised behavior ofBroadcasteradd/removemethods.
This chapter is a migration guide for people switching from Jersey 1.x. Since many of the Jersey 1.x features became part of JAX-RS 2.0 standard which caused changes in the package names, we decided it is a good time to do a more significant incompatible refactoring, which will allow us to introduce some more interesting new features in the future. As the result, there are many incompatibilities between Jersey 1.x and Jersey 2.0. This chapter summarizes how to migrate the concepts found in Jersey 1.x to Jersey/JAX-RS 2.0 concepts.
Jersey 1.x contains number of proprietary server APIs. This section covers migration of application code relying on those APIs.
Jersey 1.x have its own internal dependency injection framework which handles injecting various parameters into field or methods. It also provides a way how to register custom injection provider in Singleton or PerRequest scopes. Jersey 2.x uses HK2 as dependency injection framework and users are also able to register custom classes or instances to be injected in various scopes.
Main difference in Jersey 2.x is that you don't need to create special classes or providers for this task; everything should be achievable using HK2 API. Custom injectables can be registered at ResourceConfig level by adding new HK2 Module or by dynamically adding binding almost anywhere using injected HK2 Services instance.
Jersey 1.x Singleton:
ResourceConfig resourceConfig = new
DefaultResourceConfig(); resourceConfig.getSingletons().add( new SingletonTypeInjectableProvider<Context,
SingletonType>( SingletonType.class, new SingletonType()) {});
Jersey 1.x PerRequest:
ResourceConfig resourceConfig = new
DefaultResourceConfig(); resourceConfig.getSingletons().add( new PerRequestTypeInjectableProvider<Context,
PerRequestType>() { @Override public Injectable<PerRequestType> getInjectable(ComponentContext
ic, Context context) { //... } });
Jersey 2.0 HK2 Module:
public static class MyBinder extends AbstractBinder
{
@Override protected void configure() { // request scope binding
bind(MyInjectablePerRequest.class).to(MyInjectablePerRequest.class).in(RequestScoped.class); // singleton
binding bind(MyInjectableSingleton.class).in(Singleton.class); // singleton instance binding bind(new
MyInjectableSingleton()).to(MyInjectableSingleton.class); }
}
// register module to ResourceConfig (can be done also in constructor) ResourceConfig rc = new
ResourceConfig(); rc.addClasses(/* ... */); rc.addBinders(new MyBinder());
Jersey 2.0 dynamic binding:
public static class MyApplication extends
Application {
@Inject public MyApplication(ServiceLocator serviceLocator) { System.out.println("Registering
injectables...");
DynamicConfiguration dc = Injections.getConfiguration(serviceLocator);
// request scope binding Injections.addBinding(
Injections.newBinder(MyInjectablePerRequest.class).to(MyInjectablePerRequest.class).in(RequestScoped.class),
dc);
// singleton binding Injections.addBinding( Injections.newBinder(MyInjectableSingleton.class)
.to(MyInjectableSingleton.class) .in(Singleton.class), dc);
// singleton instance binding Injections.addBinding( Injections.newBinder(new MyInjectableSingleton())
.to(MyInjectableSingleton.class), dc);
// request scope binding with specified custom annotation Injections.addBinding(
Injections.newBinder(MyInjectablePerRequest.class) .to(MyInjectablePerRequest.class) .qualifiedBy(new
MyAnnotationImpl()) .in(RequestScoped.class), dc);
// commits changes dc.commit(); }
@Override public Set<Class<?>> getClasses() { return ... }}
In Jersey 1, the reload functionality is based on two interfaces:
- com.sun.jersey.spi.container.ContainerListener
- com.sun.jersey.spi.container.ContainerNotifier
Containers, which support the reload functionality implement the
ContainerListener
interface, so that once you get access to the actual container instance, you could call it's
onReload
method and get the container re-load the config. The second interface helps you to obtain the actual container
instance reference. An example on how things are wired together follows.
Example 28.1. Jersey 1 reloader implementation
public class Reloader implements
ContainerNotifier { List<ContainerListener> ls;
public Reloader() { ls = new ArrayList<ContainerListener>(); }
public void addListener(ContainerListener l) { ls.add(l); }
public void reload() { for (ContainerListener l : ls) { l.onReload(); } } }
Example 28.2. Jersey 1 reloader registration
Reloader reloader = new Reloader();
resourceConfig.getProperties().put(ResourceConfig.PROPERTY_CONTAINER_NOTIFIER, reloader);
In Jersey 2, two interfaces are involved again, but these have been re-designed.
- org.glassfish.jersey.server.spi.Container
- org.glassfish.jersey.server.spi.ContainerLifecycleListener
The
Container
interface introduces two
reload
methods, which you can call to get the application re-loaded. One of these methods allows to pass in a
new ResourceConfig instance.
You can register your implementation of
ContainerLifecycleListener
the same way as any other provider (i.e. either by annotating it by @Provider annotation or adding
it to the Jersey ResourceConfig directly either using the class (using
ResourceConfig.addClasses()) or registering a particular instance using
ResourceConfig.addSingletons()
method.
An example on how things work in Jersey 2 follows.
Example 28.3. Jersey 2 reloader implementation
public class Reloader implements
ContainerLifecycleListener {
Container container;
public void reload(ResourceConfig newConfig) { container.reload(newConfig); }
public void reload() { container.reload(); }
@Override public void onStartup(Container container) { this.container = container; }
@Override public void onReload(Container container) { // ignore or do whatever you want after reload
has been done }
@Override public void onShutdown(Container container) { // ignore or do something after the container
has been shutdown } }
Example 28.4. Jersey 2 reloader registration
Reloader reloader = new Reloader();
resourceConfig.addSingletons(reloader);
JAX-RS 2.0 defines new order of MessageBodyWorkers - whole set is sorted by declaration distance, media type
and source (custom providers having higher priority than default ones provided by Jersey). JAX-RS 1.x ordering
can still be forced by setting parameter
MessageProperties.LEGACY_WORKERS_ORDERING
("jersey.config.workers.legacyOrdering") to true
in ResourceConfig or ClientConfig properties.
JAX-RS 2.0 provides functionality that is equivalent to the Jersey 1.x proprietary client API. Here is a rough mapping between the Jersey 1.x and JAX-RS 2.0 Client API classes:
Table 28.2. Mapping of Jersey 1.x to JAX-RS 2.0 client classes
| Jersey 1.x Class | JAX-RS 2.0 Class | Notes |
|---|---|---|
| com.sun.jersey.api.client.Client | ClientBuilder | For the static factory methods and constructors. |
| Client | For the instance methods. | |
| com.sun.jersey.api.client.WebResource | WebTarget | |
| com.sun.jersey.api.client.AsyncWebResource | WebTarget | You can access async versions of the async methods by calling
WebTarget.request().async()
|
The following sub-sections show code examples.
Jersey 1.x way:
Client client = Client.create(); WebResource
webResource = client.resource(restURL).path("myresource/{param}"); String result =
webResource.pathParam("param", "value").get(String.class);
JAX-RS 2.0 way:
Client client = ClientBuilder.newClient();
WebTarget target = client.target(restURL).path("myresource/{param}"); String result =
target.pathParam("param", "value").get(String.class);
Jersey 1.x way:
Client client = Client.create(); WebResource
webResource = client.resource(restURL); webResource.addFilter(new HTTPBasicAuthFilter(username,
password));
JAX-RS 2.0 way:
Client client = ClientBuilder.newClient();
WebTarget target = client.target(restURL); target.register(new HttpBasicAuthFilter(username, password));
Jersey 1.x way:
Client client = Client.create(); WebResource
webResource = client.resource(restURL).accept("text/plain"); ClientResponse response =
webResource.get(ClientResponse.class);
JAX-RS 2.0 way:
Client client = ClientBuilder.newClient();
WebTarget target = client.target(restURL); Response response = target.request("text/plain").get();
Jersey 1.x way:
Client client = Client.create(); WebResource
webResource = client.resource(restURL); ClientResponse response = webResource.post(ClientResponse.class,
"payload");
JAX-RS 2.0 way:
Client client = ClientBuilder.newClient();
WebTarget target = client.target(restURL); Response response =
target.request().post(Entity.text("payload"));
Jersey 1.x way:
HTTPSProperties prop = new
HTTPSProperties(hostnameVerifier, sslContext); DefaultClientConfig dcc = new DefaultClientConfig();
dcc.getProperties().put(HTTPSProperties.PROPERTY_HTTPS_PROPERTIES, prop); Client client =
Client.create(dcc);
Jersey 2.0 way:
Client client = ClientBuilder.newBuilder()
.sslContext(sslContext) .hostnameVerifier(hostnameVerifier) .build();
JSON Support has undergone certain changes in Jersey 2.x. The most visible difference for the developer is in the initialization and configuration.
In Jersey 1.x, the JAXB/JSON Support was implemented as a set of
MessageBodyReaders
and
MessageWriters
in the
jersey-json
module. Internally, there were several implementations of JSON to Object mapping ranging from Jersey's own custom
solution to third party providers, such as
Jackson
orJettison. The configuration of the JSON support was centralized in the
JSONConfiguration
and
JSONJAXBContext
classes.
There are three main JSON-mapping handling approaches, which are preserved in Jersey 2: JAXB-based, POJO mapping and Low-level parsing The following table shows how to enable each of them in both Jersey 2 compared to Jersey 1:
Table 28.3. JSON approaches and usage in Jersey 1 vs Jersey 2
| Approach | Jersey 1 | Jersey 2 |
|---|---|---|
| POJO | registerPOJOMappingFeature, use ObjectMapper for
configuration
|
use
Jackson
provider: (add
jersey-media-json-jackson
dependency and
register
theJacksonFeature), configure with custom ObjectMapper
instance.
|
| JAXB | Default; useJSONConfiguration/
JSONJAXBContext
for configuration
| use
MOXy
(add the
jersey-media-moxy
dependency; the feature will be registered
automatically), configure using
MoxyJsonConfig
|
| Low-level | Direct usage of
JSONObject
and/or
JSONArray
classes
| use JSON-P (standard) or Jettison (non-standard) APIs (add the relevant dependency) |
Example 28.5. Initializing JAXB-based support with MOXy
<dependency> <groupId>org.glassfish.jersey.media</groupId> <artifactId>jersey-media-moxy</artifactId>
<version>2.29.1</version> </dependency>
Note
For JAXB-based support, MOXy is the default way in Jersey 2. However, other providers (
Jackson,Jettison) can be used as well. The relevant feature has to be
registered (and dependency added) and custom implementation of
ContextResolver
has to be provided. See the code snippets in therelated chapter.
For more on particular
Feature
registration, see also:
Jackson registration,
Jettison registration,
MOXy registration,
JSON-P registration.
It is important to point out, that the
Feature
registration has to be done separately for client and server.
Note
With Jersey 2.9,
Jackson
has been updated to version 2.3.2. The feature is still configured via mentioned
ObjectMapper
class, but the package has changed.
- For
jackson 1.x, useorg.codehaus.jackson.map.ObjectMapper - For
jackson 2.x, usecom.fasterxml.jackson.core.ObjectMapper
Jersey 1 was selecting the provider automatically based on the desired JSON Notation. This concept was replaced in Jersey 2 by direct choice of provider (as shown above). To provide some guide how to achieve the same results as in the previous Jersey version, see the following list:
MAPPEDnot supportedNATURALdefault MOXy outputJETTISON_MAPPEDsupported by JettisonBADGERFISHsupported by Jettison
As mentioned, the centralized configuration of Jersey 1's
JSONConfiguration
does not have a direct equivalent in Jersey 2. Each provider has it's own way to be configured. Detailed
description of each method and property is out of scope of this migration guide and can be found in the
documentation and APIs of the relevant providers and/or the relevant Jersey module API. Bellow are several
basic examples how to configure certain options when using MOXy with Jersey's
MoxyJsonConfig
class.
Formated output
Jersey 1:
JSONConfiguration.createJSONConfigurationWithFormatted()Jersey 2/MOXy:
MoxyJsonConfig.setFormattedOutput()Namespaces mapping
Jersey 1:
JSONConfiguration.natural().xml2JsonNs()Jersey 2/MOXy:
MoxyJsonConfig.setNamespacePrefixMapper()Namespace separator
Jersey 1:
JSONConfiguration.natural().nsSeparator()Jersey 2/MOXy:
MoxyJsonConfig.setNamespaceSeparator()
Properties can be also passed directly to
Marshaller
and/or
Unmarshaller
using:MoxyJsonConfig'sproperty(),
marshallerProperty()
and
unmarshallerProperty()
methods.
More on the JSON Support topic can be found inSection 9.1, “JSON”.
Table of Contents
List of common configuration properties that can be found in CommonProperties class. All of these properties can be overridden by their server/client counterparts.
Table A.1. List of common configuration properties
| Constant | Value | Description |
|---|---|---|
| CommonProperties.FEATURE_AUTO_DISCOVERY_DISABLE | jersey.config.disableAutoDiscovery |
Disables feature auto discovery globally on client/server. Default value is |
| CommonProperties.JSON_PROCESSING_FEATURE_DISABLE | jersey.config.disableJsonProcessing |
Disables configuration of Json Processing (JSR-353) feature. Default value is |
| CommonProperties.METAINF_SERVICES_LOOKUP_DISABLE | jersey.config.disableMetainfServicesLookup |
Disables META-INF/services lookup globally on client/server. Default value is |
| CommonProperties.MOXY_JSON_FEATURE_DISABLE | jersey.config.disableMoxyJson |
Disables configuration of MOXy Json feature. Default value is |
| CommonProperties.OUTBOUND_CONTENT_LENGTH_BUFFER | jersey.config.contentLength.buffer |
An integer value that defines the buffer size used to buffer the outbound message entity in order to
determine its size and set the value of HTTP |
| LoggingFeature.LOGGING_FEATURE_LOGGER_NAME |
jersey.config.logging.logger.name
|
Logger name of the logging filter.
See logging chapter for more information.
The default value is org.glassfish.jersey.logging.LoggingFeature
|
| LoggingFeature.LOGGING_FEATURE_LOGGER_LEVEL |
jersey.config.logging.logger.level
| Level of logging filter's logger at which the messages will be logged. See logging chapter for more information. |
| LoggingFeature.LOGGING_FEATURE_VERBOSITY |
jersey.config.logging.verbosity
|
Verbosity of logging filter describes how verbose the logging filter will be.
There are 3 possible values LoggingFeature.Verbosity.HEADERS_ONLY,
LoggingFeature.Verbosity.PAYLOAD_TEXT or
LoggingFeature.Verbosity.PAYLOAD_ANY.
See logging chapter for more information.
|
| LoggingFeature.LOGGING_FEATURE_MAX_ENTITY_SIZE |
jersey.config.logging.entity.maxSize
| The maximum number of bytes of the entity which will be logged. See logging chapter for more information. |
List of server configuration properties that can be found in ServerProperties class.
Table A.2. List of server configuration properties
| Constant | Value | Description |
|---|---|---|
| ServerProperties.APPLICATION_NAME | jersey.config.server.application.name |
Defines the application name. The name is an arbitrary user defined name which is used to distinguish between Jersey applications in the case that more applications are deployed on the same runtime (container). The name can be used for example for purposes of monitoring by JMX when name identifies to which application deployed MBeans belong to. The name should be unique in the runtime. The property does not have a default value. |
| ServerProperties.BV_FEATURE_DISABLE | jersey.config.beanValidation.disable.server |
Disables Bean Validation support. Default value is |
| ServerProperties .BV_DISABLE_VALIDATE_ON_EXECUTABLE_OVERRIDE_CHECK | jersey.config.beanValidation
.disable.validateOnExecutableCheck.server |
Disables |
| ServerProperties.BV_SEND_ERROR_IN_RESPONSE | jersey.config.beanValidation
.enableOutputValidationErrorEntity.server |
Enables sending validation error information to the client. Default value is |
| ServerProperties.FEATURE_AUTO_DISCOVERY_DISABLE | jersey.config.server.disableAutoDiscovery |
Disables feature auto discovery on server. Default value is |
| ServerProperties.HTTP_METHOD_OVERRIDE | jersey.config.server.httpMethodOverride |
Defines configuration of HTTP method overriding. This property is used by HttpMethodOverrideFilter to determine where it should look for method override information (e.g. request header or query parameters). |
| ServerProperties.JSON_PROCESSING_FEATURE_DISABLE | jersey.config.server.disableJsonProcessing |
Disables configuration of Json Processing (JSR-353) feature. Default value is |
| ServerProperties.LANGUAGE_MAPPINGS | jersey.config.server.languageMappings |
Defines mapping of URI extensions to languages. The property is used by UriConnegFilter. |
| ServerProperties.MEDIA_TYPE_MAPPINGS | jersey.config.server.mediaTypeMappings |
Defines mapping of URI extensions to media types. The property is used by UriConnegFilter. |
| ServerProperties.METAINF_SERVICES_LOOKUP_DISABLE | jersey.config.server.disableMetainfServicesLookup |
Disables META-INF/services lookup on server. Default value is |
| ServerProperties.MOXY_JSON_FEATURE_DISABLE | jersey.config.server.disableMoxyJson |
Disables configuration of MOXy Json feature. Default value is |
| ServerProperties.MONITORING_ENABLED (Jersey 2.12 or later) | jersey.config.server
.monitoring.statistics.enabled |
If |
| ServerProperties.MONITORING_STATISTICS_ENABLED | jersey.config.server
.monitoring.enabled |
If |
| ServerProperties.MONITORING_STATISTICS_MBEANS_ENABLED | jersey.config.server
.monitoring.statistics.mbeans.enabled |
If |
| ServerProperties.MONITORING_STATISTICS_REFRESH_INTERVAL (Jersey 2.10 or later) | jersey.config.server
.monitoring.statistics.refresh.interval |
Interval (in |
| ServerProperties.OUTBOUND_CONTENT_LENGTH_BUFFER (Jersey 2.2 or later) | jersey.config.contentLength.server.buffer |
An integer value that defines the buffer size used to buffer the outbound message entity in order to
determine its size and set the value of HTTP |
| ServerProperties.PROVIDER_CLASSNAMES | jersey.config.server.provider.classnames |
Defines one or more class names that implement application-specific resources and providers. If the property is set, the specified classes will be instantiated and registered as either application JAX-RS root resources or providers. |
| ServerProperties.PROVIDER_CLASSPATH | jersey.config.server.provider.classpath |
Defines class-path that contains application-specific resources and providers. If the property is set, the specified packages will be scanned for JAX-RS root resources and providers. |
| ServerProperties.PROVIDER_PACKAGES | jersey.config.server.provider.packages |
Defines one or more packages that contain application-specific resources and providers. If the property is set, the specified packages will be scanned for JAX-RS root resources and providers. |
| ServerProperties.PROVIDER_SCANNING_RECURSIVE | jersey.config.server
.provider.scanning.recursive |
Sets the recursion strategy for package scanning. Default value is |
| ServerProperties.REDUCE_CONTEXT_PATH_SLASHES_ENABLED | jersey.config.server.reduceContextPathSlashes.enabled |
Ignores multiple slashes between a port and a context path and will resolve it
as URI with only one slash. Default value is |
| ServerProperties.RESOURCE_VALIDATION_DISABLE | jersey.config.server
.resource.validation.disable |
Disables |
| ServerProperties.RESOURCE_VALIDATION_IGNORE_ERRORS | jersey.config.server
.resource.validation.ignoreErrors |
Determines whether validation of application resource models should fail even in case of a fatal
validation errors. Default value is |
| ServerProperties.WADL_FEATURE_DISABLE | jersey.config.server.wadl.disableWadl |
Disables WADL generation. Default value is |
| ServerProperties.WADL_GENERATOR_CONFIG | jersey.config.server.wadl.generatorConfig |
Defines the wadl generator configuration that provides a WadlGenerator. |
| ServerProperties.RESPONSE_SET_STATUS_OVER_SEND_ERROR | jersey.config.server.response.setStatusOverSendError |
Whenever response status is |
| ServerProperties.TRACING | jersey.config.server.tracing.type |
Enables/disables tracing support. Possible values are |
| ServerProperties.TRACING_THRESHOLD | jersey.config.server.tracing.threshold |
Sets the amount of detail provided by tracing. Possible values are |
| ServerProperties.PROCESSING_RESPONSE_ERRORS_ENABLED | jersey.config.server.exception.processResponseErrors |
If property value is |
| ServerProperties.SUBRESOURCE_LOCATOR_CACHE_SIZE | jersey.config.server.subresource.cache.size |
An integer value that defines the size of cache for sub-resource locator models. The cache is used to provide better performance for application that uses JAX-RS sub-resource locators. |
| ServerProperties.SUBRESOURCE_LOCATOR_CACHE_SIZE | jersey.config.server.subresource.cache.size |
An integer value that defines the maximum age (in seconds) for cached for sub-resource locator models. The age of an cache entry is defined as the time since the last access (read) to the entry in the cache. Entry aging is not enabled by default. |
| ServerProperties.SUBRESOURCE_LOCATOR_CACHE_JERSEY_RESOURCE_ENABLED | jersey.config.server.subresource.cache.jersey.resource.enabled |
If |
| ServerProperties.LOCATION_HEADER_RELATIVE_URI_RESOLUTION_DISABLED | jersey.config.server.headers.location.relative.resolution.disabled |
If |
| LoggingFeature.LOGGING_FEATURE_LOGGER_NAME_SERVER |
jersey.config.server.logging.logger.name
|
Logger name of the logging filter.
See logging chapter for more information.
The default value is org.glassfish.jersey.logging.LoggingFeature
|
| LoggingFeature.LOGGING_FEATURE_LOGGER_LEVEL_SERVER |
jersey.config.server.logging.logger.level
| Level of logging filter's logger at which the messages will be logged. See logging chapter for more information. |
| LoggingFeature.LOGGING_FEATURE_VERBOSITY_SERVER |
jersey.config.server.logging.verbosity
|
Verbosity of logging filter describes how verbose the logging filter will be.
There are 3 possible values LoggingFeature.Verbosity.HEADERS_ONLY,
LoggingFeature.Verbosity.PAYLOAD_TEXT or
LoggingFeature.Verbosity.PAYLOAD_ANY.
See logging chapter for more information.
|
| LoggingFeature.LOGGING_FEATURE_MAX_ENTITY_SIZE_SERVER |
jersey.config.server.logging.entity.maxSize
| The maximum number of bytes of the entity which will be logged. See logging chapter for more information. |
List of servlet configuration properties that can be found in ServletProperties class.
Table A.3. List of servlet configuration properties
| Constant | Value | Description |
|---|---|---|
| ServletProperties.FILTER_CONTEXT_PATH | jersey.config.servlet.filter.contextPath |
If set, indicates the URL pattern of the Jersey servlet filter context path. |
| ServletProperties.FILTER_FORWARD_ON_404 | jersey.config.servlet.filter.forwardOn404 |
If set to |
| ServletProperties.FILTER_STATIC_CONTENT_REGEX | jersey.config.servlet.filter.staticContentRegex |
If set the regular expression is used to match an incoming servlet path URI to some web page content such as static resources or JSPs to be handled by the underlying servlet engine. |
| ServletProperties.JAXRS_APPLICATION_CLASS | javax.ws.rs.Application |
Application configuration initialization property whose value is a fully qualified class name of a class that implements JAX-RS Application. |
| ServletProperties.PROVIDER_WEB_APP | jersey.config.servlet.provider.webapp |
Indicates that Jersey should scan the whole web app for application-specific resources and providers. |
| ServletProperties.QUERY_PARAMS_AS_FORM_PARAMS_DISABLED | jersey.config.servlet.form.queryParams.disabled |
If |
| ServletProperties.SERVICE_LOCATOR | jersey.config.servlet.context.serviceLocator |
Identifies the object that will be used as a parent ServiceLocator in the Jersey WebComponent. |
List of client configuration properties that can be found in ClientProperties class.
Table A.4. List of client configuration properties
| Constant | Value | Description |
|---|---|---|
| ClientProperties.ASYNC_THREADPOOL_SIZE | jersey.config.client.async.threadPoolSize |
Asynchronous thread pool size. Default value is not set. Supported with GrizzlyConnectorProvider only.. |
| ClientProperties.CHUNKED_ENCODING_SIZE | jersey.config.client.chunkedEncodingSize |
Chunked encoding size. Default value is not set. |
| ClientProperties.CONNECT_TIMEOUT | jersey.config.client.connectTimeout |
Read timeout interval, in milliseconds. Default value is |
| ClientProperties.FEATURE_AUTO_DISCOVERY_DISABLE | jersey.config.client.disableAutoDiscovery |
Disables feature auto discovery on client. Default value is |
| ClientProperties.FOLLOW_REDIRECTS | jersey.config.client.followRedirects |
Declares that the client will automatically redirect to the URI declared in 3xx responses. Default value is |
| ClientProperties.JSON_PROCESSING_FEATURE_DISABLE | jersey.config.client.disableJsonProcessing |
Disables configuration of Json Processing (JSR-353) feature. Default value is |
| ClientProperties.METAINF_SERVICES_LOOKUP_DISABLE | jersey.config.disableMetainfServicesLookup.client |
Disables META-INF/services lookup on client. Default value is |
| ClientProperties.MOXY_JSON_FEATURE_DISABLE | jersey.config.client.disableMoxyJson |
Disables configuration of MOXy Json feature. Default value is |
| ClientProperties.OUTBOUND_CONTENT_LENGTH_BUFFER (Jersey 2.2 or later) | jersey.config.client.contentLength.buffer |
An integer value that defines the buffer size used to buffer the outbound message entity in order to
determine its size and set the value of HTTP |
| ClientProperties.PROXY_URI | jersey.config.client.proxy.uri |
URI of a HTTP proxy the client connector should use. Default value is not set. Currently supported with ApacheConnectorProvider and JettyConnectorProvider only. |
| ClientProperties.PROXY_USERNAME (Jersey 2.5 or later) | jersey.config.client.proxy.username |
User name which will be used for HTTP proxy authentication. Default value is not set. Currently supported with ApacheConnectorProvider and JettyConnectorProvider only. |
| ClientProperties.PROXY_PASSWORD (Jersey 2.5 or later) | jersey.config.client.proxy.password |
Password which will be used for HTTP proxy authentication. Default value is not set. Currently supported with ApacheConnectorProvider and JettyConnectorProvider only. |
| ClientProperties.READ_TIMEOUT (Jersey 2.5 or later) | jersey.config.client.readTimeout |
Read timeout interval, in milliseconds. Default value is |
| ClientProperties.REQUEST_ENTITY_PROCESSING (Jersey 2.5 or later) | jersey.config.client.request.entity.processing |
Defines whether the request entity should be serialized using internal buffer to
evaluate content length or chunk encoding should be used. Possible values are
|
| ClientProperties.SUPPRESS_HTTP_COMPLIANCE_VALIDATION (Jersey 2.2 or later) | jersey.config.client.suppressHttpComplianceValidation |
If |
| ClientProperties.USE_ENCODING | jersey.config.client.useEncoding |
Indicates the value of |
| LoggingFeature.LOGGING_FEATURE_LOGGER_NAME_CLIENT |
jersey.config.client.logging.logger.name
|
Logger name of the logging filter.
See logging chapter for more information.
The default value is org.glassfish.jersey.logging.LoggingFeature
|
| LoggingFeature.LOGGING_FEATURE_LOGGER_LEVEL_CLIENT |
jersey.config.client.logging.logger.level
| Level of logging filter's logger at which the messages will be logged. See logging chapter for more information. |
| LoggingFeature.LOGGING_FEATURE_VERBOSITY_CLIENT |
jersey.config.client.logging.verbosity
|
Verbosity of logging filter describes how verbose the logging filter will be.
There are 3 possible values LoggingFeature.Verbosity.HEADERS_ONLY,
LoggingFeature.Verbosity.PAYLOAD_TEXT or
LoggingFeature.Verbosity.PAYLOAD_ANY.
See logging chapter for more information.
|
| LoggingFeature.LOGGING_FEATURE_MAX_ENTITY_SIZE_CLIENT |
jersey.config.client.logging.entity.maxSize
| The maximum number of bytes of the entity which will be logged. See logging chapter for more information. |