imqkeytool -servlet keyStoreLocationC HTTP/HTTPS Support
Message Queue includes support for Java clients to communicate with a message broker by means of the HTTP or secure HTTP (HTTPS) transport protocols, rather than through a direct TCP connection. (HTTP/ HTTPS support is not available for C clients.) Because HTTP/ HTTPS connections are normally allowed through firewalls, this allows client applications to be separated from the broker by a firewall.
This appendix describes the architecture used to enable HTTP/ HTTPS support and explains the setup work needed to allow Message Queue clients to use such connections. It has the following sections:
HTTP/HTTPS Support Architecture
Message Queue’s support architecture is very similar for both HTTP and HTTPS support, as shown in Figure C-1:
-
On the client side, an HTTP or HTTPS transport driver (part of the Message Queue client runtime) encapsulates each message into an HTTP request and makes sure that these requests are transmitted in the correct sequence.
-
If necessary, the client can use an HTTP proxy server to communicate with the broker. The proxy’s address is specified using command line options when starting the client; seeUsing an HTTP Proxy for more information.
-
An HTTP or HTTPS tunnel servlet (both bundled with Message Queue) is loaded into an application server or Web server on the broker side and used to pull payload messages from client HTTP requests before forwarding them to the broker. The tunnel servlet also sends broker messages back to the client in response to the client’s HTTP requests. A single tunnel servlet can be used to access multiple brokers.
-
On the broker side, the
httpjmsorhttpsjmsconnection service unwraps and demultiplexes incoming messages from the corresponding tunnel servlet.
Figure C-1 HTTP/HTTPS Support Architecture
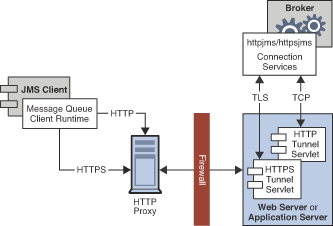
The main difference between HTTP and HTTPS connections is that in the
HTTPS case (httpsjms connection service), the tunnel servlet has a
secure connection to both the client application and the broker. The
secure connection to the broker is established by means of the Secure
Socket Layer (SSL) protocol. Message Queue’s SSL-enabled HTTPS tunnel
servlet passes a self-signed certificate to any broker requesting a
connection. The broker uses the certificate to establish an encrypted
connection to the tunnel servlet. Once this connection is established, a
secure connection between the client application and the tunnel servlet
can be negotiated by the client application and the application server
or Web server.
Enabling HTTP/HTTPS Support
The procedures for enabling HTTP and HTTPS support are essentially the same for both protocols, although a few extra steps are required in the HTTPS case to generate and access the needed encryption keys and certificates. The steps are as follows. (For HTTPS, start with step 1; for non-secure HTTP, start with step 4.)
-
(HTTPS only) Generate a self-signed certificate for the HTTPS tunnel servlet.
-
(HTTPS only) Modify the deployment descriptor in the tunnel servlet’s
.warfile to specify the location and password of the certificate key store. -
(HTTPS only) Validate the Web or application server’s self-signed certificate and install it in the client application’s trust store.
-
(HTTP and HTTPS) Deploy the HTTP or HTTPS tunnel servlet.
-
(HTTP and HTTPS) Configure the broker’s
httpjmsorhttpsjmsconnection service and start the broker. -
(HTTP and HTTPS) Configure an HTTP or HTTPS connection.
The following subsections describe each of these steps in greater detail, using GlassFish Server as an example for purposes of illustration. If you are using a different application server or Web server (such as Oracle iPlanet Web Server), the procedures will be substantially similar but may differ in detail; see your server product’s own documentation for specifics.
Step 1 (HTTPS Only): Generating a Self-Signed Certificate for the Tunnel Servlet ^^^^^^^^^^^^^^^^^^^^^^^^^^^^
Message Queue’s SSL support is oriented toward securing on-the-wire data, on the assumption that the client is communicating with a known and trusted server. Therefore, SSL is implemented using only self-signed server certificates. Before establishing an HTTPS connection, you must obtain such a certificate. (This step is not needed for ordinary, non-secure HTTP connections.)
Run the Message Queue Key Tool utility (imqkeytool) to generate a
self-signed certificate for the tunnel servlet. (On UNIX systems, you
may need to run the utility as the root user in order to have permission
to create the key store.) Enter the following at the command prompt:
where keyStoreLocation is the location of Message Queue’s key store file.
The Key Tool utility prompts you for a key store password:
Enter keystore password:After you have entered a valid password, the utility prompts you for identifying information from which to construct an X.500 distinguished name. Table C-1 shows the prompts and the values to be provided for each prompt. Values are case-insensitive and can include spaces.
Table C-1 Distinguished Name Information Required for a Self-Signed Certificate
| Prompt | X.500 Attribute | Description | Example |
|---|---|---|---|
|
commonName (CN) |
Fully qualified name of server running the broker |
|
|
organizationalUnit (OU) |
Name of department or division |
|
|
organizationName (ON) |
Name of larger organization, such as a company or government entity |
|
|
localityName (L) |
Name of city or locality |
|
|
stateName (ST) |
Full (unabbreviated) name of state or province |
|
|
country © |
Standard two-letter country code |
|
When you have entered the information, the Key Tool utility displays it for confirmation: for example,
   Is CN=mqserver.sun.com, OU=purchasing, ON=Acme Widgets, Inc.,
   L=San Francisco, ST=California, C=US correct?
To accept the current values and proceed, enter yes; to reenter
values, accept the default or enter no. After you confirm, the utility
pauses while it generates a key pair.
Next, the utility asks for a password to lock the key pair (key password). Press Return in response to this prompt to use the same password for both the key password and the key store password.
|
Caution
|
Be sure to remember the password you specify. You must provide this password later to the tunnel servlet so it can open the key store. |
The Key Tool utility generates a self-signed certificate and places it in Message Queue’s key store file at the location you specified for the keyStoreLocation argument.
|
Caution
|
The HTTPS tunnel servlet must be able to see the key store. Be sure to move or copy the generated key store from the location specified by keyStoreLocation to one accessible to the tunnel servlet (see Step 4 (HTTP and HTTPS): Deploying the Tunnel Servlet). |
Step 2 (HTTPS Only): Specifying the Key Store Location and Password
The tunnel servlet’s Web archive (.war) file includes a deployment
descriptor, an XML file containing the basic configuration information
needed by the application server or Web server to load and run the
servlet. Before deploying the .war file for the HTTPS tunnel servlet,
you must edit the deployment descriptor to specify the location and
password of the certificate key store. (This step is not needed for
ordinary, non-secure HTTP connections.)
To Specify the Location and Password of the Certificate Key Store
-
Copy the
.warfile to a temporary directory:
cp IMQ_HOME/lib/imqhttps.war /tmp
-
Make the temporary directory your current directory.
cd /tmp
-
Extract the contents of the
.warfile.
jar xvf imqhttps.war
-
List the
.warfile’s deployment descriptor.
Enter the command
ls -l WEB-INF/web.xml
to confirm that the deployment descriptor file (WEB-INF/web.xml) was
successfully extracted.
5. Edit the deployment descriptor to specify the key store location and
password.
Edit the web.xml file to provide appropriate values for the
keystoreLocation and keystorePassword elements (as well as
servletPort and servletHost, if necessary): for example,
<init-param>
<param-name>keystoreLocation</param-name>
<param-value>/local/tmp/imqhttps/keystore</param-value>
</init-param>
<init-param>
<param-name>keystorePassword</param-name>
<param-value>shazam</param-value>
</init-param>
<init-param>
<param-name>servletHost</param-name>
<param-value>localhost</param-value>
</init-param>
<init-param>
<param-name>servletPort</param-name>
<param-value>7674</param-value>
</init-param>
::
|
Note
|
If you are concerned about exposure of the key store password, you can
use file-system permissions to restrict access to the |
-
Reassemble the contents of the
.warfile.
jar uvf imqhttps.war WEB-INF/web.xml
Step 3 (HTTPS Only): Validating and Installing the Server’s Self-Signed Certificate ^^^^^^^^^^^^^^^^^^^^^^^^^^^^^
In order for a client application to communicate with the Web or application server, you must validate the server’s self-signed certificate and install it in the application’s trust store. The following procedure shows how:
To Validate and Install the Server’s Self-Signed Certificate
-
Validate the server’s certificate.
By default, the GlassFish Server generates a self-signed certificate and stores it in a key store file at the location
appServerRoot/glassfish/domains/domain1/config/keystore.jks
where appServerRoot is the root directory in which the application
server is installed.
|
Note
|
If necessary, you can use the JDK Key Tool utility to generate a key store of your own and use it in place of the default key store. For more information, see the details about establishing a secure connection using SSL in "Introduction to Security in the Java EE Platform" in The Java EE 7 Tutorial. |
-
Make the directory containing the key store file your current directory.
For example, to use the Application Server’s default key store file (as shown above), navigate to its directory with the command
cd appServerRoot/glassfish/domains/domain1/config
where appServerRoot is, again, the root directory in which the
application server is installed.
2. List the contents of the key store file.
The Key Tool utility’s -list option lists the contents of a specified
key store file. For example, the following command lists the Application
Server’s default key store file (keystore.jks):
keytool -list -keystore keystore.jks -vThe -v option tells the Key Tool utility to display certificate
fingerprints in human-readable form.
3. Enter the key store password.
The Key Tool utility prompts you for the key store file’s password:
Enter keystore password:By default, the key store password is set to changeit; you can use the
Key Tool utility’s -storepasswd option to change it to something more
secure. After you have entered a valid password, the Key Tool utility
will respond with output like the following:
Keystore type: JKS
Keystore provider: SUN

Your keystore contains 1 entry

Alias name: slas
Creation date: Nov 13, 2007
Entry type: PrivateKeyEntry
Certificate chain length: 1
Certificate[1]:
Owner: CN=helios, OU=Sun Java System Application Server, O=Sun Microsystems,
L=Santa Clara, ST=California, C=US
Issuer: CN=helios, OU=Sun Java System Application Server, O=Sun Microsystems,
L=Santa Clara, ST=California, C=US
Serial number: 45f74784
Valid from: Tue Nov 13 13:18:39 PST 2007 until: Fri Nov 10 13:18:39 PST 2017
Certificate fingerprints:
         MD5:  67:04:CC:39:83:37:2F:D4:11:1E:81:20:05:98:0E:D9
         SHA1: A5:DE:D8:03:96:69:C5:55:DD:E1:C4:13:C1:3D:1D:D0:4C:81:7E:CB
         Signature algorithm name: MD5withRSA
Version: 1-
Verify the certificate’s fingerprints.
Obtain the correct fingerprints for the Application Server’s self-signed certificate by independent means (such as by telephone) and compare them with the fingerprints displayed by thekeytoollistcommand. Do not accept the certificate and install it in your application’s trust store unless the fingerprints match. -
Export the Application Server’s certificate to a certificate file.
Use the Key Tool utility’s-exportoption to export the certificate from the Application Server’s key store to a separate certificate file, from which you can then import it into your application’s trust store. For example, the following command exports the certificate shown above, whose alias isslas, from the Application Server’s default key store (keystore.jks) to a certificate file namedslas.cer:
keytool  -export  -keystore keystore.jks  -storepass changeit
-alias slas  -file slas.cer
The Key Tool utility responds with the output
Certificate stored in file <slas.cer>-
Verify the contents of the certificate file.
If you wish, you can double-check the contents of the certificate file to make sure it contains the correct certificate: -
List the contents of the certificate file.
The Key Tool utility’s-printcertoption lists the contents of a specified certificate file. For example, the following command lists the certificate fileslas.certhat was created in the preceding step:
keytool -printcert -file slas.cer -v
Once again, the -v option tells the Key Tool utility to display the
certificate’s fingerprints in human-readable form. The resulting output
looks like the following:
Owner: CN=helios, OU=Sun Java System Application Server, O=Sun Microsystems,
L=Santa Clara, ST=California, C=US
Issuer: CN=helios, OU=Sun Java System Application Server, O=Sun Microsystems,
L=Santa Clara, ST=California, C=US
Serial number: 45f74784
Valid from: Tue Nov 13 13:18:39 PST 2007 until: Fri Nov 10 13:18:39 PST 2017
Certificate fingerprints:
         MD5:  67:04:CC:39:83:37:2F:D4:11:1E:81:20:05:98:0E:D9
         SHA1: A5:DE:D8:03:96:69:C5:55:DD:E1:C4:13:C1:3D:1D:D0:4C:81:7E:CB
         Signature algorithm name: MD5withRSA
Version: 1-
Confirm the certificate’s contents.
Examine the output from thekeytoolprintcertcommand to make sure that the certificate is correct. -
Import the certificate into your application’s trust store.
The Key Tool utility’s-importoption installs a certificate from a certificate file in a specified trust store. For example, if your client application’s trust store is kept in the file/local/tmp/imqhttps/appKeyStore, the following command will install the certificate from the fileslas.cercreated above:
keytool -import -file slas.cer -keystore "/local/tmp/imqhttps/appKeyStore"
Step 4 (HTTP and HTTPS): Deploying the Tunnel Servlet
You can deploy the HTTP or HTTPS tunnel servlet on GlassFish Server either from the command line or by using the application server’s Web-based administration GUI. In either case, you must then modify the Application Server’s security policy file to grant permissions for the tunnel servlet.
To deploy the tunnel servlet from the command line, use the deploy
subcommand of the application server administration utility (asadmin):
for example,
asadmin deploy  --user admin  --passwordfile pfile.txt  --force=true
/local/tmp/imqhttps/imqhttps.war
The procedure below shows how to use the Web-based GUI to deploy the servlet.
After deploying the tunnel servlet (whether from the command line or with the Web-based GUI), proceed to Modifying the Application Server’s Security Policy File for instructions on how to grant it the appropriate permissions.
To Deploy the HTTP or HTTPS Tunnel Servlet
-
Deploy the tunnel servlet:
-
In the Web-based administration GUI, choose
App Server>Instances>appServerInstance>Applications>Web Applications
where appServerInstance is the application server instance on which you
are deploying the tunnel servlet.
2. Click the Deploy button.
2. Specify the .war file location:
1. Enter the location of the tunnel servlet’s Web archive file
(imqhttp.war or imqhttps.war) in the File Path text field.
The file is located in the IMQ_HOME/lib directory.
2. Click the OK button.
3. Specify the context root directory:
1. Enter the `/`contextRoot portion of the tunnel servlet’s URL.
The URL has the form
http://hostName:portNumber/contextRoot/tunnelor
https://hostName:portNumber/contextRoot/tunnelFor example, if the URL for the tunnel servlet is
http://hostName:portNumber/imq/tunnelthe value you enter would be
/imq-
Click the OK button.
A confirmation screen appears, showing that the tunnel servlet has been successfully deployed and is enabled by default. The servlet is now available at the URL
http://hostName:portNumber/contextRoot/tunnel
or
https://hostName:portNumber/contextRoot/tunnelwhere contextRoot is the context root directory you specified in step a
above. Clients can now use this URL to connect to the message service
using an HTTP or HTTPS connection.
4. Modify the server’s security policy file
Once you have deployed the HTTP or HTTPS tunnel servlet, you must grant
it the appropriate permissions by modifying the Application Server’s
security policy file, as described in the next procedure.
Modifying the Application Server’s Security Policy File
Each application server instance has a security policy file specifying its security policies or rules. Unless modified, the default security policies would prevent the HTTP or HTTPS tunnel servlet from accepting connections from the Message Queue message broker. In order for the broker to connect to the tunnel servlet, you must add an additional entry to this policy file:
-
Open the security policy file.
The file is namedserver.policyand resides at a location that varies depending on your operating system platform. On the Solaris platform, for example, the policy file for serverjeeveswould be located at
appServerRoot/glassfish/domains/domain1/jeeves/config/server.policy
where appServerRoot is the root directory in which GlassFish Server is
installed.
2. Add the following entry to the file:
grant codeBase
"file:appServerRoot/glassfish/domains/domain1/jeeves
/applications/j2ee-modules/imqhttps/-
{
permission java.net.SocketPermission "*","connect,accept,resolve";
};-
Save and close the security policy file.
Step 5 (HTTP and HTTPS): Configuring the Connection Service
HTTP/HTTPS support is not activated for a broker by default, so before
connecting using these protocols, you need to reconfigure the broker to
activate the httpjms or httpsjms connection service.
Table C-2 shows broker configuration properties pertaining
specifically to these two connection services. Once reconfigured, the
broker can be started normally, as described under
Starting Brokers.
Table C-2 Broker Configuration Properties for the httpjms and
httpsjms Connection Services
| Property | Type | Default Value | Description |
|---|---|---|---|
|
String |
|
Host name or IP address of (local or remote) host running tunnel servlet |
|
Integer |
|
Port number of tunnel servlet |
|
Integer |
-1 |
Interval, in seconds, between client HTTP/ HTTPS requests If zero or negative, the client will keep one request pending at all times. |
|
Integer |
60 |
Tunnel servlet timeout interval |
To Activate the httpjms or httpsjms Connection Service
-
Open the broker’s instance configuration file.
The instance configuration file is namedconfig.propertiesand is located inIMQ_VARHOME/instances/`instanceName/props`. -
Add
httpjmsorhttpsjmsto the list of active connection services.
Add the valuehttpjmsorhttpsjmsto theimq.service.activelistproperty: for example,
imq.service.activelist=jms,admin,httpjms
or
imq.service.activelist=jms,admin,httpsjms-
Set any other HTTP/HTTPS-related configuration properties as needed.
At startup, the broker looks for an application server or Web server and an HTTP or HTTPS tunnel servlet running on its local host machine. If necessary, you can reconfigure the broker to access a remote tunnel servlet instead, by setting theservletHostandservletPortproperties appropriately (see Table C-2): for example,
imq.httpjms.http.servletHost=helios
imq.httpjms.http.servletPort=7675
You can also improve performance by reconfiguring the connection
service’s pullPeriod property. This specifies the interval, in
seconds, at which each client issues HTTP/HTTPS requests to pull
messages from the broker. With the default value of -1, the client will
keep one such request pending at all times, ready to pull messages as
fast as possible. With a large number of clients, this can cause a heavy
drain on server resources, causing the server to become unresponsive.
Setting the pullPeriod property to a positive value configures the
client’s HTTP/HTTPS transport driver to wait that many seconds between
pull requests, conserving server resources at the expense of increased
response times to clients.
The connectionTimeout property specifies the interval, in seconds,
that the client runtime waits for a response from the HTTP/ HTTPS tunnel
servlet before throwing an exception, as well as the time the broker
waits after communicating with the tunnel servlet before freeing a
connection. (A timeout is necessary in this case because the broker and
the tunnel servlet have no way of knowing if a client that is accessing
the tunnel servlet has terminated abnormally.)
Step 6 (HTTP and HTTPS): Configuring a Connection
To make HTTP/HTTPS connections to a broker, a client application needs an appropriately configured connection factory administered object. Before configuring the connection factory, clients wishing to use secure HTTPS connections must also have access to SSL libraries provided by the Java Secure Socket Extension (JSSE) and must obtain a trusted root certificate.
Installing a Root Certificate (HTTPS Only)
If the root certificate of the certification authority (CA) that signed your application server’s (or Web server’s) certificate is not in the trust store by default, or if you are using a proprietary application server or Web server certificate, you must install the root certificate in the trust store. (This step is not needed for ordinary, non-secure HTTP connections, or if the CA’s root certificate is already in the trust store by default.)
Installing a Root Certificate in the Trust Store
-
Import the root certificate.
Execute the command
JRE_HOME/bin/keytool  -import   -trustcacerts
-alias certAlias  -file certFile
-keystore trustStoreFile
where certFile is the file containing the root certificate, certAlias is
the alias representing the certificate, and trustStoreFile is the file
containing your trust store.
2. Confirm that you trust the certificate.
Answer YES to the question Trust``this``certificate?
3. Identify the trust store to the client application.
In the command that launches the client application, use the -D option
to specify the following properties:
javax.net.ssl.trustStore=trustStoreFile
javax.net.ssl.trustStorePassword=trustStorePassword
Configuring the Connection Factory (HTTP and HTTPS)
To enable HTTP/HTTPS support, you need to set the connection factory’s
imqAddressList attribute to the URL of the HTTP/HTTPS tunnel servlet.
The URL has the form
http://hostName:portNumber/contextRoot/tunnelor
https://hostName:portNumber/contextRoot/tunnelwhere hostName`:`portNumber is the host name and port number of the application server or Web server hosting the tunnel servlet and contextRoot is the context root directory you specified when deploying the tunnel servlet on the server, as described above under Step 4 (HTTP and HTTPS): Deploying the Tunnel Servlet.
You can set the imqAddressList attribute in any of the following ways:
-
Use the
-ooption to theimqobjmgrcommand that creates the connection factory administered object (see Adding a Connection Factory). -
Set the attribute when creating the connection factory administered object using the Administration Console (
imqadmin). -
Use the
-Doption to the command that launches the client application. -
Use an API call to set the attributes of the connection factory after you create it programmatically in client application code (see the Open Message Queue Developer’s Guide for Java Clients).
Using a Single Servlet to Access Multiple Brokers (HTTP and HTTPS)
It is not necessary to configure multiple application or Web servers and
tunnel servlets in order to access multiple brokers; you can share a
single server instance and tunnel servlet among them. To do this, you
must configure the imqAddressList connection factory attribute as
follows:
http://hostName:portNumber/contextRoot/tunnel?ServerName= brokerHostName:instanceNameor
https://hostName:portNumber/contextRoot/tunnel?ServerName= brokerHostName:instanceNamewhere brokerHostName is the broker instance host name and instanceName is the name of the specific broker instance you want your client to access.
To check that you have entered the correct values for brokerHostName and instanceName, generate a status report for the HTTP/HTTPS tunnel servlet by accessing the servlet URL from a browser:
http://localhost:8080/imqhttp/tunnelThe report lists all brokers being accessed by the servlet, as shown in Example C-1.
Example C-1 Tunnel Servlet Status Report
HTTP tunnel servlet ready.
Servlet Start Time : Thu May 30 01:08:18 PDT 2002
Accepting secured connections from brokers on port : 7675
Total available brokers = 2
Broker List :
   helios:broker1
selene:broker2Troubleshooting
This section describes possible problems with an HTTP or HTTPS connection and provides guidance on how to handle them.
Server or Broker Failure
The consequences of a server or broker failure in an (HTTP or HTTPS) connection vary depending on the specific component that has failed:
-
If the application server or Web server fails and is restarted, all existing connections are restored with no effect on clients.
-
If the broker fails and is restarted, an exception is thrown and clients must reestablish their connections.
-
In the unlikely event that both the broker and the application server or Web server fail and the broker is not restarted, the application server or Web server will restore client connections and continue waiting for a broker connection without notifying clients. To avoid this situation, always restart the broker after a failure.
Client Failure to Connect Through the Tunnel Servlet
If an HTTPS client cannot connect to the broker through the tunnel servlet, do the following:
If a Client Cannot Connect
-
Start the tunnel servlet and the broker.
-
Use a browser to access the servlet manually through the tunnel servlet URL.
-
Use the following administrative commands to pause and resume the connection:
imqcmd pause svc   -n httpsjms  -u admin
imqcmd resume svc  -n httpsjms  -u admin
When the service resumes, an HTTPS client should be able to connect to the broker through the tunnel servlet.