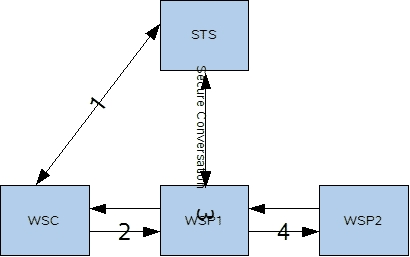
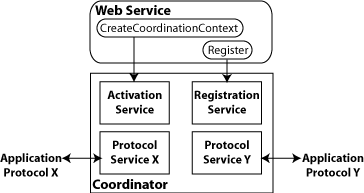
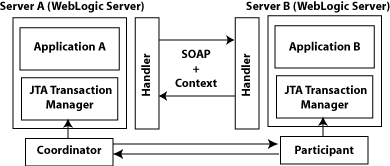
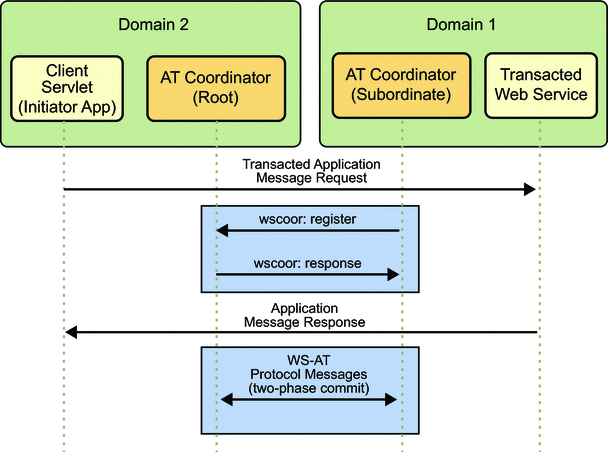
Metro User GuideLinks: Table of Contents | Single HTML | Single PDF

Metro User Guide


Table of Contents

Preface
1. Introduction to Metro
1.1. Required Software
1.2. What is WSIT?
1.2.1. Bootstrapping and Configuration
1.2.2. Message Optimization Technology
1.2.3. Reliable Messaging Technology
1.2.4. Security Technology
1.3. How Metro Relates to .NET Windows Communication Foundation (WCF)
1.4. Metro Specifications
1.4.1. Bootstrapping and Configuration Specifications
1.4.2. Message Optimization Specifications
1.4.3. Reliable Messaging Specifications
1.4.4. Security Specifications
1.5. How the Metro Technologies Work
1.5.1. How Message Optimization Works
1.5.2. How Reliable Messaging Works
1.5.3. How Security Works
2. Using Metro
2.1. Metro Tools
2.1.1. Useful tools for your toolbox
2.2. Using Mavenized Metro Binaries
2.2.1. Using Metro in a Maven project
2.2.2. Using Metro in a non-Maven project
2.3. Developing with NetBeans
2.3.1. Registering GlassFish with the IDE
2.3.2. Creating a Web Service
2.3.3. Configuring Metro's WSIT Features in the Web Service
2.3.4. Deploying and Testing a Web Service
2.3.5. Creating a Client to Consume a WSIT-Enabled Web Service
2.4. Developing with Eclipse
2.4.1. Setup
2.4.2. Create a Metro Web Services Endpoint
2.4.3. Creating Web Service Client using Wsimport CLI
2.4.4. Creating Web Service Client using Wsimport Ant Task
2.4.5. Creating Web Service Client using SOAP UI Plugin
2.5. Logging
2.5.1. Dynamic tube-based message logging
2.5.2. Dumping SOAP messages on client
2.5.3. Dumping SOAP messages on server
2.6. Deploying Metro endpoint
2.6.1. The WAR Contents
2.6.2. Using sun-jaxws.xml
2.7. Handlers and MessageContext
2.7.1. Efficient Handlers in Metro
2.8. Deploying Metro with ...
2.8.1. WebLogic 12
2.9. Developing client application with locally packaged WSDL
2.9.1. Service API to pass the WSDL information
2.9.2. Xml Catalog
2.9.3. Using -wsdlLocation switch
2.10. How to invoke and endpoint by overriding endpoint address in the WSDL
2.10.1. BindingProvider.ENDPOINT_ADDRESS_PROPERTY
2.10.2. Create Service using updated WSDL
2.11. Maintaining State in Web Services
2.12. FastInfoset
2.12.1. Using FastInfoset
2.13. High Availability Support in Metro
3. Compiling WSDL
3.1. Compiling multiple WSDLs that share a common schema
3.2. Dealing with schemas that are not referenced
3.3. Customizing XML Schema binding
3.3.1. How to get simple and better typed binding
3.4. Generating Javadocs from WSDL documentation
3.5. Passing Java Compiler options to Wsimport
4. SOAP
4.1. SOAP headers
4.1.1. Adding SOAP headers when sending requests
4.1.2. Accessing SOAP headers for incoming messages
4.1.3. Adding SOAP headers when sending replies
4.1.4. Mapping additional WSDL headers to method parameters
4.2. Schema Validation
4.2.1. Server Side Schema Validation
4.2.2. Client Side Schema Validation
5. HTTP
5.1. HTTP headers
5.1.1. Sending HTTP headers on request
5.1.2. Accessing HTTP headers of the response
5.2. HTTP compression
5.3. HTTP cookies
5.3.1. Enabling cookie support
5.3.2. Accessing HTTP cookies in the response
5.3.3. Accessing HTTP cookies on the server
5.4. HTTP client streaming support
5.5. Access HTTP headers in a Handler
5.5.1. From Client side handler
5.5.2. From Server side handler
5.6. HTTP Timeouts
5.7. HTTP Persistent Connections (keep-alive)
5.8. HTTPS HostnameVerifier
5.9. HTTPS SSLSocketFactory
5.10. HTTP address in soap:address and import locations
6. Processing Large Data
6.1. Receiving large SOAP requests
6.1.1. Provider<Message>
6.2. Binary Attachments (MTOM)
6.2.1. MTOM
6.2.2. Enabling MTOM on server
6.2.3. Enabling MTOM on client
6.2.4. MTOM threshold
6.2.5. .NET interoperability
6.3. Large Attachments
6.3.1. Client Side
6.3.2. Server Side
6.3.3. Configuration
6.3.4. Large Attachments Summary
7. Bootstrapping and Configuration
7.1. What is a Server-Side Endpoint?
7.2. Creating a Client from WSDL
7.3. Client From WSDL Examples
8. Message Optimization
8.1. Creating a MTOM Web Service
8.2. Configuring Message Optimization in a Web Service
8.3. Deploying and Testing a Web Service with Message Optimization Enabled
8.4. Creating a Client to Consume a Message Optimization-enabled Web Service
8.5. Message Optimization and Secure Conversation
9. SOAP/TCP Web Service transport
9.1. What is SOAP/TCP?
9.2. Creating a SOAP/TCP enabled Web Service
9.3. Configuring Web Service to be able to operate over SOAP/TCP transport
9.4. Deploying and Testing a Web Service with SOAP/TCP Transport Enabled
9.5. Creating a Client to Consume a SOAP/TCP-enabled Web Service
9.6. Configuring Web Service client to operate over SOAP/TCP transport
10. Using Reliable Messaging
10.1. Introduction to Reliable Messaging
10.2. Configuring Web Service Endpoint
10.3. Configuring Web Service Client
10.4. Configurable features summary
10.5. Creating Web Service Providers and Clients that use Reliable Messaging
10.6. Using Secure Conversation With Reliable Messaging
10.7. High Availability Support in Reliable Messaging
11. WS-MakeConnection support
11.1. Introduction to WS-MakeConnection
11.2. Configuring Web Service Endpoint
11.2.1. Configuration via an WS-Policy expression
11.2.2. Configuration via a Java annotation
11.3. Configuring Web Service Client
12. Using WSIT Security
12.1. Configuring Security Using NetBeans IDE
12.2. Summary of Configuration Requirements
12.2.1. Summary of Service-Side Configuration Requirements
12.2.2. Summary of Client-Side Configuration Requirements
12.3. Security Mechanisms
12.3.1. Username Authentication with Symmetric Key
12.3.2. Username Authentication with Password Derived Keys
12.3.3. Mutual Certificates Security
12.3.4. Symmetric Binding with Kerberos Tokens
12.3.5. Transport Security (SSL)
12.3.6. Message Authentication over SSL
12.3.7. SAML Authorization over SSL
12.3.8. Endorsing Certificate
12.3.9. SAML Sender Vouches with Certificates
12.3.10. SAML Holder of Key
12.3.11. STS Issued Token
12.3.12. STS Issued Token with Service Certificate
12.3.13. STS Issued Endorsing Token
12.4. Configuring SSL and Authorized Users
12.4.1. Configuring SSL For Your Applications
12.4.2. Adding Users to GlassFish
12.5. Configuring Keystores and Truststores
12.5.1. Specifying Aliases with the Updated Stores
12.5.2. Configuring the Keystore and Truststore
12.5.3. Configuring Validators
12.6. Configuring Kerberos for GlassFish and Tomcat
12.6.1. For GlassFish
12.6.2. For Tomcat
12.7. Securing Operations and Messages
12.7.1. Supporting Token Options
12.8. Configuring A Secure Token Service (STS)
12.9. Example Applications
12.9.1. Example: Username Authentication with Symmetric Key (UA)
12.9.2. Example: Username with Digest Passwords
12.9.3. Example: Mutual Certificates Security (MCS)
12.9.4. Example: Transport Security (SSL)
12.9.5. Example: SAML Authorization over SSL (SA)
12.9.6. Example: SAML Sender Vouches with Certificates (SV)
12.9.7. Example: STS Issued Token (STS)
12.9.8. Example: Broker Trust STS (BT)
12.9.9. Example: STS Issued Token With SecureConversation (STS+SC)
12.9.10. Example: Kerberos Token (Kerb)
13. WSIT Security Features: Advanced: Topics
13.1. Using Security Mechanisms
13.2. Understanding WSIT Configuration Files
13.2.1. Service-Side WSIT Configuration Files
13.2.2. Client-Side WSIT Configuration Files
13.3. Security Mechanism Configuration Options
13.4. Building custom STS
13.4.1. Handling Claims with Metro STS
13.5. Handling Token and Key Requirements at Run Time
13.6. Advanced Usages of STS in Security
13.6.1. Token Caching and Sharing
13.6.2. ActAs and Identity Delegation
14. WSIT Example Using a Web Container Without NetBeans IDE
14.1. Environment Configuration Settings
14.1.1. Setting the Web Container Listener Port
14.1.2. Setting the Web Container Home Directory
14.2. WSIT Configuration and WS-Policy Assertions
14.3. Creating a Web Service without NetBeans
14.3.1. Creating a Web Service From Java
14.3.2. Creating a Web Service From WSDL
14.4. Building and Deploying the Web Service
14.4.1. Building and Deploying a Web Service Created From Java
14.4.2. Building and Deploying a Web Service Created From WSDL
14.4.3. Deploying the Web Service to a Web Container
14.4.4. Verifying Deployment
14.5. Creating a Web Service Client
14.5.1. Creating a Client from Java
14.5.2. Creating a Client from WSDL
14.6. Building and Deploying a Client
14.7. Running a Web Service Client
14.8. Undeploying a Web Service
15. Accessing Metro Services Using WCF Clients
15.1. Creating a WCF Client
15.1.1. Prerequisites to Creating the WCF Client
15.1.2. Examining the Client Class
15.1.3. Building and Running the Client
16. Data Contracts
16.1. Web Service - Start from Java
16.1.1. Data Types
16.1.2. Fields and Properties
16.1.3. Java Classes
16.1.4. Open Content
16.1.5. Enum Type
16.1.6. Package-level Annotations
16.2. Web Service - Start from WSDL
16.3. Customizations for WCF Service WSDL
16.3.1. generateElementProperty Attribute
16.4. Developing a Microsoft .NET Client
16.5. BP 1.1 Conformance
17. Using Atomic Transactions
17.1. Using Web Services Atomic Transactions
17.1.1. Overview of Web Services Atomic Transactions
17.1.2. Enabling Web Services Atomic Transactions on Web Service Endpoint
17.1.3. Enabling Web Services Atomic Transactions on Web Service Clients
17.1.4. System Level Configuration
17.1.5. Compatibility
17.2. About the basicWSTX Example
17.3. Building, Deploying and Running the basicWSTX Example
18. Managing Policies
18.1. Managing Policies
18.1.1. Introduction
18.1.2. Policy References
18.1.3. WSDL Import
18.1.4. External Policy References
19. Monitoring and Management
19.1. Introduction to Metro JMX Monitoring
19.2. Enabling and Disabling Monitoring
19.2.1. Enabling and disabling Metro monitoring via system properties
19.2.2. Enabling and disabling endpoint monitoring via policy
19.2.3. Enabling and disabling client monitoring via policy
19.3. Monitoring Identifiers
19.3.1. Endpoint Monitoring Identifiers
19.3.2. Client monitoring identifiers
19.3.3. Identifier Character Mapping
19.3.4. Resolving Monitoring Root Name Conflicts
19.4. Available Monitoring Information
19.4.1. WSClient Information
19.4.2. WSEndpoint Information
19.4.3. WSNonceManager Information
19.4.4. WSRMSCSessionManager Information
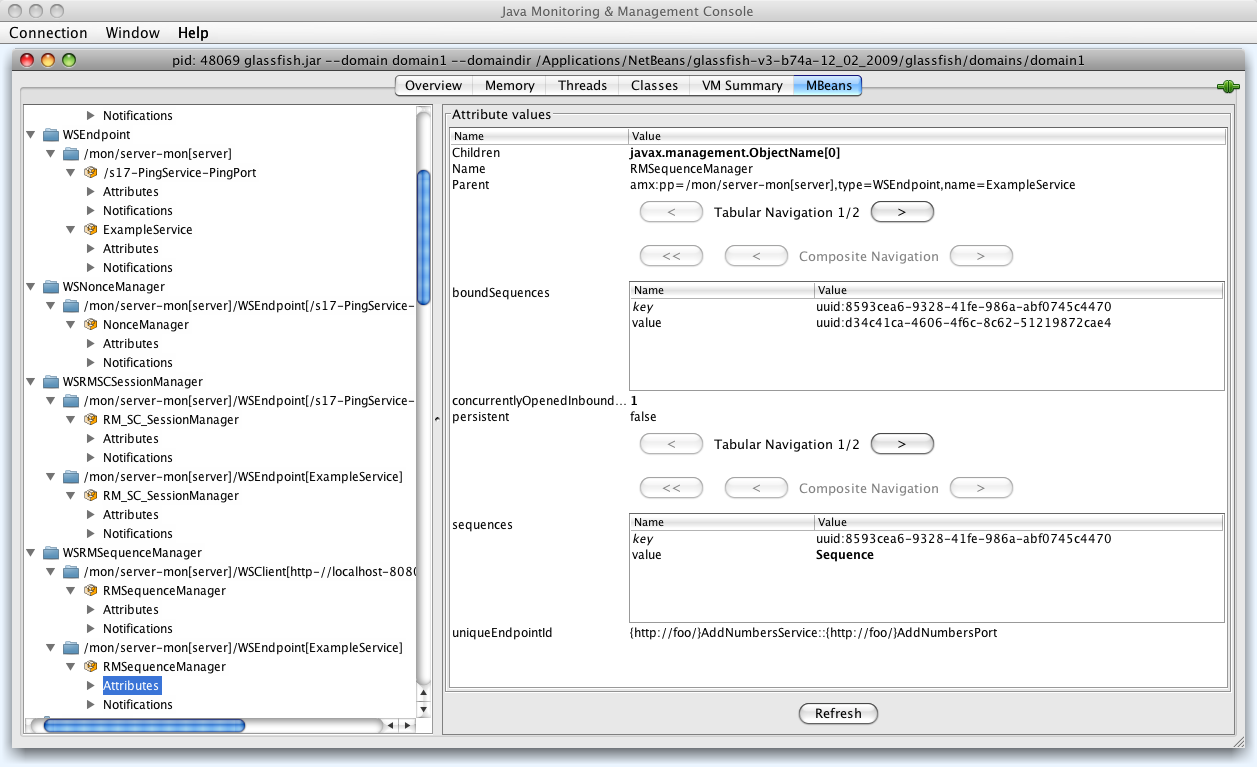
19.4.5. WSRMSequenceManager Information
19.5. Notes
20. Further Information
20.1. Links to more information

List of Figures

1.1. Metro's WSIT Web Services Features
1.2. Bootstrapping and Configuration
1.3. Bootstrapping and Configuration Specifications
1.4. Message Optimization Specifications
1.5. Reliable Messaging Specifications
1.6. Web Services Security Specifications
1.7. Application Message Exchange Without Reliable Messaging
1.8. Application Message Exchange with Reliable Messaging Enabled
1.9. Security Policy Exchange
1.10. Trust and Secure Conversation
1.11. Secure Conversation
2.1. Editing Web Service Attributes
2.2. Reliable Messaging Configuration Window
2.3. SOAP UI - JAX-WS Artifacts
2.4. SOAP UI - Preferences
8.1. Enabling MTOM
9.1. Enabling SOAP/TCP
9.2. Enabling SOAP/TCP for a Web Service client
10.1. Quality of Service (NetBeans)
10.2. Quality of Service - Advanced (NetBeans)
10.3. Advanced Reliable Messaging Attributes (NetBeans)
12.1. Web Service Attributes Editor Page
12.2. Web Service References Attributes Editor Page for Web Service Clients
12.3. Quality of Service - Client - Security
12.4. Deployment Descriptor Page
12.5. Keystore Configuration Dialog
12.6. Web Service Attributes Editor Page: Operation Level
12.7. Web Service Attributes Editor Page: Message Parts
12.8. Kerberos Configuration Attributes - Service
12.9. Kerberos Configuration Attributes - Client
13.1. ActAs and Identity Delegation
17.1. Web Services Atomic Transactions Framework
17.2. Atomic Transaction - Interaction between two Servers
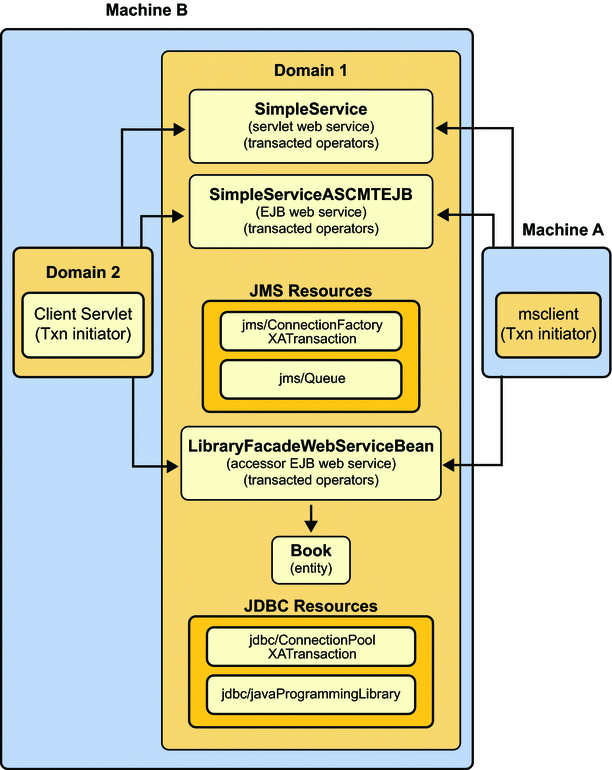
17.3. WS-Coordination and WS-AtomicTransaction Protocols in Two GlassFish Domains
17.4. Components in the basicWSTX Example
17.5. basicWSTX Results
19.1. Monitoring - One client and two services running inside the same instance of GlassFish
19.2. Monitoring - top-level information available for each client
19.3. Monitoring - WSEndpoint information
19.4. Monitoring - WSRMSequenceManager Information

List of Tables

1.1. Metro Specification Versions
2.1. Endpoint attributes
3.1. wsdl:documentation to Javadoc mapping
6.1. JAXB Mapping Rules
10.1. Reliable Messaging Configuration Options for Service Endpoint
10.2. Reliable Messaging Configuration Options for Service Client
10.3. Namespaces used within Metro Reliable Messaging WS-Policy Assertions
10.4. Reliable Messaging Configuration Features - Layout
10.5. Enable Reliable Messaging + version
10.6. Sequence Inactivity Timeout
10.7. Acknowledgement interval
10.8. Retransmission Interval
10.9. Retransmission Interval Adjustment Algorithm
10.10. Maximum Retransmission Count
10.11. Close sequence timeout
10.12. Acknowledgement request interval
10.13. Bind RM sequence to security token
10.14. Bind RM sequence to secured transport
10.15. Exactly once delivery
10.16. At Most once delivery
10.17. At Least once delivery
10.18. InOrder delivery
10.19. Flow Control
10.20. Maximum Flow Control Buffer Size
10.21. Maximum concurrent RM sessions
10.22. Reliable Messaging Persistence
10.23. Sequence manager maintenace task execution period
12.1. Summary of Service-Side Configuration Requirements
12.2. Summary of Client-Side Configuration Requirements
12.3. Keystore and Truststore Aliases
12.4. Keystore and Truststore Aliases for STS
13.1. Security Mechanism Configuration Options
16.1. CLR to XML Schema Type Mapping
17.1. Components of Web Services Atomic Transactions
17.2. Web Services Atomic Transactions Configuration Options
17.3. Flow Types Values
17.4. Web Services Atomic Transaction Policy Assertion Values (WS-AtomicTransaction 1.2)

Preface

This document explains various interesting/complex/tricky aspects of Metro, based on questions posted on the Metro mailing list and answers provided. This is still a work-in-progress. Any feedback is appreciated.

Chapter 1. Introduction to Metro

1.1. Required Software

To use this guide, download and install the following software:

1.2. What is WSIT?

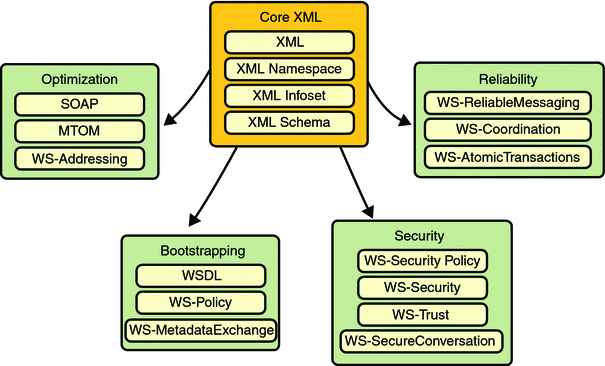
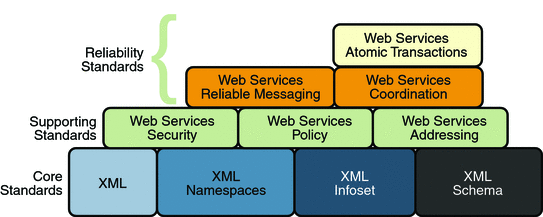
For three years (and continuing) Sun has worked closely with Microsoft to ensure interoperability of web services enterprise technologies such as security , reliable messaging, and atomic transactions. That portion of Metro is known as WSIT (Web Service Interoperability Technologies). Metro's WSIT subsystem is an implementation of a number of open web services specifications to support enterprise features. In addition to security, reliable messaging, and atomic transactions, Metro includes a bootstrapping and configuration technology. Metro's WSIT Web Services Features shows the underlying services that were implemented for each technology.

Figure 1.1. Metro's WSIT Web Services Features

Metro's WSIT Web Services Features

Starting with the core XML support currently built into the Java platform, Metro uses or extends existing features and adds new support for interoperable web services. See the following sections for an overview of each feature:

1.2.1. Bootstrapping and Configuration

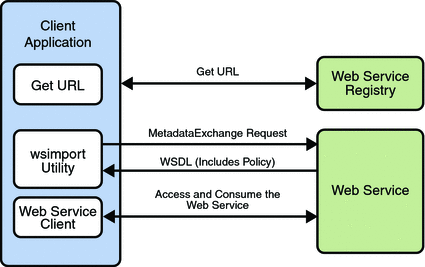
Bootstrapping and configuration consists of using a URL to access a web service, retrieving its WSDL file, and using the WSDL file to create a web service client that can access and consume a web service. The process consists of the following steps, which are shown in Bootstrapping and Configuration.

Figure 1.2. Bootstrapping and Configuration

Bootstrapping and Configuration

  1. Client acquires the URL for a web service that it wants to access and consume. How you acquire the URL is outside the scope of this tutorial. For example, you might look up the URL in a Web Services registry.

  2. The client uses the URL and the wsimport tool to send a WS-MetadataExchange Request to access the web service and retrieve the WSDL file. The WSDL file contains a description of the web service endpoint, including WS-Policy assertions that describe the security, reliability, transactional, etc., capabilities and requirements of the service. The description describes the requirements that must be satisfied to access and consume the web service.

  3. The client uses the WSDL file to create the web service client.

  4. The web service client accesses and consumes the web service.

Bootstrapping and Configuration explains how to bootstrap and configure a web service client and a web service endpoint that use the Metro's WSIT technologies.

1.2.2. Message Optimization Technology

A primary function of web services applications is to share data among applications over the Internet. The data shared can vary in format and include large binary payloads, such as documents, images, music files, and so on. When large binary objects are encoded into XML format for inclusion in SOAP messages, even larger files are produced. When a web service processes and transmits these large files over the network, the performance of the web service application and the network are negatively affected. In the worst case scenario the effects are as follows:

  • The performance of the web service application degrades to a point that it is no longer useful.

  • The network gets bogged down with more traffic than the allotted bandwidth can handle.

One way to deal with this problem is to encode the binary objects so as to optimize both the SOAP application processing time and the bandwidth required to transmit the SOAP message over the network. In short, XML needs to be optimized for web services. This is the exactly what the Message Optimization technology does. It ensures that web services messages are transmitted over the Internet in the most efficient manner.

Sun recommends that you use message optimization if your web service client or web service endpoint will be required to process binary encoded XML documents larger than 1KB.

For instructions on how to use the Message Optimization technology, see Message Optimization.

1.2.3. Reliable Messaging Technology

Reliable Messaging is a Quality of Service (QoS) technology for building more reliable web services. Reliability (in terms of what is provided by WS-ReliableMessaging) is measured by a system's ability to deliver messages from point A to point B. The primary purpose of Reliable Messaging is to ensure the delivery of application messages to web service endpoints.

The reliable messaging technology ensures that messages in a given message sequence are delivered at least once and not more than once and optionally in the correct order. When messages in a given sequence are lost in transit or delivered out of order, this technology enables systems to recover from such failures. If a message is lost in transit, the sending system retransmits the message until its receipt is acknowledged by the receiving system. If messages are received out of order, the receiving system may re-order the messages into the correct order.

You should consider using reliable messaging if the web service is experiencing the following types of problems:

  • Communication failures are occurring that result in the network being unavailable or connections being dropped

  • Application messages are being lost in transit

  • Application messages are arriving at their destination out of order and ordered delivery is a requirement

To help decide whether or not to use reliable messaging, weigh the following advantages and disadvantages:

  • Enabling reliable messaging ensures that messages are delivered exactly once from the source to the destination and, if the ordered-delivery option is enabled, ensures that messages are delivered in order.

  • Enabling reliable messaging uses more memory (especially if the ordered delivery option is enabled) since messages must be stored (even after they are sent) until receipt is acknowledged.

  • Non-reliable messaging clients cannot interoperate with web services that have reliable messaging enabled.

For instructions on how to use the Reliable Messaging technology, see Using Reliable Messaging.

1.2.4. Security Technology

Until now, web services have relied on transport-based security such as SSL to provide point-to-point security. Metro implements WS-Security so as to provide interoperable message content integrity and confidentiality, even when messages pass through intermediary nodes before reaching their destination endpoint. WS-Security as provided by Metro is in addition to existing transport-level security, which may still be used.

Metro also enhances security by implementing WS-Secure Conversation, which enables a consumer and provider to establish a shared security context when a multiple-message-exchange sequence is first initiated. Subsequent messages use derived session keys that increase the overall security while reducing the security processing overhead for each message.

Further, Metro implements two additional features to improve security in web services:

  • Web Services Trust: Enables web service applications to use SOAP messages to request security tokens that can then be used to establish trusted communications between a client and a web service.

  • Web Services Security Policy: Enables web services to use security assertions to clearly represent security preferences and requirements for web service endpoints.

Metro implements these features in such a way as to ensure that web service binding security requirements, as defined in the WSDL file, can interoperate with and be consumed by Metro and WCF endpoints.

For instructions on how to use the WS-Security technology, see Using WSIT Security.

1.3. How Metro Relates to .NET Windows Communication Foundation (WCF)

Web services interoperability is an initiative of Sun and Microsoft. We test and deliver products to market that interoperate across different platforms.

Metro is the product of Sun's web services interoperability initiative. Windows Communication Foundation (WCF) in .NET is Microsoft's unified programming model for building connected systems. WCF, which is available as part of the .NET Framework 3.x product, includes application programming interfaces (APIs) for building secure, reliable, transacted web services that interoperate with non-Microsoft platforms.

Sun Microsystems and Microsoft jointly test Metro against WCF to ensure that Sun web service clients (consumers) and web services (producers) do in fact interoperate with WCF web services applications and vice versa. This testing ensures that the following interoperability goals are realized:

  • Metro web services clients can access and consume WCF web services.

  • WCF web services clients can access and consume Metro web services.

Sun provides Metro on the Java platform and Microsoft provides WCF on the .NET 3.0 and .NET 3.5 platforms. The sections that follow describe the web services specifications implemented by Sun Microsystems in Web Services Interoperability Technologies (WSIT) and provide high-level descriptions of how each WSIT technology works.

Note

Because Metro-based clients and services are interoperable, you can gain the benefits of Metro without using WCF.

1.4. Metro Specifications

The specifications for bootstrapping and configuration, message optimization, reliable messaging, and security technologies are discussed in the following sections:

Metro implements the following WS-* specifications.

Table 1.1. Metro Specification Versions

TechnologyMetro Version
Bootstrappingsince v1.0 : WS-MetadataExchange v1.1
Policy (W3C standards)since v1.0 : WS-Policy v1.2
since v1.0 : WS-PolicyAttachment v1.2
since v1.3 : WS-Policy v1.5
since v1.3 : WS-PolicyAttachment v1.5
Reliable Messaging (OASIS standards)since v1.0 : WS-ReliableMessaging v1.0
since v1.0 : WS-ReliableMessaging Policy v1.0
since v1.3 : WS-ReliableMessaging v1.1
since v1.3 : WS-ReliableMessaging Policy v1.1
since v2.0 : WS-ReliableMessaging v1.2
since v2.0 : WS-ReliableMessaging Policy v1.2
since v2.0 : WS-MakeConnection v1.1
Atomic Transactions (OASIS standards)since v2.1 : WS-AtomicTransaction v1.2
since v2.1 : WS-Coordination v1.2
Security (OASIS standards)since v1.0 : WS-Security v1.0
since v1.0 : WS-Security v1.1
since v1.0 : WS-SecurityPolicy v1.1
since v1.3 : WS-SecurityPolicy v1.2
since v1.0 : WS-Trust v1.2
since v1.3 : WS-Trust v1.3
since v2.0 : WS-Trust v1.4
since v1.0 : WS-SecureConversation v1.2
since v1.3 : WS-SecureConversation v1.3
since v2.0 : WS-SecureConversation v1.4
Security Profiles (OASIS standards)since v1.3 All 1.0 and 1.1 profiles listed here except Web Services Security REL Token Profile V1.0

Metro 1.3 + and WCF in .NET 3.5 implement the same specifications.

Metro 1.0 - 1.2 and WCF in .NET 3.0 implement the same specifications.

1.4.1. Bootstrapping and Configuration Specifications

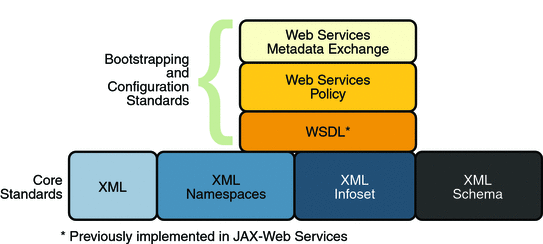
Bootstrapping and configuring involves a client getting a web service URL (perhaps from a service registry) and obtaining the information needed to build a web services client that is capable of accessing and consuming a web service over the Internet. This information is usually obtained from a WSDL file. Bootstrapping and Configuration Specifications shows the specifications that were implemented to support bootstrapping and configuration.

Figure 1.3. Bootstrapping and Configuration Specifications

Bootstrapping and Configuration Specifications

In addition to the Core XML specifications, bootstrapping and configuration was implemented using the following specifications:

  • WSDL: WSDL is a standardized XML format for describing network services. The description includes the name of the service, the location of the service, and ways to communicate with the service, that is, what transport to use. WSDL descriptions can be stored in service registries, published on the Internet, or both.

  • Web Services Policy: This specification provides a flexible and extensible grammar for expressing the capabilities, requirements, and general characteristics of a web service. It provides the mechanisms needed to enable web services applications to specify policy information in a standardized way. However, this specification does not provide a protocol that constitutes a negotiation or message exchange solution for web Services. Rather, it specifies a building block that is used in conjunction with the WS-Metadata Exchange protocol. When applied in the web services model, policy is used to convey conditions on interactions between two web service endpoints. Typically, the provider of a web service exposes a policy to convey conditions under which it provides the service. A requester might use the policy to decide whether or not to use the service.

  • Web Services Metadata Exchange: This specification defines a protocol to enable a consumer to obtain a web service's metadata, that is, its WSDL and policies. It can be thought of as a bootstrap mechanism for communication.

1.4.2. Message Optimization Specifications

Message optimization is the process of transmitting web services messages in the most efficient manner. It is achieved in web services communication by encoding messages prior to transmission and then de-encoding them when they reach their final destination.

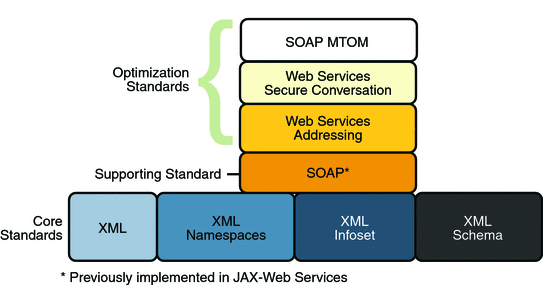
Message Optimization Specifications shows the specifications that were implemented to optimize communication between two web service endpoints.

Figure 1.4. Message Optimization Specifications

Message Optimization Specifications

In addition to the Core XML specifications, optimization was implemented using the following specifications:

  • SOAP: With SOAP implementations, client requests and web service responses are most often transmitted as SOAP messages over HTTP to enable a completely interoperable exchange between clients and web services, all running on different platforms and at various locations on the Internet. HTTP is a familiar request-and response standard for sending messages over the Internet, and SOAP is an XML-based protocol that follows the HTTP request-and-response model. In SOAP 1.1, the SOAP portion of a transported message handles the following:

    • Defines an XML-based envelope to describe what is in the message and how to process the message.

    • Includes XML-based encoding rules to express instances of application-defined data types within the message.

    • Defines an XML-based convention for representing the request to the remote service and the resulting response.

      In SOAP 1.2 implementations, web service endpoint addresses can be included in the XML-based SOAP envelope, rather than in the transport header (for example in the HTTP transport header), thus enabling SOAP messages to be transport independent.

  • Web Services Addressing: This specification defines a endpoint reference representation. A web service endpoint is an entity, processor, or resource that can be referenced and to which web services messages can be addressed. Endpoint references convey the information needed to address a web service endpoint. The specification defines two constructs: message addressing properties and endpoint references, that normalize the information typically provided by transport protocols and messaging systems in a way that is independent of any particular transport or messaging system. This is accomplished by defining XML tags for including web service addresses in the SOAP message, instead of the HTTP header. The implementation of these features enables messaging systems to support message transmission in a transport-neutral manner through networks that include processing nodes such as endpoint managers, firewalls, and gateways.

  • Web Services Secure Conversation: This specification provides better message-level security and efficiency in multiple-message exchanges in a standardized way. It defines basic mechanisms on top of which secure messaging semantics can be defined for multiple-message exchanges and allows for contexts to be established and potentially more efficient keys or new key material to be exchanged, thereby increasing the overall performance and security of the subsequent exchanges.

  • SOAP MTOM: The SOAP Message Transmission Optimization Mechanism (MTOM), paired with the XML-binary Optimized Packaging (XOP), provides standard mechanisms for optimizing the transmission format of SOAP messages by selectively encoding portions of the SOAP message, while still presenting an XML Infoset to the SOAP application. This mechanism enables the definition of a hop-by-hop contract between a SOAP node and the next SOAP node in the SOAP message path so as to facilitate the efficient pass-through of optimized data contained within headers or bodies of SOAP messages that are relayed by an intermediary. Further, it enables message optimization to be done in a binding independent way.

1.4.3. Reliable Messaging Specifications

Reliability (in terms of WS-ReliableMessaging) is measured by a system's ability to deliver messages from point A to point B regardless of network errors. Reliable Messaging Specifications shows the specifications that were implemented to ensure reliable delivery of messages between two web services endpoints.

Figure 1.5. Reliable Messaging Specifications

Reliable Messaging Specifications

In addition to the Core XML specifications and supporting standards (Web Services Security and Web Services Policy, which are required building blocks), the reliability feature is implemented using the following specifications:

  • Web Services Reliable Messaging: This specification defines a standardized way to identify, track, and manage the reliable delivery of messages between exactly two parties, a source and a destination, so as to recover from failures caused by messages being lost or received out of order. The specification is also extensible so it allows additional functionality, such as security, to be tightly integrated. The implementation of this specification integrates with and complements the Web Services Security, and the Web Services Policy implementations.

  • Web Services Coordination: This specification defines a framework for providing protocols that coordinate the actions of distributed applications. This framework is used by Web Services Atomic Transactions. The implementation of this specification enables the following capabilities:

    • Enables an application service to create the context needed to propagate an activity to other services and to register for coordination protocols.

    • Enables existing transaction processing, workflow, and other coordination systems to hide their proprietary protocols and to operate in a heterogeneous environment.

    • Defines the structure of context and the requirements so that context can be propagated between cooperating services.

  • Web Services Atomic Transactions: This specification defines a standardized way to support two-phase commit semantics such that either all operations invoked within an atomic transaction succeed or are all rolled back. Implementations of this specification require the implementation of the Web Services Coordination specification.

1.4.4. Security Specifications

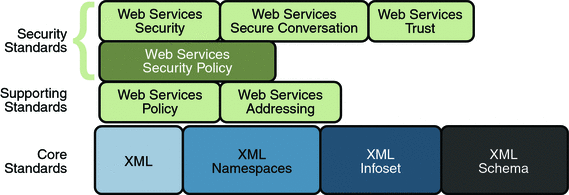
Web Services Security Specifications shows the specifications implemented to secure communication between two web service endpoints and across intermediate endpoints.

Figure 1.6. Web Services Security Specifications

Web Services Security Specifications

In addition to the Core XML specifications, the security feature is implemented using the following specifications:

  • Web Services Security: This specification defines a standard set of SOAP extensions that can be used when building secure web services to implement message content integrity and confidentiality. The implementation provides message content integrity and confidentiality even when communication traverses intermediate nodes, thus overcoming a short coming of SSL. The implementation can be used within a wide variety of security models including PKI, Kerberos, and SSL and provides support for multiple security token formats, multiple trust domains, multiple signature formats, and multiple encryption technologies.

  • Web Services Policy: This specification provides a flexible and extensible grammar for expressing the capabilities, requirements, and general characteristics of a web service. It provides a framework and a model for the expression of these properties as policies and is a building block for Web Services Security policy.

  • Web Services Trust: This specification supports the following capabilities in a standardized way:

    • Defines extensions to Web Services Security that provide methods for issuing, renewing, and validating security tokens used by Web services security.

    • Establishes, assesses the presence of, and brokers trust relationships.

  • Web Services Secure Conversation: This specification defines a standardized way to provide better message-level security and efficiency in multiple-message exchanges. The Metro implementation provides basic mechanisms on top of which secure messaging semantics can be defined for multiple-message exchanges and allows for contexts to be established along with more efficient keys or new key material. This approach increases the overall performance and security of the subsequent exchanges. While the Web Services Security specification, described above, focuses on the message authentication model, it does leave openings for several forms of attacks. The Secure Conversation authentication specification defines a standardized way to authenticate a series of messages, thereby addressing the short comings of Web Services Security. With the Web Services Security Conversation model, the security context is defined as a new Web Services security token type that is obtained using a binding of Web Services Trust.

  • Web Services Security Policy: This specification defines a standard set of patterns or sets of assertions that represent common ways to describe how messages are secured on a communications path. The Metro implementation allows flexibility in terms of tokens, cryptography, and mechanisms used, including leveraging transport security, but is specific enough to ensure interoperability based on assertion matching by web service clients and web services providers.

1.5. How the Metro Technologies Work

The following sections provide a high-level description of how the message optimization, reliable messaging, and security technologies work.

1.5.1. How Message Optimization Works

Message optimization ensures that web services messages are transmitted over the Internet in the most efficient manner. Because XML is a textual format, binary files must be represented using character sequences before they can be embedded in an XML document. A popular encoding that permits this embedding is known as base64 encoding, which corresponds to the XML Schema data type xsd:base64Binary. In a web services toolkit that supports a binding framework, a value of this type must be encoded before transmission and decoded before binding. The encoding and decoding process is expensive and the costs increase linearly as the size of the binary object increases.

Message optimization enables web service endpoints to identify large binary message payloads, remove the message payloads from the body of the SOAP message, encode the message payloads using an efficient encoding mechanism (effectively reducing the size of the payloads), re-insert the message payloads into the SOAP message as attachments (the file is linked to the SOAP message body by means of an Include tag). Thus, message optimization is achieved by encoding binary objects prior to transmission and then de-encoding them when they reach there final destination.

The optimization process is really quite simple. To effect optimized message transmissions, the sending endpoint checks the body of the SOAP message for XML encoded binary objects that exceed a predetermined size and encodes those objects for efficient transmission over the Internet.

SOAP MTOM, paired with the XML-binary Optimized Packaging (XOP), addresses the inefficiencies related to the transmission of binary data in SOAP documents. Using MTOM and XOP, XML messages are dissected in order to transmit binary files as MIME attachments in a way that is transparent to the application. This transformation is restricted to base64 content in canonical form as defined in XSD Datatypes as specified in XML Schema Part 2: Datatypes Second Edition, W3C Recommendation 28 October 2004.

Thus, the Metro technology achieves message optimization through an implementation of the MTOM and XOP specifications. With the message optimization feature enabled, small binary objects are sent in-line in the SOAP body. For large binary objects, this becomes quite inefficient, so the binary object is separated from the SOAP body, encoded, sent as an attachment to the SOAP message, and decoded when it reaches its destination endpoint.

1.5.2. How Reliable Messaging Works

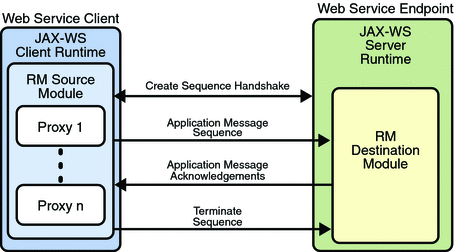
When reliable messaging is enabled, messages are grouped into sequences, which are defined by the client's proxies. Each proxy corresponds to a message sequence, which consists of all of the request messages for that proxy. Each message contains a sequence header. The header includes a sequence identifier that identifies the sequence and a unique message number that indicates the order of the message in the sequence. The web service endpoint uses the sequence header information to group the messages and, if the Ordered Delivery option is selected, to process them in the proper order. Additionally, if secure conversation is enabled, each message sequence is assigned its own security context token. The security context token is used to sign the handshake messages that initialize communication between two web service endpoints and subsequent application messages.

Thus, using the Reliable Messaging technology, web service endpoints collaborate to determine which messages in a particular application message sequence arrived at the destination endpoint and which messages require resending. The reliable messaging protocol requires that the destination endpoint return message-receipt acknowledgements that include the sequence identifier and the message number of each message received. If the source determines that a message was not received by the destination, it resends the message and requests an acknowledgement. Once the source has sent all messages for a given sequence and their receipt has been acknowledged by the destination, the source terminates the sequence.

The web service destination endpoint in turn sends the application messages along to the application. If ordered delivery is configured (optional), the destination endpoint reconstructs a complete stream of messages for each sequence in the exact order in which the messages were sent and sends them along to the destination application. Thus, through the use of the reliable messaging protocol, the destination endpoint is able to provide the following delivery assurances to the web service application:

  • Each message is delivered to the destination application at least once.

  • Each message is delivered to the destination application at most once.

  • Sequences of messages are grouped by sequence identifiers and delivered to the destination application in the order defined by the message numbers.

Application Message Exchange Without Reliable Messaging shows a simplified view of client and web service application message exchanges when the Reliable Messaging protocol is not used.

Figure 1.7. Application Message Exchange Without Reliable Messaging

Application Message Exchange Without Reliable Messaging

When the Reliable Messaging protocol is not used, application messages flow over the HTTP connection with no delivery assurances. If messages are lost in transit or delivered out of order, the communicating endpoints have no way of knowing.

Application Message Exchange with Reliable Messaging Enabled shows a simplified view of client and web service application message exchanges when reliable messaging is enabled.

Figure 1.8. Application Message Exchange with Reliable Messaging Enabled

Application Message Exchange with Reliable Messaging Enabled

With reliable messaging enabled, the Reliable Messaging source module is plugged into the Metro web service client. The source module transmits the application messages and keeps copies of the messages until their receipt is acknowledged by the destination module through the exchange of protocol messages. The destination module acknowledges messages and optionally buffers them for ordered-delivery guarantee. After guaranteeing order, if configured, the destination module allows the messages to proceed through the Metro dispatch for delivery to the endpoint or application destination.

1.5.3. How Security Works

The following sections describe how the Metro security technologies, security policy, trust, and secure conversation work.

1.5.3.1. How Security Policy Works

The Metro Web Service Security Policy implementation builds on the features provided by the Web Service Policy implementation in Metro. It enables users to use XML elements to specify the security requirements of a web service endpoint, that is, how messages are secured on the communication path between the client and the web service. The web service endpoint specifies the security requirements to the client as assertions (see Security Policy Exchange).

Figure 1.9. Security Policy Exchange

Security Policy Exchange

The security policy model uses the policy specified in the WSDL file for associating policy assertions with web service communication. As a result, whenever possible, the security policy assertions do not use parameters or attributes. This enables first-level, QName-based assertion matching to be done at the framework level without security domain-specific knowledge. The first-level matching provides a narrowed set of policy alternatives that are shared by the client and web service endpoint when they attempt to establish a secure communication path.

Note

A QName is a qualified name, as specified by the XML Schema Part2: Datatypes specification, Namespaces in XML, and Namespaces in XML Errata. A qualified name is made up of a namespace URI, a local part, and a prefix.

The benefit of representing security requirements as assertions is that QName matching is sufficient to find common security alternatives and that many aspects of security can be factored out and reused. For example, it may be common that the security mechanism is constant for a web service endpoint, but that the message parts that are protected, or secured, may vary by message action.

The following types of assertions are supported:

  • Protection assertions: Define the scope of security protection. These assertions identify the message parts that are to be protected and how they are to be protected, that is, whether data integrity and confidentiality mechanisms are to be used.

  • Conditional assertions: Define general aspects or preconditions of the security. These assertions define the relationships within and the characteristics of the environment in which security is being applied, such as the tokens that can be used, which tokens are for integrity or confidentiality protection, applicable algorithms to use, and so on.

  • Security binding assertions: Define the security mechanism that is used to provide security. These assertions are a logical grouping that defines how the conditional assertions are used to protect the indicated message parts. For example, the assertions might specify that an asymmetric token is to be used with a digital signature to provide integrity protection, and that parts are to be encrypted with a symmetric key, which is then encrypted using the public key of the recipient. In their simplest form, the security binding assertions restrict what can be placed in the wsse:Security header and the associated processing rules.

  • Supporting token assertions: Define the token types and usage patterns that can be used to secure individual operations and/or parts of messages.

  • Web Services Security and Trust assertions: Define the token referencing and trust options that can be used.

1.5.3.2. How Trust Works

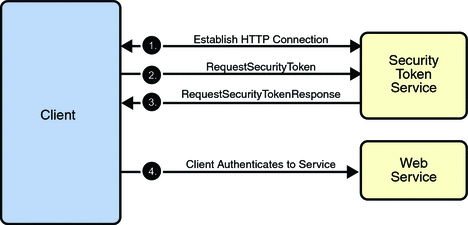
Trust and Secure Conversation shows how the Web Services Trust technology establishes trust.

Figure 1.10. Trust and Secure Conversation

Trust and Secure Conversation

To establish trust between a client, a Security Token Service, and a web service:

  1. The client establishes an HTTPS connection with the Secure Token Service using one of the following methods:

    • Username Authentication and Transport Security: The client authenticates to the Security Token Service using a username token. The Security Token Service uses a certificate to authenticate to the Client. Transport security is used for message protection.

    • Mutual Authentication: Both the client-side and server-side use X509 certificates to authenticate to each other. The client request is signed using Client's X509 certificate, then signed using ephemeral key. The web service signs the response using keys derived from the client's key.

  2. The client sends a RequestSecurityToken message to the Security Token Service.

  3. The Security Token Service sends a Security Assertion Markup Language (SAML) token to the Client.

  4. The client uses the SAML token to authenticate itself to the web service and trust is established.

All communication uses SOAP messages.

1.5.3.3. How Secure Conversation Works

Secure Conversation shows how the Web Services Secure Conversation technology establishes a secure conversation when the Trust technology is not used.

Figure 1.11. Secure Conversation

Secure Conversation

To establish a secure conversation between a Client and a web service:

  1. The client sends a X509 Certificate to authenticate itself to the web service.

  2. The web service sends a X509 Certificate to authenticate itself to the client.

All communication uses SOAP messages.

Chapter 2. Using Metro

2.1. Metro Tools

Metro provides these tools to help develop Web services applications:

Note that these tools are located in the webservices-tools.jar file in the lib/ subdirectory of Metro (standalone) download. In GlassFish these tools are located in the webservices-osgi.jar under glassfish/modules subdirectory. Shell script versions that of the tools are located under glassfish/bin.

2.1.1. Useful tools for your toolbox

Over the years, the Metro team has found the following tools to be useful for our users when working with web services.

  1. soapUI is a great tool for manually sending SOAP messages to test your web services quickly, or even to automate those testing.

  2. wsmonitor and tcpmon are great tools to monitor the communication between the client and the server.

2.2. Using Mavenized Metro Binaries

Initially, all Metro releases were built using Ant-based infrastructure. As usual, this approach had some advantages as well as some disadvantages. Perhaps the main disadvantage was that it was difficult to manage the set of all the Metro dependencies. As a result, we were not able to provide first class support for our Maven-based users.

This has changed with Metro 2.1 release. Metro 2.1 has brought a significant change to the Metro build process as one of the major tasks in the release was to switch Metro build system from Ant to Maven. The main Metro build as well as the whole WSIT project modules have been fully mavenized and currently Metro is built, assembled and installed using Maven. Metro releases are deployed to Maven central. The Metro modules share a new common root groupId with a value of org.glassfish.metro and can be browsed at the following location: https://search.maven.org/search?q=org.glassfish.metro. All Metro binaries, sources as well as javadoc and samples are all available in the maven repository.

2.2.1. Using Metro in a Maven project

If you want to use Metro in a Maven project, you need to declare a dependency on the Metro runtime bundle:

Example 2.1. Declaring Metro non-OSGi dependencies

<project>
    ...
    <dependencies>
        ...
        <dependency>
            <groupId>org.glassfish.metro</groupId>
            <artifactId>webservices-rt</artifactId>
            <version>4.0.0</version>
        </dependency>
        ...
    </dependencies>
    ...
</project>

Specifying this dependency, Maven resolves all the transitive dependencies and gets all the jars that webservices-rt module depends on. Should you want to use OSGi-fied Metro bundle, you need to declare the following dependency instead:

Example 2.2. Declaring Metro OSGi dependencies

<project>
    ...
    <dependencies>
        ...
        <dependency>
            <groupId>org.glassfish.metro</groupId>
            <artifactId>webservices-osgi</artifactId>
            <version>4.0.0</version>
        </dependency>
        ...
    </dependencies>
    ...
</project>

2.2.1.1. Using Metro Tools from Maven

Metro has Maven plugins for WSImport and WSGen tools and this snippet from pom.xml shows the usage of these maven plugins. More information on using these plugins is available at JAX-WS Maven Plugin Project site.

2.2.2. Using Metro in a non-Maven project

Even though Metro is currently Maven-based and fully available from a Maven repository, you can, of course, still use it in a non-Maven project or install it manually to your container. First, you need to go to the Metro Standalone Bundle root in the Maven repository and download and unzip a version of your choice. For further instructions, please consult the readme.html file available under the unzipped metro root directory.

2.3. Developing with NetBeans

2.3.1. Registering GlassFish with the IDE

Before you create the web service, make sure GlassFish has been registered with the NetBeans IDE. The registered server list can be viewed from the ToolsServers menu item.

If necessary, to register GlassFish with the IDE:

  1. Start the IDE. Choose ToolsServers from the main menu.

    The Servers window appears.

  2. Click Add Server.

  3. Select GlassFish , and click Next.

    The platform folder location window displays.

  4. Specify the platform location of the server instance and the domain to which you want to register, then click Next.

    The Servers window displays.

  5. If requested, type the admin username and password that you supplied when you installed the web container (the defaults are admin and adminadmin), then click Finish.

2.3.2. Creating a Web Service

The starting point for developing a web service with Metro is a Java class file annotated with the jakarta.jws.WebService annotation. The WebService annotation defines the class as a web service endpoint. The following Java code shows a web service. The IDE will create most of this Java code for you.

Example 2.3. 

package org.me.calculator;

import jakarta.jws.WebService;
import jakarta.jws.WebMethod;
import jakarta.jws.WebParam;

@WebService()
public class Calculator {
    @WebMethod(action="sample_operation")
    public String operation(@WebParam(name="param_name")
            String param) {
        // implement the web service operation here
        return param;
    }

    @WebMethod(action="add")
    public int add(@WebParam(name = "i") int i,
           @WebParam(name = "j") int j) {
        int k = i + j;
        return k;
    }
}

Notice that this web service performs a very simple operation. It takes two integers, adds them, and returns the result.

To Create the Web Service

Perform the following steps to use the IDE to create this web service.

  1. Click the Services tab in the left pane, expand the Servers node, and verify that GlassFish is listed in the left pane. If it is not listed, register it by following the steps in Registering GlassFish with the IDE.

  2. Choose FileNew Project, select Java Web from Category, select Web Application from Projects, and click Next.

  3. Assign the project a name that is representative of services that will be provided by the web service (for example, CalculatorApplication), set the Project Location to the location where you'd like to create the project, and click Next. Verify that GlassFish is the Server and that Java EE Version is Java EE 5 or above. Click Finish.

    Note

    When you create the web service project, be sure to define a Project Location that does not include spaces in the directory name. Spaces in the directory might cause the web service and web service clients to fail to build and deploy properly. To avoid this problem, Sun recommends that you create a directory, for example C:\work, and put your project there.

  4. Right-click the CalculatorApplication node and choose NewWeb Service.

  5. Type the web service name (CalculatorWS) and the package name (org.me.calculator) in the Web Service Name and the Package fields respectively.

  6. Select Create Web Service from Scratch and click Finish.

    The IDE then creates a skeleton CalculatorWS.java file for the web service. This file displays in Source mode in the right pane.

  7. In the Operations box of the Design view of CalculatorWS.java, click Add Operation.

  8. In the upper part of the Add Operation dialog box, type add in Name.

  9. Type int into the Return Type field.

    In the Return Type field, you can either enter a primitive data type or select Browse to select a complex data type.

  10. In the lower part of the Add Operation dialog box, click Add and create a parameter named i of type int. Click Add again and create a parameter named j of type int.

  11. Click OK at the bottom of the Add Operation dialog box.

  12. Notice that the add method has been added in the Operations design box.

  13. Click the Source tab for CalculatorWS.java in the right pane. Notice that the add method has been added to the source code.

    Example 2.4. 

    @WebMethod(operationName="add")
    public int add(@WebParam(name = "i") int i, @WebParam(name = "j") int j) {
        // TODO write your implementation code here
        return 0;
    }

  14. Change the add method to the following :

    Example 2.5. 

    @WebMethod(operationName="add")
    public int add(@WebParam(name = "i") int i, @WebParam(name = "j") int j) {
        int k = i + j;
        return k;
    }

  15. Save the CalculatorWS.java file.

2.3.3. Configuring Metro's WSIT Features in the Web Service

Now that you have coded a web service, you can configure the web service to use Metro's WSIT technologies.

You have a possibility to choose which .NET / METRO version you want your service to be compatible with. There are two choices:

  1. .NET 3.5 / METRO 1.3

  2. .NET 3.0 / METRO 1.0

Choose the version appropriate for your web service development (Note the Metro 2.0 library provided by the latest NetBeans and GlassFish products support either version.) .NET 3.5 / METRO 1.3 is selected by default. There are several differences in between the two versions. For .NET 3.0 / METRO 1.0 documentation please follow this link: Metro 1.0 documentation.

This section describes just how to configure the Reliable Messaging. For a discussion of reliable messaging, see Using Reliable Messaging. To see how to secure the web service, see Using WSIT Security.

To Configure Metro's WSIT Features in the Web Service

To configure a web service to use Reliable Messaging, perform the following steps:

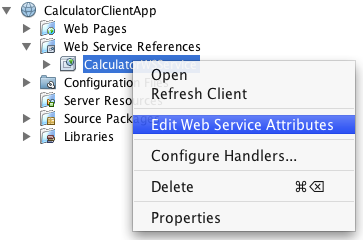
  1. In the Projects window, expand the Web Services node under the CalculatorApplication node, right-click the CalculatorWSService node, and choose Edit Web Service Attributes, as shown in Editing Web Service Attributes.

    Figure 2.1. Editing Web Service Attributes

    Editing Web Service Attributes

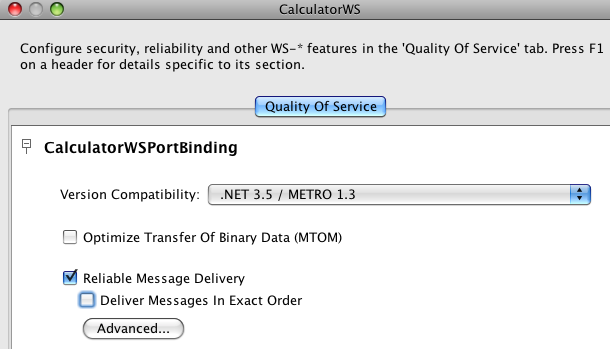
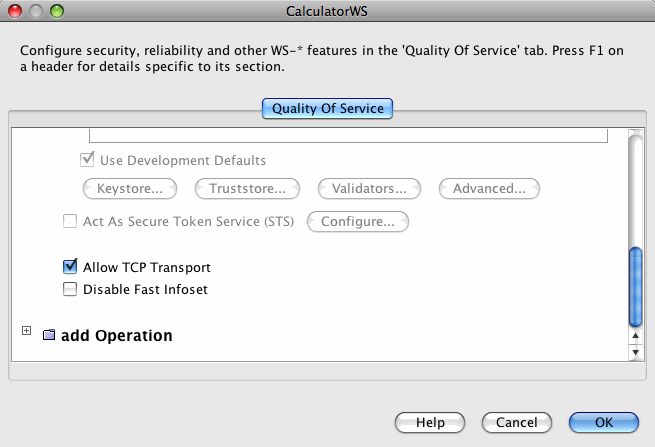
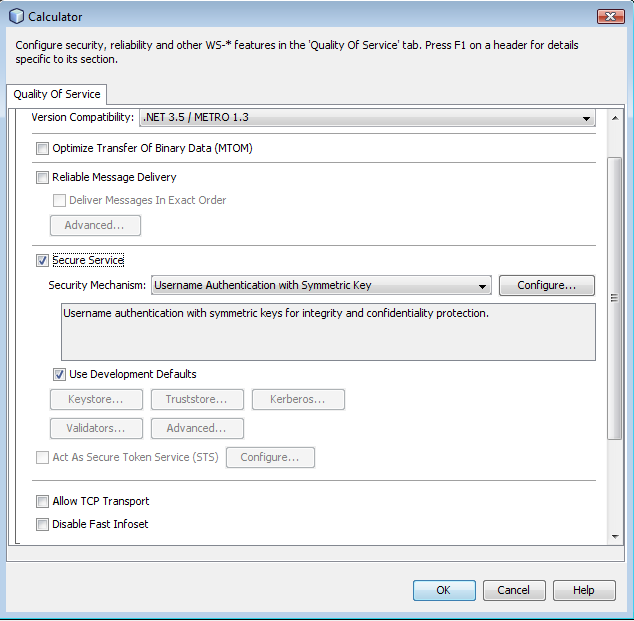
  2. Select the Reliable Message Delivery check box, as shown in Reliable Messaging Configuration Window, and click OK.

    Figure 2.2. Reliable Messaging Configuration Window

    Reliable Messaging Configuration Window

    This setting ensures that the service sends an acknowledgement to the clients for each message that is delivered, thus enabling clients to recognize message delivery failures and to retransmit the message. This capability makes the web service a "reliable" web service.

  3. In the left pane, expand the Web Pages node and the WEB-INF node, and double-click the wsit-endpoint-classname.xml (wsit-org.me.calculator.CalculatorWS.xml) file to view this file. Click the Source tab.

    The following tags enable reliable messaging:

    <wsp:Policy wsu:Id="CalculatorWSPortBindingPolicy">
        <wsp:ExactlyOne>
            <wsp:All>
                <wsam:Addressing wsp:Optional="false"/>
                <wsrm:RMAssertion/>
            </wsp:All>
        </wsp:ExactlyOne>
    </wsp:Policy>

2.3.4. Deploying and Testing a Web Service

Now that you have configured the web service to use Metro's WSIT technologies, you can deploy and test it.

To Deploy and Test a Web Service

  1. Right-click CalculatorApplication in the Project node, and select Properties, then select Run.

  2. Type /CalculatorWSService?wsdl in the Relative URL field and click OK.

  3. Right-click the Project node and choose Run. The first time GlassFish is started, you will be prompted for the admin password.

    The IDE starts the web container, builds the application, and displays the WSDL file page in your browser. You have now successfully deployed a Metro-based web service.

2.3.5. Creating a Client to Consume a WSIT-Enabled Web Service

Now that you have built and tested a web service that uses Metro's WSIT technologies, you can create a client that accesses and consumes that web service. The client will use the web service's WSDL to create the functionality necessary to satisfy the interoperability requirements of the web service.

To Create a Client to Consume a WSIT-Enabled Web Service

To create a client to access and consume the web service, perform the following steps.

  1. Choose FileNew Project, select Web Application from the Java Web category and click Next.

  2. Name the project, for example, CalculatorWSServletClient, and click Next.

  3. Verify that GlassFish is the Server and that Java EE Version is Java EE 5 or above. Click Finish.

  4. Right-click the CalculatorWSServletClient node and select NewWeb Service Client.

    The NewWeb Service Client window displays.

    Note

    NetBeans submenus are dynamic, so the Web Service Client option may not appear. If you do not see the Web Service Client option, select NewFile\FolderWebservicesWeb Service Client.

  5. Select the WSDL URL option.

  6. Cut and paste the URL of the web service that you want the client to consume into the WSDL URL field.

    For example, here is the URL for the CalculatorWS web service:

    Example 2.6. 

    http://localhost:8080/CalculatorApplication/CalculatorWSService?wsdl

    When Jakarta XML Web Services implementation generates the web service, it appends Service to the class name by default.

  7. Click Finish.

  8. Right-click the CalculatorWSServletClient project node and choose NewServlet.

  9. Name the servlet ClientServlet, specify the package name, for example, org.me.calculator.client and click Finish.

  10. To make the servlet the entry point to your application, right-click the CalculatorWSServletClient project node, choose Properties, click Run, type /ClientServlet in the Relative URL field, and click OK.

  11. If ClientServlet.java is not already open in the Source Editor, open it.

  12. In the Source Editor, remove the line that comments out the body of the processRequest method.

    This is the start-comment line that starts the section that comments out the code:

    Example 2.7. 

    /* TODO output your page here

  13. Delete the end-comment line that ends the section of commented out code:

    Example 2.8. 

    */

  14. Add some empty lines after the following line:

    Example 2.9. 

    out.println("<h1>Servlet ClientServlet at " +
            request.getContextPath () + "</h1>");

  15. Right-click in one of the empty lines that you added, then choose Insert Code... action and select Call Web Service Operation. Note that for older NetBeans releases, this action was present under "Web Service Client ResourcesCall Web Service Operation".

    Then Select Operation to Invoke dialog box appears.

  16. Browse to the Add operation and click OK.

    The processRequest method is as follows, with bold indicating code added by the IDE:

    Example 2.10. 

    protected void processRequest(HttpServletRequest request,
            HttpServletResponse response)
            throws ServletException, IOException {
        response.setContentType("text/html;charset=UTF-8");
        PrintWriter out = response.getWriter();
        out.println("<html>");
        out.println("<head>");
        out.println("<title>Servlet ClientServlet</title>");
        out.println("</head>");
        out.println("<body>");
        out.println("<h1>Servlet ClientServlet at " + request
                .getContextPath() + "</h1>");
        try { // Call Web Service Operation
            org.me.calculator.client.CalculatorWS port = service
                    .getCalculatorWSPort();
            // TODO initialize WS operation arguments here
            int i = 0;
            int j = 0;
            // TODO process result here
            int result = port.add(i, j);
            out.println("Result = " + result);
        } catch (Exception ex) {
            // TODO handle custom exceptions here
        }
        out.println("</body>");
        out.println("</html>");
        out.close();
    }

  17. Change the values for int i and int j to other numbers, such as 3 and 4.

  18. Add a line that prints out an exception, if an exception is thrown.

    The try/catch block is as follows (new and changed lines from this step and the previous step are highlighted in bold text):

    Example 2.11. 

    try { // Call Web Service Operation
        org.me.calculator.client.CalculatorWS port =
                service.getCalculatorWSPort();
        // TODO initialize WS operation arguments here
        int i = 3;
        int j = 4;
        // TODO process result here
        int result = port.add(i, j);
        out.println("<p>Result: " + result);
    } catch (Exception ex) {
        out.println("<p>Exception: " + ex);
    }

  19. If Reliable Messaging is enabled, the client needs to close the port when done or the server log will be overwhelmed with messages. To close the port, first add the following line to the import statements at the top of the file:

    Example 2.12. 

    import com.sun.xml.ws.Closeable;

    Then add the line in bold at the end of the try block, as shown below.

    Example 2.13. 

    try { // Call Web Service Operation
        org.me.calculator.client.CalculatorWS port =
                service.getCalculatorWSPort();
        // TODO initialize WS operation arguments here
        int i = 3;
        int j = 4;
        // TODO process result here
        int result = port.add(i, j);
        out.println("<p>Result: " + result);
        ((Closeable)port).close();
    } catch (Exception ex) {
        out.println("<p>Exception: " + ex);
    }

  20. Save ClientServlet.java.

  21. Right-click the project node and choose Run.

    The server starts (if it was not running already), the application is built, deployed, and run. The browser opens and displays the calculation result.

    Note

    For NetBeans 6.x and GlassFish v3, if you are getting GlassFish errors with a "java.lang.IllegalStateException: Servlet [CompletionInitiatorPortTypeImpl] and Servlet [ParticipantPortTypeImpl] have the same url pattern" message, make sure the Metro 2.0 JARs were excluded from the client servlet WAR file as explained in Step 19.

2.4. Developing with Eclipse

This document describes developing Metro WebServices on Eclipse. The instructions below are for Eclipse for JavaEE

2.4.1. Setup

This is one time setup.

To setup the environment in Eclipse

  1. After starting Eclipse, select the J2EE perspective: WindowsOpen PerspectiveOthersJ2EE

  2. In the lower window you should see a tab with label Servers. Select the tab and right click in the window and select newServer.

  3. To download the GlassFish server, select Download additional server adapters. Accept the license and wait for Eclipse to restart.

  4. After Eclipse has restarted, you can create a new GlassFish Java EE 5 server.

  5. In the creation dialog select Installed Runtimes and select the directory where your GlassFish installation resides.

2.4.2. Create a Metro Web Services Endpoint

To create a Metro Web Services Endpoint

  1. To create the HelloWorld service, create a new dynamic Web project. Give it a name (e.g. helloworld) and select as target runtime GlassFish

  2. Example 2.14. HelloWorld.java

    package sample;
    
    import jakarta.jws.WebService;
    
    @WebService
    public class HelloWorld {
        public String hello(String param){
        return param + ", World";
        }
    }              


  3. Deploy the service by selecting the project and select Run asRun on server.

  4. Check in the server Window that the helloworld project has a status of Synchronized. If this is not the case, right-click in the server window and select publish.

  5. You can check that the GlassFish server is started and contains the Web service by going to the GlassFish admin console (localhost:4848)

See Arun's screen cast, it talks about the above steps.

2.4.3. Creating Web Service Client using Wsimport CLI

To create a Web Service Client using Wsimport CLI

  1. Create a new project for the HelloWorld client (an ordinary Java project suffices).

  2. Select Add GlassFish as Server Runtime in Build Path.

  3. Open a command window and go into the source directory of that project in Eclipse. For example, if the Eclipse workspace is in path

    Example 2.15. 

    c:\home\vivekp\workspace


    and the name of the project is HelloWorldClient, then you need to go to

    Example 2.16. 

    c:\home\vivekp\workspace\helloworld\src


    In this directory execute

    Example 2.17. 

    wsimport -keep http://localhost:8080/helloworld/HelloWorldService?wsdl


    On Linux or with Cygwin on Windows, you need to escape the ? by using \? instead.

  4. Select refresh in the project view to see the generated files.

  5. Now you can create the client class HelloWorldClient

  6. You can execute the client, by selecting the HelloWorldClient in the package explorer of Eclipse and selecting RunJava Application. In the console window of Eclipse, you should see "Hello World".

2.4.4. Creating Web Service Client using Wsimport Ant Task

You can pretty much avoid steps 3 - 5 above by using an Ant build.xml file.

To create Web Service Client using Wsimport Ant Task

  1. Select helloworldclient in Package Exp and create a new file build.xml

  2. In this file (build.xml) copy the sample ant build script

  3. Then select build.xml in the package explorer, then right click Run AsAnt Build...

  4. Invoke client target, it will run wsimport ant task and generate the client side stubs

  5. Invoke run to invoke the endpoint and run the client or you can execute the client, by selecting the HelloWorldClient in the package explorer of Eclipse and selecting RunJava Application. In the console window of Eclipse, you should see "Hello World".

2.4.5. Creating Web Service Client using SOAP UI Plugin

To create Web Service Client using SOAP UI Plugin

  1. Inside Eclipse, install SOAP UI Plugin

  2. Select HelpSoftware UpdatesFind and Install...

  3. Press the New Remote Site button and add http://www.soapui.org/eclipse/update/site.xml as the plugin URL

  4. Select Finish and the follow the dialogs to install the soapUI feature

  5. Create a new project for the HelloWorld client (an ordinary Java project suffices).

  6. Select Add GlassFish as Server Runtime in Build Path.

  7. right click BuildPath+Add Library+ServerRuntime+GlassFish

  8. Select the project and right click Soap UIAdd SOAPUI Nature, SOAP UI WebService item will be added in Project Explorer

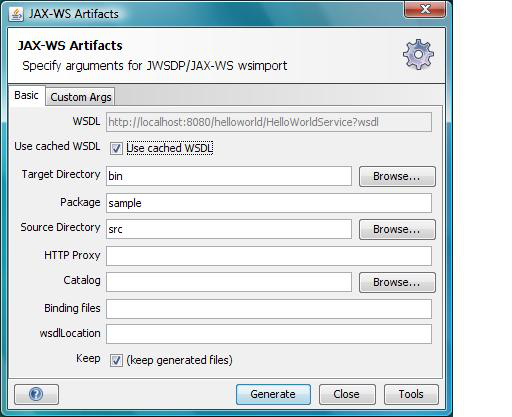
  9. Select HelloWorldPortBinding and right click GenerateCodeJAX-WS Artifacts

  10. Enter the appropriate info in the JAX-WS Artifacts window

    Figure 2.3. SOAP UI - JAX-WS Artifacts

    SOAP UI - JAX-WS Artifacts


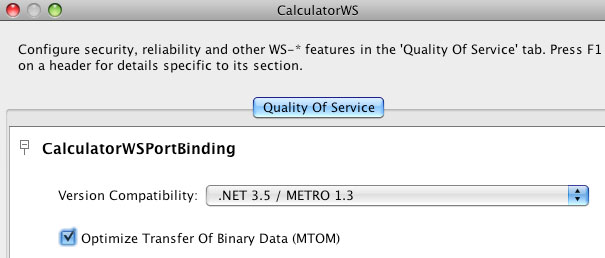
  11. Click Tools and enter the location of Wsimport, for example c:\glassfish\bin

    Figure 2.4. SOAP UI - Preferences

    SOAP UI - Preferences


  12. Click OK

  13. Then click Generate on JAX-WS Artifacts window, it will display a dialog box that the operation was successful. Switch back to Java Perspective, then refresh the src folder and you can see the wsimport generated classes

  14. Now implement your client code

    Example 2.18. HelloWorldClient.java

    package sample;
    
    public class HelloWorldClient {
    
       /**
        * @param args
        */
        public static void main(String[] args) {
            //Create Service
            HelloWorldService service = new HelloWorldService();
    
            //create proxy
            HelloWorld proxy = service.getHelloWorldPort();
    
            //invoke
            System.out.println(proxy.hello("hello"));
        }
    }          


  15. You can execute the client by selecting the HelloWorldClient in the package explorer of Eclipse and selecting RunJava Application. In the console window of Eclipse, you should see "Hello World".

You can also use Wsimport and Wsgen Maven2 tools. For details see here. Netbeans offers an easy to use a comprehensive Metro tooling choice. On Eclipse you can use SOAP UI or ant build script or CLI or even Maven based tools, which does not look bad. There is RFE on Eclipse and looks like it is being looked at. For the Quality Of Service features (WS-* features) it is little difficult as manually creating/modifying WSIT configuration is hard, so we will need an equivalent of the WSIT Plugin in NetBeans for Eclipse. Please let us know if you are willing to write a WSIT plugin for Eclipse.

2.5. Logging

2.5.1. Dynamic tube-based message logging

As you may know, Metro creates a tubeline for each WS endpoint and endoint client to process SOAP messages flowing from and to the endpoint and or its client. Each tubeline consist of a set of tube instances chained together. A tube is a basic SOAP message processing unit. Standard Metro tubes are used to implement processing logic for different SOAP processing aspects (validation, Java-XML mapping etc.) and higher-level QoS domains (security, reliable messaging etc.) As an experimental feature, custom tubes are supported as well.

When developing an advanced web service that requires Quality of Service features or adding a custom tube into the default Metro tubeline, the ability to see the SOAP message content at different processing stages as the message flows through the tubeline may be very useful. As Metro tubeline get's dynamically created for each endpoint or client, Metro (since version 2.0) provides a new message logging facility that copes with the dynamics of a tubeline creation by defining a set of templating rules that provide a generic way for constructing system-level properties able to control message content logging before and/or after each tube's processing.

To turn on the logging for any particular tube (or a set of tubes) created by a specific tube factory, the developer needs to set one or more of the following system properties, depending on the target scope:

  • <tube_factory_class_name>.dump - expects boolean string, if set to true turns on the logging before and after tube's processing

  • <tube_factory_class_name>.dump.before - expects boolean string, if set to true turns on the logging before tube's processing

    • overrides anything set by <tube_factory_class_name>.dump

  • <tube_factory_class_name>.dump.after - expects boolean string, if set to true turns on the logging after tube's processing

    • overrides anything set by <tube_factory_class_name>.dump

  • <tube_factory_class_name>.dump.level - expects string representing java.util.logging.Level , if set, overrides the default message dumping level for the class, which is java.util.logging.Level.INFO

There is a set of common system properties that control logging for all tubes and take the lowest precedence so that they can be overriden by a tube-specific properties:

  • com.sun.metro.soap.dump - expects a boolean string, if set to true turns on the message dumping before and after each tube's processing on both sides client and endpoint

  • com.sun.metro.soap.dump.before/after - expects a boolean string, if set to true turns on the message dumping before/after each tube's processing on both sides client and endpoint.

  • com.sun.metro.soap.dump.client/endpoint - expects a boolean string, if set to true turns on the message dumping before and after each tube's processing on the respective side (client or endpoint).

  • com.sun.metro.soap.dump.client/endpoint.before/after - expects a boolean string, if set to true turns on the message dumping before/after each tube's processing on the respective side (client or endpoint).

  • com.sun.metro.soap.dump.level and com.sun.metro.soap.dump.client/endpoint.level - controls the logging level for the whole tubeline

The logger root used for message dumping is <tube_factory_class_name>.

Most of the factories create tubes on both client and endpoint side. To narrow down the message dumping scope, following system properties can be used:

  • <tube_factory_class_name>.dump.client/endpoint - expects boolean string, if set to true turns on the logging before and after tube's processing

    • overrides anything set by <tube_factory_class_name>.dump

  • <tube_factory_class_name>.dump.client/endpoint.before - expects boolean string, if set to true turns on the logging before tube's processing

    • overrides anything set by <tube_factory_class_name>.dump and/or <tube_factory_class_name>.dump.client/endpoint

  • <tube_factory_class_name>.dump.client/endpoint.after - expects boolean string, if set to true turns on the logging after tube's processing

    • overrides anything set by <tube_factory_class_name>.dump and/or <tube_factory_class_name>.dump.client/endpoint

  • <tube_factory_class_name>.dump.client/endpoint.level - expects string representing java.util.logging.Level , if set, overrides anything set by <tube_factory_class_name>.level and or the default message dumping level for the class, which is java.util.logging.Level.INFO

2.5.1.1. Examples

In the following examples we will be working with the metro-default.xml file that defines the default Metro tubeline and looks like this:

Example 2.19. 

<metro xmlns:xsi='http://www.w3.org/2001/XMLSchema-instance'
       xmlns='http://java.sun.com/xml/ns/metro/config'
       version="1.0">
   <tubelines default="#default-metro-tubeline">
      <tubeline name="default-metro-tubeline">
         <client-side>
            <tube-factory
                    className="com.sun.xml.ws.assembler.jaxws.TerminalTubeFactory"/>
            <tube-factory
                    className="com.sun.xml.ws.assembler.jaxws.HandlerTubeFactory"/>
            <tube-factory
                    className="com.sun.xml.ws.assembler.jaxws.ValidationTubeFactory"/>
            <tube-factory
                    className="com.sun.xml.ws.assembler.jaxws.MustUnderstandTubeFactory"/>
            <tube-factory
                    className="com.sun.xml.ws.assembler.jaxws.MonitoringTubeFactory"/>
            <tube-factory
                    className="com.sun.xml.ws.assembler.jaxws.AddressingTubeFactory"/>
            <tube-factory
                    className="com.sun.xml.ws.tx.runtime.TxTubeFactory"/>
            <tube-factory
                    className="com.sun.xml.ws.rx.rm.runtime.RmTubeFactory"/>
            <tube-factory
                    className="com.sun.xml.ws.rx.mc.runtime.McTubeFactory"/>
            <tube-factory
                    className="com.sun.xml.wss.provider.wsit.SecurityTubeFactory"/>
            <tube-factory
                    className="com.sun.xml.ws.dump.ActionDumpTubeFactory"/>
            <tube-factory
                    className="com.sun.xml.ws.rx.testing.PacketFilteringTubeFactory"/>
            <tube-factory
                    className="com.sun.xml.ws.dump.MessageDumpingTubeFactory"/>
            <tube-factory
                    className="com.sun.xml.ws.assembler.metro.jaxws.TransportTubeFactory"/>
         </client-side>
         <endpoint-side>
            <tube-factory
                    className="com.sun.xml.ws.assembler.metro.jaxws.TransportTubeFactory"/>
            <tube-factory
                    className="com.sun.xml.ws.dump.MessageDumpingTubeFactory"/>
            <tube-factory
                    className="com.sun.xml.ws.rx.testing.PacketFilteringTubeFactory"/>
            <tube-factory
                    className="com.sun.xml.ws.dump.ActionDumpTubeFactory"/>
            <tube-factory
                    className="com.sun.xml.wss.provider.wsit.SecurityTubeFactory"/>
            <tube-factory
                    className="com.sun.xml.ws.rx.mc.runtime.McTubeFactory"/>
            <tube-factory
                    className="com.sun.xml.ws.assembler.jaxws.AddressingTubeFactory"/>
            <tube-factory
                    className="com.sun.xml.ws.rx.rm.runtime.RmTubeFactory"/>
            <tube-factory
                    className="com.sun.xml.ws.tx.runtime.TxTubeFactory"/>
            <tube-factory
                    className="com.sun.xml.ws.assembler.jaxws.MonitoringTubeFactory"/>
            <tube-factory
                    className="com.sun.xml.ws.assembler.jaxws.MustUnderstandTubeFactory"/>
            <tube-factory
                    className="com.sun.xml.ws.assembler.jaxws.HandlerTubeFactory"/>
            <tube-factory
                    className="com.sun.xml.ws.assembler.jaxws.ValidationTubeFactory"/>
            <tube-factory
                    className="com.sun.xml.ws.assembler.jaxws.TerminalTubeFactory"/>
         </endpoint-side>
      </tubeline>
   </tubelines>
</metro>

Example 1

To turn on the the message dumping before and after security tube's processing on both, client and endpoint side, following system property needs to be set to true:

com.sun.xml.wss.provider.wsit.SecurityTubeFactory.dump=true
Example 2

To turn on the the message dumping only after security tube's processing on both, client and server side, following system property needs to be set to true:

com.sun.xml.wss.provider.wsit.SecurityTubeFactory.dump.after=true
Example 3

To turn on the the message dumping only after security tube's processing only on the client side, following system property needs to be set to true:

com.sun.xml.wss.provider.wsit.SecurityTubeFactory.dump.client.after=true
Example 4

This example sets message dumping before and after security processing, except for before security processing on the endpoint side. The logging level for message dumps is set to FINE on both sides:

com.sun.xml.wss.provider.wsit.SecurityTubeFactory.dump=true
com.sun.xml.wss.provider.wsit.SecurityTubeFactory.dump.endpoint.before=false
com.sun.xml.wss.provider.wsit.SecurityTubeFactory.dump.level=FINE

2.5.2. Dumping SOAP messages on client

2.5.2.1. Transport level dump

One of the things people want to do while developing Web Services is to look at what the client is sending and receiving. To monitor soap traffic, there are some GUI tools like TCP Monitor and WSMonitor. These monitors are implemented with a 'man in the middle' approach where-in, the monitor listens to a port (Client send requests to this port) and forwards it to another port (Server listens to this port). Since these tools use port forwarding, you need to change your Web Service client to send request to the port where the monitor listens (Especially, if you are using static clients generated by wsimport, the default endpoint address taken from the wsdl needs to be overidden by setting ENDPOINT_ADDRESS_PROPERTY on the proxy).

In Eclipse implementation of Jakarta XML Web Services, you can monitor the request and response messages without changing the client. When you invoke the Web Service, just pass the system property com.sun.xml.ws.transport.http.client.HttpTransportPipe.dump=true, it prints out the request and response message.

If you are using an Apache Ant script to run your client, this system property can be set as a <jvmarg/> element:

Example 2.20. Setting system properties via Ant

<project name="metro client" basedir=".">
   <property environment="env"/>
   <property name="build.dir" location="$${basedir}/build"/>
   <property name="build.classes.dir" location="$${build.dir}/classes"/>

   <target name="run">
      <java classname="client.MyClient" fork="yes">
         <arg value="xxx"/>
         <!-- optional args[0] sent to MyClient.main() -->
         <arg value="xxx"/>
         <!-- optional args[1], etc. -->
         <classpath>
            <pathelement location="$${build.classes.dir}"/>
            <pathelement location="$${env.AS_HOME}/lib/javaee.jar"/>
            <pathelement location="$${env.AS_HOME}/lib/webservices-rt.jar"/>
            <pathelement location="$${env.AS_HOME}/lib/activation.jar"/>
         </classpath>
         <jvmarg value="-Dcom
         .sun.xml.ws.transport.http.client.HttpTransportPipe.dump=true"/>
      </java>
   </target>
</project>

Alternatively you can execute com.sun.xml.ws.transport.http.client.HttpTransportPipe.dump=true; from your Java program to programatically enable/disable logging. Since you often run XML Web Services in a container where setting system properties can be tedious, you might find this easier.

With this switch enabled, you'll see message dumps like the following in System.out.

Example 2.21. Sample dump

---[HTTP request]---
SOAPAction:
Content-Type: text/xml
Accept: text/xml, multipart/related, text/html, image/gif, image/jpeg, *; q=.2, */*; q=.2
<?xml version="1.0" ?><S:Envelope xmlns:S="http://schemas.xmlsoap.org/soap/envelope/"><S:Body><addNumbers xmlns="http://duke.example.org"><arg0>10</arg0><arg1>20</arg1></addNumbers></S:Body></S:Envelope>--------------------

---[HTTP response 200]---
Date: Thu, 17 Aug 2006 00:35:42 GMT
Content-type: text/xml
Transfer-encoding: chunked
Server: Apache-Coyote/1.1
null: HTTP/1.1 200 OK

<?xml version="1.0" ?><S:Envelope xmlns:S="http://schemas.xmlsoap.org/soap/envelope/"><S:Body><addNumbersResponse xmlns="http://duke.example.org"><return>30</return></addNumbersResponse></S:Body></S:Envelope>--------------------

A similar property com.sun.xml.ws.transport.local.LocalTransportPipe.dump=true is available for the local transport.

2.5.2.2. Transport-agnostic dump

The dump mechanism explained above allows you to get the actual bytes that are sent over the wire, as well as any transport specific information (such as HTTP headers), but the mechanism is different from transports to transports. Eclipse implementation of Jakarta XML Web Services also defines a transport-agnostic dump, which works regardless of what transport you use.

This dump happens after Eclipse implementation of Jakarta XML Web Services parses the incoming message into XML infoset. So you will not be able to investigate a well-formedness error with this dump.

To enable such dump, set the system property com.sun.xml.ws.util.pipe.StandaloneTubeAssembler.dump=true or execute that as a Java program.

2.5.3. Dumping SOAP messages on server

You can dump incoming HTTP requests and responses to System.out on the server side by using the system property com.sun.xml.ws.transport.http.HttpAdapter.dump=true. This works exactly like above (except that this works on server, not client.) You can also set this property programatically by executing com.sun.xml.ws.transport.http.HttpAdapter.dump=true; as Java program.

The transport agnostic dump as explained above also works on the server for incoming messages and responses.

2.6. Deploying Metro endpoint

Before you deploy or publish your endpoint, you will need to package your endpoint application into a WAR file. The requirements when building a WAR:

  • All WSDLs, Schema files should be packaged under WEB-INF/wsdl dir. It is recommended not to package the WSDL if you are doing Java-first development.

  • WebService implementation class should contain @WebService annotation. Provider based endpoints should have @WebServiceProvider annotation.

  • wsdl, service, port attributes are mandatory for Provider based endpoints and can be specified in @WebServiceProvider annotation or deployment descriptor (sun-jaxws.xml).

  • Deployment descriptors, web.xml, web services deployment descriptor (sun-jaxws.xml or 109 or spring)

2.6.1. The WAR Contents

Typically, one creates the WAR file with a GUI development tool or with the ant war task from the generated artifacts from wsimport, wsgen, or apt tools.

For example, a sample WAR file starting from a WSDL file:

Example 2.22. Sample WAR contents (WSDL First)

WEB-INF/classes/hello/HelloIF.class SEI
WEB-INF/classes/hello/HelloImpl.class Endpoint
WEB-INF/sun-jaxws.xml JAX-WS RI deployment descriptor
WEB-INF/web.xml Web deployment descriptor
WEB-INF/wsdl/HelloService.wsdl WSDL
WEB-INF/wsdl/schema.xsd WSDL imports this Schema

2.6.2. Using sun-jaxws.xml

Metro defines its own deployment descriptor, which is also known as deployment descriptor of the Eclipse Implementation of Jakarta XML Web Services- sun-jaxws.xml.

Here is the schema for sun-jaxws.xml:

Example 2.23. 

<?xml version="1.0" encoding="UTF-8"?>
<!--

    Copyright (c) 1997, 2022 Oracle and/or its affiliates. All rights reserved.

    This program and the accompanying materials are made available under the
    terms of the Eclipse Distribution License v. 1.0, which is available at
    http://www.eclipse.org/org/documents/edl-v10.php.

    SPDX-License-Identifier: BSD-3-Clause

-->

<xsd:schema
        xmlns:xsd="http://www.w3.org/2001/XMLSchema"
        xmlns:tns="http://java.sun.com/xml/ns/jax-ws/ri/runtime"
        xmlns:javaee="https://jakarta.ee/xml/ns/jakartaee"
        targetNamespace="http://java.sun.com/xml/ns/jax-ws/ri/runtime"
        elementFormDefault="qualified"
        attributeFormDefault="unqualified"
        version="1.0">

    <xsd:import namespace="https://jakarta.ee/xml/ns/jakartaee"
                schemaLocation="https://jakarta.ee/xml/ns/jakartaee/jakartaee_web_services_metadata_handler_3_0.xsd"/>

    <xsd:element name="endpoints">
        <xsd:complexType>
            <xsd:sequence>
                <xsd:element name="endpoint" type="tns:endpointType" minOccurs="0" maxOccurs="unbounded"/>
            </xsd:sequence>
            <xsd:attribute name="version" type="xsd:string" use="required"/>
        </xsd:complexType>
    </xsd:element>

    <xsd:complexType name="externalMetadata">
        <xsd:attribute name="file" type="xsd:string" use="optional"/>
        <xsd:attribute name="resource" type="xsd:string" use="optional"/>
    </xsd:complexType>

    <xsd:complexType name="endpointType">
        <xsd:annotation>
            <xsd:documentation>
                An endpoint definition has several attributes:
                <ul>
                    <li>name</li>
                    - the endpoint name
                    <li>implementation</li>
                    - the name of the endpoint implementation class
                    <li>wsdl</li>
                    - the name of a resource corresponding to the WSDL document for the endpoint
                    <li>service</li>
                    - the QName of the WSDL service that owns this endpoint;
                    <li>port</li>
                    - the QName of the WSDL port for this endpoint;
                    <li>url-pattern</li>
                    - the URL pattern this endpoint is mapped to.
                    <li>binding</li>
                    - specify binding id for SOAP1.1 or SOAP1.2
                    <li>databinding</li>
                    - specify databinding type - "glassfish.jaxb" for JAX-B RI (default), "eclipselink.jaxb" for Toplink
                    MOXy
                    <li>enable-mtom</li>
                    - Enables MTOM optimization
                </ul>
                <p>
                    <b>wsdl, service, port</b>
                    attributes are required for provider based endpoints
                </p>
                <p>Allowed nested element(s) is
                    <b>external-metadata</b>
                    defining xml descriptor to be used to supplement or override annotation metadata. One element
                    defines one resource/file.
                </p>
            </xsd:documentation>
        </xsd:annotation>

        <xsd:sequence>
            <xsd:element name="external-metadata" type="tns:externalMetadata" minOccurs="0" maxOccurs="unbounded"/>
            <xsd:element ref="javaee:handler-chains" minOccurs="0" maxOccurs="1"/>
        </xsd:sequence>
        <xsd:attribute name="name" type="xsd:string" use="required"/>
        <xsd:attribute name="implementation" type="xsd:string" use="required"/>
        <xsd:attribute name="wsdl" type="xsd:anyURI"/>
        <xsd:attribute name="service" type="xsd:anyURI"/>
        <xsd:attribute name="port" type="xsd:anyURI"/>
        <xsd:attribute name="url-pattern" type="xsd:anyURI" use="required"/>
        <xsd:attribute name="databinding" type="xsd:string"/>
        <xsd:attribute name="binding" type="xsd:string"/>
        <xsd:attribute name="enable-mtom" type="xsd:boolean"/>
    </xsd:complexType>

</xsd:schema>

The <endpoints> element contain one or more <endpoint> elements. Each endpoint represents a port in the WSDL and it contains all information about implementation class, servlet url-pattern, binding, WSDL, service, port QNames. The following shows a sun-jaxws.xml file for a simple HelloWorld service. sun-jaxws.xml is the schema instance of sun-jaxws.xml.

Example 2.24. 

<?xml version="1.0" encoding="UTF-8"?>
<endpoints
        xmlns="http://java.sun.com/xml/ns/jax-ws/ri/runtime"
        version="2.0">
    <endpoint
            name="MyHello"
            implementation="hello.HelloImpl"
            url-pattern="/hello"/>
</endpoints>

  • Endpoint attribute

    Table 2.1. Endpoint attributes

    AttributeOptionalUse
    nameNName of the endpoint
    wsdlYPrimary wsdl file location in the WAR file. E.g. WEB-INF/wsdl/HelloService.wsdl. If this isn't specified, Metro runtime will generate and publish a new WSDL. When the service is developed from Java, it is recommended to omit this attribute.
    serviceYQName of WSDL service. For e.g. {http://example.org/}HelloService. When the service is developed from java, it is recommended to omit this attribute.
    portYQName of WSDL port. For e.g. {http://example.org/}HelloPort. When the service is developed from Java, it is recommended to omit this attribute.
    implementationNEndpoint implementation class name. For e.g: hello.HelloImpl. The class should have @WebService annotation. Provider based implementation class should have @WebServiceProvider annotation.
    url-patternNShould match <url-pattern> in web.xml
    bindingYBinding id defined in the Jakarta XML Web Services API. The possible values are: "http://schemas.xmlsoap.org/wsdl/soap/http","http://www.w3.org/2003/05/soap/bindings/HTTP/" If omitted, it is considered SOAP1.1 binding.
    enable-mtomYEnables MTOM optimization. true or false. Default is false.


  • Specifying Handler Chains

    Example 2.25. 

    <?xml version="1.0" encoding="UTF-8"?>
    <endpoints xmlns="http://java.sun.com/xml/ns/jax-ws/ri/runtime"
               version="2.0">
        <endpoint name="MyHello">
            <handler-chains xmlns="https://jakarta.ee/xml/ns/jakartaee">
                <handler-chain>
                    <handler>
                        <handler-name>MyHandler</handler-name>
                        <handler-class>hello.MyHandler</handler-class>
                    </handler>
                </handler-chain>
            <handler-chains>
        </endpoint>
    </endpoints>    


  • External Web Service Metadata

    Example 2.26. 

    If there is a need to use existing implementation for web service and it is impossible to change the source code to provide necessary java annotations, it is possible to use external web service metadata configuration. For more information on this topic see External Web Service Metadata

    <?xml encoding="UTF-8" version="1.0" ?>
    <endpoints xmlns="http://java.sun.com/xml/ns/jax-ws/ri/runtime" version="2.0">
        <endpoint implementation="org.example.server.BlackboxService" url-pattern="/WS" name="WS">
            <external-metadata resource="external-metadata-org.example.server.BlackboxService.xml" />
        </endpoint>
    </endpoints>


2.6.2.1. The web.xml File

The following shows a web.xml file for a simple HelloWorld service. It shows the listener and servlet classes that need to be used when deploying Metro-based web services.

Example 2.27. 

<?xml version="1.0" encoding="UTF-8"?>
<web-app version="6.0" xmlns="https://jakarta.ee/xml/ns/jakartaee"
        xmlns:xsi="http://www.w3.org/2001/XMLSchema-instance"
        xsi:schemaLocation="https://jakarta.ee/xml/ns/jakartaee https://jakarta.ee/xml/ns/jakartaee/web-app_6_0.xsd">
   <listener>
      <listener-class>
         com.sun.xml.ws.transport.http.servlet.WSServletContextListener
      </listener-class>
   </listener>
   <servlet>
      <servlet-name>hello</servlet-name>
      <servlet-class>com.sun.xml.ws.transport.http.servlet.WSServlet
      </servlet-class>
      <load-on-startup>1</load-on-startup>
   </servlet>
   <servlet-mapping>
      <servlet-name>hello</servlet-name>
      <url-pattern>/hello</url-pattern>
   </servlet-mapping>
   <session-config>
      <session-timeout>60</session-timeout>
   </session-config>
</web-app>

2.7. Handlers and MessageContext

2.7.1. Efficient Handlers in Metro

Extend your Web Service applications with the new efficient Handlers in Eclipse Metro : Use this RI extension to take advantage of the Eclipse Metro Message API for efficient access to message and other contextual information.

2.8. Deploying Metro with ...

2.8.1. WebLogic 12

Here are the steps to use the Metro 2.x/Eclipse Implementation of Jakarta XML Web services instead of Oracle's JAX-WS implementation in Weblogic 12.1.1.0 without affecting the Weblogic domain or other applications under the same domain:

  1. Create an EAR file and include your WAR file inside it. Here is the directory structure of the EAR file:

    • META-INF/

    • META-INF/MANIFEST.MF

    • META-INF/application.xml

    • META-INF/weblogic-application.xml

    • metro-custom-tubes.war (your .war application)

    • APP-INF/

    • APP-INF/lib/

    • APP-INF/lib/stax-api.jar

    • APP-INF/lib/webservices-api.jar

    • APP-INF/lib/webservices-extra-api.jar

    • APP-INF/lib/webservices-extra.jar

    • APP-INF/lib/webservices-rt.jar

    • APP-INF/lib/webservices-tools.jar

    • APP-INF/classes/

  2. Include a META-INF/application.xml file to point out the name of the EAR file and the location and context of the WAR file:

    <?xml version="1.0" encoding="UTF-8"?>
    <application xmlns:xsi="http://www.w3.org/2001/XMLSchema-instance"
                 xmlns="https://jakarta.ee/xml/ns/jakartaee"
                 xmlns:application="https://jakarta.ee/xml/ns/jakartaee/application_10.xsd"
                 xsi:schemaLocation="https://jakarta.ee/xml/ns/jakartaee
                     https://jakarta.ee/xml/ns/jakartaee/application_10.xsd"
                 id="Application_ID" version="10">
      <module>
        <web>
          <web-uri>metro-custom-tubes.war</web-uri>
          <context-root>metro-custom-tubes</context-root>
        </web>
      </module>
    </application>
  3. Include a META-INF/weblogic-application.xml file that uses Weblogic's class loading filtering feature to override the System class loader packages and resources with the ones from the application class loader:

    <?xml version="1.0" encoding="UTF-8"?>
    <wls:weblogic-application xmlns:xsi="http://www.w3.org/2001/XMLSchema-instance"
            xmlns:wls="http://www.bea.com/ns/weblogic/weblogic-application"
            xsi:schemaLocation="
                http://www.bea.com/ns/weblogic/weblogic-application
                http://www.bea.com/ns/weblogic/weblogic-application.xsd
                https://jakarta.ee/xml/ns/jakartaee
                https://jakarta.ee/xml/ns/jakartaee/application_10.xsd">
        <wls:application-param>
            <wls:param-name>webapp.encoding.default</wls:param-name>
            <wls:param-value>UTF-8</wls:param-value>
        </wls:application-param>
        <prefer-application-packages>
         <wls:package-name>com.sun.xml.fastinfoset</wls:package-name>
         <wls:package-name>com.sun.xml.fastinfoset.tools</wls:package-name>
         <wls:package-name>com.sun.xml.fastinfoset.vocab</wls:package-name>
         <wls:package-name>com.sun.xml.fastinfoset.util</wls:package-name>
         <wls:package-name>com.sun.xml.fastinfoset.stax.events</wls:package-name>
         <wls:package-name>com.sun.xml.fastinfoset.stax</wls:package-name>
         <wls:package-name>com.sun.xml.fastinfoset.stax.factory</wls:package-name>
         <wls:package-name>com.sun.xml.fastinfoset.stax.util</wls:package-name>
         <wls:package-name>com.sun.xml.fastinfoset.sax</wls:package-name>
         <wls:package-name>com.sun.xml.fastinfoset.dom</wls:package-name>
         <wls:package-name>com.sun.xml.fastinfoset.algorithm</wls:package-name>
         <wls:package-name>com.sun.xml.fastinfoset.org.apache.xerces.util</wls:package-name>
         <wls:package-name>com.sun.xml.fastinfoset.alphabet</wls:package-name>
         <wls:package-name>org.jvnet.fastinfoset</wls:package-name>
         <wls:package-name>org.jvnet.fastinfoset.sax</wls:package-name>
         <wls:package-name>org.jvnet.fastinfoset.sax.helpers</wls:package-name>
         <wls:package-name>org.jvnet.fastinfoset.stax</wls:package-name>
         <wls:package-name>com.sun.xml.messaging.saaj</wls:package-name>
         <wls:package-name>com.sun.xml.messaging.saaj.util</wls:package-name>
         <wls:package-name>com.sun.xml.messaging.saaj.util.transform</wls:package-name>
         <wls:package-name>com.sun.xml.messaging.saaj.packaging.mime</wls:package-name>
         <wls:package-name>com.sun.xml.messaging.saaj.packaging.mime.util</wls:package-name>
         <wls:package-name>com.sun.xml.messaging.saaj.packaging.mime.internet</wls:package-name>
         <wls:package-name>com.sun.xml.messaging.saaj.client.p2p</wls:package-name>
         <wls:package-name>com.sun.xml.messaging.saaj.soap</wls:package-name>
         <wls:package-name>com.sun.xml.messaging.saaj.soap.ver1_2</wls:package-name>
         <wls:package-name>com.sun.xml.messaging.saaj.soap.name</wls:package-name>
         <wls:package-name>com.sun.xml.messaging.saaj.soap.ver1_1</wls:package-name>
         <wls:package-name>com.sun.xml.messaging.saaj.soap.dynamic</wls:package-name>
         <wls:package-name>com.sun.xml.messaging.saaj.soap.impl</wls:package-name>
         <wls:package-name>jakarta.jws</wls:package-name>
         <wls:package-name>jakarta.jws.soap</wls:package-name>
         <wls:package-name>org.jvnet.staxex</wls:package-name>
         <wls:package-name>org.glassfish.gmbal</wls:package-name>
         <wls:package-name>org.glassfish.gmbal.util</wls:package-name>
         <wls:package-name>org.glassfish.ha.store.criteria</wls:package-name>
         <wls:package-name>org.glassfish.ha.store.criteria.spi</wls:package-name>
         <wls:package-name>org.glassfish.ha.store.api</wls:package-name>
         <wls:package-name>org.glassfish.ha.store.util</wls:package-name>
         <wls:package-name>org.glassfish.ha.store.annotations</wls:package-name>
         <wls:package-name>org.glassfish.ha.store.impl</wls:package-name>
         <wls:package-name>org.glassfish.ha.store.spi</wls:package-name>
         <wls:package-name>jakarta.annotation</wls:package-name>
         <wls:package-name>jakarta.annotation.security</wls:package-name>
         <wls:package-name>jakarta.annotation.sql</wls:package-name>
         <wls:package-name>org.jvnet.mimepull</wls:package-name>
         <wls:package-name>jakarta.xml.ws</wls:package-name>
         <wls:package-name>jakarta.xml.ws.handler</wls:package-name>
         <wls:package-name>jakarta.xml.ws.handler.soap</wls:package-name>
         <wls:package-name>jakarta.xml.ws.http</wls:package-name>
         <wls:package-name>jakarta.xml.ws.soap</wls:package-name>
         <wls:package-name>jakarta.xml.ws.spi</wls:package-name>
         <wls:package-name>jakarta.xml.ws.spi.http</wls:package-name>
         <wls:package-name>jakarta.xml.ws.wsaddressing</wls:package-name>
         <wls:package-name>com.sun.tools.ws.spi</wls:package-name>
         <wls:package-name>com.sun.tools.ws.ant</wls:package-name>
         <wls:package-name>com.sun.tools.ws.api</wls:package-name>
         <wls:package-name>com.sun.tools.ws.api.wsdl</wls:package-name>
         <wls:package-name>com.sun.tools.ws.wsdl.framework</wls:package-name>
         <wls:package-name>com.sun.tools.ws.wsdl.document</wls:package-name>
         <wls:package-name>com.sun.tools.ws.wsdl.document.mime</wls:package-name>
         <wls:package-name>com.sun.tools.ws.wsdl.document.soap</wls:package-name>
         <wls:package-name>com.sun.tools.ws.wsdl.document.http</wls:package-name>
         <wls:package-name>com.sun.tools.ws.wsdl.document.jaxws</wls:package-name>
         <wls:package-name>com.sun.tools.ws.wsdl.document.schema</wls:package-name>
         <wls:package-name>com.sun.tools.ws.wsdl.parser</wls:package-name>
         <wls:package-name>com.sun.tools.ws</wls:package-name>
         <wls:package-name>com.sun.tools.ws.util.xml</wls:package-name>
         <wls:package-name>com.sun.tools.ws.util</wls:package-name>
         <wls:package-name>com.sun.tools.ws.processor</wls:package-name>
         <wls:package-name>com.sun.tools.ws.processor.modeler.wsdl</wls:package-name>
         <wls:package-name>com.sun.tools.ws.processor.modeler</wls:package-name>
         <wls:package-name>com.sun.tools.ws.processor.modeler.annotation</wls:package-name>
         <wls:package-name>com.sun.tools.ws.processor.generator</wls:package-name>
         <wls:package-name>com.sun.tools.ws.processor.util</wls:package-name>
         <wls:package-name>com.sun.tools.ws.processor.model</wls:package-name>
         <wls:package-name>com.sun.tools.ws.processor.model.java</wls:package-name>
         <wls:package-name>com.sun.tools.ws.processor.model.exporter</wls:package-name>
         <wls:package-name>com.sun.tools.ws.processor.model.jaxb</wls:package-name>
         <wls:package-name>com.sun.tools.ws.resources</wls:package-name>
         <wls:package-name>com.sun.tools.ws.wscompile</wls:package-name>
         <wls:package-name>com.sun.tools.ws.wscompile.plugin.at_generated</wls:package-name>
         <wls:package-name>com.sun.tools.xjc</wls:package-name>
         <wls:package-name>com.sun.tools.xjc.api</wls:package-name>
         <wls:package-name>com.sun.tools.xjc.api.util</wls:package-name>
         <wls:package-name>com.sun.tools.xjc.api.impl.s2j</wls:package-name>
         <wls:package-name>com.sun.tools.xjc.reader</wls:package-name>
         <wls:package-name>com.sun.tools.xjc.reader.internalizer</wls:package-name>
         <wls:package-name>com.sun.tools.xjc.reader.dtd</wls:package-name>
         <wls:package-name>com.sun.tools.xjc.reader.dtd.bindinfo</wls:package-name>
         <wls:package-name>com.sun.tools.xjc.reader.relaxng</wls:package-name>
         <wls:package-name>com.sun.tools.xjc.reader.gbind</wls:package-name>
         <wls:package-name>com.sun.tools.xjc.reader.xmlschema</wls:package-name>
         <wls:package-name>com.sun.tools.xjc.reader.xmlschema.bindinfo</wls:package-name>
         <wls:package-name>com.sun.tools.xjc.reader.xmlschema.ct</wls:package-name>
         <wls:package-name>com.sun.tools.xjc.reader.xmlschema.parser</wls:package-name>
         <wls:package-name>com.sun.tools.xjc.outline</wls:package-name>
         <wls:package-name>com.sun.tools.xjc.generator.bean</wls:package-name>
         <wls:package-name>com.sun.tools.xjc.generator.bean.field</wls:package-name>
         <wls:package-name>com.sun.tools.xjc.generator.util</wls:package-name>
         <wls:package-name>com.sun.tools.xjc.generator.annotation.spec</wls:package-name>
         <wls:package-name>com.sun.tools.xjc.util</wls:package-name>
         <wls:package-name>com.sun.tools.xjc.writer</wls:package-name>
         <wls:package-name>com.sun.tools.xjc.runtime</wls:package-name>
         <wls:package-name>com.sun.tools.xjc.addon.sync</wls:package-name>
         <wls:package-name>com.sun.tools.xjc.addon.locator</wls:package-name>
         <wls:package-name>com.sun.tools.xjc.addon.at_generated</wls:package-name>
         <wls:package-name>com.sun.tools.xjc.addon.code_injector</wls:package-name>
         <wls:package-name>com.sun.tools.xjc.addon.accessors</wls:package-name>
         <wls:package-name>com.sun.tools.xjc.addon.episode</wls:package-name>
         <wls:package-name>com.sun.tools.xjc.model</wls:package-name>
         <wls:package-name>com.sun.tools.xjc.model.nav</wls:package-name>
         <wls:package-name>com.sun.xml.xsom.parser</wls:package-name>
         <wls:package-name>com.sun.xml.xsom.util</wls:package-name>
         <wls:package-name>com.sun.xml.xsom.visitor</wls:package-name>
         <wls:package-name>com.sun.xml.xsom.impl.parser</wls:package-name>
         <wls:package-name>com.sun.xml.xsom.impl.parser.state</wls:package-name>
         <wls:package-name>com.sun.xml.xsom.impl</wls:package-name>
         <wls:package-name>com.sun.xml.xsom.impl.scd</wls:package-name>
         <wls:package-name>com.sun.xml.xsom.impl.util</wls:package-name>
         <wls:package-name>com.sun.xml.xsom</wls:package-name>
         <wls:package-name>org.relaxng.datatype</wls:package-name>
         <wls:package-name>org.relaxng.datatype.helpers</wls:package-name>
         <wls:package-name>com.sun.codemodel</wls:package-name>
         <wls:package-name>com.sun.codemodel.writer</wls:package-name>
         <wls:package-name>com.sun.codemodel.util</wls:package-name>
         <wls:package-name>com.sun.codemodel.fmt</wls:package-name>
         <wls:package-name>org.kohsuke.rngom.ast.builder</wls:package-name>
         <wls:package-name>org.kohsuke.rngom.ast.om</wls:package-name>
         <wls:package-name>org.kohsuke.rngom.ast.util</wls:package-name>
         <wls:package-name>org.kohsuke.rngom.binary</wls:package-name>
         <wls:package-name>org.kohsuke.rngom.binary.visitor</wls:package-name>
         <wls:package-name>org.kohsuke.rngom.digested</wls:package-name>
         <wls:package-name>org.kohsuke.rngom.dt.builtin</wls:package-name>
         <wls:package-name>org.kohsuke.rngom.dt</wls:package-name>
         <wls:package-name>org.kohsuke.rngom.nc</wls:package-name>
         <wls:package-name>org.kohsuke.rngom.parse.compact</wls:package-name>
         <wls:package-name>org.kohsuke.rngom.parse</wls:package-name>
         <wls:package-name>org.kohsuke.rngom.parse.host</wls:package-name>
         <wls:package-name>org.kohsuke.rngom.parse.xml</wls:package-name>
         <wls:package-name>org.kohsuke.rngom.util</wls:package-name>
         <wls:package-name>org.kohsuke.rngom.xml.sax</wls:package-name>
         <wls:package-name>org.kohsuke.rngom.xml.util</wls:package-name>
         <wls:package-name>com.sun.xml.dtdparser</wls:package-name>
         <wls:package-name>com.sun.istack.tools</wls:package-name>
         <wls:package-name>org.codehaus.stax2</wls:package-name>
         <wls:package-name>org.codehaus.stax2.evt</wls:package-name>
         <wls:package-name>org.codehaus.stax2.io</wls:package-name>
         <wls:package-name>org.codehaus.stax2.osgi</wls:package-name>
         <wls:package-name>org.codehaus.stax2.ri</wls:package-name>
         <wls:package-name>org.codehaus.stax2.ri.dom</wls:package-name>
         <wls:package-name>org.codehaus.stax2.ri.evt</wls:package-name>
         <wls:package-name>org.codehaus.stax2.ri.typed</wls:package-name>
         <wls:package-name>org.codehaus.stax2.typed</wls:package-name>
         <wls:package-name>org.codehaus.stax2.util</wls:package-name>
         <wls:package-name>org.codehaus.stax2.validation</wls:package-name>
         <wls:package-name>com.sun.tools.jxc</wls:package-name>
         <wls:package-name>com.sun.tools.jxc.api.impl.j2s</wls:package-name>
         <wls:package-name>com.sun.tools.jxc.api</wls:package-name>
         <wls:package-name>com.sun.tools.jxc.ap</wls:package-name>
         <wls:package-name>com.sun.tools.jxc.gen.config</wls:package-name>
         <wls:package-name>com.sun.tools.jxc.model.nav</wls:package-name>
         <wls:package-name>com.sun.xml.ws.policy</wls:package-name>
         <wls:package-name>com.sun.xml.ws.policy.subject</wls:package-name>
         <wls:package-name>com.sun.xml.ws.policy.sourcemodel</wls:package-name>
         <wls:package-name>com.sun.xml.ws.policy.sourcemodel.wspolicy</wls:package-name>
         <wls:package-name>com.sun.xml.ws.policy.sourcemodel.attach</wls:package-name>
         <wls:package-name>com.sun.xml.ws.policy.spi</wls:package-name>
         <wls:package-name>com.sun.xml.ws.policy.privateutil</wls:package-name>
         <wls:package-name>com.ctc.wstx.api</wls:package-name>
         <wls:package-name>com.ctc.wstx.cfg</wls:package-name>
         <wls:package-name>com.ctc.wstx.compat</wls:package-name>
         <wls:package-name>com.ctc.wstx.dom</wls:package-name>
         <wls:package-name>com.ctc.wstx.dtd</wls:package-name>
         <wls:package-name>com.ctc.wstx.ent</wls:package-name>
         <wls:package-name>com.ctc.wstx.evt</wls:package-name>
         <wls:package-name>com.ctc.wstx.exc</wls:package-name>
         <wls:package-name>com.ctc.wstx.io</wls:package-name>
         <wls:package-name>com.ctc.wstx.msv</wls:package-name>
         <wls:package-name>com.ctc.wstx.osgi</wls:package-name>
         <wls:package-name>com.ctc.wstx.sax</wls:package-name>
         <wls:package-name>com.ctc.wstx.sr</wls:package-name>
         <wls:package-name>com.ctc.wstx.stax</wls:package-name>
         <wls:package-name>com.ctc.wstx.sw</wls:package-name>
         <wls:package-name>com.ctc.wstx.util</wls:package-name>
         <wls:package-name>org.glassfish.external.amx</wls:package-name>
         <wls:package-name>org.glassfish.external.probe.provider</wls:package-name>
         <wls:package-name>org.glassfish.external.probe.provider.annotations</wls:package-name>
         <wls:package-name>org.glassfish.external.arc</wls:package-name>
         <wls:package-name>org.glassfish.external.statistics</wls:package-name>
         <wls:package-name>org.glassfish.external.statistics.impl</wls:package-name>
         <wls:package-name>org.glassfish.external.statistics.annotations</wls:package-name>
         <wls:package-name>jakarta.xml.bind.annotation.adapters</wls:package-name>
         <wls:package-name>jakarta.xml.bind.annotation</wls:package-name>
         <wls:package-name>jakarta.xml.bind.attachment</wls:package-name>
         <wls:package-name>jakarta.xml.bind</wls:package-name>
         <wls:package-name>jakarta.xml.bind.helpers</wls:package-name>
         <wls:package-name>jakarta.xml.bind.util</wls:package-name>
         <wls:package-name>com.sun.xml.bind.api</wls:package-name>
         <wls:package-name>com.sun.xml.bind</wls:package-name>
         <wls:package-name>com.sun.xml.bind.util</wls:package-name>
         <wls:package-name>com.sun.xml.bind.v2</wls:package-name>
         <wls:package-name>com.sun.xml.bind.v2.util</wls:package-name>
         <wls:package-name>com.sun.xml.bind.v2.bytecode</wls:package-name>
         <wls:package-name>com.sun.xml.bind.v2.runtime</wls:package-name>
         <wls:package-name>com.sun.xml.bind.v2.runtime.property</wls:package-name>
         <wls:package-name>com.sun.xml.bind.v2.runtime.output</wls:package-name>
         <wls:package-name>com.sun.xml.bind.v2.runtime.reflect</wls:package-name>
         <wls:package-name>com.sun.xml.bind.v2.runtime.reflect.opt</wls:package-name>
         <wls:package-name>com.sun.xml.bind.v2.runtime.unmarshaller</wls:package-name>
         <wls:package-name>com.sun.xml.bind.v2.model.impl</wls:package-name>
         <wls:package-name>com.sun.xml.bind.v2.model.runtime</wls:package-name>
         <wls:package-name>com.sun.xml.bind.v2.model.annotation</wls:package-name>
         <wls:package-name>com.sun.xml.bind.v2.schemagen</wls:package-name>
         <wls:package-name>com.sun.xml.bind.v2.schemagen.xmlschema</wls:package-name>
         <wls:package-name>com.sun.xml.bind.unmarshaller</wls:package-name>
         <wls:package-name>com.sun.xml.bind.marshaller</wls:package-name>
         <wls:package-name>com.sun.xml.stream.buffer</wls:package-name>
         <wls:package-name>com.sun.xml.stream.buffer.sax</wls:package-name>
         <wls:package-name>com.sun.xml.stream.buffer.stax</wls:package-name>
         <wls:package-name>jakarta.xml.soap</wls:package-name>
         <wls:package-name>com.sun.xml.ws.spi</wls:package-name>
         <wls:package-name>com.sun.xml.ws.spi.db</wls:package-name>
         <wls:package-name>com.sun.xml.ws.addressing</wls:package-name>
         <wls:package-name>com.sun.xml.ws.addressing.v200408</wls:package-name>
         <wls:package-name>com.sun.xml.ws.addressing.policy</wls:package-name>
         <wls:package-name>com.sun.xml.ws.addressing.model</wls:package-name>
         <wls:package-name>com.sun.xml.ws.org.objectweb.asm</wls:package-name>
         <wls:package-name>com.sun.xml.ws.api</wls:package-name>
         <wls:package-name>com.sun.xml.ws.api.addressing</wls:package-name>
         <wls:package-name>com.sun.xml.ws.api.streaming</wls:package-name>
         <wls:package-name>com.sun.xml.ws.api.client</wls:package-name>
         <wls:package-name>com.sun.xml.ws.api.fastinfoset</wls:package-name>
         <wls:package-name>com.sun.xml.ws.api.wsdl.writer</wls:package-name>
         <wls:package-name>com.sun.xml.ws.api.wsdl.parser</wls:package-name>
         <wls:package-name>com.sun.xml.ws.api.policy.subject</wls:package-name>
         <wls:package-name>com.sun.xml.ws.api.policy</wls:package-name>
         <wls:package-name>com.sun.xml.ws.api.pipe</wls:package-name>
         <wls:package-name>com.sun.xml.ws.api.pipe.helper</wls:package-name>
         <wls:package-name>com.sun.xml.ws.api.handler</wls:package-name>
         <wls:package-name>com.sun.xml.ws.api.databinding</wls:package-name>
         <wls:package-name>com.sun.xml.ws.api.ha</wls:package-name>
         <wls:package-name>com.sun.xml.ws.api.config.management.policy</wls:package-name>
         <wls:package-name>com.sun.xml.ws.api.config.management</wls:package-name>
         <wls:package-name>com.sun.xml.ws.api.server</wls:package-name>
         <wls:package-name>com.sun.xml.ws.api.message</wls:package-name>
         <wls:package-name>com.sun.xml.ws.api.message.saaj</wls:package-name>
         <wls:package-name>com.sun.xml.ws.api.message.stream</wls:package-name>
         <wls:package-name>com.sun.xml.ws.api.model.soap</wls:package-name>
         <wls:package-name>com.sun.xml.ws.api.model.wsdl</wls:package-name>
         <wls:package-name>com.sun.xml.ws.api.model</wls:package-name>
         <wls:package-name>com.sun.xml.ws.streaming</wls:package-name>
         <wls:package-name>com.sun.xml.ws.client</wls:package-name>
         <wls:package-name>com.sun.xml.ws.client.dispatch</wls:package-name>
         <wls:package-name>com.sun.xml.ws.client.sei</wls:package-name>
         <wls:package-name>com.sun.xml.ws.binding</wls:package-name>
         <wls:package-name>com.sun.xml.ws.fault</wls:package-name>
         <wls:package-name>com.sun.xml.ws.wsdl</wls:package-name>
         <wls:package-name>com.sun.xml.ws.wsdl.writer</wls:package-name>
         <wls:package-name>com.sun.xml.ws.wsdl.writer.document</wls:package-name>
         <wls:package-name>com.sun.xml.ws.wsdl.writer.document.soap12</wls:package-name>
         <wls:package-name>com.sun.xml.ws.wsdl.writer.document.soap</wls:package-name>
         <wls:package-name>com.sun.xml.ws.wsdl.writer.document.http</wls:package-name>
         <wls:package-name>com.sun.xml.ws.wsdl.writer.document.xsd</wls:package-name>
         <wls:package-name>com.sun.xml.ws.wsdl.parser</wls:package-name>
         <wls:package-name>com.sun.xml.ws.assembler</wls:package-name>
         <wls:package-name>com.sun.xml.ws.assembler.dev</wls:package-name>
         <wls:package-name>com.sun.xml.ws.assembler.jaxws</wls:package-name>
         <wls:package-name>com.sun.xml.ws.developer</wls:package-name>
         <wls:package-name>com.sun.xml.ws</wls:package-name>
         <wls:package-name>com.sun.xml.ws.policy.jaxws.spi</wls:package-name>
         <wls:package-name>com.sun.xml.ws.policy.jaxws</wls:package-name>
         <wls:package-name>com.sun.xml.ws.util</wls:package-name>
         <wls:package-name>com.sun.xml.ws.util.xml</wls:package-name>
         <wls:package-name>com.sun.xml.ws.util.exception</wls:package-name>
         <wls:package-name>com.sun.xml.ws.util.pipe</wls:package-name>
         <wls:package-name>com.sun.xml.ws.handler</wls:package-name>
         <wls:package-name>com.sun.xml.ws.runtime.config</wls:package-name>
         <wls:package-name>com.sun.xml.ws.config.management.policy</wls:package-name>
         <wls:package-name>com.sun.xml.ws.config.metro.dev</wls:package-name>
         <wls:package-name>com.sun.xml.ws.config.metro.util</wls:package-name>
         <wls:package-name>com.sun.xml.ws.server</wls:package-name>
         <wls:package-name>com.sun.xml.ws.server.sei</wls:package-name>
         <wls:package-name>com.sun.xml.ws.server.provider</wls:package-name>
         <wls:package-name>com.sun.xml.ws.dump</wls:package-name>
         <wls:package-name>com.sun.xml.ws.db</wls:package-name>
         <wls:package-name>com.sun.xml.ws.db.glassfish</wls:package-name>
         <wls:package-name>com.sun.xml.ws.message</wls:package-name>
         <wls:package-name>com.sun.xml.ws.message.source</wls:package-name>
         <wls:package-name>com.sun.xml.ws.message.saaj</wls:package-name>
         <wls:package-name>com.sun.xml.ws.message.jaxb</wls:package-name>
         <wls:package-name>com.sun.xml.ws.message.stream</wls:package-name>
         <wls:package-name>com.sun.xml.ws.model</wls:package-name>
         <wls:package-name>com.sun.xml.ws.model.soap</wls:package-name>
         <wls:package-name>com.sun.xml.ws.model.wsdl</wls:package-name>
         <wls:package-name>com.sun.xml.ws.commons.xmlutil</wls:package-name>
         <wls:package-name>com.sun.xml.ws.transport</wls:package-name>
         <wls:package-name>com.sun.xml.ws.transport.http</wls:package-name>
         <wls:package-name>com.sun.xml.ws.transport.http.client</wls:package-name>
         <wls:package-name>com.sun.xml.ws.transport.http.server</wls:package-name>
         <wls:package-name>com.sun.xml.ws.resources</wls:package-name>
         <wls:package-name>com.sun.xml.ws.protocol.xml</wls:package-name>
         <wls:package-name>com.sun.xml.ws.protocol.soap</wls:package-name>
         <wls:package-name>com.sun.xml.ws.encoding</wls:package-name>
         <wls:package-name>com.sun.xml.ws.encoding.xml</wls:package-name>
         <wls:package-name>com.sun.xml.ws.encoding.soap.streaming</wls:package-name>
         <wls:package-name>com.sun.xml.ws.encoding.soap</wls:package-name>
         <wls:package-name>com.sun.xml.ws.encoding.policy</wls:package-name>
         <wls:package-name>com.oracle.xmlns.webservices.jaxws_databinding</wls:package-name>
         <wls:package-name>com.oracle.webservices.api</wls:package-name>
         <wls:package-name>com.oracle.webservices.api.databinding</wls:package-name>
         <wls:package-name>com.oracle.webservices.api.message</wls:package-name>
         <wls:package-name>com.oracle.webservices.impl.internalspi.encoding</wls:package-name>
         <wls:package-name>com.oracle.webservices.impl.encoding</wls:package-name>
         <wls:package-name>com.sun.xml.ws.encoding.fastinfoset</wls:package-name>
         <wls:package-name>com.sun.xml.ws.transport.httpspi.servlet</wls:package-name>
         <wls:package-name>com.sun.xml.ws.developer.servlet</wls:package-name>
         <wls:package-name>com.sun.xml.ws.server.servlet</wls:package-name>
         <wls:package-name>com.sun.xml.ws.transport.http.servlet</wls:package-name>
         <wls:package-name>com.sun.xml.bind.api.impl</wls:package-name>
         <wls:package-name>com.sun.xml.bind.v2.model.core</wls:package-name>
         <wls:package-name>com.sun.xml.bind.v2.model.util</wls:package-name>
         <wls:package-name>com.sun.xml.bind.v2.model.nav</wls:package-name>
         <wls:package-name>com.sun.xml.bind.v2.schemagen.episode</wls:package-name>
         <wls:package-name>com.sun.xml.bind.annotation</wls:package-name>
         <wls:package-name>com.sun.istack.localization</wls:package-name>
         <wls:package-name>com.sun.istack</wls:package-name>
         <wls:package-name>com.sun.istack.logging</wls:package-name>
         <wls:package-name>com.sun.xml.txw2</wls:package-name>
         <wls:package-name>com.sun.xml.txw2.output</wls:package-name>
         <wls:package-name>com.sun.xml.txw2.annotation</wls:package-name>
    
        </prefer-application-packages>
         <wls:prefer-application-resources>
          <wls:resource-name>META-INF/services/javax.xml.stream.*</wls:resource-name>
          <wls:resource-name>META-INF/services/jakarta.xml.ws.*</wls:resource-name>
          <wls:resource-name>META-INF/services/jakarta.xml.bind.*</wls:resource-name>
          <wls:resource-name>META-INF/services/jakarta.xml.soap.*</wls:resource-name>
          <wls:resource-name>META-INF/services/com.sun.xml.ws.*</wls:resource-name>
          <wls:resource-name>META-INF/services/com.sun.tools.ws.*</wls:resource-name>
          <wls:resource-name>META-INF/services/com.sun.tools.xjc.*</wls:resource-name>
          <wls:resource-name>META-INF/services/com.oracle.webservices.*</wls:resource-name>
          <wls:resource-name>META-INF/services/org.relxng.*</wls:resource-name>
          <wls:resource-name>com.sun.xml.fastinfoset.resources.*</wls:resource-name>
          <wls:resource-name>com.sun.xml.messaging.saaj.util.*</wls:resource-name>
          <wls:resource-name>com.sun.xml.messaging.saaj.client.p2p.*</wls:resource-name>
          <wls:resource-name>com.sun.xml.messaging.saaj.soap.*</wls:resource-name>
          <wls:resource-name>com.sun.tools.ws.*</wls:resource-name>
          <wls:resource-name>com.sun.tools.xjc.*</wls:resource-name>
          <wls:resource-name>com.sun.xml.xsom.*</wls:resource-name>
          <wls:resource-name>com.sun.xml.xsom.impl.parser.*</wls:resource-name>
          <wls:resource-name>com.sun.tools.jxc.*</wls:resource-name>
          <wls:resource-name>com.sun.xml.ws.policy.privateutil.*</wls:resource-name>
          <wls:resource-name>jakarta.xml.bind.*</wls:resource-name>
          <wls:resource-name>com.sun.xml.bind.api.*</wls:resource-name>
          <wls:resource-name>com.sun.xml.bind.v2.runtime.*</wls:resource-name>
          <wls:resource-name>com.sun.xml.bind.v2.model.impl.*</wls:resource-name>
          <wls:resource-name>com.sun.xml.bind.v2.model.annotation.*</wls:resource-name>
          <wls:resource-name>com.sun.xml.bind.v2.schemagen.*</wls:resource-name>
          <wls:resource-name>com.sun.xml.bind.unmarshaller.*</wls:resource-name>
          <wls:resource-name>com.sun.xml.ws.util.*</wls:resource-name>
          <wls:resource-name>com.sun.xml.ws.resources.*</wls:resource-name>
          <wls:resource-name>com.sun.xml.bind.v2.*</wls:resource-name>
          <wls:resource-name>com.sun.xml.bind.marshaller.*</wls:resource-name>
          <wls:resource-name>complexType.rng</wls:resource-name>
          <wls:resource-name>element.rng</wls:resource-name>
          <wls:resource-name>simpleType.rng</wls:resource-name>
          <wls:resource-name>modelGroup.rng</wls:resource-name>
          <wls:resource-name>xmlschema.rng</wls:resource-name>
          <wls:resource-name>attribute.rng</wls:resource-name>
          <wls:resource-name>include.rng</wls:resource-name>
        </wls:prefer-application-resources>
    
    
    </wls:weblogic-application>
  4. Make sure the webservices-*.jar files are placed in the APP-INF/lib directory.

  5. Make sure any Metro classes you are overriding are placed in the APP-INF/classes directory.

  6. Here is the directory structure of the WAR file:

    • META-INF/

    • META-INF/MANIFEST.MF

    • WEB-INF/

    • WEB-INF/web.xml

    • WEB-INF/sun-jaxws.xml

    • WEB-INF/weblogic.xml

    • WEB-INF/metro.xml

    • WEB-INF/wsdl/

    • WEB-INF/wsdl/AddNumbers.wsdl

    • WEB-INF/classes/

    • WEB-INF/classes/*

  7. Include a WEB-INF\weblogic.xml file with the prefer-web-inf-classes entry to override the System class loader classes with the ones in the WEB-INF\lib directory:

    <?xml version="1.0" encoding="UTF-8"?>
    <weblogic-web-app xmlns="http://www.bea.com/ns/weblogic/90">
        <container-descriptor>
            <prefer-web-inf-classes>true</prefer-web-inf-classes>
        </container-descriptor>
    </weblogic-web-app>

2.8.1.1. Known Issues

  1. Make sure any Oneway methods / operations in your service implementation class have the @Oneway annotation in order to avoid this NullPointerException:

    com.sun.xml.ws.transport.http.servlet.WSServletContextListener contextInitialized
         SEVERE: WSSERVLET11: failed to parse runtime descriptor:
    java.lang.NullPointerException
         java.lang.NullPointerException
             at com.sun.xml.ws.model.JavaMethodImpl.freeze(JavaMethodImpl.java:375)
             at com.sun.xml.ws.model.AbstractSEIModelImpl.freeze(AbstractSEIModelImpl

2.9. Developing client application with locally packaged WSDL

In the JAX-WS programming model, to develop a web services client you compile the deployed WSDL using wsimport and then at runtime the same WSDL is used to determine binding information. The default WSDL used can be determined by looking in the jakarta.xml.ws.Service subclass generated by wsimport. You can choose another location (network or local file directory) for the WSDL other than the one you used wsimport with, for example if you do not want runtime accesses of the WSDL to go over the network or if you want to edit a copy of the WSDL to work around some bug (dangerous but we do it sometimes).

There are the different ways in which you can provide the local WSDL information to the JAX-WS runtime:

2.9.1. Service API to pass the WSDL information

Example 2.28. Sample service creation using local WSDL

URL baseUrl = client.MtomService.class.getResource(".");
URL url = new URL(baseUrl, "../Soap11MtomUtf8.svc.xml");
MtomService service = new MtomService(url, new QName("http://tempuri.org/", "MtomService"));
IMtomTest proxy = service.getBasicHttpBindingIMtomTest();
String input="Hello World";
byte[] response = proxy.echoStringAsBinary(input);

2.9.2. Xml Catalog

  • Create a catalog file

  • META-INF/jax-ws-catalog.xml

    Example 2.29. jax-ws-catalog.xml

    <catalog xmlns="urn:oasis:names:tc:entity:xmlns:xml:catalog" prefer="system">
        <system systemId="http://131.107.72.15/MTOM_Service_Indigo/Soap11MtomUtf8.svc?wsdl"
                uri="Soap11MtomUtf8.svc.xml"/>
    </catalog>


  • For details see the details on using catalog scheme

This works well but requires some work, such as composing the right catalog file then package it appropriately.

2.9.3. Using -wsdlLocation switch

There is another easy way to do it - just run wsimport with -wsdlLocation switch and provide the WSDL location value which is relative to the generated Service class and provide the WSDL location value which is relative to the generated Service class and you need to put this WSDL file at this relative location.

Let us try to create a client for the NET 3.0 MTOM endpoint. I am using Metro 1.0.

First I save the .NET 3.0 MTOM WSDL locally then run wsimport giving the relative location to where you will package the wsdl with your application

Example 2.30. Sample wsimport command

wsimport -keep -d build/classes -p client etc/Soap11MtomUtf8.svc.xml -wsdlLocation ../Soap11MtomUtf8.svc.xml

Note

Why is the relative location is ../Soap11MtomUtf8.svc.xml? Basically the generated Service will be at build/classes/client location and I would copy this WSDL at build/classes, see option -d and -p.

Here is excerpt from the generated MtomService class. You can see how the wsdlLocation value is generated inside it and is used internally to create the Service.

Example 2.31. MtomService.java

/**
 * This class was generated by the JAX-WS RI.
 * JAX-WS RI 2.1.2-hudson-53-SNAPSHOT
 * Generated source version: 2.1
 */
@WebServiceClient(name = "MtomService",
        targetNamespace = "http://tempuri.org/",
        "../Soap11MtomUtf8.svc.xml")
public class MtomService extends Service {

    private final static URL MTOMSERVICE_WSDL_LOCATION;
    private final static Logger logger = Logger.getLogger(client
            .MtomService.class.getName());

    static {
        URLurl = null;
        try {
            URLbaseUrl;

            baseUrl = client.MtomService.class.getResource(".");
            url = new URL(baseUrl, "../Soap11MtomUtf8.svc.xml");
        } catch (MalformedURLException e) {
            logger.warning("Failed to create URL for the wsdl Location: ." +
                    "./Soap11MtomUtf8.svc.xml");
            logger.warning(e.getMessage());
        }
        MTOMSERVICE_WSDL_LOCATION = url;
    }

    public MtomService() {
        super(MTOMSERVICE_WSDL_LOCATION,
                new QName("http://tempuri.org/", "MtomService"));
    }

    ...
    

See Client.java below it invokes the .NET 3.0 service. You may notice here that you dont need to enable MTOM explicitly. Metro bring in .NET 3.0 interop thru WSIT and due to this the MTOM policy assertions in the .NET 3.0 WSDL, it correctly interpreted and the IMtomTest port is configured with MTOM enabled.

Example 2.32. MtomService.java

package client;

import com.sun.xml.ws.transport.http.client.HttpTransportPipe;

/**
 * Client that invokes .NET 3.0 MTOM endpoint using a local wsdl
 */
public class Client {

    public static void main(String[] args) {

        //enble SOAP Message logging
        HttpTransportPipe.dump = true;

        //Create IMtomTest proxy to invoke .NET 3.0 MTOM service
        IMtomTest proxy = new MtomService().getBasicHttpBindingIMtomTest();
        String input = "Hello World";
        byte[] response = proxy.echoStringAsBinary(input);
        System.out.println("Sent: " + input + ", Received: " + new String
                (response));
    }
}

Get the complete client bundle from here and see the enclosed Readme.txt for instructions on how to run it.

2.10. How to invoke and endpoint by overriding endpoint address in the WSDL

Often times there is need to override the endpoint address that is obtained from the WSDL referenced by the generated Service class. This is how you can do this:

2.10.1. BindingProvider.ENDPOINT_ADDRESS_PROPERTY

You can use BindingProvider.ENDPOINT_ADDRESS_PROPERTY to set the endpoint address in your client application code.

Example 2.33. Sample

//Create service and proxy from the generated Service class.
HelloService service = new HelloService();
HelloPort proxy = service.getHelloPort();

((BindingProvider) proxy).getRequestContext().put(BindingProvider
        .ENDPOINT_ADDRESS_PROPERTY, "http://new/endpointaddress");

proxy.sayHello("Hello World!");           

2.10.2. Create Service using updated WSDL

In case you have access to the updated WSDL which has the right endpoint address, you can simply create the Service using this WSDL and there will be no need to set the BindingProvider.ENDPOINT_ADDRESS property.

Note

This updated WSDL must have the same wsdl:service and wsdl:port as in the original wsdl. Otherwise you may get an error while creating the Service or Port.

Example 2.34. Sample

//Create service and proxy from the generated Service class.
HelloService service = new HelloService(serviceName,
        "http://new/endpointaddress?wsdl");
HelloPort proxy = service.getHelloPort();

proxy.sayHello("Hello World!");

2.11. Maintaining State in Web Services

These articles provide details on maintaing state with Eclipse Implementation of Jakarta XML Web Services.

2.12. FastInfoset

The Fast Infoset specification (ITU-T Rec. X.891 | ISO/IEC 24824-1) describes an open, standards-based "binary XML" format that is based on the XML Information Set. Metro supports this optimized encoding implementation. For ease of deployment, Eclipse Implementation of Jakarta XML Web Services also support a form of HTTP content negotiation that can be used to turn on Fast Infoset during message exchanges. By default, the Fast Infoset encoding is turned off. For more information on how to use this feature see the following section.

The XML Information Set specifies the result of parsing an XML document, referred to as an XML infoset (or simply an infoset), and a glossary of terms to identify infoset components, referred to as information items and properties. An XML infoset is an abstract model of the information stored in an XML document; it establishes a separation between data and information in a way that suits most common uses of XML. In fact, several of the concrete XML data models are defined by referring to XML infoset items and their properties. For example, SOAP Version 1.2 makes use of this abstraction to define the information in a SOAP message without ever referring to XML 1.X, and the SOAP HTTP binding specifically allows for alternative media types that "provide for at least the transfer of the SOAP XML Infoset".

The Fast Infoset specification is jointly standardized at the ITU-T and ISO. The specification is available to all ITU-T sector members and can also be obtained via the corresponding ISO national body in your location. These specifications recommend the use of the MIME type application/fastinfoset, which has been approved by the Internet Engineering Steering Group (IESG) for documents serialized using this format.

FI is an open-source project initiated by Sun Microsystems to provide access to a fast, fully-featured and robust implementation of the Fast Infoset specification. Metro employs the basic Fast Infoset parsers and serializers available from that project.

2.12.1. Using FastInfoset

Content negotiation is completely driven by the client and uses the standard HTTP headers Accept and Content-Type. The initial request is always encoded in XML, but the client has the option of including the MIME type application/fastinfoset as part of the HTTP Accept header list. If the request is received by a Fast Infoset-enabled service, the reply will be encoded in Fast Infoset. The remainder of the conversation between the client and the service will also be encoded in Fast Infoset as long as the client continues to use the same client object (e.g., the same stub instance) to converse with the server. We call this form of negotiation pessimistic, in contrast to the optimistic case in which a client directly initiates a message exchange using the more efficient encoding.

Content negotiation can be enabled in two different ways: (i) by setting a system property on the VM used to run the client, and (ii) by setting a property on the proxy object. In either case, both the property name and its value are identical. For Eclipse Metro, the name of the property is com.sun.xml.ws.client.ContentNegotiation. In either case, the accepted property values are none (the default) and pessimistic, optimistic. Note that due to JDK repackaging, if you are using JAX-WS implementation directly from JDK you need to use this property name: com.sun.xml.internal.ws.client.ContentNegotiation.

Example 2.35. Enabling FastInfoset by configuring proxy

// Enabling FI in pessimistic mode
Map<String, Object> ctxt = ((BindingProvider)proxy).getRequestContext();
ctxt.put("com.sun.xml.ws.client.ContentNegotiation", "pessimistic");

java -Dcom.sun.xml.ws.client.ContentNegotiation=pessimistic ...

2.13. High Availability Support in Metro

Starting with the Metro 2.1 release Metro officially supports deployment in clustered environment configurations including the support for stateful Metro features, namely Reliable Messaging (see High Availability Support in Reliable Messaging for limitations), Secure Conversation, Security NONCE Manager and Stateful Web Services. Currently this support is tested with and limited to the GlassFish Application Server.

Clustering support in Metro is automatic, which means that once configured and enabled in the container, there is no extra configuration required on the Metro side to enable Metro High Availability support. The GlassFish Metro Glue Module that is responsible for Metro - GlassFish integration does all the necessary configuration automatically during the Metro module initialization by injecting the required configuration information into the Metro runtime using a private API contract.

For more information on configuring Clustering environment in GlassFish, please consult the GlassFish Application Server User Guide or watch this very comprehensible basic screencast or another a more recent screen cast available at The GlassFish YouTube Channel.

Chapter 3. Compiling WSDL

3.1. Compiling multiple WSDLs that share a common schema

Occasionally, a server will expose multiple services that share common schema types. Perhaps the "common schema types" are from an industry-standard schema, or perhaps the server was developed by a Java-first web service toolkit and the services all use the same Java classes as parameter/return values. When compiling such a WSDL, it's desirable for the shared portion to produce the same Java classes to avoid duplicates. There are two ways to do this.

The easy way is for you to compile all the WSDLs into the same package:

$ wsimport -p org.acme.foo first.wsdl
$ wsimport -p org.acme.foo second.wsdl

The Java classes that correspond to the common part will be overwritten multiple times, but since they are identical, in the end this will produce the desired result. If the common part is separated into its own namespace, you can use a Jakarta XML Binding customization so that the common part will go to the overwritten package while everything else will get its own package.

$ cat common.jaxb
<bindings xmlns="https://jakarta.ee/xml/ns/jaxb" version="3.0">
  <bindings scd="x-schema::tns" xmlns:tns="http://common.schema.ns/">
    <schemaBindings>
      <package name="org.acme.foo.common" />
    </schemaBindings>
  </bindings>
</bindings>
$ wsimport -p org.acme.foo.first  first.wsdl  -b common.jaxb
$ wsimport -p org.acme.foo.second second.wsdl -b common.jaxb

You can also compile the schema upfront by xjc, then use its episode file when later invoking wsimport. For this to work, the common schema needs to have a URL that you can pass into xjc. If the schema is inlined inside the WSDL, you'll have to pull it out into a separate file.

$ xjc -episode common.episode common.xsd
$ wsimport wsdl-that-uses-common-schema.wsdl -b common.episode

This will cause wsimport to refer to classes that are generated from XJC earlier.

For more discussion on this, please see this forum thread.

3.2. Dealing with schemas that are not referenced

Because of ambiguity in the XML Schema spec, some WSDLs are published that reference other schemas without specifying their locations. This happens most commonly with the reference to the schema for XML Schema, like this:

Example 3.1. Location-less reference to a schema

<!-- notice there's no schemaLocation attribute -->
<xs:import namespace="http://www.w3.org/2001/XMLSchema" />

When you run wsimport with such a schema, this is what happens:

$ wsimport  SecureConversation.wsdl
[ERROR] undefined element declaration 'xs:schema'
line 1 of http://131.107.72.15/Security_WsSecurity_Service_Indigo/WSSecureConversation.svc?xsd=xsd0

To fix this, two things need to be done:

  1. Run wsimport with the -b option and pass the URL/path of the actual schema (in the case of XML Schema, it's here. This is to provide the real resolvable schema for the missing schema.

  2. For the schema for Schema, potential name conflicts may arise. This was discussed here at length and a Jakarta XML Binding customization has been created to resolve such conflicts.

So your wsimport command will be:

$ wsimport -b  http://www.w3.org/2001/XMLSchema.xsd  -b  customization.xjb  SecureConversation.wsdl

You can do the same with NetBeans 5.5.1 by providing local copies of these schema and customization files. If you are facing this issue try it and let us know if you have any problems.

3.3. Customizing XML Schema binding

3.3.1. How to get simple and better typed binding

wsimport internally uses XJC tool from Eclipse Implementation of JAXB to achive XML Schema to Java binding. The default behaviour is strictly as per Jakarta XML Binding specification. However it does not work for everyone, for example if you want to map xs:anyURI to java.net.URI instead of java.lang.String (default mapping).

There is a Jakarta XML Binding global customization that can help you achieve these tasks:

  • Eliminating JAXBElements as much as possible

  • Giving you a better, more typed binding in general

  • Using plural property names where applicable

<?xml version="1.0" encoding="UTF-8"?>
<jaxb:bindings
  xmlns:jaxb="https://jakarta.ee/xml/ns/jaxb" jaxb:version="3.0"
  xmlns:xjc= "http://java.sun.com/xml/ns/jaxb/xjc" jaxb:extensionBindingPrefixes="xjc">

  <jaxb:globalBindings>
    <xjc:simple />
  </jaxb:globalBindings>
</jaxb:bindings>

Then simply run your wsimport and pass this binding customization file

wsimport -p mypackage -keep -b simple.xjb myservice.wsdl

See Kohsuke's blog for more details.

3.4. Generating Javadocs from WSDL documentation

wsimport can map the documentation inside the WSDL that can map as corresponding Javadoc on the generated classes. The documentation inside the WSDL should be done using standard WSDL 1.1 element: <wsdl:documentation>.

It is important to note that not everythign in the WSDL maps to Java class, the table below shows wsdl:documentation to Javadoc mapping for various WSDL compoenents that correspond to the generated Java class.

Table 3.1. wsdl:documentation to Javadoc mapping

WSDL documentation (wsdl:documentation)Javadoc
wsdl:portTypeAs a Javadoc on the generated Service Endpoint Interface (SEI) class
wsdl:portType/wsdl:operationAs a Javadoc on the corresponding method of the generated SEI class
wsdl:serviceAs a Javadoc on the generated Service class
wsdl:service/wsdlportAs a Javadoc on the generated getXYZPort() methods of the Service class

Let us see a sample wsdl with documentation and the generated Java classes:

Example 3.2. WSDL with documentation

<wsdl:portType name="HelloWorld">
   <wsdl:documentation>This is a simple HelloWorld service.
   </wsdl:documentation>
   <wsdl:operation name="echo">
      <wsdl:documentation>This operation simply echoes back whatever it
         receives
      </wsdl:documentation>
      <wsdl:input message="tns:echoRequest"/>
      <wsdl:output message="tns:echoResponse"/>
   </wsdl:operation>
</wsdl:portType>

<service name="HelloService">
   <wsdl:documentation>This is a simple HelloWorld service.
   </wsdl:documentation>
   <port name="HelloWorldPort" binding="tns:HelloWorldBinding">
      <wsdl:documentation>A SOAP 1.1 port</wsdl:documentation>
      <soap:address location="http://localhost/HelloService"/>
   </port>
</service>

In the above WSDL the documentation is mentioned using standard WSDL 1.1 element: <wsdl:documentation>. Running wsimport on this will generate Javadoc on the SEI and Service class.

Example 3.3. Generated SEI - HellowWorld.java

/**
 * This is a simple HelloWorld service.
 *
 * This class was generated by the JAX-WS RI.
 * JAX-WS RI 2.1.3-11/27/2007 02:44 PM(vivekp)-
 * Generated source version: 2.1
 *
 */
@WebService(name = "HelloWorld",
        targetNamespace = "http://example.com/wsdl")
@XmlSeeAlso({
        ObjectFactory.class
})
public interface HelloWorld {


    /**
     * This operation simply echoes back whatever it receives
     *
     * @param reqInfo
     * @return
     *     returns java.lang.String
     */
    @WebMethod
    @WebResult(name = "respInfo",
            targetNamespace = "http://example.com/types")
    @RequestWrapper(localName = "echo",
            targetNamespace = "http://example.com/types",
            className = "sample.EchoType")
    @ResponseWrapper(localName = "echoResponse",
            targetNamespace = "http://example.com/types",
            className = "sample.EchoResponseType")
    public String echo(
            @WebParam(name = "reqInfo",
                    targetNamespace = "http://example.com/types")
            String reqInfo);

}

Example 3.4. Generated Service class HelloWorldService.java

/**
 * This is a simple HelloWorld service.
 *
 * This class was generated by the JAX-WS RI.
 * JAX-WS RI 2.1.3-11/27/2007 02:44 PM(vivekp)-
 * Generated source version: 2.1
 *
 */
@WebServiceClient(name = "HelloService",
        targetNamespace = "http://example.com/wsdl",
        wsdlLocation = "file:/C:/issues/wsdl/sample.wsdl")
public class HelloService
        extends Service
{

    private final static URL HELLOSERVICE_WSDL_LOCATION;
    private final static Logger logger =
            Logger.getLogger(sample.HelloService.class.getName());

    static {
        URL url = null;
        try {
            URL baseUrl;
            baseUrl = sample.HelloService.class.getResource(".");
            url = new URL(baseUrl, "file:/C:/issues/wsdl/sample.wsdl");
        } catch (MalformedURLException e) {
            logger.warning("Failed to create URL for the wsdl Location: " +
                    "'file:/C:/issues/wsdl/sample.wsdl', " +
                    "retrying as a local file");
            logger.warning(e.getMessage());
        }
        HELLOSERVICE_WSDL_LOCATION = url;
    }

    public HelloService(URL wsdlLocation, QName serviceName) {
        super(wsdlLocation, serviceName);
    }

    public HelloService() {
        super(HELLOSERVICE_WSDL_LOCATION,
                new QName("http://example.com/wsdl", "HelloService"));
    }

    /**
     * A SOAP 1.1 port
     *
     * @return
     *     returns HelloWorld
     */
    @WebEndpoint(name = "HelloWorldPort")
    public HelloWorld getHelloWorldPort() {
        return super.getPort(
                new QName("http://example.com/wsdl", "HelloWorldPort"),
                HelloWorld.class);
    }

3.5. Passing Java Compiler options to Wsimport

wsimport invokes Javac to compile the generated classes. There is no option currently to pass any options to the compiler. You can use -Xnocompile option of wsimport to not compile the generated classes. But, this would require you to compile the generated sources separately in your project.

Note

This would be useful, if you are developing the Web service/Client on JDK 6 and you want to deploy it on JDK 5. Since there is no option to pass Javac tool option "-target 1.5" directly, you can use -Xnocompile option of wsimport and further compile it yourself.

Chapter 4. SOAP

4.1. SOAP headers

When the WSDL you are compiling specifies that some parts of a message are bound to SOAP headers, wsimport generates the right stuff (@WebParam (header=true)), so you can pass headers as arguments to the method invocation. When starting from Java, you can use this same annotation to indicate that some parameters be sent as headers.

That said, there are many WSDLs out there that do not specify SOAP headers explicitly, yet the protocol still requires such headers to be sent, so the Eclipse Implementation of Jakarta XML Web Services offers convenient ways for you to send/receive additional headers at runtime.

4.1.1. Adding SOAP headers when sending requests

The portable way of doing this is that you create a SOAPHandler and mess with Jakarta SOAP with Attachments, but the Eclipse Implementation of Jakarta XML Web Services provides a better way of doing this.

When you create a proxy or dispatch object, they implement BindingProvider interface. When you use the Eclipse Implementation of Jakarta XML Web Services, you can downcast to WSBindingProvider which defines a few more methods provided only by the Eclipse Implementation of Jakarta XML Web Services.

This interface lets you set an arbitrary number of Header object, each representing a SOAP header. You can implement it on your own if you want, but most likely you'd use one of the factory methods defined on Headers class to create one.

Example 4.1. Adding custom headers

import com.sun.xml.ws.developer.WSBindingProvider;

HelloPort port = helloService.getHelloPort();  // or something like that...
WSBindingProvider bp = (WSBindingProvider) port;

bp.setOutboundHeader(
        // simple string value as a header, 
        // like <simpleHeader>stringValue</simpleHeader>
        Headers.create(new QName("simpleHeader"), "stringValue"),
        // create a header from JAXB object
        Headers.create(jaxbContext, myJaxbObject)
);

Once set, it will take effect on all the successive methods. If you'd like to see more factory methods on Headers, please let us know.

4.1.2. Accessing SOAP headers for incoming messages

Server can access all the SOAP headers of the incoming messages by using the JAXWSProperties#INBOUND_HEADER_LIST_PROPERTY property like this:

Example 4.2. Accessing incoming headers

@WebService
public class FooService {
    @Resource
    WebServiceContext context;

    @WebMethod
    public void sayHelloTo(String name) {
        HeaderList hl = context.getMessageContext().get(JAXWSProperties
                .INBOUND_HEADER_LIST_PROPERTY);
        Header h = hl.get(MYHEADER);
    }

    private static final QName MYHEADER = new QName("myNsUri", "myHeader");
}

Clients can similarly access all the SOAP headers of the incoming messages:

Example 4.3. Accessing incoming headers

HelloPort port = helloService.getHelloPort();  // or something like that...
port.sayHelloTo("duke");
HeaderList hl = port.getResponseContext().get(JAXWSProperties
        .INBOUND_HEADER_LIST_PROPERTY);
Header h = hl.get(MYHEADER);

See the Header interface for more details about how to access the header values.

4.1.3. Adding SOAP headers when sending replies

Servers tend to be developed "from-Java" style, so we feel the necessity of adding out-of-band headers is smaller (you can just define headers as method @WebParam(mode=OUT,header=true) parameters.) Therefore, currently there's no support for adding out-of-band SOAP headers into response messages.

If you'd like us to improve on this front, please let us know.

4.1.4. Mapping additional WSDL headers to method parameters

Sometimes WSDLs in the binding section reference soap:header messages that are not part of the input or output contract defined in the portType operation. For example:

Example 4.4. Sample WSDL with additional header bindings

<message name="additionalHeader">
   <part name="additionalHeader" element="types:additionalHeader"/>
</message>

<wsdl:portType name="HelloPortType">
   <wsdl:operation name="echo">
      <wsdl:input message="tns:echoRequest"/>
      <wsdl:output message="tns:echoResponse"/>
   </wsdl:operation>
</wsdl:portType>

<wsdl:binding name="HelloBinding" type="tns:HelloPortType">
   <soap:binding style="document"
                 transport="http://schemas.xmlsoap.org/soap/http"/>
   <wsdl:operation name="echo">
      <soap:operation/>
      <wsdl:input>
         <soap:body message="tns:echoRequest"/>
         <soap:header message="tns:additionalHeader"
                      part="additionalHeader"/>
      </wsdl:input>
      <wsdl:output>
         <soap:body message="tns:echoResponse"/>
      </wsdl:output>
   </wsdl:operation>
</wsdl:binding>

In the above schema in the wsdl:binding section tns:additionalHeader is bound but if you see this header is not part of the echo abstract contract (i.e., the wsdl:portType section). According to Jakarta XML Web Services specification only the wsdl:part's from the abstract portion are mapped to Java method parameters.

Running wsimport on this wsdl will generate this method signature:

wsimport sample.wsdl

Example 4.5. Default mapping

public String echo(String request);

Note

wsimport has an option -XadditionalHeaders, this option will map such additional headers as method parameters.

wsimport -XadditionalHeaders sample.wsdl

Example 4.6. WSDL to Java mapping with -XadditionalHeaders switch

public String echo(String request, String additionalHeader);

4.2. Schema Validation

SOAP messages are not validated against schemas by default with the Eclipse Implementation of Jakarta XML Web Services. However, this can be enabled for doc/lit cases. The Eclipse Implementation of Jakarta XML Web Services uses JAXP's SchemaFactory API to do the validation.

4.2.1. Server Side Schema Validation

The @SchemaValidation annotation needs to be specified on the endpoint implementation to enable server side validation. Both the incoming SOAP request and outgoing SOAP response will be validated, with exceptions returned to the client for any validation errors that occur.

Example 4.7. Enabling Schema Validation for an Endpoint

import com.sun.xml.ws.developer.SchemaValidation;
...

@SchemaValidation
@WebService
public class HelloImpl {
}

If a application wants to have complete control over validation error handling, it can set up a ValidationErrorHandler to receive notification of errors. The handler has access to the Packet and can store any information in its invocationProperties. These properties are accessible from the endpoint's MessageContext.

Example 4.8. Customizing Schema Validation

@SchemaValidation(handler = MyErrorHandler.class)
@WebService
public class HelloImpl {
}

import com.sun.xml.ws.developer.ValidationErrorHandler;
import org.xml.sax.SAXParseException;
import org.xml.sax.SAXException;

public class MyErrorHandler extends ValidationErrorHandler {
    public void warning(SAXParseException e) throws SAXException {
        // Store warnings in the packet so that they can be retrieved 
        // from the endpoint
        packet.invocationProperties.put("error", e);
    }

    public void error(SAXParseException e) throws SAXException {
        throw e;
    }

    public void fatalError(SAXParseException e) throws SAXException {
        ; // noop
    }
}

4.2.2. Client Side Schema Validation

Proxy needs to be created with SchemaValidationFeature to enable client side validation. Both the outgoing SOAP request and incoming SOAP response will be validated.

Example 4.9. Enabling Proxy with Schema Validation

import com.sun.xml.ws.developer.SchemaValidationFeature;
...

SchemaValidationFeature feature = new SchemaValidationFeature();
HelloPort port = new HelloService.getHelloPort(feature);
// All invocations on this port are validated

If a client application wants to have complete control over validation error handling, it can set up a ValidationErrorHandler to receive notification of errors. The handler has access to the Packet and can store any information in its invocationProperties. These properties are accessible from proxy's response context.

Example 4.10. Customizing Schema Validation

SchemaValidationFeature feature =
        new SchemaValidationFeature(MyErrorHandler.class);
HelloPort port = new HelloService.getHelloPort(feature);
// All invocations on this port will be validated

Chapter 5. HTTP

5.1. HTTP headers

5.1.1. Sending HTTP headers on request

Client can set additional HTTP headers for making a requests by using MessageContext.HTTP_REQUEST_HEADERS. See the following code for an example:

Example 5.1. Sending HTTP headers

import java.util.Collections;
import jakarta.xml.ws.BindingProvider;
import jakarta.xml.ws.handler.MessageContext;

HelloPort port =...;
((BindingProvider) port).getRequestContext().put(MessageContext
        .HTTP_REQUEST_HEADERS, Collections.singletonMap
        ("X-Client-Version", Collections.singletonList("1.0-RC")));

// the header will be sent to all successive invocations
port.sayHelloTo("duke");

Note that the property takes Map<String,List<String>> as the type.

5.1.2. Accessing HTTP headers of the response

Clients can access the HTTP headers of the response by using MessageContext.HTTP_RESPONSE_HEADERS. See the following code for example:

Example 5.2. Accessing HTTP headers

HelloPort port = ...;
port.sayHelloTo("duke");

headers = (Map<String, List<String>>) ((BindingProvider) port)
        .getResponseContext().get(MessageContext.HTTP_RESPONSE_HEADERS);

5.2. HTTP compression

HTTP supports compression of data at the transport level, which can substantially reduce the size of the data (at the expense of an additional CPU load.)

When sending a request to a server, a client can inform the server that it can receive compressed response like this:

Example 5.3. Request HTTP Compression

Map<String, List<String> httpHeaders = new HashMap<String, List<String>>();
httpHeaders.put("Accept-Encoding", Collections.singletonList("gzip"));
Map<String, Object> reqContext = ((bindingProvider)proxy).getRequestContext();
requestContext.put(MessageContext.HTTP_REQUEST_HEADERS, httpHeaders);

This works even if the server isn't capable of doing compression; it will simply respond with uncompressed response and it will work transparently.

If a client knows that the server is capable of receiving a compressed request, it can send a compressed request by adding one more HTTP header as follows:

Example 5.4. Sending Compressed Request

Map<String, List<String> httpHeaders = new HashMap<String, List<String>>();
httpHeaders.put("Content-Encoding", Collections.singletonList("gzip"));
httpHeaders.put("Accept-Encoding", Collections.singletonList("gzip"));
Map<String, Object> reqContext = ((bindingProvider) proxy)
        .getRequestContext();
requestContext.put(MessageContext.HTTP_REQUEST_HEADERS, httpHeaders);

Note that this will fail if the server is incapable of dealing with compressed HTTP traffic. Most modern HTTP servers understand it, but this is not guaranteed.

5.3. HTTP cookies

5.3.1. Enabling cookie support

To enable cookie support, you need to enable the session property. This causes requests sent via the port to use the same cookie jar, so if the server responds with a cookie, the next request will go out with those cookies. This allows the server to use the normal session tracking mechanism like HttpSession.

Example 5.5. Sending HTTP headers

HelloPort port = ...;
port.getRequestContext().put(BindingProvider.SESSION_MAINTAIN_PROPERTY,true);

5.3.2. Accessing HTTP cookies in the response

TODO

5.3.3. Accessing HTTP cookies on the server

When the web service is using servlets as the transport mechanism, you can use servlet's native support for cookies. See the following code to how to access jakarta.servlet.http.HttpServletRequest from your service.

Example 5.6. Accessing cookies

class MyService {
    @Resource
    WebServiceContext context;

    public void foo() {
        HttpServletRequest rq = (HttpServletRequest) context
                .getMessageContext().get(MessageContext.SERVLET_REQUEST);
        HttpServletResponse rs = (HttpServletResponse) context
                .getMessageContext().get(MessageContext.SERVLET_RESPONSE);
    }
}

5.4. HTTP client streaming support

Jakarta XML Web Services uses Java SE's HttpURLConnection to send requests to web service. By default, HttpURLConnection buffers the entire request before sending it on the wire. To enable HTTP streaming support, one needs to enable setChunkedStreamingMode() on the connection. The same thing can be achieved by doing the following in Jakarta XML Web Services clients.

Example 5.7. HTTP client streaming support

int chunkSize = ...;
Map<String, Object> ctxt = ((BindingProvider)proxy).getRequestContext();
ctxt.put(JAXWSProperties.HTTP_CLIENT_STREAMING_CHUNK_SIZE, chunkSize);

5.5. Access HTTP headers in a Handler

HTTP headers can be accessed in a Handler. Here is how you can access the Content-Type HTTP header in a Handler:

5.5.1. From Client side handler

HTTP headers can be accessed in a client side Handler in an incoming response. Here is Handler code that demonstrates how to do this:

Example 5.8. ClientHandler.java

public class ClientHandler implements SOAPHandler<SOAPMessageContext> {
    public boolean handleMessage(SOAPMessageContext context) {
        if (!(Boolean) context.get(MessageContext
                .MESSAGE_OUTBOUND_PROPERTY)) {
            
            Map<String, List<String>> map = (Map<String, 
                    List<String>>) context.get(MessageContext
                    .HTTP_RESPONSE_HEADERS);
            
            List<String> contentType = getHTTPHeader(map, "Content-Type");
            if (contentType != null) {
                StringBuffer strBuf = new StringBuffer();
                for (String type : contentType) {
                    strBuf.append(type);
                }
                System.out.println("Content-Type:" + strBuf.toString());
            }
        }
        return true;
    }


    private
    @Nullable
    List<String> getHTTPHeader(Map<String, List<String>> headers, 
                               String header) {
        for (Map.Entry<String, List<String>> entry : headers.entrySet()) {
            String name = entry.getKey();
            if (name.equalsIgnoreCase(header))
                return entry.getValue();
        }
        return null;
    }
}

5.5.2. From Server side handler

HTTP headers can be accessed in a server side Handler on an incoming request. Here is Handler code that demonstrates how to do this:

Example 5.9. ServerHandler.java

public class ServerHandler implements SOAPHandler<SOAPMessageContext> {
    public boolean handleMessage(SOAPMessageContext context) {

        if (!(Boolean) context.get(MessageContext
                .MESSAGE_OUTBOUND_PROPERTY)) {
            
            Map<String, List<String>> map = (Map<String, 
                    List<String>>) context.get(MessageContext
                    .HTTP_REQUEST_HEADERS);
            
            List<String> contentType = getHTTPHeader(map, "Content-Type");
            if (contentType != null) {
                StringBuffer strBuf = new StringBuffer();
                for (String type : contentType) {
                    strBuf.append(type);
                }
                System.out.println("Content-Type:" + strBuf.toString());
            }
        }

        return true;
    }

    private
    @Nullable
    List<String> getHTTPHeader(@NotNull Map<String, 
            List<String>> headers, @NotNull String header) {
        
        for (Map.Entry<String, List<String>> entry : headers.entrySet()) {
            String name = entry.getKey();
            if (name.equalsIgnoreCase(header))
                return entry.getValue();
        }
        return null;
    }
}

5.6. HTTP Timeouts

Jakarta XML Web Services uses Java SE's HttpURLConnection to send requests to web services. URLConnection offers setConnectTimeout() and setReadTimeout() methods so that clients can control connection timeouts. The same things can be achieved by doing the following in Jakarta XML Web Services clients:

Example 5.10. HTTP client timeouts

// setConnectTimeout()
int timeout = ...;
Map<String, Object> ctxt = ((BindingProvider)proxy).getRequestContext();
ctxt.put(JAXWSProperties.CONNECT_TIMEOUT, timeout);

// setReadTimeout()
int timeout = ...;
Map<String, Object> ctxt = ((BindingProvider)proxy).getRequestContext();
ctxt.put("com.sun.xml.ws.request.timeout", timeout);

5.7. HTTP Persistent Connections (keep-alive)

Persistent connections improve performance by allowing the underlying socket connection to be reused for multiple http requests. Jakarta XML Web Services uses Java SE's HttpURLConnection to send requests to web services. HTTP keep-alive behavior can be controlled by the http.keepAlive (default: true) and http.maxConnections (default: 5) system properties. For more information, see Networking Properties

5.8. HTTPS HostnameVerifier

Jakarta XML Web Services uses Java SE's HttpsURLConnection to send requests to web services that use the HTTPS transport. HttpsURLConnection offers a setHostnameVerifier() method so that the client's verification callback can be called to determine whether a connection is allowed. The same thing can be achieved by doing the following in Jakarta XML Web Services clients:

Example 5.11. SSL Hostname Verification

HostNameVerifier hostNameVerifier = ...;
int timeout = ...;
Map<String, Object> ctxt = ((BindingProvider)proxy).getRequestContext();
ctxt.put(JAXWSProperties.HOSTNAME_VERIFIER, hostNameVerifier);

5.9. HTTPS SSLSocketFactory

Jakarta XML Web Services uses Java SE's HttpsURLConnection to send requests to web services that use HTTPS transport. HttpsURLConnection offers setSSLSocketFactory() method and that factory is used when creating sockets for secure https URL connections. The same thing can be achieved by doing the following in Jakarta XML Web Services clients:

Example 5.12. HTTPS SSLSocketFactory

SSLSocketFactory sslSocketFactory = ...;
Map<String, Object> ctxt = ((BindingProvider)proxy).getRequestContext();
ctxt.put(JAXWSProperties.SSL_SOCKET_FACTORY, sslSocketFactory);

5.10. HTTP address in soap:address and import locations

A service may be hosted in a servlet container that is behind firewall/load balancer. Then a published WSDL's soap:address, wsdl:import, xsd:import locations may point to the internal address(not to the external firewall/loadbalancer address). Metro uses the HttpServletRequest's getServerName() and getServerPort() to figure out the server's address and port respectively. This works in many cases, but you may need to configure the servlet container's server address in some cases.

  • This is supported in GlassFish, by configuring "server-name" attribute of <http-listener> in domain.xml. For example, set it to "http://firewall-host:firewall-port"

  • This is supported in Tomcat, by using the "proxyName" and "proxyPort" attributes on <Connector>. See tomcat configuration

Chapter 6. Processing Large Data

6.1. Receiving large SOAP requests

Processing of large incoming SOAP requests can be made more efficient with some additional effort.

6.1.1. Provider<Message>

An implementation extension Provider<Message> can be used to read an incoming SOAP message by using XMLStreamReader (among other things.) This allows you to read the SOAP message on-demand lazily, without needing to buffer the whole message in memory.

See the relevant Eclipse implementation of JAXB users guide section for how to combine Jakarta XML Binding with such streaming processing.

6.2. Binary Attachments (MTOM)

6.2.1. MTOM

MTOM (and XOP) allows you to send and receive binary attachments (such as files and images) efficiently and in an interoperable manner.

6.2.1.1. What is MTOM?

Perhaps the best way to understand the pros and cons of MTOM is to see an actual on-the-wire message. See an example below:

Example 6.1. Sample MTOM message

Content-Type: Multipart/Related; start-info="text/xml"; type="application/xop+xml"; boundary="----=_Part_0_1744155.1118953559416"
Content-Length: 3453
SOAPAction: ""

------=_Part_1_4558657.1118953559446
Content-Type: application/xop+xml; type="text/xml"; charset=utf-8

<S:Envelope xmlns:S="http://schemas.xmlsoap.org/soap/envelope/">
  <S:Body>
    <Detail xmlns="http://example.org/mtom/data">
      <image>
        <xop:Include xmlns:xop="http://www.w3.org/2004/08/xop/include" href="cid:5aeaa450-17f0-4484-b845-a8480c363444@example.org" />
      </image>
    </Detail>
  </S:Body>
</S:Envelope>


------=_Part_1_4558657.1118953559446
Content-Type: image/jpeg
Content-ID: <5aeaa450-17f0-4484-b845-a8480c363444@example.org>


... binary data ...

The noteworthy points are:

  1. The binary attachment is packaged in a MIME multi-part message (the same mechanism used in e-mail to handle attachments.)

  2. An <xop:Include> element is used to mark where the binary data is.

  3. The actual binary data is kept in a different MIME part.

MTOM is efficient, in the sense that it doesn't have the 33% size increase penalty that xs:base64Binary has. It is interoperable, in the sense that it is a W3C standard. However, MIME multipart incurs a small cost proportional to the number of attachments, so it is not suitable for a large number of tiny attachments.

The schema that describes the above message is below. The MTOM spec is designed to work below the XML infoset level, so the schema describes the image as being of type xs:base64Binary, even though it can be attached as seen above. When using MTOM, any base64Binary can be attached or inlined.

Example 6.2. Schema

<element name="Detail" type="types:DetailType"/>
<complexType name="DetailType">
  <sequence>
    <element name="image" type="base64Binary" />
  </sequence>
</complexType>

6.2.1.2. xmime:expectedContentType to Java type mapping

Schema elements of type xs:base64Binary or xs:hexBinary can be annotated by using the xmime:expectedContentType attribute to indicate the type of binary that is expected. wsimport recognizes this annotation and will map the binary data to its proper Java representation instead. The table below is taken from Jakarta XML Binding spec Table 9-1, which shows the mapping rules:

Table 6.1. JAXB Mapping Rules

MIME TypeJava Type
image/*java.awt.Image
text/plainjava.lang.String
application/xml, text/xmljavax.xml.transform.Source
(others)jakarta.activation.DataHandler

6.2.1.3. xmime:contentType attribute

The schema can further use the xmime:contentType attribute to designate the actual content type of the binary data used in the message. (In contrast, xmime:expectedContentTypes specifies what are allowed. This combination allows you to say "image/* is expected but this message contains image/jpeg".)

This attribute can be used with elements whose content is either xs:base64Binary or xs:hexBinary. Consider the following example:

Example 6.3. Using xmime:contentType

<element name="TestMtomXmimeContentType" type="types:PictureType"/>

<complexType name="PictureType">
  <simpleContent>
    <restriction base="xmime:base64Binary">
      <attribute ref="xmime:contentType" use="required" />
    </restriction>
  </simpleContent>
</complexType>

Here xmime:base64Binary is defined by Describing Media Content of Binary Data in XML. The following code shows how your program can set the MIME type to the generated beans:

Example 6.4. Setting content type

PictureType req = new PictureType();
req.setValue(name.getBytes());
req.setContentType("application/xml");

On the wire this is how it looks:

Example 6.5. SOAP Message that uses xmime:contentType

<S:Envelope xmlns:S="http://schemas.xmlsoap.org/soap/envelope/"
  xmlns:xsd="http://www.w3.org/2001/XMLSchema"
  xmlns:ns1="http://example.org/mtom/data"
  xmlns:ns2="http://www.w3.org/2005/05/xmlmime">
  <S:Body>
    <ns1:TestMtomXmimeContentTypeResponse ns2:contentType="application/xml">
      <xop:Include
          xmlns:xop="http://www.w3.org/2004/08/xop/include"
          href="cid:193ed174-d313-4325-8eed-16cc25595e4e@example.org"/>
    </ns1:TestMtomXmimeContentTypeResponse>
  </S:Body>
</S:Envelope>

6.2.2. Enabling MTOM on server

There are several ways to enable MTOM.

  1. By using the @MTOM annotation on SEI. This is convenience and preferable for developers.

    Example 6.6. Annotating SEI with @MTOM

    @jakarta.xml.ws.soap.MTOM
    @WebService
    public class HelloImpl implements Hello {
        ....
    }


  2. By using the enable-mtom attribute in the sun-jaxws.xml configuration file. This allows the MTOM setting to be changed at deployment time.

    Example 6.7. Enabling MTOM in sun-jaxws.xml

    <endpoints xmlns='http://java.sun.com/xml/ns/jax-ws/ri/runtime' version='2.0'>
      <endpoint name="Mtom" implementation="mtom.server.HelloImpl"
        url-pattern="/hello"
        enable-mtom="true"/>
    </endpoints>


  3. If you are using Eclipse Implementation of Jakarta XML Web Services via Spring, you can also enable MTOM from the bean definition file. See the JAX-WS spring extension for more.

6.2.3. Enabling MTOM on client

There are several ways to enable MTOM.

  1. By doing nothing. If the server WSDL advertises that it supports MTOM, the MTOM support in the client will be automatically enabled. This is the preferable way.

  2. By passing MTOMFeature as WebServiceFeature parameter while creating a proxy or a Dispatch. See the example below:

    Example 6.8. Passing MTOMFeature

    Hello port = new HelloService().getHelloPort(new MTOMFeature());
    Dispatch d = new HelloService().createDispatch(....,new MTOMFeature());


6.2.4. MTOM threshold

As discussed above, in rare situations where you have a lot of tiny attachments, the overhead of MTOM may outweigh the benefit of binary transfer. To cope with this situation, the Eclipse Implementation of Jakarta XML Web Services supports the notion of "threshold" --- if an attachment is smaller than the size specified in threshold, it will simply inline the binary data as base64 binary instead of making it an attachment. Because of the way MTOM spec is designed, such inline vs attachment decision is handled by the toolkits of both ends and will not harm the application running on both sides.

There are two ways to control the threshold:

  1. By using the com.sun.xml.ws.developer.JAXWSProperties.MTOM_THRESHOLD_VALUE property in the RequestContext on the client side and in the MessageContext on the server side.

  2. By adding parameter to the @MTOM annotation, such as @MTOM(threshold=3000)

  3. By adding parameter to the MTOMFeature object, such as new MTOM(3000)

6.2.5. .NET interoperability

6.2.5.1. Using Metro distribution

MTOM support is fully interoperable with .NET clients and servers. If you are working with Metro then your MTOM solution as a endpoint or as client will work out of the box.

6.2.5.2. Using Eclipse Implementation of Jakarta XML Web Services distribution

If you are using Eclipse Implementation of Jakarta XML Web Services distribution, MTOM interop with .NET client or server will not work out of the box. The reason behind this is that Eclipse Implementation of Jakarta XML Web Services does not have built in support for WS-Policy and .NET 3.0/.NET 3.5 looks for an MTOM policy assertion in the WSDL before turning on MTOM encoding. So, you will need to turn it on explicitly on your .NET 3.0/3.5 or Eclipse Implementation of Jakarta XML Web Services client.

The MTOM policy assertion that .NET 3.0/.NET 3.5 understands is: <wsoma:OptimizedMimeSerialization/>

6.2.5.2.1. JAX-WS RI endpoint and .NET client

Turn on MTOM explicitly on your .NET client using the WCF editor available with Visual Studio 2005.

6.2.5.2.2. Eclipse Implementation of Jakarta XML Web Services client and .NET endpoint

Turn on MTOM on Eclipse Implementation of Jakarta XML Web Services client as defined above.

Here is a sample Metro MTOM endpoint and a .NET 3.0 client.

6.3. Large Attachments

Eclipse Implementation of Jakarta XML Web Services provides support for sending and receiving large attachments in a streaming fashion. Often times, large attachments need to be stored on the file system since they cannot be kept in memory(limited by heap size). But in certain cases, streaming of attachments is possible without ever storing the content on the file system. RI will try to stream the attachments whenever it is possible. Otherwise, it would store the large attachments on the file system.

The programming model is based on MTOM and DataHandler. You want to send large data as a SOAP attachment, see this section for more details. Also you want to bind large data to DataHandler instead of byte[]. RI provides a StreamingDataHandler, a DataHandler implementation that can be used to access the data efficiently in a streaming fashion.

6.3.1. Client Side

RI uses Java SE's HttpURLConnection for web service invocations. HttpURLConnection buffers the request data by default. So the client applications need to enable streaming explicitly, see http client streaming. The following sample show how to send and receive large data.

Example 6.9. Sample client for large attachments

import com.sun.xml.ws.developer.JAXWSProperties;
import com.sun.xml.ws.developer.StreamingDataHandler;

MTOMFeature feature = new MTOMFeature();
MyService service = new MyService();
MyProxy proxy = service.getProxyPort(feature);
Map<String, Object> ctxt = ((BindingProvider)proxy).getRequestContext();
// Enable HTTP chunking mode, otherwise HttpURLConnection buffers
ctxt.put(JAXWSProperties.HTTP_CLIENT_STREAMING_CHUNK_SIZE, 8192); 
DataHandler dh = proxy.fileUpload(...);
StreamingDataHandler sdh = (StreamingDataHandler)dh;
InputStream in = sdh.readOnce();
...
in.close();
sdh.close();

6.3.2. Server Side

Use @MTOM feature for a service and DataHandler parameter for large data. If the WSDL contains xmime:expectedContentTypes="application/octet-stream", it would be mapped to DataHandler in the generated SEI. If the service is starting from java, @XmlMimeType("application/octet-stream") can be used to generate an appropriate schema type in the generated WSDL.

The following sample shows how to upload files. It uses StreamingDataHandler.moveTo(File) convenient method to store the contents of the attachment to a file.

Example 6.10. Sample service for large attachments

import com.sun.xml.ws.developer.StreamingDataHandler;
...

@MTOM
@WebService
public class UploadImpl {

    // Use @XmlMimeType to map to DataHandler on the client side
    public void fileUpload(String name, 
                           @XmlMimeType("application/octet-stream") 
                           DataHandler data) {
        try {
            StreamingDataHandler dh = (StreamingDataHandler) data;
            File file = File.createTempFile(name, "");
            dh.moveTo(file);
            dh.close();
        } catch (Exception e) {
            throw new WebServiceException(e);
        }
    }
}

6.3.3. Configuration

You can configure streaming attachments behaviour using @StreamingAttachment on the server side, and using StreamingAttachmentFeature on the client side. Using this feature, you can configure only certain sized attachments are written to a file.

Example 6.11. Sample Service Configuration

import com.sun.xml.ws.developer.StreamingAttachment;

// Configure such that whole MIME message is parsed eagerly,
// Attachments under 4MB are kept in memory
@MTOM
@StreamingAttachment(parseEagerly=true, memoryThreshold=4000000L)
@WebService
public class UploadImpl {
}

Example 6.12. Sample client configuration

import com.sun.xml.ws.developer.StreamingAttachmentFeature;

MTOMFeature mtom = new MTOMFeature();
// Configure such that whole MIME message is parsed eagerly,
// Attachments under 4MB are kept in memory
StreamingAttachmentFeature stf =
        new StreamingAttachmentFeature(null, true, 4000000L);
MyService service = new MyService();
MyProxy proxy = service.getProxyPort(feature, stf);

6.3.4. Large Attachments Summary

  • Use MTOM and DataHandler in the programming model.

  • Cast the DataHandler to StreamingDataHandler and use its methods.

  • Make sure you call StreamingDataHandler.close() and also close the StreamingDataHandler.readOnce() stream.

  • Enable HTTP chunking on the client-side.

Chapter 7. Bootstrapping and Configuration

7.1. What is a Server-Side Endpoint?

Web services expose one or more endpoints to which messages can be sent. A web service endpoint is an entity, processor, or resource that can be referenced and to which web services messages can be addressed. Endpoint references convey the information needed to address a web service endpoint. Clients need to know this information before they can access a service.

Typically, web services package endpoint descriptions and use a WSDL file to share these descriptions with clients. Clients use the web service endpoint description to generate code that can send SOAP messages to and receive SOAP messages from the web service endpoint.

7.2. Creating a Client from WSDL

To create a web service client that can access and consume a web service provider, you must obtain the information that defines the interoperability requirements of the web service provider. Providers make this information available by means of WSDL files. WSDL files may be made available in service registries or published on the Internet using a URL (or both). You can use a web browser or NetBeans IDE to obtain WSDL files.

A WSDL file contains descriptions of the following:

  • Network services: The description includes the name of the service, the location of the service, and ways to communicate with the service, that is, what transport to use.

  • Web services policies: Policies express the capabilities, requirements, and general characteristics of a web service. Web service providers use policies to specify policy information in a standardized way. Policies convey conditions on interactions between two web service endpoints. Typically, the provider of a web service exposes a policy to convey conditions under which it provides the service. A requester (a client) might use the policy to decide whether or not to use the service.

Web Services Metadata Exchange (WS-MEX) is the protocol for requesting and transferring the WSDL from the provider to the client. This protocol is a bootstrap mechanism for communication.

7.3. Client From WSDL Examples

The following sections, found in other chapters of this tutorial, explain how to create a client from a WSDL file using the example files in the tutorial bundle:

Chapter 8. Message Optimization

8.1. Creating a MTOM Web Service

The starting point for developing a web service to use WSIT is a Java class file annotated with the jakarta.jws.WebService annotation.

For detailed instructions for how to use NetBeans IDE to create a web service, see Creating a Web Service.

8.2. Configuring Message Optimization in a Web Service

To use the IDE to configure a web service for message optimization, perform the following steps.

To Configure Message Optimization in a Web Service

  1. In the IDE Projects window, expand the Web Services node, right-click the CalculatorWSService node, and choose Edit Web Service Attributes.

    The Web Service Attributes editor appears.

  2. Select the Optimize Transfer of Binary Data (MTOM) check box, as shown in Enabling MTOM, and click OK.

    This setting configures the web service to optimize messages that it transmits and to decode optimized messages that it receives.

    Figure 8.1. Enabling MTOM

    Enabling MTOM

8.3. Deploying and Testing a Web Service with Message Optimization Enabled

Now that you have configured the web service to use message optimization, you can deploy and test it.

To Deploy and Test a Web Service with Message Optimization Enabled

To deploy and test the web service, perform the following steps.

  1. Right-click the project node and select Properties, then select Run.

  2. Type /CalculatorWSService?wsdl in the Relative URL field and click OK.

  3. Right-click the project node and choose Run.

    The IDE starts the web container, builds the application, and displays the WSDL file page in your browser.

    The following WSIT tags related to message optimization display in the WSDL file:

    Example 8.1. 

    <ns1:Policy wsu:Id="CalculatorWSPortBindingPolicy"/>
      <ns1:ExactlyOne>
        <ns1:All>
          <ns2:OptimizedMimeSerialization/>
            <ns3:RMAssertion/>
              <ns4:UsingAddressing ns1:Optional="true"/>
        </ns1:All>
      </ns1:ExactlyOne>
    </ns1:Policy>

8.4. Creating a Client to Consume a Message Optimization-enabled Web Service

Now that you have built and tested a web service that uses the WSIT Message Optimization technology, you can create a client that accesses and consumes that web service. The client will use the web service's WSDL to create the functionality necessary to satisfy the interoperability requirements of the web service.

To Create a Client to Consume a WSIT-enabled Web Service

To create a client to access and consume the web service, perform the following steps.

  1. Choose FileNew Project, select Java Web from the Web category and click Next.

  2. Name the project, for example, CalculatorWSServletClient, and click Finish.

  3. Right-click the CalculatorWSServletClient node and select NewWeb Service Client.

    The New Web Service Client window displays.

    Note

    NetBeans submenus are dynamic, so the Web Service Client option may not appear. If you do not see the Web Service Client option, select NewFile\FolderWebservicesWeb Service Client.

  4. Select the WSDL URL option.

  5. Cut and paste the URL of the web service that you want the client to consume into the WSDL URL field.

    For example, here is the URL for the CalculatorWS web service:

    Example 8.2. 

    http://localhost:8080/CalculatorApplication/CalculatorWSService?wsdl

    When Jakarta XML Web Service implementation generates the web service, it appends Service to the class name by default.

  6. Type org.me.calculator.client in the Package field, and click Finish.

  7. Right-click the CalculatorWSServletClient project node and choose NewServlet.

  8. Name the servlet ClientServlet, specify the package name, for example, org.me.calculator.client and click Finish.

  9. To make the servlet the entry point to your application, right-click the CalculatorWSServletClient project node, choose Properties, click Run, type /ClientServlet in the Relative URL field, and click OK.

  10. If ClientServlet.java is not already open in the Source Editor, open it.

  11. In the Source Editor, remove the line that comments out the body of the processRequest method.

    This is the start-comment line that starts the section that comments out the code:

    Example 8.3. 

    /* TODO output your page here

  12. Delete the end-comment line that ends the section of commented out code:

    Example 8.4. 

    */


  13. Add some empty lines after the following line:

    Example 8.5. 

    out.println("<h1>Servlet ClientServlet at " +
            request.getContextPath () + "</h1>");


  14. Right-click in one of the empty lines that you added, then choose Web Service Client ResourcesCall Web Service Operation.

    The Select Operation to Invoke dialog box appears.

  15. Browse to the Add operation and click OK.

    The processRequest method is as follows, with bold indicating code added by the IDE:

    Example 8.6. 

    protected void processRequest(HttpServletRequest request, 
                                  HttpServletResponse response) throws 
            ServletException, IOException {
        
        response.setContentType("text/html;charset=UTF-8");
        PrintWriter out = response.getWriter();
        out.println("<html>");
        out.println("<head>");
        out.println("<title>Servlet ClientServlet</title>");
        out.println("</head>");
        out.println("<body>");
        out.println("<h1>Servlet ClientServlet at " + request
                .getContextPath() + "</h1>");
        try { // Call Web Service Operation
            org.me.calculator.client.CalculatorWS port = service
                    .getCalculatorWSPort();
            // TODO initialize WS operation arguments here
            int i = 0;
            int j = 0;
            // TODO process result here
            int result = port.add(i, j);
            out.println("Result = " + result);
        } catch (Exception ex) {
            // TODO handle custom exceptions here
        }
        out.println("</body>");
        out.println("</html>");
        out.close();
    }

  16. Change the values for int i and int j to other numbers, such as 3 and 4.

  17. Add a line that prints out an exception, if an exception is thrown.

    The try/catch block is as follows (new and changed lines from this step and the previous step are highlighted in bold text):

    Example 8.7. 

    try { // Call Web Service Operation
        org.me.calculator.client.CalculatorWS port = service
                .getCalculatorWSPort();
        // TODO initialize WS operation arguments here
        int i = 3;
        int j = 4;
        // TODO process result here
        int result = port.add(i, j);
        out.println("<p>Result: " + result);
    } catch (Exception ex) {
        out.println("<p>Exception: " + ex);
    }

  18. Save ClientServlet.java.

  19. Right-click the project node and choose Run.

    The server starts (if it was not running already), the application is built, deployed, and run. The browser opens and displays the calculation result.

8.5. Message Optimization and Secure Conversation

The Web Services Secure Conversation technology has message optimization benefits. While providing better message-level security it also improves the efficiency of multiple-message exchanges. It accomplishes this by providing basic mechanisms on top of which secure messaging semantics can be defined for multiple-message exchanges. This feature allows for contexts to be established so that potentially more efficient keys or new key material can be exchanged. The result is that the overall performance of subsequent message exchanges is improved.

For more information on how to use Secure Conversation, see Using WSIT Security.

Chapter 9. SOAP/TCP Web Service transport

9.1. What is SOAP/TCP?

SOAP/TCP is TCP transport for Web Services. By default SOAP/TCP uses FastInfoset encoding in stateful mode, which lets SOAP/TCP to index XML elements optimal way, taking into account specifics of each concrete Web Service.

9.2. Creating a SOAP/TCP enabled Web Service

For detailed instructions for how to use NetBeans IDE to create a web service, see Creating a Web Service.

9.3. Configuring Web Service to be able to operate over SOAP/TCP transport

To use the IDE to configure a web service transport, perform the following steps.

To Configure SOAP/TCP transport in a Web Service

  1. In the IDE Projects window, expand the Web Services node, right-click the CalculatorWSService node, and choose Edit Web Service Attributes.

    The Web Service Attributes editor appears.

  2. Select the Allow TCP Transport check box, as shown in Enabling SOAP/TCP, and click OK.

    This setting configures the web service to be able to operate over SOAP/TCP transport additionally to the default HTTP.

    Figure 9.1. Enabling SOAP/TCP

    Enabling SOAP/TCP

9.4. Deploying and Testing a Web Service with SOAP/TCP Transport Enabled

Now that you have configured the web service to be able to operate over SOAP/TCP, you can deploy and test it.

To Deploy and Test a Web Service with SOAP/TCP Enabled

To deploy and test the web service, perform the following steps.

  1. Right-click the project node and select Properties, then select Run.

  2. Type /CalculatorWSService?wsdl in the Relative URL field and click OK.

  3. Right-click the project node and choose Run.

    The IDE starts the web container, builds the application, and displays the WSDL file page in your browser.

    The following WSIT tags related to SOAP/TCP display in the WSDL file:

    Example 9.1. 

    <wsp:Policy wsu:Id="CalculatorWSPortBindingPolicy">
        <wsp:ExactlyOne>
            <wsp:All>
                <ns2:OptimizedTCPTransport enabled="true"/>
            </wsp:All>
        </wsp:ExactlyOne>
    </wsp:Policy>

9.5. Creating a Client to Consume a SOAP/TCP-enabled Web Service

For detailed instructions for how to use NetBeans IDE to create a web service client, see Creating a Client to Consume a WSIT-Enabled Web Service.

9.6. Configuring Web Service client to operate over SOAP/TCP transport

To use the IDE to configure a web service client transport, perform the following steps.

To Configure SOAP/TCP transport in a Web Service client

  1. In the IDE Projects window, expand the Web Service References node, right-click the CalculatorWSService node, and choose Edit Web Service Attributes.

    The Web Service Attributes editor appears.

  2. Select the Automatically Select Optimal Transport (HTTP/TCP) check box, as shown in Enabling SOAP/TCP for a Web Service client, and click OK.

    This setting configures the web service client to choose SOAP/TCP transport as prefferable, when working with a Web Service.

    Figure 9.2. Enabling SOAP/TCP for a Web Service client

    Enabling SOAP/TCP for a Web Service client

    After checking the SOAP/TCP check box, new policy assertions will be added to the Web Service client policy configuration file. Open CalculatorWSService.xml file, which is situated under the project's Source Packages/META-INF folder.

    The following WSIT tags related to SOAP/TCP display in the Web Service client configuration file:

    Example 9.2. 

    <wsp:Policy wsu:Id="CalculatorWSPortBindingPolicy">
        <wsp:ExactlyOne>
            <wsp:All>
                <tcp:AutomaticallySelectOptimalTransport/>
            </wsp:All>
        </wsp:ExactlyOne>
    </wsp:Policy>

Chapter 10. Using Reliable Messaging

10.1. Introduction to Reliable Messaging

In the SOAP messaging world, presence of software, system or network failures is a common issue web service developers need to deal with. This issue is even more obvious in mobile applications which access the corporate network through mobile-enabled channels with limited connectivity and connection quality, such as WiFi, UMTS or GPRS.

WS-ReliableMessaging specification, an OASIS standard, addresses this issue by defining a modular mechanism for reliable transfer of messages. It defines a messaging protocol to identify, track, and manage the reliable transfer of messages between a source and a destination in an interoperable fashion. The modularity and the extension points defined in the mechanism allows integration of other quality of service features, such as message level security.

Metro implementation of reliable messaging is based o WS-ReliableMessaging. As other Quality of Service features, Reliable Messaging is configured via WS-Policy expressions stored in the WSDL document of a web service or in the web service's WSIT configuration file. These XML-based expressions are designed for machine processing rather than for human readability. Metro comes with a tooling support in the form of a plug-in for NetBeans IDE which provides a convenient way to configure reliable messaging feature for your web services. It provides a dialog-based wizard that lets you fine-tune a few reliable messaging configuration properties. In general, the properties you configure on the web service endpoint apply to the web service client as well. On the other hand, the client-side configuration options have only local effect and let you tweak the client-specific behavior.

In the following sections we will look at enabling reliable messaging with Metro in more detail. These sections also contain tables that describe configuration options in more detail for service endpoint (Configuring Web Service Endpoint) as well as service client (Reliable Messaging Configuration Options for Service Client) side.

10.2. Configuring Web Service Endpoint

When creating a reliable web service, you first start by creating a web service using common steps described in section Developing with NetBeans. Once the web service is created, a design view of the web service should open in the editor window. If the design view is not opened, locate your web service in the Projects view and double-click the web service to open it in the editor window.

In the design view, there is a Quality of Service section as show on the picture below:

Figure 10.1. Quality of Service (NetBeans)

Quality of Service (NetBeans)


In this section you may either simply check the Reliable Message Delivery checkbox and accept the Reliable Messaging configuration defaults, which means that your RM configuration for your web service is done, or you may click the Advanced button to display the Quality of Service dialog as shown on the picture below.

Figure 10.2. Quality of Service - Advanced (NetBeans)

Quality of Service - Advanced (NetBeans)


Note

You may alternatively access the Quality of Service dialog by right clicking on a web service in the Projects view and selecting Edit Web Service Attributes from the context pop-up menu.

The Quality of Service dialog contains more configuration options for Reliable Messaging. Some of these are accessible direclty while the most advance configuration details are hidden behind the Advanced button in a seprate dialog presented on the next picture.

Figure 10.3. Advanced Reliable Messaging Attributes (NetBeans)

Advanced Reliable Messaging Attributes (NetBeans)


In order to provide better overview of the RM configuration options, we included the following table that povides a detailed description of all the reliable messaging configuration options available on the service endpoint.

Table 10.1. Reliable Messaging Configuration Options for Service Endpoint

OptionDescription
Reliable Message DeliveryEnables or disables reliable messaging feature.
Deliver Messages In Exact Order

Specifies whether the Reliable Messaging protocol ensures that the application messages for a given message sequence are delivered to the endpoint application in the order indicated by the message numbers.

This option increases the time to process application message sequences and may result in the degradation of web service performance. Therefore, you should not enable this option unless ordered delivery is required by the web service.

Message Delivery AssuranceThis option tells our Reliable Messaging implementation what type of the message delivery assurance is expected. Currently it can be set to "Exactly Once" and "At Least Once".
  • Exactly Once delivery assurance, as the name suggests, guarantees that each message request from the web service client will be delivered to the web service endpoint once and only once. By default, this delivery assurance strategy is applied.

  • At Least Once delivery assurance guarantees that each message request from the web service client will be delivered to the web service endpoint, however it is possible that duplicate messages may be delivered under some circumstances. In general, this type of delivery assurance may provide better performance.

Flow ControlEnables or disables the flow control feature. When enabled, this feature works in conjunction with the Max Buffer Size setting to determine the maximum number of messages for sequence that can be stored at the endpoint awaiting delivery to the application. Messages may have to be withheld from the application if ordered delivery is required and some of their predecessors have not arrived. If the number of stored messages reaches the threshold specified in the Max Buffer Size setting, incoming messages belonging to the sequence are ignored.
Maximum Flow Control Buffer SizeIf Flow control is enabled, this value specifies the number of request messages that will be buffered in the RM session. The default setting is 32. For more information, see the description of the Flow Control option.
Inactivity Timeout

Specifies the time interval beyond which either source or destination may terminate the RM session due to inactivity. The default setting is 600,000 milliseconds (10 minutes). A web service endpoint will always terminate session whose inactivity timeout has expired.

This option may be used to ensure the early removal of stale RM sequences and thus reduce the memory footprint of the service endpoint. Note that setting the value of this option affects also the web service proxy usage patterns in the client applications.


10.3. Configuring Web Service Client

While most of the Reliable Messaging options are configured on the web service endpoint, there are some details that may be fine-tuned on the client side as well. To configure the client-side details of Reliable Messaging you first need to create a web service proxy. Section Creating a Client to Consume a WSIT-Enabled Web Service describes all the necessary steps.

Once a web service proxy is created, you can find it in the Projects view under Web Service References item. By right-clicking on the we service proxy and selecting Edit Web Service Attributes from the opened context pop-up menu you may open a dialog that let's you specify additional RM details.

When dialog opens, it may have multiple tabs. The Reliable messaging configuration options are located on the Quality of Service tab in Advanced Configuration section. Following table describes all the reliable messaging configuration options available on the web service client side.

Table 10.2. Reliable Messaging Configuration Options for Service Client

OptionDescription
RM Resend IntervalThe time in milliseconds after which the sender (RMSource) attempts to redeliver unacknowledged messages to the Reliable Messaging Destination (RM-enabled WS endpoint). By default, resend happen every 2000ms.
RM Close TimeoutBy default, the call to proxy.close() will not return until all messages have been acknowledged. RM close timeout is the interval (in milliseconds) that the client runtime will block waiting for a call to close() to return. If there are still unacknowledged messages after this interval is reached, and the call to close has returned, an error will be logged about messages being lost.
RM Ack Request IntervalThe suggested minimum time that the sender (RMSource) should allow to elapse between sending consecutive Acknowledgement request messages to the Reliable Messaging Destination (RM-enabled WS endpoint).

10.4. Configurable features summary

In the previous chapter we focused on configuring Metro reliable messaging using NetBeans IDE. This section is a summary of all Metro reliable messaging runtime features that can be configured since Metro v2.0 and higher. The summary lists all the features discussed before as well as all other features that can be only configured by manually editing the WSIT config file.

Please note that this chapter focuses on features configurable with Metro v2.0 and higher.

Table 10.3. Namespaces used within Metro Reliable Messaging WS-Policy Assertions

PrefixNamespace
wsphttp://www.w3.org/ns/ws-policy
wsrmp10http://schemas.xmlsoap.org/ws/2005/02/rm/policy
wsrmphttp://docs.oasis-open.org/ws-rx/wsrmp/200702
net30rmphttp://schemas.microsoft.com/net/2005/02/rm/policy
net35rmphttp://schemas.microsoft.com/ws-rx/wsrmp/200702
sunrmphttp://sun.com/2006/03/rm
sunrmcphttp://sun.com/2006/03/rm/client
metrohttp://java.sun.com/xml/ns/metro/ws-rx/wsrmp/200702

Table 10.4. Reliable Messaging Configuration Features - Layout

Feature name
Description
WS-RM 1.0 compatible assertion
WS-RM 1.1+ compatible assertion

Table 10.5. Enable Reliable Messaging + version

Enable Reliable Messaging + version
Specifies that WS-ReliableMessaging protocol MUST be used when sending messages. Defines also the version of the WS-RM protocol to be used.
/wsrmp10:RMAssertion
/wsrmp:RMAssertion

Table 10.6. Sequence Inactivity Timeout

Sequence Inactivity Timeout
Specifies the time interval beyond which either RM Source or RM Destination may terminate the RM sequence due to inactivity. The default setting is 600,000 milliseconds (10 minutes). A web service endpoint will always terminate session whose inactivity timeout has expired. Specified in milliseconds.
/wsrmp10:RMAssertion/wsrmp10:InactivityTimeout
/net35rmp:InactivityTimeout

Table 10.7. Acknowledgement interval

Acknowledgement interval
Specifies the duration after which the RM Destination will transmit an acknowledgement. If omitted, there is no implied value. Specified in milliseconds.
/wsrmp10:RMAssertion/wsrmp10:AcknowledgementInterval
/net35rmp:AcknowledgementInterval

Table 10.8. Retransmission Interval

Retransmission Interval
Specifies how long the RM Source will wait after transmitting a message and before retransmitting the message. If omitted, there is no implied value. Specified in milliseconds.
/wsrmp10:RMAssertion/wsrmp10:BaseRetransmissionInterval/sunrmcp:ResendInterval
/metro:RetransmissionConfig/metro:Interval

Table 10.9. Retransmission Interval Adjustment Algorithm

Retransmission Interval Adjustment Algorithm
Specifies that the retransmission interval will be adjusted using a specific (e.g. exponential back-off) algorithm.

/wsrmp10:RMAssertion/wsrmp10:ExponentialBackoff

("Exponential backoff" algorithm only)

/metro:RetransmissionConfig/metro:Algorithm

Table 10.10. Maximum Retransmission Count

Maximum Retransmission Count

A message is considered to be transferred if its delivery at the recipient has been acknowledged by the recipient.

If an acknowledgment has not been received within a certain amount of time for a message that has been transmitted, the infrastructure automatically retransmits the message. The infrastructure tries to send the message for at most a preconfigured number of times. Not receiving an acknowledgment before this limit is reached is considered a fatal communication failure, and causes the RM session to fail.

N/A
/metro:RetransmissionConfig/metro:MaxRetries

Table 10.11. Close sequence timeout

Close sequence timeout
By default, the call to proxy.close() will not return until all messages have been acknowledged. RM close timeout is the interval (in milliseconds) that the client runtime will block waiting for a call to close() to return. If there are still unacknowledged messages after this interval is reached, and the call to close has returned, an error will be logged about messages being lost.

/sunrmcp:CloseTimeout

(client side only)

/metro:CloseSequenceTimeout

Table 10.12. Acknowledgement request interval

Acknowledgement request interval
Defines the suggested minimum time that the sender (RM Source) should allow to elapse between sending consecutive Acknowledgement request messages to the RM Destination.
/sunrmcp:AckRequestInterval
/metro:AckRequestInterval

Table 10.13. Bind RM sequence to security token

Bind RM sequence to security token
Defines the requirement that an RM Sequence MUST be bound to an explicit token that is referenced from a wsse:SecurityTokenReference in the CreateSequence message.
N/A
/wsrmp:RMAssertion/wsp:Policy/wsrmp:SequenceSTR

Table 10.14. Bind RM sequence to secured transport

Bind RM sequence to secured transport
Defines the requirement that an RM Sequence MUST be bound to the session(s) of the underlying transport-level protocol used to carry the CreateSequence and CreateSequenceResponse message. (When present, this assertion MUST be used in conjunction with the sp:TransportBinding assertion.)
N/A
/wsrmp:RMAssertion/wsp:Policy/wsrmp:SequenceTransportSecurity

Table 10.15. Exactly once delivery

Exactly once delivery
Each message is to be delivered exactly once; if a message cannot be delivered then an error MUST be raised by the RM Source and/or RM Destination. The requirement on an RM Source is that it SHOULD retry transmission of every message sent by the Application Source until it receives an acknowledgement from the RM Destination. The requirement on the RM Destination is that it SHOULD retry the transfer to the Application Destination of any message that it accepts from the RM Source until that message has been successfully delivered, and that it MUST NOT deliver a duplicate of a message that has already been delivered.
default
/wsrmp:RMAssertion/wsp:Policy/wsrmp:DeliveryAssurance/wsp:Policy/wsrmp:ExactlyOnce

Table 10.16. At Most once delivery

At Most once delivery
Each message is to be delivered at most once. The RM Source MAY retry transmission of unacknowledged messages, but is NOT REQUIRED to do so. The requirement on the RM Destination is that it MUST filter out duplicate messages, i.e. that it MUST NOT deliver a duplicate of a message that has already been delivered.
N/A
/wsrmp:RMAssertion/wsp:Policy/wsrmp:DeliveryAssurance/wsp:Policy/wsrmp:AtMostOnce

Table 10.17. At Least once delivery

At Least once delivery
Each message is to be delivered at least once, or else an error MUST be raised by the RM Source and/or RM Destination. The requirement on an RM Source is that it SHOULD retry transmission of every message sent by the Application Source until it receives an acknowledgement from the RM Destination. The requirement on the RM Destination is that it SHOULD retry the transfer to the Application Destination of any message that it accepts from the RM Source, until that message has been successfully delivered. There is no requirement for the RM Destination to apply duplicate message filtering.
/sunrmcp:AllowDuplicates
/wsrmp:RMAssertion/wsp:Policy/wsrmp:DeliveryAssurance/wsp:Policy/wsrmp:AtLeastOnce

Table 10.18. InOrder delivery

InOrder delivery
Messages from each individual Sequence are to be delivered in the same order they have been sent by the Application Source. The requirement on an RM Source is that it MUST ensure that the ordinal position of each message in the Sequence (as indicated by a message Sequence number) is consistent with the order in which the messages have been sent from the Application Source. The requirement on the RM Destination is that it MUST deliver received messages for each Sequence in the order indicated by the message numbering. This DeliveryAssurance can be used in combination with any of the AtLeastOnce, AtMostOnce or ExactlyOnce assertions, and the requirements of those assertions MUST also be met. In particular if the AtLeastOnce or ExactlyOnce assertion applies and the RM Destination detects a gap in the Sequence then the RM Destination MUST NOT deliver any subsequent messages from that Sequence until the missing messages are received or until the Sequence is closed.
/sunrmp:Ordered
/wsrmp:RMAssertion/wsp:Policy/wsrmp:DeliveryAssurance/wsp:Policy/wsrmp:InOrder

Table 10.19. Flow Control

Flow Control
Enables or disables the flow control feature. When enabled, this feature works in conjunction with the Max Buffer Size setting to determine the maximum number of messages for sequence that can be stored at the endpoint awaiting delivery to the application. Messages may have to be withheld from the application if ordered delivery is required and some of their predecessors have not arrived. If the number of stored messages reaches the threshold specified in the Max Buffer Size setting, incoming messages belonging to the sequence are ignored.
/net30rmp:RmFlowControl

Table 10.20. Maximum Flow Control Buffer Size

Maximum Flow Control Buffer Size
If Flow control is enabled, this value specifies the number of request messages that will be buffered in the RM session. The default setting is 32. For more information, see the description of the Flow Control option.
/net30rmp:RmFlowControl/net30rmp:MaxReceiveBufferSize

Table 10.21. Maximum concurrent RM sessions

Maximum concurrent RM sessions
Specifies how many concurrently active RM sessions (measured based on inbound RM sequences) the SequenceManager dedicated to the WS Endpoint accepts before starting to refuse new requests for sequence creation.
N/A
/metro:MaxConcurrentSessions

Table 10.22. Reliable Messaging Persistence

Reliable Messaging Persistence
Specifies whether the runtime should use persistent sequence and message storage or not.
N/A
/metro:Persistent

Table 10.23. Sequence manager maintenace task execution period

Sequence manager maintenace task execution period
Specifies the period (in milliseconds) of a sequence maintenance task execution. Sequence maintenance task takes care of terminating inactive sequences and removing the terminated sequences from the sequence repository.
N/A
/metro:MaintenanceTaskPeriod

10.5. Creating Web Service Providers and Clients that use Reliable Messaging

Examples and detailed instructions on how to create web service providers and clients that use reliable messaging are provided in the following chapters:

10.6. Using Secure Conversation With Reliable Messaging

If Secure Conversation is enabled for the web service endpoint, the web service acquires a Security Context Token (SCT) for each application message sequence, that is, each message sequence is assigned a different SCT. The web service then uses that token to sign all messages exchanged for that message sequence between the source and destination for the life of the sequence. Hence, there are two benefits in using Secure Conversation with Reliable Messaging:

  • The sequence messages are secure while in transit between the source and destination endpoints.

  • If there are different users accessing data at the source and destination endpoints, the SCT prevents users from seeing someone else's data.

    Note

    Secure Conversation is a WS-Security option, not a reliable messaging option. If Secure Conversation is enabled on the web service endpoint, Reliable Messaging uses Security Context Tokens.

For more information on how to use Secure Conversation, see Using WSIT Security.

10.7. High Availability Support in Reliable Messaging

Starting with the Metro 2.1 release Metro implementation of reliable messaging supports deployment in clustered environment configurations of the GlassFish Application Server 3.1 and higher. The only untested and thus currently officially unsupported reliable messaging feature in an HA environment is in-order message delivery. For more details see RM section of the WSIT 2.1 Release Notes.

For a general overview of Metro High Availability support, please consult High Availability Support in Metro section.

Chapter 11. WS-MakeConnection support

11.1. Introduction to WS-MakeConnection

The WS-MakeConnection specification defines a protocol that allows messages to be transferred between WS-MakeConnection-aware nodes by using a transport-specific back-channel. The protocol itself is described in a transport-independent manner. This allows it to be implemented using different network technologies. To support interoperable Web services, a SOAP binding is defined within WS-MakeConnection specification.

The WS-MakeConnection mechanism for the transfer of messages between two endpoints is useful in situations when the sending endpoint is unable to initiate a new connection to the receiving endpoint. Such situation may typically occur when a connection from a non-adressable client is broken before a response to client's request has been delivered. Rather than discarding the old response, replaying the whole request/response message exchange and generating a new response, which may be computationally or otherwise resource intensive, WS-MakeConnection provides a way how to uniquely identify non-addressable endpoints, and a mechanism by which undelivered messages destined for those endpoints can be delivered.

As all of the WS-* technologies, WS-MakeConnection mechanism is extensible allowing additional functionality, such as security, to be tightly integrated. WS-MakeConnection specification integrates with and complements the WS-ReliableMessaging, WS-Security, WS-Policy, and other Web services specifications.

11.2. Configuring Web Service Endpoint

11.2.1. Configuration via an WS-Policy expression

As all other WS-* features, WS-MakeConnection can be enabled using a WS-Policy assertion. Unfortunately, unlike many other WS-* features, NetBeans IDE in it's current version 6.8 don't provide a nice GUI-based support for enabling/disabling WS-MakeConnection feature on an endpoint. This means that in order to enable WS-MakeConnection, you need to manually put the assertion into your endpoint's WSIT config file. Here are the steps:

  1. Open the existing WSIT config file for the endpoint.

    • If no config file has been created for the endpoint yet, you can create an empty one with a little help from NetBeans IDE by selecting and unselecting any feature in the QoS dialog or the "Design" tab of the web service endpoint.

  2. Add the WS-MakeConnection assertion namespace definition into the root XML element of the WSIT config file:

    Example 11.1. 

    xmlns:wsmc="http://docs.oasis-open.org/ws-rx/wsmc/200702"


  3. Create new WS-Policy expression in the config file:

    Example 11.2. 

    <wsp:Policy wsu:Id="McTestEchoPortBindingPolicy">
        <wsp:ExactlyOne>
            <wsp:All>
                <wsam:Addressing wsp:Optional="false"/>
                <wsmc:MCSupported />
            </wsp:All>
        </wsp:ExactlyOne>
    </wsp:Policy>


  4. Attach newly created WS-Policy expression to the endpoint binding using WS-Policy reference:

    Example 11.3. 

    <binding name="McTestEchoPortBinding" type="tns:McTestEcho">
        <wsp:PolicyReference URI="#McTestEchoPortBindingPolicy"/>
    
        ...
    
    </binding>


  5. Build and run the service. Service will now have WS-MakeConnection support enabled.

11.2.2. Configuration via a Java annotation

In addition to using WS-Policy expression as discussed in Configuration via an WS-Policy expression, you may as well configure WS-MakeConnection support using a @MakeConnectionSupported Java annotation provided by Metro. Please note, that this annotation is meant to annotate whole classes only. The resulting Java code for a sample web service would look like this:

Example 11.4. Example of WS-MakeConnection enabled service class using @MakeConnectionSupported Java annotation

package com.sun.metro.mc.service;

import com.sun.xml.ws.rx.mc.MakeConnectionSupported;
import jakarta.jws.WebMethod;
import jakarta.jws.WebParam;
import jakarta.jws.WebService;

@WebService()
@MakeConnectionSupported
public class McTestEcho {

    /**
     * Web service operation
     */
    @WebMethod(operationName = "echo")
    public String echo(@WebParam(name = "message")
    final String message) {
        return "Received: " + message;
    }

}

11.3. Configuring Web Service Client

Once the WS endpoint is properly configured in Metro to support WS-MakeConnection protocol messages, it advertises this ability in it's WSDL descriptor. In case you are developing a client for such an endpoint (which advertises WS-MakeConnection support in its WSDL), all the necessary configuration happens autmatically and you don't need to take any additional steps to enable WS-MakeConnection support on the client side.

There are however other web service frameworks that sometimes fail to advertise their advanced capabilities. In case of such an endpoint, which doesn't have the <wsmc:MCSupported /> assertion specified in its WSDL descriptor but you know that it DOES support WS-MakeConnection, you can use the JAX-WS's WS Feature mechanism to explicitly enable WS-MakeConnection support on your client proxy by passing a com.sun.xml.ws.rx.mc.MakeConnectionSupportedFeature instance as a parameter into a port getter method:

Example 11.5. 

McTestEcho port = null;
try {
    McTestEchoService service = new McTestEchoService();
    port = service.getMcTestEchoPort(
        new com.sun.xml.ws.rx.mc.MakeConnectionSupportedFeature());

    String message = "Test";

    String result = port.echo(message);

    System.out.println("Result = "+result);
} catch (Exception ex) {
    ex.printStackTrace();
} finally {
    if (port != null) {
        try {
            ((java.io.Closeable) port).close();
        } catch (java.io.IOException ex) {
            ex.printStackTrace();
        }
    }
}

Please note once again that passing the com.sun.xml.ws.rx.mc.MakeConnectionSupportedFeature explicitly is required ONLY if the endpoint fails to advertise its support for WS-MakeConnection feature via the <wsmc:MCSupported /> WS-Policy assertion.

Chapter 12. Using WSIT Security

Table of Contents

12.1. Configuring Security Using NetBeans IDE
12.2. Summary of Configuration Requirements
12.2.1. Summary of Service-Side Configuration Requirements
12.2.2. Summary of Client-Side Configuration Requirements
12.3. Security Mechanisms
12.3.1. Username Authentication with Symmetric Key
12.3.2. Username Authentication with Password Derived Keys
12.3.3. Mutual Certificates Security
12.3.4. Symmetric Binding with Kerberos Tokens
12.3.5. Transport Security (SSL)
12.3.6. Message Authentication over SSL
12.3.7. SAML Authorization over SSL
12.3.8. Endorsing Certificate
12.3.9. SAML Sender Vouches with Certificates
12.3.10. SAML Holder of Key
12.3.11. STS Issued Token
12.3.12. STS Issued Token with Service Certificate
12.3.13. STS Issued Endorsing Token
12.4. Configuring SSL and Authorized Users
12.4.1. Configuring SSL For Your Applications
12.4.2. Adding Users to GlassFish
12.5. Configuring Keystores and Truststores
12.5.1. Specifying Aliases with the Updated Stores
12.5.2. Configuring the Keystore and Truststore
12.5.3. Configuring Validators
12.6. Configuring Kerberos for GlassFish and Tomcat
12.6.1. For GlassFish
12.6.2. For Tomcat
12.7. Securing Operations and Messages
12.7.1. Supporting Token Options
12.8. Configuring A Secure Token Service (STS)
12.9. Example Applications
12.9.1. Example: Username Authentication with Symmetric Key (UA)
12.9.2. Example: Username with Digest Passwords
12.9.3. Example: Mutual Certificates Security (MCS)
12.9.4. Example: Transport Security (SSL)
12.9.5. Example: SAML Authorization over SSL (SA)
12.9.6. Example: SAML Sender Vouches with Certificates (SV)
12.9.7. Example: STS Issued Token (STS)
12.9.8. Example: Broker Trust STS (BT)
12.9.9. Example: STS Issued Token With SecureConversation (STS+SC)
12.9.10. Example: Kerberos Token (Kerb)

12.1. Configuring Security Using NetBeans IDE

This section describes the following tasks:

To Secure the Service

To use the IDE to configure security for a web service and/or a web service operation, perform the following steps.

  1. Create or open your web service.

    If you need an example of how to create a web service, refer to Developing with NetBeans.

    Note

    When creating an application using the wizards in NetBeans IDE and running on GlassFish, the Java EE Version defaults to Java EE 5. This results in an application compliant with Jakarta Enterprise Web Services Specification, which can be read at https://jakarta.ee/specifications/enterprise-ws/. If you select a value other than the default, for example, J2EE 1.4, the application that is created is not Jakarta Enterprise Web Services compliant, which means that the application is not Jakarta XML Web Service, but is JAX-RPC.

  2. In the Projects window, expand the Web Services node.

  3. Right-click the node for the web service you want to secure.

  4. Select Edit Web Service Attributes.

    When the Web Service Attributes Editor is opened, the Quality of Service options appear (see Web Service Attributes Editor Page).

    Figure 12.1. Web Service Attributes Editor Page

    Web Service Attributes Editor Page

  5. Select Secure Service.

    This option enables WSIT security for all of the operations of a web service.

    For information on how to secure selected operations, refer to Securing Operations and Messages.

  6. Choose a Security Mechanism from the list.

    Most of the mechanisms are fully functional without further configuration, however, if you'd like to customize the mechanism, click Configure to specify the configuration for that mechanism.

    Options in the Configure dialog are discussed in Security Mechanism Configuration Options.

  7. Select Use Development Defaults.

    Select this option to import certificates into the GlassFish keystore and truststore so that they can be used immediately for development. The WSIT message security mechanisms require the use of v3 certificates. The default GlassFish keystore and truststore do not contain v3 certificates at this time. In order to use message security mechanisms with GlassFish, it is necessary to obtain keystore and truststore files that contain v3 certificates and import the appropriate certificates into the default GlassFish stores.

    In addition to importing certificates, when this option is selected a default user is created in the file realm with username wsitUser.

    In a production environment, you should provide your own certificates and user settings, however, in a development environment you may find these defaults useful.

  8. Specify Keystore, Truststore, STS, SSL, and/or user information as required for the selected security mechanism.

    Refer to the entry for the selected security mechanism in Summary of Service-Side Configuration Requirements . This table summarizes the information that needs to be set up for each of the security mechanisms.

  9. Click OK to save your changes.

  10. Run the web application by right-clicking the project node and selecting Run.

  11. Verify the URL of the WSDL file before proceeding with the creation of the web service client.

    The client will be created from this WSDL file, and will get the service's security policies through the web service reference URL when the client is built or refreshed.

To Secure the Client

All of the steps in To Secure the Service need to be completed before you create your web service client. The service's security policies are defined in its WSDL. You specify this WSDL file when you create the client application so that the client is configured to work with the service's security mechanism through the web service reference URL when the client is built or refreshed.

To use the IDE to configure security for a web service client, perform the following steps.

  1. Create a client for your web service.

    If you need an example of how to do this, see Creating a Client to Consume a WSIT-Enabled Web Service .

    If you are creating a client for a mechanism that will use SSL, specify the secure port for running the client when completing the New Web Service Client step. To do this, type https:// fully_qualified_hostname :8181/ rest_of_url in the WSDL URL field of the New Web Service Client wizard. For the example, this is the way to specify the secure URL for CalculatorWSService web service:

    https://fully_qualified_hostname:8181/CalculatorApplication/CalculatorWSService?wsdl

    Note

    If you prefer to use localhost in place of the fully-qualified hostname when specifying the URL for the service WSDL, you must follow the workaround described in Transport Security (SSL) Workaround.

  2. In the Projects window, expand the client node.

  3. Expand the Web Service References node.

  4. Right-click the node for the web service reference you want to secure.

  5. Select Edit Web Service Attributes.

    When the Web Service References Attributes Editor is opened, select the Quality of Service tab to display the security options (see Web Service References Attributes Editor Page for Web Service Clients ).

    Figure 12.2. Web Service References Attributes Editor Page for Web Service Clients

    Web Service References Attributes Editor Page for Web Service Clients

  6. Select Use Development Defaults.

    Refer to Summary of Client-Side Configuration Requirements for a summary of what options are required on the client side. The configuration requirements for the client are dependent upon which security mechanism is specified on the server side.

  7. Click OK to save your changes.

    The security configuration information is saved in two files under Source Packages/META-INF. For more information on the format and runtime usage of these files, see Client-Side WSIT Configuration Files .

12.2. Summary of Configuration Requirements

The following sections summarize the options that need to be configured for each of the security mechanisms on both the service and client side. The configuration requirements for the client are dependent upon which security mechanism is specified on the server side.

This section covers the following topics:

12.2.1. Summary of Service-Side Configuration Requirements

Summary of Service-Side Configuration Requirements summarizes the options that need to be configured for each security mechanism. Each of the columns is briefly discussed after the table.

Table 12.1. Summary of Service-Side Configuration Requirements

Mechanism

Keystore

Truststore

STS

SSL

User in GlassFish

Kerberos

Username Authentication with Symmetric Key

X


X


Username Authentication with Password Derived Keys


X


Mutual Certificates

X

X (no alias)


Symmetric Binding with Kerberos Tokens


X

Transport Security


X

X


Message Authentication over SSL - Username Token


X

X


Message Authentication over SSL - X.509 Token


X (no alias)


X


SAML Authorization over SSL


X


Endorsing Certificate

X

X


SAML Sender Vouches with Certificate

X

X (no alias)


SAML Holder of Key

X

X (no alias)


STS Issued Token

X

X

X


STS Issued Token with Service Cert.

X

X

X


STS Issued Endorsing Token

X

X

X


  • Keystore: If this column has an X, select Use Development Defaults, or click the Keystore button and configure the keystore to specify the alias identifying the service certificate and private key. For the GlassFish keystores, the file is keystore.jks and the alias is xws-security-server, assuming that you've updated the GlassFish default certificate stores.

  • Truststore : If this column has an X, select Use Development Defaults, or click the Truststore button and configure the truststore to specify the alias that contains the certificate and trusted roots of the client. For the GlassFish keystores, the file is cacerts.jks and the alias is xws-security-client , assuming that you've updated the GlassFish default certificate stores.

  • STS : If this column has an X, you must have a Security Token Service that can be referenced by the service. An example of an STS can be found in the section To Create and Secure the STS (STS) . The STS is secured using a separate (non-STS) security mechanism. The security configuration for the client-side of this application is dependent upon the security mechanism selected for the STS, and not on the security mechanism selected for the application.

  • SSL : To use a mechanism that uses secure transport (SSL), you must configure the system to point to the client and server keystore and truststore files. Steps for doing this are described in Configuring SSL For Your Applications .

  • User in GlassFish : To use a mechanism that requires a user database for authentication, you can add a user to the file realm of GlassFish. Select Use Development Defaults, or follow the instructions for doing this at Adding Users to GlassFish .

  • Kerberos : This option is only valid for 'Symmetri Binding with Kerberos Tokens' Profile. Click the Kerbeos button to specify the login module to be used for this service. Login Modules can be specified in $GLASSFISH_HOME/domains/domain1/config/login.conf for GlassFish. An example showing use of Kerberos Tokens can be found at Example: Kerberos Token (Kerb).

12.2.2. Summary of Client-Side Configuration Requirements

Summary of Client-Side Configuration Requirements summarizes the options that need to be configured for each of the security mechanisms on the client-side. Each of the columns is briefly discussed after the table.

Table 12.2. Summary of Client-Side Configuration Requirements

Mechanism

Keystore

Truststore

Default User

SAML Callback Handler

STS

SSL

User in GlassFish

Kerberos

Username Authentication with Symmetric Key


X

X


X


Username Authentication with Password Derived Keys


X


X


Mutual Certificates

X

X


Symmetric Binding with Kerberos Tokens


X

Transport Security


X

X


Message Authentication over SSL - Username Token


X


X

X


Message Authentication over SSL - X.509 Token

X


X


SAML Authorization over SSL

X

X


X


X


Endorsing Certificate

X

X


SAML Sender Vouches with Certificate

X

X


X


SAML Holder of Key

X

X


X


STS Issued Token

X

X


X


STS Issued Token with Service Certificate

X

X


X


STS Issued Endorsing Token

X

X


X


  • Keystore: If this column has an X, select Use Development Defaults, or click Keystore to configure the keystore to point to the alias for the client certificate. For the GlassFish keystores, the keystore file is keystore.jks and the alias is xws-security-client, assuming that you've updated the GlassFish default certificate stores.

  • Truststore: If this column has an X, select Use Development Defaults, or click Truststore to configure the truststore that contains the certificate and trusted roots of the server. For the GlassFish keystores, the file is cacerts.jks and the alias is xws-security-server , assuming that you've updated the GlassFish default certificate stores as described in To Manually Update GlassFish Certificates.

    When using an STS mechanism, the client specifies the truststore and certificate alias for the STS, not the service. For the GlassFish stores, the file is cacerts.jks and the alias is wssip.

  • Default User: When this column has an X, you must configure either a default username and password, a UsernameCallbackHandler, or leave these options blank and specify a user at runtime. More information on these options can be found at Configuring Username Authentication on the Client.

  • SAML Callback Handler : When this column has an X, you must specify a SAML Callback Handler. Examples of SAML Callback Handlers are described in Example SAML Callback Handlers.

  • STS : If this column has an X, you must have a Security Token Service that can be referenced by the service. An example of an STS can be found in the sectionTo Create and Secure the STS (STS). The STS is secured using a separate (non-STS) security mechanism. The security configuration for the client-side of this application is dependent upon the security mechanism selected for the STS, and not on the security mechanism selected for the application. Note that on the service side, it is optionally to set Issuer for the STS to be used. You only need to configure the STS information on the client side if Issuer if not available in the service wsdl. If both configured, the service side Issuer takes high priority.

  • SSL : To use a mechanism that uses secure transport (SSL), you must configure the system to point to the client and server keystore and truststore files. Steps for doing this are described in Configuring SSL For Your Applications.

  • User in GlassFish: To use a mechanism that requires a user database for authentication, select Use Development Defaults, or add a user to the file realm of GlassFish. Instructions for doing this can be found at Adding Users to GlassFish.

  • Kerberos: This option is only valid for 'Symmetric Binding with Kerberos Tokens' profile. Click Kerberos button to configure the Login Module and Service Principal to be used by client, and if credential delegation should be set. An example showing use of Kerberos Tokens can be found at Example: Kerberos Token (Kerb).

12.2.2.1. Configuring Username Authentication on the Client

On the client side, a user name and password must be configured for some of the security mechanisms. For this purpose, you can use the default Username and Password Callback Handlers (when deploying to GlassFish), specify a SAML Callback Handler, specify a default user name and password for development purposes, create and specify your own Callback Handlers if the container you are using does not provide defaults, or specify the username and password dynamically at runtime. When using any of these options, you must create an authorized user on GlassFish using the Admin Console, as described in Adding Users to GlassFish.

To Configure Username Authentication on the Client

Once you've created an authorized user and determined how your application needs to specify the user, configure the Username Authentication options as follows.

  1. In the Projects window, expand the node for the web service client.

  2. Expand the Web Service References node.

  3. Right-click the node for the web service reference for which you want to configure security options.

  4. Select Edit Web Service Attributes.

  5. Select the Quality of Service tab to display the WSIT Security options.

  6. Expand the Security section to specify the user name and password information as required by the service. The dialog appears as shown in Quality of Service - Client - Security.

    Figure 12.3. Quality of Service - Client - Security

    Quality of Service - Client - Security


  7. The following options are available.

    Note

    Currently the GlassFish CallbackHandler cannot handle the following: SAML Callbacks and Require ThumbPrint Reference assertions under an X.509 Token. This may be addressed in a future milestone.

    • Use Development Defaults:

      Select this option to import certificates into the GlassFish keystore and truststore so that they can be used immediately for development. The WSIT message security mechanisms require the use of v3 certificates. The default GlassFish keystore and truststore do not contain v3 certificates at this time. In order to use message security mechanisms with GlassFish, it is necessary to obtain keystore and truststore files that contain v3 certificates and import the appropriate certificates into the default GlassFish stores.

      In addition to importing certificates, when this option is selected a default user is created in the file realm with username wsitUser.

      In a production environment, you should provide your own certificates and user settings, however, in a development environment you may find these defaults useful.

    • Authentication Credentials: Select Static or Dynamic. Select Static to supply a static username and password, or select Dynamic and specify the Username and Password CallbackHandlers. Select Static if you want to fill in the exact user credentials that the client is providing, and which cannot be changed after deployment. Static is useful to developing and testing applications prior to deployment. Select Dynamic to use CallbackHandlers to provide a dynamic way to provide credentials. Dynamic is useful if the credentials need to be obtained from some third party, for example, or if the developer doesn't want to store the user name and password in a configuration file because it might introduce a security risk.

    • Default Username, Default Password : These options are available when Static is selected as the Authentication Credential. Type the name of an authorized user and the password for this user. This option is best used only in the development environment. When the Default Username and Default Password are specified, the username and password are stored in the wsit-client.xml file in clear text, which presents a security risk. Do not use this option for production.

    • Default Username Callback Handler, Default Password Callback Handler : These options are available when the Authentication Credential is Dynamic. If you create JSR-109-compliant web services and web service clients that run under an Application Server container (JSR-109 deployment), the container handles the callbacks and you do not need to configure Callback Handlers of your own. If you are using another container, select the Browse button to select the class implementing the javax.security.auth.callback.CallbackHandler interface.

    • SAML Callback Handler : To use a SAML Callback Handler, you need to create one, as there is no default. References to example SAML Callback Handlers are provided in Example SAML Callback Handlers. An example that uses a SAML Callback Handler can be found in Example: SAML Authorization over SSL (SA).

    • Timestamp Timeout: This property specifies the duration(in seconds) for which timestamp should be considered valid. The default is 5 mins(300 seconds).

12.2.2.2. Example SAML Callback Handlers

Creating a SAML Callback Handler is beyond the scope of this document. However, the following web pages may be helpful for this purpose:

When writing SAML Callback Handlers for different security mechanisms, set the subject confirmation method to SV (Sender Vouches) or HOK (Holder of Key) and the appropriate SAML Assertion version depending on the SAML version and SAML Token Profile selected when setting the security mechanism for the service. When the subject confirmation method is HOK, a keystore and truststore file must be configured in the SAMLCallbackHandler. When the method is SV, you can either comment out the keystore and truststore information, or leave it, as it will not be used.

For example, the following code snippet for one of the SAMLCallbackHandlers listed above demonstrates how to set the subject confirmation method and sets the SAMLAssertion version to 1.0, profile 1.0.

Example 12.1. 

if (callbacks[i] instanceof SAMLCallback) {
    try {

        SAMLCallback samlCallback = (SAMLCallback) callbacks[i];

        /*
         Set confirmation Method to SV [SenderVouches] or
         HOK[Holder of Key]
        */
        samlCallback.setConfirmationMethod(samlCallback
                .SV_ASSERTION_TYPE);

        if (samlCallback.getConfirmationMethod().equals
                (samlCallback.SV_ASSERTION_TYPE)) {
            
            samlCallback.setAssertionElement
                    (createSVSAMLAssertion());

            svAssertion_saml10 = samlCallback.getAssertionElement();
            /*
            samlCallback.setAssertionElement
                (createSVSAMLAssertion20());
            svAssertion_saml20 =
                 samlCallback.getAssertionElement();
            */
        } else if (samlCallback.getConfirmationMethod().equals
                (samlCallback.HOK_ASSERTION_TYPE)) {
            
            samlCallback.setAssertionElement
                    (createHOKSAMLAssertion());
            hokAssertion_saml10 = samlCallback
                    .getAssertionElement();
            /*
            samlCallback.setAssertionElement
                (createHOKSAMLAssertion20());
            hokAssertion_saml20 =
                 samlCallback.getAssertionElement();
            */
        }
    } catch (Exception e) {
        e.printStackTrace();
    }
} else {
    throw unsupportedCallback;
}

12.3. Security Mechanisms

This section describes security mechanisms you can implement with WSIT. This section provides an overview of the following mechanisms:

A table that summarizes the configuration options on the server side is available in Summary of Service-Side Configuration Requirements.

Some common communication issues that need to be addressed using security mechanisms are discussed in Using Security Mechanisms.

12.3.1. Username Authentication with Symmetric Key

The Username Authentication with Symmetric Key mechanism protects your application for integrity and confidentiality. Symmetric key cryptography relies on a single, shared secret key that is used to both sign and encrypt a message. Symmetric keys are usually faster than public key cryptography.

For this mechanism, the client does not possess any certificate/key of his own, but instead sends its username/password for authentication. The client shares a secret key with the server. The shared, symmetric key is generated at runtime and encrypted using the service's certificate. The client must specify the alias in the truststore by identifying the server's certificate alias.

See Also: Example: Username Authentication with Symmetric Key (UA).

12.3.2. Username Authentication with Password Derived Keys

This feature is same as "Username Authentication with Symmetric Key", except that the protection token is Username Token.This feature relies on a single, shared secret key that is derived using password, salt(a 16 byte random array),iterations(an int value).This key will be used for signing and encrypting a message.

For this mechanism, the client does not need to have any certificate/key of his own.A 160 bit secret key will be generated using password,salt and iterations. This secret key will be used for signature/encryption. In the request the username,salt and iterations will be send to the server.The server generates the same key using the password(which it already has),salt and iterations. Using this key the server is able to decrypt the message and verify the signature.The default value for iterations is 1000.Current Netbeans versions doesn't show this feature in the security features list.So for a detailed explanation about this feature and to know how to configure this , please visit the blog: http://blogs.sun.com/SureshMandalapu/entry/passwordderivedkeys_support_in_metro

12.3.3. Mutual Certificates Security

The Mutual Certificates Security mechanism adds security through authentication and message protection that ensures integrity and confidentiality. When using mutual certificates, a keystore and truststore file must be configured for both the client and server sides of the application.

See Also: Example: Mutual Certificates Security (MCS).

12.3.4. Symmetric Binding with Kerberos Tokens

Symmetric Binding with Kerberos Tokens does client authentication using Kerberos Tokens and integrity and confidentiality protection using symmetric keys generated with Kerberos V5 Protocol. This profile assumes that Kerberos authentication is supported by the underlying platform and a KDC is configured. When using Kerberos Tokens Profile, a Login Module must be configured for the service, and a Login Module and Service Principal must be specified for the client.

Note

Kerberos is supported in Metro since 1.1 release. Netbeans support is available for Kerberos from Metro 1.3 and Netbeans 6.5 release. Kerberos is NOT supported on AIX systems.

See Also: Example: Kerberos Token (Kerb).

12.3.5. Transport Security (SSL)

The Transport Security mechanism protects your application during transport using SSL for authentication and confidentiality. Transport-layer security is provided by the transport mechanisms used to transmit information over the wire between clients and providers, thus transport-layer security relies on secure HTTP transport (HTTPS) using Secure Sockets Layer (SSL). Transport security is a point-to-point security mechanism that can be used for authentication, message integrity, and confidentiality. When running over an SSL-protected session, the server and client can authenticate one another and negotiate an encryption algorithm and cryptographic keys before the application protocol transmits or receives its first byte of data. Security is "live" from the time it leaves the consumer until it arrives at the provider, or vice versa. The problem is that it is not protected once it gets to its destination. For protection of data after it reaches its destination, use one of the security mechanisms that uses SSL and also secures data at the message level.

Digital certificates are necessary when running secure HTTP transport (HTTPS) using Secure Sockets Layer (SSL). The HTTPS service of most web servers will not run unless a digital certificate has been installed. Digital certificates have already been created for GlassFish, and the default certificates are sufficient for running this mechanism, and are required when using Atomic Transactions (see Using Atomic Transactions ). However, the message security mechanisms require a newer version of certificates than is available with GlassFish. You can download valid keystore and truststore files for the client and server as described in To Manually Update GlassFish Certificates.

To use this mechanism, follow the steps in Configuring SSL For Your Applications.

See Also: Example: Transport Security (SSL).

12.3.5.1. Transport Security (SSL) Workaround

This note applies to cases where https is the transport protocol used between a WSIT client and a secure web service using transport binding, and you are referencing localhost when creating the client.

Note

If you use the fully-qualified hostname (FQHN) in the URL for the service WSDL when you are adding the web service client to the client application, this workaround is not required. It is only required when you specify localhost in the URL for the service WSDL.

During development (not production) it is sometimes convenient to use certificates whose CN (Common Name) does not match the host name in the URL.

A developer would want to use a CN which is different from the host name in the URL in WSIT when using https addresses in Dispatch clients and during wsimport . The below mentioned workaround is only for the Dispatch clients, which are also used in WS-Trust to communicate with STS. This has to be done even if the client's main service is not on https, but only the STS is on https.

Java by default verifies that the certificate CN (Common Name) is the same as host name in the URL. If the CN in the certificate is not the same as the host name, your web service client fails with the following exception:

Example 12.2. 

jakarta.xml.ws.WebServiceException: java.io.IOException:
HTTPS hostname wrong: should be <hostname as in the certificate>

The recommended way to overcome this issue is to generate the server certificate with the Common Name (CN) matching the host name.

To work around this only during development, in your client code, you can set the default host name verifier to a custom host name verifier which does a custom check. An example is given below. It is sometimes necessary to include this in the static block of your main Java class as shown below to set this verifier before any connections are made to the server.

Example 12.3. 

static {
    //WORKAROUND. TO BE REMOVED.
    javax.net.ssl.HttpsURLConnection.setDefaultHostnameVerifier(
            new javax.net.ssl.HostnameVerifier(){
                public boolean verify(String hostname,
                                      javax.net.ssl.SSLSession sslSession) {
                    if (hostname.equals("mytargethostname")) {
                        return true;
                    }
                    return false;
                }
            });
}             

Please remember to remove this code once you install valid certificates on the server.

12.3.6. Message Authentication over SSL

The Message Authentication over SSL mechanism attaches a cryptographically secured identity or authentication token with the message and use SSL for confidentiality protection.

By default, a Username Supporting Token will be used for message authentication. To use an X.509 Supporting Token instead, click the Configure button and select X509. Under this scenario, you will need to configure your system for using SSL as described in Configuring SSL For Your Applications.

12.3.7. SAML Authorization over SSL

The SAML Authorization over SSL mechanism attaches an authorization token with the message and uses SSL for confidentiality protection. In this mechanism, the SAML token is expected to carry some authorization information about an end user. The sender of the token is actually vouching for the credentials in the SAML token.

To use this mechanism, configure SSL on the server, as described in Configuring SSL For Your Applications, and, on the clients side, configure a SAMLCallbackHandler as described in Example SAML Callback Handlers.

See Also: Example: SAML Authorization over SSL (SA).

12.3.8. Endorsing Certificate

This mechanism uses secure messages using symmetric key for integrity and confidentiality protection, and uses an endorsing client certificate to augment the claims provided by the token associated with the message signature. For this mechanism, the client knows the service's certificate, and requests need to be endorsed/authorized by a special identity. For example, all requests to a vendor must be endorsed by a purchase manager, so the certificate of the purchase manager should be used to endorse (or counter sign) the original request.

12.3.9. SAML Sender Vouches with Certificates

This mechanism protects messages with mutual certificates for integrity and confidentiality and with a Sender Vouches SAML token for authorization. The Sender Vouches method establishes the correspondence between a SOAP message and the SAML assertions added to the SOAP message. The attesting entity provides the confirmation evidence that will be used to establish the correspondence between the subject of the SAML subject statements (in SAML assertions) and SOAP message content. The attesting entity, presumed to be different from the subject, vouches for the verification of the subject. The receiver has an existing trust relationship with the attesting entity. The attesting entity protects the assertions (containing the subject statements) in combination with the message content against modification by another party. For more information about the Sender Vouches method, read the SAML Token Profile document at http://docs.oasis-open.org/wss/oasis-wss-saml-token-profile-1.0.pdf .

For this mechanism, the SAML token is included as part of the message signature as an authorization token and is sent only to the recipient. The message payload needs to be signed and encrypted. The requestor is vouching for the credentials (present in the SAML assertion) of the entity on behalf of which the requestor is acting.

The initiator token, which is an X.509 token, is used for signature. The recipient token, which is also an X.509 token, is used for encryption. For the server, this is reversed, the recipient token is the signature token and the initiator token is the encryption token. A SAML token is used for authorization.

See Also: Example: SAML Sender Vouches with Certificates (SV).

12.3.10. SAML Holder of Key

This mechanism protects messages with a signed SAML assertion (issued by a trusted authority) carrying client public key and authorization information with integrity and confidentiality protection using mutual certificates. The Holder-of-Key (HOK) method establishes the correspondence between a SOAP message and the SAML assertions added to the SOAP message. The attesting entity includes a signature that can be verified with the key information in the confirmation method of the subject statements of the SAML assertion referenced for key info for the signature. For more information about the Holder of Key method, read the SAML Token Profile document at http://docs.oasis-open.org/wss/oasis-wss-saml-token-profile-1.0.pdf .

Under this scenario, the service does not trust the client directly, but requires the client to send a SAML assertion issued by a particular SAML authority. The client knows the recipient's public key, but does not share a direct trust relationship with the recipient. The recipient has a trust relationship with the authority that issues the SAML token. The request is signed with the client's private key and encrypted with the server certificate. The response is signed using the server's private key and encrypted using the key provided within the HOK SAML assertion.

12.3.11. STS Issued Token

This security mechanism protects messages using a token issued by a trusted Secure Token Service (STS) for message integrity and confidentiality protection.

An STS is a service that implements the protocol defined in the WS-Trust specification (you can find a link to this specification at https://eclipse-ee4j.github.io/metro-wsit ). This protocol defines message formats and message exchange patterns for issuing, renewing, canceling, and validating security tokens.

Service providers and consumers are in potentially different managed environments but use a single STS to establish a chain of trust. The service does not trust the client directly, but instead trusts tokens issued by a designated STS. In other words, the STS is taking on the role of a second service with which the client has to securely authenticate. The issued tokens contain a key, which is encrypted for the server and which is used for deriving new keys for signing and encrypting.

To use this mechanism for the web service, you simply select this option as your security mechanism. However, you must have a Security Token Service that can be referenced by the service. An example of an STS can be found in the section To Create and Secure the STS (STS) . In this section, you select a security mechanism for the STS. The security configuration for the client-side of this application is dependent upon the security mechanism selected for the STS, and not on the security mechanism selected for the application. The client truststore must contain the certificate of the STS, which has the alias of wssip if you are using the updated GlassFish certificates.

See Also: Example: STS Issued Token (STS).

12.3.12. STS Issued Token with Service Certificate

This security mechanism is similar to the one discussed in STS Issued Token , with the difference being that in addition to the service requiring the client to authenticate using a SAML token issued by a designated STS, confidentiality protection is achieved using a service certificate. A service certificate is Unhandled tag caution used by a client to authenticate the service and provide message protection. For GlassFish, a default certificate of s1as is installed.

To use this mechanism for the web service, you simply select this option as your security mechanism. However, you must have a Security Token Service that can be referenced by the service. An example of an STS can be found in the section To Create and Secure the STS (STS) . In this section, you select a security mechanism for the STS. The security configuration for the client-side of this application is dependent upon the security mechanism selected for the STS, and not on the security mechanism selected for the application. The client truststore must contain the certificate of the STS, which has the alias of wssip if you are using the updated GlassFish certificates.

12.3.13. STS Issued Endorsing Token

This security mechanism is similar to the one discussed in STS Issued Token , with the difference being that the client authenticates using a SAML token that is issued by a designated STS. An endorsing token is used to sign the message signature.

In this mechanism, message integrity and confidentiality are protected using ephemeral keys encrypted for the service. Ephemeral keys use an algorithm where the exchange key value is purged from the cryptographic service provider (CSP) when the key handle is destroyed. The service requires messages to be endorsed by a SAML token issued by a designated STS.

Service providers and consumers are in potentially different managed environments. For this mechanism, the service requires that secure communications be endorsed by a trusted STS. The service does not trust the client directly, but instead trusts tokens issued by a designated STS. In other words, the STS is taking on the role of a second service with which the client has to securely authenticate.

For this mechanism, authentication of the client is achieved in this way:

  • The client authenticates with the STS and obtains the necessary token with credentials.

  • The client's request is signed and encrypted using ephemeral key K.

  • The server's response is signed and encrypted using the same K.

  • The primary signature of the request is endorsed using the issued token.

To use this mechanism for the web service, you simply select this option as your security mechanism. However, you must have a Security Token Service that can be referenced by the service. An example of an STS can be found in the section To Create and Secure the STS (STS) . In this section, you select a security mechanism for the STS. The security configuration for the client-side of this application is dependent upon the security mechanism selected for the STS, and not on the security mechanism selected for the application. The client truststore must contain the certificate of the STS, which has the alias of wssip if you are using the updated GlassFish certificates.

12.4. Configuring SSL and Authorized Users

This section discusses configuring security for your web service and web service client using the WSIT security mechanisms. Some of these mechanisms require some configuration outside of NetBeans IDE. Depending upon which security mechanism you plan to use, some of the following tasks will need to be completed:

  • If you are using the GlassFish container and message security, you must update the GlassFish keystore and truststore by importing v3 certificates. The procedure for updating the certificates is described in To Manually Update GlassFish Certificates.

  • If you are using a security mechanism that requires a user to enter a user name and password, create authorized users for your container. Steps for creating an authorized user for the GlassFish container are described in Adding Users to GlassFish.

  • To use a mechanism that uses secure transport (SSL), you must configure the system to point to the client and server keystore and truststore files. Steps for doing this are described in Configuring SSL For Your Applications.

This section covers the following topics:

12.4.1. Configuring SSL For Your Applications

This section describes adding the steps to configure your application for SSL. These steps will need to be accomplished for any application that uses one of the mechanisms:

To Configure SSL for Your Application

The following steps are generic to any application, but have example configurations that will work with the tutorial examples, in particular, Example: SAML Authorization over SSL (SA) and Example: Transport Security (SSL).

To configure SSL for your application, follow these steps.

  1. Select one of the mechanisms that require SSL.

    These include Transport Security (SSL), Message Authentication over SSL, andSAML Authorization over SSL.

  2. Server Configuration

    • GlassFish is already configured for SSL. No further SSL configuration is necessary if you are using Transport Security. However, if you are using one of the Message Security mechanisms with SSL, you must update the GlassFish certificates as described in To Manually Update GlassFish Certificates.

    • Configure a user on GlassFish as described in Adding Users to GlassFish.

  3. Client Configuration

    For configuring your system for SSL in order to work through the examples in this tutorial, the same keystore and truststore files are used for both the client and the service. This makes it unnecessary to set system properties to point to the client stores, as both GlassFish and NetBeans IDE are aware of these certificates and point to them by default.

    In general, for the client side of SSL you will not be using the same certificates for the client and the service. In that case, you need to define the client certificate stores by setting the system properties -Djavax.net.ssl.trustStore , -Djavax.net.ssl.keyStore , -Djavax.net.ssl.trustStorePassword , and -Djavax.net.ssl.keyStorePassword in the application client container.

    You can specify the environment variables for keystore and truststore by setting the environment variable VMARGS through the shell environment or inside an Ant script, or by passing them in when you start NetBeans IDE from the command line. For example, in the latter case, you would specify the property settings as follows:

    netbeans-install/bin/netbeans.exe
    -J-Djavax.net.ssl.trustStore=as-install/domains/domain1/config/cacerts.jks
    -J-Djavax.net.ssl.keyStore=as-install/domains/domain1/config/keystore.jks
    -J-Djavax.net.ssl.trustStorePassword=changeit
    -J-Djavax.net.ssl.keyStorePassword=changeit

    Use the hard-coded path to the keystore and truststore files, not variables.

    For the SSL mechanism, the browser will prompt you to accept the server alias s1as.

  4. Service Configuration

    To require the service to use the HTTPS protocol, you must select a security mechanism that uses SSL (as described in a previous step), and you have to specify the security requirements in the service's application deployment descriptor. This file is ejb-jar.xml for a web service that is implemented as an EJB endpoint, and web.xml for a web service implemented as a servlet. To specify the security information, follow these steps:

    1. From your web service application, expand Web Pages | WEB-INF.

    2. Double-click web.xml (or ejb-jar.xml ) to open it in the editor.

    3. Select the Security tab.

    4. On the Security Constraints line, expand the node for SSL transport for CalculatorWSService. This will display when a security mechanism that requires SSL is selected. This constraint will be sufficient for the example applications. This sections walks you through making some changes in the event that you would like to customize the security constraint for your application.

    5. Under Web Resource Collection, click Edit.

    6. Change the URL Pattern to be protected (for example, /* ). Select which HTTP Methods to protect, for example, POST. Click OK to close this dialog.

    7. Unselect Enable Authentication Constraint. Ensure that the Enable User Data Constraint box is checked. Verify that CONFIDENTIAL is selected for the Transport Guarantee to specify that the application uses SSL because the application requires that data be transmitted so as to prevent other entities from observing the contents of the transmission.

      The IDE appears as shown in Deployment Descriptor Page.

      Figure 12.4. Deployment Descriptor Page

      Deployment Descriptor Page

    8. Click the XML tab to display the additions to web.xml . The security constraint looks like this:

      Example 12.4. 

      <security-constraint>
          <display-name>Constraint1</display-name>
          <web-resource-collection>
              <web-resource-name>CalcWebResource</web-resource-name>
              <description/>
              <url-pattern>/*</url-pattern>
              <http-method>POST</http-method>
          </web-resource-collection>
          <user-data-constraint>
              <description/>
              <transport-guarantee>CONFIDENTIAL</transport-guarantee>
          </user-data-constraint>
      </security-constraint>

    9. When you run this project (right-click, select Run), the browser will ask you to accept the server certificate of s1as . Accept this certificate. The WSDL appears in the browser.

  5. Creating a Client

    When creating your client application, use the fully-qualified hostname to specify the secure WSDL location (use https:// fully_qualified_hostname :8181/CalculatorApplication/CalculatorWSService?wsdl , for example, in place of http://localhost:8080/CalculatorApplication/CalculatorWSService?wsdl ).

    In some cases, you might get an error dialog telling you that the URL https:// fully_qualified_hostname :8181/CalculatorApplication/CalculatorWSService?wsdl couldn't be downloaded. However, this is the correct URL, and it does load when you run the service. So, when this error occurs, repeat the steps that create the Web Service Client using the secure WSDL. The second time, the web service reference is created and you can continue creating the client.

12.4.2. Adding Users to GlassFish

This section describes the following tasks:

To Add a User to GlassFish for Development

To create a user in the GlassFish file realm to be used for testing and development purposes, follow these steps.

  1. In NetBeans IDE, right-click the web service, select Edit Web Service Attributes.

  2. Select Secure Service.

  3. Select Use Development Defaults.

    In addition to setting up keystore and truststore files, this option creates a default user on GlassFish. The user has the name wsitUser and the password of changeit .

To Add Users to GlassFish Using the Admin Console

To add users to GlassFish using the Admin Console, follow these steps.

  1. Start GlassFish if you haven't already done so.

  2. Start the Admin Console if you haven't already done so.

    You can start the Admin Console by starting a web browser and specifying the URL http://localhost:4848/asadmin . If you changed the default Admin port during installation, type the correct port number in place of 4848.

  3. To log in to the Admin Console, type the user name and password of a user in the admin-realm who belongs to the asadmin group.

    The name ( admin ) and password ( adminadmin ) entered during installation will work, as will any users added to this realm and group subsequent to installation.

  4. Expand the Configuration node in the Admin Console tree.

  5. Expand the Security node in the Admin Console tree.

  6. Expand the Realms node, then select the file realm.

  7. Click the Manage Users button.

  8. Click New to add a new user to the realm.

  9. Type the correct information into the User ID, Password, and Group(s) fields.

    The example applications reference a user with the following attributes:

    • User ID = wsitUser

    • Group List = wsit

    • New Password = changeit

    • Confirm New Password = changeit

  10. Click OK to add this user to the list of users in the realm.

  11. Click Logout when you have completed this task.

To Add Users to GlassFish From the Command Line

  1. Make sure GlassFish is running, then type the following command:

    as-install/bin/asadmin create-file-user --groups wsit wsitUser
  2. When you are prompted for the password, type changeit .

12.5. Configuring Keystores and Truststores

This section describes configuring keystores and truststores. Security mechanisms that use certificates require keystore and truststore files for deployment.

  • For GlassFish, default keystore and truststore files come bundled. However, WSIT security mechanisms for message security require X.509 version 3 certificates. GlassFish contains version 1 certificates. Therefore, to enable the WSIT applications to run on GlassFish, you will need to follow the instructions in To Manually Update GlassFish Certificates .

  • For Tomcat, keystore and truststore files do not come bundled with this container, so they must be provided. You can download valid keystore and truststore files for the client and server from http://xwss.java.net/ .

This section covers the following topics:

To Automatically Update GlassFish Certificates

You can have NetBeans automatically update the GlassFish certificates to the version needed to work with message security. To do this, follow these steps:

  1. In NetBeans IDE, right-click the web service, select Edit Web Service Attributes.

  2. Select Secure Service.

  3. Select Use Development Defaults.

    This option imports certificates into the GlassFish keystore and truststore so that they can be used immediately for development.

    In a production environment, you should provide your own certificates and user settings, however, in a development environment you may find these defaults useful.

To Manually Update GlassFish Certificates

The WSIT message security mechanisms require the use of v3 certificates. The default GlassFish keystore and truststore Unhandled tag varname do not contain v3 certificates at this time (but should before FCS). (GlassFish instances installed using JDK 1.6 do have a v3 certificate but the certificate lacks a particular extension required for supporting some secure WSIT mechanisms.) In order to use message security mechanisms with GlassFish, it is necessary to download keystore and truststore files that contain v3 certificates and import the appropriate certificates into the default GlassFish stores.

Note

The XWSS keystores are sample keystores containing sample v3 certificates. These sample keystores can be used for development and testing of security with WSIT technology. Once an application is in production, you should definitely use your own v3 certificates issued by a trusted authority. In order to use WSIT security on GlassFish, you will have to import your trusted stores into GlassFish's keystore and specify those certificates from NetBeans IDE.

To manually update the GlassFish certificates, follow these steps.

  1. Download the zip file that contains the certificates and the Ant scripts ( copyv3.zip ) by going to this URL:

    https://xwss.java.net/servlets/ProjectDocumentList?folderID=6645&expandFolder=6645&folderID=6645

  2. Unzip this file and change into its directory, copyv3 .

  3. Set the variable to the location where GlassFish is installed, as described in the README.txt file in this directory.

  4. From the copyv3 directory, execute the Ant command that will copy the keystore and truststore files to the appropriate location, and import the appropriate certificates into the GlassFish keystore and truststore.

    This Ant command is as follows:

    as-install/lib/ant/bin/ant

    The command window will echo back the certificates that are being added to the keystore and truststore files, and should look something like this:

    [echo] WARNING: currently we add non-CA certs to GF truststore, this
    will not be required in later releases when WSIT starts supporting CertStore(s)
    [java] Added Key Entry  :xws-security-server
    [java] Added Key Entry  :xws-security-client
    [java] Added Trusted Entry  :xwss-certificate-authority
    [java] Added Key Entry  :wssip
    [java] Added Trusted Entry  :xws-security-client
    [java] Added Trusted Entry  :xws-security-server
    [java] Added Trusted Entry  :wssip
    [echo] Adding JVM Option for https outbound alias, this will take at least
    One Minute.
    ...
  5. To verify that the updates were successful, follow these steps:

    1. Change to the directory containing the GlassFish keystore and truststore files, as-install /domains/domain1/config .

    2. Verify that the v3 certificate has been imported into the GlassFish truststore. To do this, run the following keytool command (all on one line):

      java-home/bin/keytool -list -keystore cacerts.jks -alias wssip -storepass changeit

      If the certificates are successfully updated, your response will look something like this:

      wssip, Aug 20, 2007, trustedCertEntry,
      Certificate fingerprint (MD5): 1A:0E:E9:69:7D:D0:80:AD:5C:85:47:91:EB:0D:11:B1

      If the certificates were not successfully update, your response will look something like this:

      keytool error: java.lang.Exception: Alias <wssip> does not exist
    3. Verify that the v3 certificate has been imported into the GlassFish keystore. To do this, run the following keytool commands:

      java-home/bin/keytool -list -keystore keystore.jks
      -alias xws-security-server -storepass changeit
      java-home/bin/keytool -list -keystore keystore.jks
      -alias xws-security-client -storepass changeit

      If the certificates were successfully updated, your response should look something like this:

      xws-security-server, Aug 20, 2007, PrivateKeyEntry,
      Certificate fingerprint (MD5): E4:E3:A9:02:3C:B0:36:0C:C1:48:6E:0E:3E:5C:5E:84

      If your certificates were not successfully updated, your response will look more like this:

      keytool error: java.lang.Exception: Alias <xws-security-server> does not exist

12.5.1. Specifying Aliases with the Updated Stores

The configuration of the aliases for all containers (Tomcat, GlassFish) and for all applications (JSR-109-compliant and non-JSR-109-compliant), except for applications that use a Security Token Service (STS) mechanism, is as shown in Keystore and Truststore Aliases .

Table 12.3. Keystore and Truststore Aliases

Keystore Alias

Truststore Alias

Client-Side Configuration

xws-security-client

xws-security-server

Server-Side Configuration

xws-security-server

xws-security-client


The configuration of the aliases for applications that use a Security Token Service (STS) mechanism is as shown in Keystore and Truststore Aliases for STS .

Table 12.4. Keystore and Truststore Aliases for STS

Keystore Alias

Truststore Alias

Client-Side Configuration

xws-security-client

xws-security-server

STS Configuration

xws-security-client

wssip


12.5.2. Configuring the Keystore and Truststore

NetBeans IDE already knows the location of the default keystore file and its password, but you need to specify which alias is to be used. The following sections discuss configuring the keystore on the service and on the client.

To Configure the Keystore on a Service Automatically

To have NetBeans IDE configure the keystore to its default values, follow these steps.

  1. In NetBeans IDE, right-click the web service, select Edit Web Service Attributes.

  2. Select Secure Service.

  3. Select Use Development Defaults.

    This option imports certificates into the GlassFish keystore and truststore so that they can be used immediately for development. This option also inserts the location and alias of the keystore and truststore files into the configuration file.

    In a production environment, you should provide your own certificates and user settings, however, in a development environment you may find these defaults useful.

To Configure the Keystore on a Service Manually

A keystore is a database of private keys and their associated X.509 certificate chains authenticating the corresponding public keys. A key is a piece of information that controls the operation of a cryptographic algorithm. For example, in encryption, a key specifies the particular transformation of plaintext into ciphertext, or vice versa during decryption. Keys are used in digital signatures for authentication.

To configure a keystore on a service, perform the following steps.

  1. Check the table in Summary of Service-Side Configuration Requirements to see if a keystore needs to be configured for the selected security mechanism. If so, continue.

  2. Right-click the web service and select Edit Web Service Attributes.

    The Web Service Attributes editor is displayed.

  3. Enable Secure Service, then select a security mechanism.

  4. Check the table in Summary of Service-Side Configuration Requirements to see what keystore configuration, if any, is required for that mechanism.

  5. Unselect Use Development Defaults.

  6. Click the Keystore button. The dialog shown in Keystore Configuration Dialog displays.

    Figure 12.5. Keystore Configuration Dialog

    Keystore Configuration Dialog


  7. Depending on what is required for the selected mechanism, you may specify the following information in the Keystore Configuration dialog:

    • Keystore Password : Specifies the password for the keystore file. If you are running under GlassFish, GlassFish's password is already entered. If you have changed the keystore's password from the default, you must specify the correct value in this field.

    • Load Aliases : Click the Load Aliases button to populate the Alias field with the aliases contained in the keystore file. The Location and Store Password fields must be specified correctly for this option to work.

    • Alias : Specifies the alias of the certificate in the specified keystore to be used for authentication. Refer to the table in Specifying Aliases with the Updated Stores to determine which alias to choose for the selected security mechanism.

    • Key Password : Specifies the password of the key within the keystore. For this sample, leave this blank. For this field, the default assumes the key password is the same as the store password, so you only need to specify this field when the key password is different.

    Note

    The Key Password field enables you to specify a password for the keystore used by the application. When specified, this password is stored in a WSIT configuration file in clear text, which is a security risk. Setting the keystore password in the development environment is fine, however, when you go into production, remember to use the container's Callback Handler to obtain the keys from the keystore. This eliminates the need for the keystore passwords to be supplied by the users. You can also specify the passwords for keystores and truststores by specifying a Callback Handler class that implements the javax.security.auth.callback.CallbackHandler interface in the Key Password or Store Password fields.

    When creating JSR-109-compliant application, GlassFish will only use the default CallbackHandlers and Validators, and you cannot override the location of the keystore and truststore files. Any attempt to override the default location will be ignored. You do, however, need to specify the keystore and truststore locations in these dialogs in order to specify the alias.

    When creating non-JSR-109-compliant application, you can specify the passwords for keystores and truststores by specifying a CallbackHandler class that implements the javax.security.auth.callback.CallbackHandler interface in the Key Password or Store Password fields.

  8. Click OK to close the dialog.

To Configure the Truststore on a Service Automatically

To have NetBeans IDE configure the truststore to its default values, follow these steps.

  1. In NetBeans IDE, right-click the web service, select Edit Web Service Attributes.

  2. Select Secure Service.

  3. Select Use Development Defaults.

    This option imports certificates into the GlassFish keystore and truststore so that they can be used immediately for development. This option also inserts the location and alias of the keystore and truststore files into the configuration file, when required for a selected security mechanism.

    In a production environment, you should provide your own certificates and user settings, however, in a development environment you may find these defaults useful.

To Configure the Truststore on a Service Manually

A truststore is a database of trusted entities and their associated X.509 certificate chains authenticating the corresponding public keys.

The truststore contains the Certificate Authority (CA) certificates and the certificates of the other party to which this entity intends to send encrypted (confidential) data. This file must contain the public key certificates of the CA and the client's public key certificate. Any kind of encryption without WS-SecureConversation will generally require that a truststore be configured on the client side. Any kind of signature without WS-SecureConversation will generally require a truststore on the server side.

Note

For this release, place the trusted certificates of other parties in GlassFish's truststore, cacerts.jks . This is not normally a recommended practice because any certificate you add to the cacerts.jks file effectively means it can be a trusted root for any and all certificate chains, which can be a security problem. In future releases, trusted certificates from other parties will be placed in a certstore, and only trusted roots will be placed inside cacerts.jks .

To set the truststore configuration options on a service, perform the following steps.

  1. Check the table in Summary of Service-Side Configuration Requirements to see if a truststore is required for the selected security mechanism. If so, continue.

  2. Right-click the web service and select Edit Web Service Attributes.

    The Web Service Attributes editor is displayed.

  3. Enable Secure Service.

  4. Unselect Use Development Defaults.

  5. Click the Truststore button.

  6. On the Truststore Configuration page, specify the following options:

    • Location : By default, the location and name of the truststore that stores the public key certificates of the CA and the client's public key certificate is already entered. The GlassFish truststore file is as-install /domains/domain1/config/cacerts.jks.

    • Store Password : Specifies the password for the truststore. If you are using GlassFish, the value of changeit is already entered. If you have changed the value of the truststore password, you must type the new value in this field.

      Note

      The Store Password field enables you to specify a password for the truststore used by the application. When specified, this password is stored in a WSIT configuration file in clear text, which is a security risk. Setting the truststore password in the development environment is fine, however, when you go into production, remember to use the container's Callback Handler to obtain the keys from the truststore. This eliminates the need for the truststore passwords to be supplied by the users. You can also specify the passwords for keystores and truststores by specifying a CallbackHandler class that implements the javax.security.auth.callback.CallbackHandler interface in the Key Password or Store Password fields.

      When creating JSR-109-compliant application, GlassFish will only use the default CallbackHandlers and Validators, and you cannot override the location of the keystore and truststore files. Any attempt to override the default location will be ignored. You do, however, need to specify the keystore and truststore locations in these dialogs in order to specify the alias.

    • Load Aliases : Click the Load Aliases button to populate the Alias field with the aliases contained in the truststore file. The Location and Store Password fields must be specified correctly for this option to work.

    • Alias : Unhandled tag tip Specifies the peer alias of the certificate in the truststore that is to be used when the client needs to send encrypted data. Refer to the table in Specifying Aliases with the Updated Stores to determine which alias is appropriate for the selected security mechanism. A truststore contains trusted other-party certificates and certificates of Certificate Authorities (CA). A peer alias is the alias of the other party (peer) that the sending party needs to use to encrypt the request.

  7. Click OK to close the dialog.

To Configure the Keystore and Truststore on a Client

On the client side, a keystore and truststore file must be configured for some of the security mechanisms. Refer to the table in Summary of Client-Side Configuration Requirements for information on which mechanisms require the configuration of keystores and truststores.

If the mechanism configured for the service requires the configuration of keystores and truststores, follow these steps.

  1. Check the table in Summary of Client-Side Configuration Requirements to see if a keystore needs to be configured for the client for the selected security mechanism. If so, continue.

  2. In the Projects window, expand the node for the web service client.

  3. Expand the Web Service References node.

  4. Right-click the node for the web service reference for which you want to configure security options.

  5. Select Edit Web Service Attributes.

    When the Web Service References Attributes Editor is opened, select the Quality of Service tab to display the WSIT Security options.

  6. Click Keystore or Truststore to specify the keystore or truststore information if required by the service.

  7. Depending on what is required for the selected mechanism, you may specify the following information:

    • Keystore Location : The directory and file name containing the certificate key to be used to authenticate the client. By default, the location is already set to the default GlassFish keystore, as-install /domains/domain1/config/keystore.jks .

    • Keystore Password : The password for the keystore used by the client. By default, the password for the GlassFish keystore is already entered. This password is changeit .

      Note

      When specified, this password is stored in a WSIT configuration file in clear text. Setting the keystore password in the development environment is fine, however, when you go into production, remember to use the container's default CallbackHandler to obtain the keys from the keystore. This eliminates the need for the keystore passwords to be supplied by the users. You can also specify the passwords for keystores and truststores by specifying a CallbackHandler class that implements the javax.security.auth.callback.CallbackHandler interface in the Keystore Password, Truststore Password, or Key Password fields.

    • Load Aliases : Click this button to populate the Alias list with all of the certificates available in the selected keystore. This option will only work if the keystore location and password are correct.

    • Keystore Alias : Select the alias in the keystore. Refer to the table in Specifying Aliases with the Updated Stores to determine which alias is appropriate for the selected security mechanism.

    • Key Password : If the client key has been password-protected, type the password for this key. The GlassFish certificate key password is changeit .

    • Truststore Location : The directory and file name of the client truststore containing the certificate of the server. By default, this field points to the default GlassFish truststore, as-install /domains/domain1/config/cacerts.jks.

    • Truststore Password : The password for the truststore used by the client. By default, the password for the GlassFish truststore is already specified. The password is changeit .

      Note

      When specified, this password is stored in a WSIT configuration file in clear text. Setting the truststore password in the development environment is fine; however, when you go into production, remember to use the container's default CallbackHandler to obtain the keys from the keystore. This eliminates the need for the keystore passwords to be supplied by the users. You can also specify the passwords for keystores and truststores by specifying a CallbackHandler class that implements the javax.security.auth.callback.CallbackHandler interface in the Keystore Password, Truststore Password, or Key Password fields.

    • Load Aliases : Click this button to populate the Alias list with all of the certificates available in the selected keystore. This option will only work if the truststore location and password are correct.

    • Truststore Alias : Select the alias of the server certificate and private key in the client truststore. Refer to the table in Specifying Aliases with the Updated Stores to determine which alias is appropriate for the selected security mechanism.

  8. Click OK to close the dialog.

12.5.3. Configuring Validators

A validator is an optional set of classes used to check the validity of a token, a certificate, a timestamp, or a username and password. The Validators button will be enabled when all of the following are true:

  • Security is enabled for the service.

  • Target server for the service is not GlassFish.

  • Development defaults are disabled.

  • Security profile for the service is not one of the three STS based profiles.

Applications that run under a GlassFish 9.1 or higher container do not need to configure Callback Handlers and Validators when using the IDE with WSIT enabled. This is because the container handles the callbacks and validation. You only need to make sure that the certificates are available at locations that GlassFish requires and/or create authorized users using the Admin Console (described in Adding Users to GlassFish .

Validators are always optional because there are defaults in the runtime (regardless of the container and regardless of whether the application is a JSR-109 or a non-JSR-109 deployment.) For non-JSR-109 deployment, you only need to specify a validator when you want to override the default validators. For JSR-109 deployments, there is no point in specifying an overriding validator, as these will be overridden back to the defaults by GlassFish, thus the Validators button is not available when the selected web service is a JSR-109-compliant application.

To Set Validator Configuration Options

To set the validator configuration options for a non-JSR-109-compliant application (such as a Java SE client), perform the following steps.

  1. Right-click the web service and select Edit Web Service Attributes.

    The Web Service Attributes editor is displayed.

  2. Enable Secure Service.

  3. Unselect Use Development Defaults.

  4. Click the Validator button.

  5. On the Validator Configuration page, specify the following options, when necessary:

    • Username Validator : Specifies the validator class to be used to validate username and password on the server side. This option is only used by a web service.

      Note

      When using the default Username Validator, make sure that the username and password of the client are registered with GlassFish (using Admin Console, described in Adding Users to GlassFish ) if using GlassFish, or is included in the tomcat-users.xml file if using Tomcat.

    • Timestamp Validator : Specifies the validator class to be used to check the token timestamp to determine whether the token has expired or is still valid.

    • Certificate Validator : Specifies the validator class to be used to validate the certificate supplied by the client or the web service.

    • SAML Validator: Specifies the validator class to be used to validate SAML token supplied by the client or the web service.

  6. Click OK to close the dialog.

12.6. Configuring Kerberos for GlassFish and Tomcat

This section explains how to setup GlassFish or Tomcat to use Kerberos Authentication. It assumes that the underlying infrastructure has Kerberos Authentication available. If you need information on how to setup Kerberos in Solaris or Ubuntu Linux environments, refer to the following links:

Note that in a Windows environment you can set up a Kerberos KDC only on Window Server editions 2000, 2022 and 2008. The KDC is bundled in these editions with its own Kerberos implementation as part of Active Directory. You can not install MIT Kerberos KDC on Windows. A Windows XP/Vista system can act as a client of the Windows Server editions KDC. Alternatively, you can install a client module of MIT Kerberos for Windows -- see Kerberos for Windows Release 3.2.2.You can then use the client module to authenticate against a KDC that was set up on a UNIX system.

12.6.1. For GlassFish

Specify the JAAS login modules to be used for Kerberos in the $GLASSFISH_HOME/domains/domain1/config/login.conf file, as follows:

KerberosClient {
    com.sun.security.auth.module.Krb5LoginModule required
    useTicketCache=true;
}

KerberosServer {
    com.sun.security.auth.module.Krb5LoginModule required
    useKeyTab=true keyTab="/etc/krb5.keytab"
    doNotPrompt=true storeKey=true
    principal="websvc/service@INDIA.SUN.LOCAL";
}

You can give any names to the login modules, that is, instead of KerberosClient and KerberosServer. You need to refer to these names in the <sc:KerberosConfig> assertion in the WSDL file and in the wsit-client.xml file.

Also edit the principal in KerberosServer to the service_principal that you created, and specify the correct location of krb5.keytab file.

12.6.2. For Tomcat

GlassFish picks the login modules from $GLASSFISH_HOME/domains/domain1/config/login.conf. In Tomcat we need to specify the file explicitly using java.security.auth.login.config system property. Here are the steps:

  • Create a file jaas.conf , and place it in $CATALINA_HOME/conf. Here's what jaas.conf looks like:

    KerberosClient {
        com.sun.security.auth.module.Krb5LoginModule required
        useTicketCache=true;
    };
    KerberosServer {
        com.sun.security.auth.module.Krb5LoginModule required
        useKeyTab=true keyTab="/etc/krb5.keytab"
        doNotPrompt=true storeKey=true
        principal="websvc/service@INDIA.SUN.COM";
    };
  • Add following line to the catalina.sh script (or specify the mentioned JAVA_OPTS property):

    JAVA_OPTS="$JAVA_OPTS "-Djava.security.auth.login.config=$CATALINA_HOME/conf/jaas.conf
  • Specify the following system property in your client code:

    -Djava.security.policy=${tomcat.home}/conf/catalina.policy
    -Djava.security.auth.login.config=${tomcat.home}/conf/jaas.conf

12.7. Securing Operations and Messages

This section explains how to specify security mechanisms at the operation level and at the message level.

You can specify security mechanisms at the following levels:

  • Operation

    At times, you may need to configure different operations with different supporting tokens. You may wish to configure security at the operation level, for example, in the situation where only one operation requires a UsernameToken to be passed and the rest of the operations do not require this, or in the situation where only one operation needs to be endorsed by a special token and the others do not.

  • Input Message and Output Message

    Security mechanisms at this level are used to specify what is being protected and the level of protection required.

    In this section, you can specify parts of a message that require integrity protection (digital signature) and/or confidentiality (encryption). When you do this, the specified part of the message, outside of security headers, requires signature and/or encryption. For example, a message producer might submit an order that contains an orderID header. The producer signs and/or encrypts the orderID header (the SOAP message header) and the body of the request (the SOAP message body). Parts that can be signed and/or encrypted include the body, the header, the local name of the SOAP header, and the namespace of the SOAP header.

    You can also specify arbitrary elements in the message that require integrity protection and/or confidentiality. Because of the mutability of some SOAP headers, a message producer may decide not to sign and/or encrypt the SOAP message header or body as a whole, but instead sign and/or encrypt elements within the header and body. Elements that can be signed and/or encrypted include an XPath expression or a URI which indicates the version of XPath to use.

This section covers the following topics:

To Specify Security at the Operation, Input Message, or Output Message Level

To specify security mechanisms at the level of the operation, input message, or output message, perform the following steps.

  1. Right-click the web service and select Web Service Attributes.

    The Web Service Attributes editor is displayed.

  2. Select Secure Service.

  3. Select a security mechanism.

    The following mechanisms do not support Input message level protection:

  4. Expand the operation Operation node (for example, the add Operation node.) It should look like Web Service Attributes Editor Page: Operation Level.

    Figure 12.6. Web Service Attributes Editor Page: Operation Level

    Web Service Attributes Editor Page: Operation Level


  5. Expand the operation section.

    The section will be grayed out if Secure Service is not selected.

  6. Select an option from the Transactions list to specify a level at which transactions will be secured.

    For this release, transactions will only use SSL for security. Transactions are discussed in Using Atomic Transactions.

  7. Expand the Input Message section.

    This section will be grayed out if Secure Service is not selected.

  8. Specify the following options, as appropriate:

    • Authentication Token : Specifies which supporting token will be used to sign and/or encrypt the specified message parts. Options include Username, X509, SAML, Issued, or None. For further description of these options, read Supporting Token Options.

    • Signed : Specifies that the authentication token must be a signed, supporting token. A signed, supporting token is signed by the primary signature token and is part of primary signature.

    • Endorsing : Specifies that the authentication token must be endorsed. With an endorsing supporting token, the key represented by the token is used to endorse/sign the primary message signature.

    • Encrypted: Specifies that the authentication token must be an encrypted supporting token.

    One can select any (or none) combination of the three options above. If both Signed and Endorsing are selected, the authentication token must be a signed, endorsing, supporting token. In this situation, the token is signed by the primary signature. The key represented by the token is used to endorse/sign the primary message signature. If Encrypted is selected as well, the supporting token is also encrypted in the request message.

  9. For the Input Message and/or Output Message, click the Message Parts button to specify which parts of the message need to be encrypted, signed, and/or required.

    See the following section for more information on the options in the Message Parts dialog.

    The Message Parts dialog appears. It should look like Web Service Attributes Editor Page: Message Parts.

    Figure 12.7. Web Service Attributes Editor Page: Message Parts

    Web Service Attributes Editor Page: Message Parts

  10. Click in a checkbox to the right of the message part or element that you would like to sign, encrypt or require.

    • Select Sign to specify the parts or elements of a message that require integrity protection (digital signature).

    • Select Encrypt to specify the parts or elements of a message that require confidentiality (encryption).

    • Select Require to specify the set of parts and/or elements that a message must contain.

  11. Click Add Body to add a row for the message body.

    This will only be necessary if the row has been removed.

  12. Click Add Header to add a row for either a specific SOAP header part or for all SOAP header parts.

    This will only be necessary if the SOAP header row in question has been deleted. The header parts that are available to sign and/or encrypt before clicking the Add Header button include To (Addressing), From (Addressing), FaultTo (Addressing), ReplyTo (Addressing), MessageID (Addressing), RelatesTo (Addressing), and Action (Addressing). After clicking Add Header, and then clicking All Headers, you may also specify AckRequested (RM), SequenceAcknowledgement (RM), and Sequence (RM).

  13. Click Add Attachments to add a row the SOAP attachments.

    This is useful if the web service has MIME attachments which should be protected. All the attachments in the message are secured on selecting this option. This option is only available for the specification version of Security Policy, supported in Netbeans IDE from 6.5 version.

    Note

    Attachments Protection is not supported in .NET 3.0 and 3.5. So it is best to avoid this feature for interop with .NET.

  14. There are no XPath elements displayed by default. Click Add XPath to add rows that enable you to specify signature and/or encryption for an XPath expression or a URI which indicates the version of XPath to use.

    By default, the Required field is selected. This is an editable field. Double-click the XPath row to specify the XPath expression or URI. Only one XPath element is allowed.

    Note

    There is a limitation when specifying XPath elements. To use XPath elements, switch off Optimize Security manually by adding the disableStreamingSecurity policy assertion. For information on how to do this, refer to http://blogs.sun.com/venu/ for more information on disableStreamingSecurity.

  15. To remove an element, select it in the Message Part section, and then click Remove to remove it from message security.

  16. Click OK to save these settings.

12.7.1. Supporting Token Options

You can use one of the following options for supporting tokens:

  • Username Token: A username token is used to identify the requestor by their username, and optionally using a password (or shared secret, or password equivalent) to authenticate that identity. When using a username token, the user must be configured on GlassFish. For information on configuring users on GlassFish, read Adding Users to GlassFish.

  • X.509 Certificate: An X.509 certificate specifies a binding between a public key and a set of attributes that includes (at least) a subject name, issuer name, serial number, and validity interval. An X.509 certificate may be used to validate a public key that may be used to authenticate a SOAP message or to identify the public key with a SOAP message that has been encrypted. When this option is selected, you must specify a truststore. For information on specifying a truststore, read To Configure the Truststore on a Service Manually.

  • Issued Token : An issued token is a token issued by a trusted Secure Token Service (STS). The service does not trust the client directly, but instead trusts tokens issued by a designated STS. In other words, the STS is taking on the role of a second service with which the client has to securely authenticate. The issued tokens contain a key, which is encrypted for the server and which is used for deriving new keys for signing and encrypting.

  • SAML Token : A SAML Token uses Security Assertion Markup Language (SAML) assertions as security tokens.

12.8. Configuring A Secure Token Service (STS)

A Secure Token Service (STS) is a Web service that issues security tokens. That is, it makes assertions based on evidence that it trusts, to whoever trusts it (or to specific recipients). To communicate trust, a service requires proof, such as a signature, to prove knowledge of a security token or set of security tokens. A service itself can generate tokens or it can rely on a separate STS to issue a security token with its own trust statement (note that for some security token formats this can just be a re-issuance or co-signature). This forms the basis of trust brokering.

The issued token security model includes a target service, a client, and a trusted third party called a Security Token Service (STS). Policy flows from service to client, and from STS to client. Policy may be embedded inside an issued token assertion, or acquired out-of-hand. There must be an explicit trust relationship between the service and the STS and the client and the STS. There does not need to be a trust relationship between the client and service.

When the web service being referenced by the client uses any of the STS security mechanisms (refer to tables in Summary of Service-Side Configuration Requirements and Summary of Client-Side Configuration Requirements ), an STS must be specified. You can specify the STS in the following ways.

This section covers the following topics:

To Create a Third-Party STS

Use the STS wizard to create an STS. When using the STS wizard, provide the name of the STS implementation class. This class must extend com.sun.xml.ws.security.trust.sts.BaseSTSImpl . After completing the steps of the wizard, your application will contain a new service that is an STS and includes a provider implementation class, STS WSDL, and a WSIT configuration file with a predefined set of policies.

To use the STS wizard to create an STS, follow these steps.

  1. Create a new project for the STS by selecting File | New Project.

  2. Select Java Web, then Web Application, then Next.

  3. Type a Project Name, then Next, then the desired Server. Click Finish.

  4. Right-click the STS Project, and select New, then select Other.

  5. Select Web Services from the Categories list.

  6. Select Secure Token Service (STS) from the File Type(s) list.

  7. Click Next.

  8. Type a name for the Web Service Class Name.

  9. Type or select a name for the Package list.

  10. Click Finish.

    The IDE takes a while to create the STS. When created, it appears under the project's Web Services node as your_STS Service , and the Java file appears in the right pane.

  11. The STS wizard creates an implementation of the provider class.

  12. Back in the Projects window, expand the STS project folder, expand the Web Services node, right-click on the web service, and select Edit Web Service Attributes to configure the STS.

  13. Select the "Version Compatibility" to ".NET 3.5 / Metro 1.3" ( e.g. see Web Service Attributes Editor Page ) . It will use WS-SX version of all WS-* specifications.

  14. Make sure Secure Service is selected.

  15. Select a Security Mechanism that is NOT one of the STS mechanisms. The example application uses Username Authentication with Symmetric Key.

  16. Select the Configure button. For the Algorithm Suite option, specify a value that matches the value of the web service. Set the Key Size to 128 if you have not configured Unlimited Strength Encryption. Select OK to close the configuration dialog.

    Note

    Some of the algorithm suite settings require that Unlimited Strength Encryption be configured in the Java Runtime Environment (JRE), particularly the algorithm suites that use 256 bit encryption. Download the Java Cryptography Extension (JCE) Unlimited Strength Jurisdiction Policy Files. Installation instructions are provided in the JCE zip file. You can download JCE from this URL: http://www.oracle.com/technetwork/java/javase/downloads/index.html

  17. Make sure Act as Secure Token Service (STS) is selected.

    The default values will create a valid STS.

    Optionally, you can change the following configuration options by clicking the Configure button:

    • Issuer : Specify an identifier for the issuer for the issued token. This value can be any string that uniquely identifies the STS, for example, MySTS .

    • Contract Implementation Class : Specify the actual implementation class for the WSTrustContract interface that will handle token issuance, validation, and the like. Default value is com.sun.xml.ws.security.trust.impl.WSTRustContractImpl for issuing SAML assertions, or click Browse to browse to another contract implementation class.

    • Life Time of Issued Tokens : The life span of the token issued by the STS. Default value is 36,000 ms.

    • Encrypt Issued Key : Select this option if the issued key should be encrypted using the service certificate. Default is true.

    • Encrypt Issued Token : Select this option if the issued token should be encrypted using the service certificate. Default is false.

    Optionally, to add one or more Service Providers that have a trust relationship with the STS, click the Add button, and specify the following configuration options:

    • Provider Endpoint URI : The endpoint URI of the service provider.

    • Certificate Alias : The alias of the certificate of the service provider in the keystore.

    • Token Type : The type of token the service provider requires, for example, urn:oasis:names:tc:SAML1.0:assertion .

    • Key Type : The type of key the service provider requires. The choices are public key or symmetric key. Symmetric key cryptography relies on a shared secret and is usually faster than public key cryptography. Public key cryptography relies on a key that is made public to all and is primarily used for encryption but can be used for verifying signatures.

  18. Click OK to close the Select STS Service Provider dialog, if open.

  19. Click OK to close the STS Configuration dialog, if open.

  20. Click the Keystore button to configure the keystore.

    If you are using the GlassFish stores, click the Load Aliases button and select wssip . Otherwise, browse to the location of your keystore and enter the relevant information.

    Click OK to close the dialog.

  21. Right-click the STS Project and select Properties. Select the Run category, and type the following in the Relative URL field: / your_STS Service?wsdl .

  22. Run the Project (right-click the Project and select Run). The STS WSDL displays in a browser window.

Check Building custom STS to build a custom STS to control the user attributes to be included in the SAML assertion.

Managing multiple services with Metro based STS

Metro based STS can be used to secure multiple services. One need to register a service provider to an STS before the issued tokens of the STS can be used for that service.

Each resgisted service comes up as a ServiceProvide in the STSConfiguration:

Example 12.5. 

<tc:STSConfiguration
        xmlns:tc="http://schemas.sun.com/ws/2006/05/trust/server"
        encryptIssuedKey="true" encryptIssuedToken="false">
   <tc:LifeTime>36000</tc:LifeTime>
   <tc:Contract>com.sun.xml.ws.security.trust.impl.WSTrustContractImpl
   </tc:Contract>
   <tc:Issuer>SunSTS</tc:Issuer>
   <tc:ServiceProviders>
      <tc:ServiceProvider endPoint="http://localhost:8080/jaxws-s5/simple">
         <tc:CertAlias>bob</tc:CertAlias>
         <tc:TokenType>
            http://docs.oasis-open.org/wss/oasis-wss-saml-token-profile-1.1
            #SAMLV1.1
         </tc:TokenType>
      </tc:ServiceProvider>
      <!-- more service providers -->
   </tc:ServiceProviders>
</tc:STSConfiguration>


At the minimum, you need to specify the endpoint as well as the cert alias for each service provider. At run time, the actual service is identified for each request RST from a client to the STS. The RST contains an AppliesTo element pointing to the endpoint of the targeted service. On the STS side, the certificate of the service is used to encrypt the issued tokens and proof keys for the service.

With Netbeans, one can add Service Providers to an STS through the configuration panel for STS:

  1. Click Configure button besides Act as Secure Token Service (STS).

  2. In the STS Configuration panel, click Add

  3. In the Select Service Provider panel, add information of the service provider. Note that you must import the certificate of the service provider to the TrustStore of the STS.

We provide a default Service Provider with endpoint="default". This default setting, working with any service providers, is for testing purpose only. In a product, you must remove it and add all the service providers to be secured by the STS. You may also implement STSConfigurationProvider with your own STSConfiguration and TrustSPMetada to configure STS and register service providers to a deployed STS at run time.

To Specify an STS on the Service Side

This section discusses how to specify a Security Token Service that can be referenced by the service. On the service side, you select a security mechanism that includes STS in its title.

The STS itself is secured using a separate (non-STS) security mechanism. The security configuration of the client-side of this application is dependent upon the security mechanism selected for the STS, and not on the security mechanism selected for the application.

To specify an STS for the web service, follow these steps.

  1. Right-click the node for the web service you want to secure.

  2. Select Edit Web Service Attributes.

  3. Select the "Version Compatibility" to ".NET 3.5 / Metro 1.3" ( e.g. see Web Service Attributes Editor Page ) . It will use WS-SX version of all WS-* specifications.

  4. Select Secure Service.

  5. Select a Security Mechanism that specifies STS from the list.

  6. Click Configure to specify the STS information.

  7. Type the Issuer Address and/or Issuer Metadata Address.

    When the Issuer Address and the Metadata values are the same, you only need to type the Issuer Address. For the example application, the Issuer Address would be http://localhost:8080/MySTSProject/MySTSService .

  8. Set the Algorithm Suite value so that the algorithm suite value of the service matches the algorithm suite value of the STS. Select 128 if you have not installed Unlimited Strength Encryption.

  9. Click OK to close the dialog.

  10. Click OK.

    A new file is added to the project. To view the WSIT configuration file, expand Web Pages | WEB-INF, then double-click the file wsit- package-name . service-name .xml and select the Source page.

  11. Right-click the project node and select Run to compile the application and deploy it onto GlassFish. A browser will open and display the WSDL file for the application.

To Specify an STS on the Client Side

Once you've determined whether it is required to configure an STS on the client side (see Summary of Client-Side Configuration Requirements), configure the client Secure Token Service options. To configure the client-side with STS, you need to configure the clients for the service and STS follow these steps.

  1. In the Projects window, expand the node for the web services client.

  2. Expand the Web Service References node.

  3. Right-click the node for the web service reference for which you want to configure security options.

  4. Select Edit Web Service Attributes.

  5. When the Web Service References Attributes Editor is opened, select the Quality of Service tab.

  6. Provide the service's certificate by pointing to an alias in the client truststore. For development purposes, click the Truststore button,, click the Load Aliases button for the truststore and select xws-security-server from the Alias list.

    • In some instances, NetBeans will not detect that this client is a JSR-196 client, and thus will require that the truststore entries be manually configured. To do this, follow the steps in this section.

    • Expand the client project node, then expand Source Packages/META-INF.

    • Double-click <service-project> ..xml to open it in the Source window. Click the Source tab to view the code. Find the sc:TrustStore elements. If these elements contain parameters for location and storepass , then just continue to the next section. If not, add these attributes to this file. The following code shows an example of how these elements could be specified.

      Example 12.6. 

      <sc:TrustStore
         wspp:visibility="private"
         location="<GF_HOME>\glassfish\domains\domain1\config\cacerts.jks"
         storepass="changeit" peeralias="xws-security-server"/>

  7. Expand the Security Token Service node to provide details for the STS to be used. When the Endpoint and the Metadata values are the same, you only need to enter the Endpoint value. For the example application you would enter the following value in the Endpoint field: http://localhost:8080/MySTSProject/MySTSService . For WS Trust Version field, select 1.3 if STS endpoint uses ".NET 3.5 / Metro 1.3" version compatibility. Otherwise use the default WS Trust Version.

    The Endpoint field is a mandatory field. Depending on how you plan to configure the STS, you can provide either Metadata information or information regarding the WSDL Location, Service Name, Port Name and Namespace. The examples following this section describe a few potential STS configurations.

  8. Click OK to close this dialog.

  9. The service requires a token to be issued from the STS, which, for the example, is http://localhost:8080/MySTSProject/MySTSService , with WSDL file http://localhost:8080/MySTSProject/MySTSService?wsdl . To do this, follow these steps:

    1. Right-click the web service client project node and select New | Web Service Client.

      The New Web Service Client window appears.

    2. Select the WSDL URL option.

    3. Cut and paste the URL of the web service that you want the client to consume into the WSDL URL field. For the tutorial example, the URL for the MySTS web servicen is:

      http://localhost:8080/MySTSProject/MySTSService?wsdl
    4. Type the package name, for example, org.me.calculator.client.sts , into the Package field, then click Finish.

      The Projects window displays the new web service client.

  10. Drill down from the web service client project node to the Web Service References node.

  11. Right-click the node for the STS service, and select Edit Web Service Attributes.

  12. Select the Quality of Service tab.

  13. If required, provide the client's private key by pointing to an alias in the keystore. For development purposes, click the Keystore button, click the Load Aliases button, and select xws-security-client from the Alias list.

  14. Verify the STS's certificate by pointing to an alias in the client truststore. For development purposes, click the Truststore button,, click the Load Aliases button and select wssip from the Alias list.

    • In some instances, NetBeans will not detect that this client is a JSR-196 client, and thus will require that the keystore and truststore entries be manually configured. To do this, follow the steps in this section.

    • Expand the web services client project node, then Source Packages | META-INF.

    • Double-click <sts-service> .xml to open it in the Source window. Click the Source tab to view the code. Find the sc:KeyStore and/or sc:TrustStore elements. If these elements contain parameters for location and storepass , then just continue to the next section. If not, add these attributes to this file. The following code shows an example of how these elements could be specified.

      Example 12.7. 

      <sc:TrustStore
         wspp:visibility="private"
         location="<GF_HOME>\glassfish\domains\domain1\config\cacerts.jks"
         storepass="changeit" peeralias="wssip"/>
      <sc:KeyStore
       wspp:visibility="private"
       location="<GF_HOME>\glassfish\domains\domain1\config\truststore.jks"
       storepass="changeit" alias="xws-security-client"/>

  15. If required, enter the default user name and password.

    If you followed the steps in Adding Users to GlassFish , this will be User Name wsitUser and Password changeit .

  16. Click OK to close this dialog.

  17. Compile and run this application by right-clicking the web services client project and selecting Run.

12.9. Example Applications

The following example applications demonstrate configuring web services and web service clients for different security mechanisms. If you are going to work through the examples sequentially, you must manually undo the changes to the service and then refresh the client in order for the client to receive the most recent version of the service's WSDL file, which contains the latest security configuration information.

12.9.1. Example: Username Authentication with Symmetric Key (UA)

The section describes the following tasks:

To Secure the Example Service Application (UA)

The following example application starts with the example provided in Developing with NetBeans and demonstrates adding security to both the web service and to the web service client.

For this example, the security mechanism of Username Authentication with Symmetric Key is used to secure the application. To add security to the service part of the example, follow these steps.

  1. Create the CalculatorApplication example by following the steps described in the following sections of Developing with NetBeans .

    1. Creating a Web Service

    2. Skip the section on adding Reliable Messaging.

    3. Deploying and Testing a Web Service (first two steps only, do not run the project yet)

  2. Expand CalculatorApplication | Web Services, then right-click the node for the web service (CalculatorWS) and select Edit Web Service Attributes.

  3. Deselect Reliable Messaging if it is selected.

  4. In the CalculatorWSPortBinding section, select Secure Service.

  5. From the drop-down list for Security Mechanism, select Username Authentication with Symmetric Key.

  6. Select Use Development Defaults to set up the keystore and truststore files, and to create a user for this application, if needed.

  7. Click OK to close the CalculatorWSService dialog.

    A new file is added to the project. To view the WSIT configuration file, expand Web Pages | WEB-INF, then double-click the file wsit-org.me.calculator.CalculatorWS.xml . This file contains the security elements within wsp:Policy tags.

    An example of this file can be viewed in the tutorial by clicking this link: Service-Side WSIT Configuration Files .

  8. Right-click the CalculatorApplication node and select Run. A browser will open and display the WSDL file for the application.

  9. Follow the steps to secure the client application as described in To Secure the Example Web Service Client Application (UA) .

To Secure the Example Web Service Client Application (UA)

This section demonstrates adding security to the web service client that references the web service created in the previous section. This web service is secured using the security mechanism described in Username Authentication with Symmetric Key . When this security mechanism is used with a web service, the web service client must provide a username and password in addition to specifying the certificate of the server.

To add security to the client that references this web service, complete the following steps.

  1. Create the client application by following the steps described in Creating a Client to Consume a WSIT-Enabled Web Service .

    Note

    Whenever you make changes on the service, refresh the client so that the client will pick up the change. To refresh the client, right-click the node for the Web Service Reference for the client, and select Refresh Client.

  2. Expand the node for the web service client application, CalculatorWSServletClient.

  3. Expand the Web Service References node.

  4. Right-click on CalculatorWSService, select Edit Web Service Attributes.

  5. In the Security section of the Quality of Service tab, select Use Development Defaults. Click OK to close.

    Note

    By default, the user name of wsitUser and the password of changeit will be entered in this section. If the example doesn't run, make sure that you have a user with this name and password set up in the file realm of the Application Server or GlassFish, as described in Adding Users to GlassFish .

  6. If you'd like to, in the tree, drill down from the project to Source Packages | META-INF. Double-click on CalculatorWSService.xml , and verify that lines similar to the following are present:

    Example 12.8. 

    <wsp:All>
       <sc:TrustStore
             wspp:visibility="private"
             location="<GF_HOME>\glassfish\domains\domain1\config\cacerts.jks"
             storepass="changeit" peeralias="xws-security-server"/>
       <sc:CallbackHandlerConfiguration wspp:visibility="private">
          <sc:CallbackHandler default="wsitUser" name="usernameHandler"/>
          <sc:CallbackHandler default="changeit" name="passwordHandler"/>
       </sc:CallbackHandlerConfiguration>
    </wsp:All>

    By selecting Use Development Defaults when securing the service, these values are automatically generated for you.

    An example of this file can be viewed in the tutorial by clicking this link: Client-Side WSIT Configuration Files .

  7. Right-click the CalculatorWSServletClient node and select Run. The result of the add operation will display in a browser window.

12.9.2. Example: Username with Digest Passwords

This example is similar to Example: Username Authentication with Symmetric Key (UA) except that digest passwords (along with Created and Nonce) are used in UsernameToken, and UsernameToken is not encrypted in the message.

To Secure the Service Application, all the steps remain same, except for step 6. For step 6, do the following:

  1. Click on Configure, select Support Hash Passwords. Click OK.

  2. Unselect Use Development Defaults, if already selected. Specify the KeyStore. Click on Validators, and specify the username validator.

    The Username Validator created should extend PasswordValidationCallback.WsitDigestPasswordValidator. Here is a sample UsernameValidator for Digest passwords.

    Example 12.9. 

    import com.sun.xml.wss.impl.callback.PasswordValidationCallback;
    
    public class SampleWsitDigestPasswordValidator extends
            PasswordValidationCallback.WsitDigestPasswordValidator {
        public  void setPassword(PasswordValidationCallback.Request request){
            //Get this password from somewhere - for example a JDBC Realm
            String passwd = "abcd!1234";
            PasswordValidationCallback.DigestPasswordRequest req =
                    (PasswordValidationCallback.DigestPasswordRequest)request;
            req.setPassword(passwd);
        }
    }


    Note

    Use of Digest Passwords can be supported for any realm which store plain passwords (not hashed ones). Currently this is supported for JDBC realm in GlassFish. Or optionally, a user can write his own custom realm.

The steps for securing the client remain same as in Example: Username Authentication with Symmetric Key (UA).

12.9.3. Example: Mutual Certificates Security (MCS)

The section describes the following tasks:

To Secure the Example Service Application (MCS)

The following example application starts with the example provided in Developing with NetBeans and demonstrates adding security to both the web service and to the web service client.

For this example, the security mechanism of Mutual Certificates Security is used to secure the application. To add security to the service part of the example, follow these steps.

  1. Create the CalculatorApplication example by following the steps described in the following sections of Developing with NetBeans .

    1. Creating a Web Service

    2. Skip the section on adding Reliable Messaging.

    3. Deploying and Testing a Web Service (first two steps only, do not run the project yet)

  2. Expand CalculatorApplication | Web Services, then right-click the node for the web service, CalculatorWS, and select Edit Web Service Attributes.

  3. Deselect Reliable Messaging if it is selected.

  4. Select Secure Service.

  5. From the drop-down list for Security Mechanism, select Mutual Certificates Security.

  6. Select Use Development Defaults.

  7. Click OK to close the dialog.

    A new file is added to the project. To view the WSIT configuration file, expand Web Pages | WEB-INF, then double-click the file wsit-org.me.calculator.CalculatorWS.xml . This file contains the security elements within wsp:Policy tags.

  8. Right-click the CalculatorApplication node and select Run.

    A browser will open and display the WSDL file for the application.

  9. Verify that the WSDL file contains the AsymmetricBinding element.

  10. Follow the steps to secure the client application as described in To Secure the Example Web Service Client Application (MCS) .

To Secure the Example Web Service Client Application (MCS)

This section demonstrates adding security to the web service client that references the web service created in the previous section. This web service is secured using the security mechanism described in Mutual Certificates Security .

To add security to the client that references this web service, complete the following steps.

  1. Create the client application following the steps described in Creating a Client to Consume a WSIT-Enabled Web Service .

    Note

    Whenever you make changes on the service, refresh the client so that the client will pick up the change. To refresh the client, right-click the node for the Web Service Reference for the client, and select Refresh Client.

  2. If you'd like, in the tree, drill down from the project to Source Packages | META-INF. Double-click on CalculatorWSService.xml , click the Source tab, and look at the section in the section <wsp:All> to see the WSIT code that has been added to this configuration file.

  3. Compile and run this application by right-clicking the CalculatorWSServletClient node and selecting Run. The result of the add operation will display in a browser window.

12.9.4. Example: Transport Security (SSL)

This section describes the following tasks:

To Secure the Example Service Application (SSL)

The following example application starts with the example provided in Developing with NetBeans and demonstrates adding transport security to both the web service and to the web service client.

For this example, the security mechanism of Transport Security (SSL) is used to secure the application. To add security to the service part of the example, follow these steps.

  1. Create the CalculatorApplication example by following the steps described in the following sections of Developing with NetBeans :

    1. Creating a Web Service

    2. Skip the section on adding Reliable Messaging.

    3. Deploying and Testing a Web Service (first two steps only, do not run the project yet)

  2. Expand CalculatorApplication | Web Services, then right-click the node for the web service, CalculatorWS, and select Edit Web Service Attributes.

  3. Deselect Reliable Messaging if it is selected.

  4. Select Secure Service.

  5. From the drop-down list for Security Mechanism, select Transport Security (SSL).

  6. Select Use Development Defaults.

  7. Click OK to close the dialog.

    A new file is added to the project. To view the WSIT configuration file, expand Web Pages | WEB-INF, then double-click the file wsit-org.me.calculator.CalculatorWS.xml . This file contains the security elements within wsp:Policy tags.

  8. To require the service to use the HTTPS protocol, security requirements must be specified in the service's application deployment descriptor, which is web.xml for a web service implemented as a servlet. Selecting Use Development Defaults takes care of this task for you.

    To view or change the security information, follow these steps:

    1. From your web service application, expand Web Pages | WEB-INF.

    2. Double-click web.xml to open it in the editor.

    3. Select the Security tab.

    4. Expand the Security Constraint named SSL transport for CalculatorWSService .

    5. A Web Resource Collection named Secure Area contains the URL Pattern to be protected, /CalculatorWSService//* and the HTTP Methods to be protected, , POST.

    6. Unselect Enable Authentication Constraint if it is selected.

    7. The Enable User Data Constraint box is checked and CONFIDENTIAL is chosen as the Transport Guarantee to specify that the application uses SSL.

    8. Click the XML tab to view the resulting deployment descriptor additions.

  9. Right-click the CalculatorApplication node and select Run. If the server presents its certificate, s1as, accept this certificate. A browser will open and display the WSDL file for the application.

  10. Follow the steps to secure the client application as described in To Secure the Example Web Service Client Application (SSL) .

To Secure the Example Web Service Client Application (SSL)

This section demonstrates adding security to the web service client that references the web service created in the previous section. This web service is secured using the security mechanism described in Transport Security (SSL) .

To add security to the client that references this web service, complete the following steps.

  1. Create the client application by following the steps described in Creating a Client to Consume a WSIT-Enabled Web Service , with the exception that you need to specify the secure WSDL when creating the Web Service Client.

    To do this, create the client application up to the step where you create the Servlet (step 5 as of this writing) by following the steps described in Creating a Client to Consume a WSIT-Enabled Web Service , with the following exception.

    In the step where you are directed to cut and paste the URL of the web service that you want the client to consume into the WSDL URL field, type https :// fully-qualified-hostname:8181 /CalculatorApplication/CalculatorWSService?wsdl (changes indicated in bold) to indicate that this client should reference the web service using the secure port. The first time you access this service, accept the certificate (s1as) when you are prompted. This is the server certificate popping up to confirm its identity to the client.

    In some cases, you might get an error dialog telling you that the URL https:// fully-qualified-hostname :8181/CalculatorApplication/CalculatorWSService?wsdl couldn't be downloaded. However, this the correct URL, and it does load when you run the service. So, when this error occurs, repeat the steps that create the Web Service Client using the secure WSDL. The second time, the web service reference is created and you can continue creating the client.

    Note

    If you prefer to use localhost in place of the fully-qualified hostname (FQHN) in this example, you must follow the steps in Transport Security (SSL) Workaround .

  2. Continue creating the client following the remainder of the instructions in Creating a Client to Consume a WSIT-Enabled Web Service .

    Note

    Some users are working through this document and just making the recommended changes and refreshing the client. For this example, you must create a new client so that you can specify the secure WSDL to create the correct setup for the client.

    Whenever you make changes on the service, refresh the client so that the client will pick up the change. To refresh the client, right-click the node for the Web Service Reference for the client, and select Refresh Client.

  3. Compile and run this application by right-clicking on the CalculatorWSServletClient node and selecting Run. The result of the add operation will display in a browser window.

12.9.5. Example: SAML Authorization over SSL (SA)

This section describes the following tasks:

To Secure the Example Service Application (SA)

The following example application starts with the example provided in Developing with NetBeans and demonstrates adding security to both the web service and to the web service client.

For this example, the security mechanism of SAML Authorization over SSL is used to secure the application. The steps are similar to the ones described in Example: Username Authentication with Symmetric Key (UA) , with the addition of the writing of a client-side SAML callback handler to populate the client's request with a SAML assertion.

To add security to the service part of the example, follow these steps.

  1. Create the CalculatorApplication example by following the steps described in the following sections of Developing with NetBeans :

    1. Creating a Web Service

    2. Skip the section on adding Reliable Messaging.

    3. Deploying and Testing a Web Service (first two steps only, do not run the project yet)

  2. Expand CalculatorApplication | Web Services, right-click the node for the web service, CalculatorWS, and select Edit Web Service Attributes.

  3. Deselect the Reliable Messaging option if it is selected.

  4. Select Secure Service.

  5. From the drop-down list for Security Mechanism, select SAML Authorization over SSL.

  6. Select Use Development Defaults to have the web.xml file modified to include a security constraint that forces the use of SSL.

  7. Click OK to exit the editor.

    A new file is added to the project. To view the WSIT configuration file, expand Web Pages | WEB-INF, then double-click the file wsit-org.me.calculator.CalculatorWS.xml . This file contains the security elements within wsp:Policy tags.

  8. To require the service to use the HTTPS protocol, security requirements must be specified in the service's application deployment descriptor, which is web.xml for a web service implemented as a servlet. Selecting Use Development Defaults takes care of this task for you.

    To view or change the security information in the deployment descriptor, follow these steps:

    1. From your web service application, expand Web Pages | WEB-INF.

    2. Double-click web.xml to open it in the editor.

    3. Select the Security tab.

    4. Expand the Security Constraint named SSL transport for CalculatorWSService .

    5. A Web Resource Collection named Secure Area contains the URL Pattern to be protected, /CalculatorWSService//* and the HTTP Methods to be protected, , POST.

    6. Unselect Enable Authentication Constraint if it is selected.

    7. The Enable User Data Constraint box is checked and CONFIDENTIAL is chosen as the Transport Guarantee to specify that the application uses SSL.

    8. Click the XML tab to view the resulting deployment descriptor additions.

  9. Right-click the CalculatorApplication node and select Run. Accept the s1as certificate if you are prompted to. A browser will open and display the WSDL file for the application.

  10. Follow the steps to secure the client application as described in To Secure the Example Web Service Client Application (SA) .

To Secure the Example Web Service Client Application (SA)

This section demonstrates adding security to the web service client that references the web service created in the previous section. This web service is secured using the security mechanism described in SAML Authorization over SSL .

To add security to the client that references this web service, complete the following steps.

  1. This example uses a non-JSR-109-compliant client for variety. To do this, create the client application up to the step where you create the Servlet (step 5 as of this writing) by following the steps described in Creating a Client to Consume a WSIT-Enabled Web Service , with the following exceptions:

    1. In the step where you are directed to cut and paste the URL of the web service that you want the client to consume into the WSDL URL field, type https:// fully-qualified-hostname :8181/CalculatorApplication/CalculatorWSService?wsdl , to indicate that this client should reference the web service using the secure port.

      The first time you access this service, accept the certificate ( s1as ) when you are prompted. This is the server certificate popping up to confirm its identity to the client.

      In some cases, you might get an error dialog telling you that the URL https:// fully-qualified-hostname :8181/CalculatorApplication/CalculatorWSService?wsdl couldn't be downloaded. However, this the correct URL, and it does load when you run the service. So, when this error occurs, repeat the steps that create the Web Service Client using the secure WSDL. The second time, the web service reference is created and you can continue creating the client.

      Note

      If you prefer to use localhost in place of the fully-qualified hostname (FQHN) in this example, follow the steps in Transport Security (SSL) Workaround .

    2. Name the application CalculatorClient (since it's not a servlet.).

  2. Instead of creating a client servlet as is described in Creating a Client to Consume a WSIT-Enabled Web Service , just add the web service operation to the generated index.jsp file to create a non-JSR-109 client. To do this, perform these steps:

    1. If the index.jsp file is not open in the right pane, expand Web Pages, then double-click index.jsp to open it.

    2. Drill down through the Web Service References node until you get to the add operation.

    3. Drag the add operation to the line immediately following the following line:

      Example 12.10. 

      <body>

    4. Edit the values for i and j if you'd like.

  3. Write a SAMLCallback handler for the client side to populate a SAML assertion into the client's request to the service.

    To create the SAMLCallbackHandler , follow these steps:

    1. Right-click the CalculatorClient node.

    2. Select New | Java Package.

    3. For Package Name, type xwss.saml and click Finish.

    4. Drill down from CalculatorClient | Source Packages | xwss.saml.

    5. Right-click xwss.saml and select New | Other.

    6. From the Categories list, select Java.

    7. From the File Types list, select Empty Java File and click Next.

    8. For Class Name, type SamlCallbackHandler and click Finish.

      The empty file appears in the IDE.

    9. Download the example file SamlCallbackHandler.java from the following URL:

      http://xwss.java.net/servlets/ProjectDocumentList?folderID=6645&expandFolder=6645&folderID=6645

    10. Open the file in a text editor.

    11. Modify the home variable to provide the hard-coded path to your GlassFish installation.

      For example, modify the line:

      Example 12.11. 

      String home = System.getProperty("WSIT_HOME");

      to

      Example 12.12. 

      String home = "/home/glassfish";

    12. Copy the contents of this file into the SamlCallbackHandler.java window that is displaying in the IDE.

  4. Drill down from CalculatorClient | Web Service References.

  5. Right-click CalculatorWSService and select Edit Web Service Attributes.

  6. Select the Quality of Service tab of the CalculatorWSService dialog.

  7. Unselect Use Development Defaults.

  8. Enter the name of the SAML Callback Handler written earlier in this section, xwss.saml.SamlCallbackHandler , into the SAML Callback Handler field.

  9. Click OK to close this dialog.

  10. To view the WSIT Configuration options, in the tree, drill down from the project to Source Packages | META-INF. Double-click CalculatorWSService.xml , click the Source tab, and look for the lines where xwss.saml.SamlCallbackHandler is specified as the SAML Callback Handler class for the client.

  11. Compile and run this application by right-clicking the CalculatorClient node and selecting Run. The result of the add operation will display in a browser window.

12.9.6. Example: SAML Sender Vouches with Certificates (SV)

This section describes the following tasks:

To Secure the Example Service Application (SV)

The following example application starts with the example provided in Developing with NetBeans and demonstrates adding security to both the web service and to the web service client.

For this example, the security mechanism of SAML Sender Vouches with Certificates is used to secure the application. The steps are similar to the ones described in Example: Username Authentication with Symmetric Key (UA) , with the addition of the writing of a client-side SAML callback handler to populate the client's request with a SAML assertion.

To add security to the service part of the example, follow these steps.

  1. Create the CalculatorApplication example by following the steps described in the following sections of Developing with NetBeans :

    1. Creating a Web Service

    2. Skip the section on adding Reliable Messaging.

    3. Deploying and Testing a Web Service (first two steps only, do not run the project yet)

  2. Expand CalculatorApplication | Web Services, then right-click the node for the web service, CalculatorWS, and select Edit Web Service Attributes.

  3. Deselect the Reliable Messaging option if it is selected.

  4. Select Secure Service.

  5. From the drop-down list for Security Mechanism, select SAML Sender Vouches with Certificates.

  6. Select Use Development Defaults. This step properly configures the keystore, truststore, and default user for this security mechanism.

  7. Click OK.

    A new file is added to the project. To view the WSIT configuration file, expand Web Pages | WEB-INF, then double-click the file wsit-org.me.calculator.CalculatorWS.xml . This file contains the security elements within wsp:Policy tags.

  8. Right-click the CalculatorApplication node and select Run. Accept the s1as certificate if you are prompted to.

    A browser will open and display the WSDL file for the application.

  9. Follow the steps to secure the client application as described in To Secure the Example Web Service Client Application (SV) .

To Secure the Example Web Service Client Application (SV)

This section demonstrates adding security to the web service client that references the web service created in the previous section. This web service is secured using the security mechanism described in SAML Sender Vouches with Certificates .

To add security to the client that references this web service, complete the following steps.

  1. This example uses a non-JSR-109-compliant client. To do this, create the client application up to the step where you create the Servlet (step 5 as of this writing) by following the steps described in Creating a Client to Consume a WSIT-Enabled Web Service , with one exception: name the application CalculatorClient (since it's not a servlet.).

  2. Instead of creating a client servlet as is described in Creating a Client to Consume a WSIT-Enabled Web Service , just add the web service operation to the generated index.jsp file to create a non-JSR-109 client. To do this, follow these steps:

    1. If the index.jsp file is not open in the right pane, double-click it to open it.

    2. Drill down through the Web Service References node until you get to the add operation.

    3. Drag the add operation to the line immediately following the following line:

      Example 12.13. 

      <body>

    4. Edit the values for i and j if you'd like.

  3. Write a SAMLCallback handler for the client side to populate a SAML assertion into the client's request to the service.

    To create the SAMLCallbackHandler , follow these steps:

    1. Right-click the CalculatorClient node.

    2. Select New | Java Package.

    3. For Package Name, type xwss.saml and click Finish.

    4. Drill down from CalculatorClient | Source Packages | xwss.saml.

    5. Right-click xwss.saml and select New | Other.

    6. From the Categories list, select Java.

    7. From the File Types list, select Empty Java File and click Next.

    8. For Class Name, type SamlCallbackHandler and click Finish.

      The empty file appears in the IDE.

    9. Download the example file SamlCallbackHandler.java from the following URL:

      http://xwss.java.net/servlets/ProjectDocumentList?folderID=6645&expandFolder=6645&folderID=6645

    10. Open the file in a text editor.

    11. Modify the home variable to provide the hard-coded path to your GlassFish installation.

      For example, modify the line:

      Example 12.14. 

      String home = System.getProperty("WSIT_HOME");

      to

      Example 12.15. 

      String home = "/home/glassfish";

    12. Copy the contents of this file into the SamlCallbackHandler.java window that is displaying in the IDE.

  4. Drill down from CalculatorClient | Web Service References.

  5. Right-click on CalculatorWSService and select Edit Web Service Attributes.

  6. Select the Quality of Service tab of the CalculatorWSService dialog.

  7. In the SAML Callback Handler field, type the name of the class written in step 3 above, xwss.saml.SamlCallbackHandler .

  8. Configure the keys: Click on the keystore button, select the alias "xws-security-client", enter the password "changeit", in the password field. Submit this dialog; Click on the truststore button, select the alias "xws-security-server". Submit the dialog.

  9. Click OK to close this dialog.

  10. In the tree, drill down from the project to Source Packages | META-INF. Double-click CalculatorWSService.xml, click the Source tab, and look for that lines where xwss.saml.SamlCallbackHandler is specified as the SAML Callback Handler class for the client. In some instances, NetBeans will not correctly specify the keystore and truststore information for non-JSR-196 clients, and thus will require that the keystore and truststore entries be manually configured. To do this, follow the example in this section.

    • Find the sc:KeyStore and sc:TrustStore elements. If these elements contain parameters for location and storepass in CalculatorWSService.xml, then just continue to the next step. If not, replace the existing keystore and truststore attributes to include these parameters. The following code shows an example of how these elements should be specified.

      Example 12.16. 

      <sc:TrustStore
         wspp:visibility="private"
         location="<GF_HOME>\glassfish\domains\domain1\config\cacerts.jks"
         storepass="changeit" peeralias="xws-security-server"/>
      <sc:KeyStore
         wspp:visibility="private"
         location="<GF_HOME>\glassfish\domains\domain1\config\keystore.jks"
         storepass="changeit" alias="xws-security-client"/>

  11. Compile and run this application by right-clicking the CalculatorClient node and selecting Run. The result of the add operation will display in a browser window.

12.9.7. Example: STS Issued Token (STS)

This section describes the following tasks:

Another STS example application can be found at the following URL: https://github.com/javaee/metro-wsit/tree/master/wsit/samples/ws-trust .

To Create and Secure the STS (STS)

To create and secure a Security Token Service for this example, follow these steps.

Note

For development with NetBeans 6.8, there are some temporary setup changes that will need to be done--see here for more details.

  1. Create a new project for the STS by selecting File | New Project.

  2. Select Java Web, then Web Application, then Next.

  3. Type MySTSProject for the Project Name, then Next, then the desired Server. Click Finish.

  4. Right-click the MySTSProject node, select New, then select Other.

  5. Select Web Services from the Categories list.

  6. Select Secure Token Service (STS) from the File Type(s) list, then click Next.

  7. Type the name MySTS for the Web Service Class Name.

  8. Enter or select org.me.my.sts in the Package field, then click Finish. If prompted to reload the catalog.xml file, click No.

    The IDE takes a while to create the STS. When created, it appears under the project's Web Services node as MySTSService .

  9. The STS wizard creates an implementation of the provider class. To view it, expand Source Packages, then org.me.my.sts. Double-click MySTS.java to open it in the right pane.

  10. In the Projects window, expand the MySTSProject node, then expand the Web Services node. Right-click the MySTSService[IMySTSService_Port] node and select Edit Web Service Attributes to configure the STS.

  11. Select the "Version Compatibility" to ".NET 3.5 / Metro 1.3" ( e.g. see Web Service Attributes Editor Page ) . It will use WS-SX version of all WS-* specifications.

  12. Select Secure Service if it's not already selected.

  13. Verify that the Security Mechanism of Username Authentication with Symmetric Key is selected.

  14. Select the Configure button. For Algorithm Suite, verify that Basic128 bit is selected (so that it matches the value selected for the service.) Select OK to close the configuration dialog.

  15. If not already selected, select Act as Secure Token Service (STS).

    Note

    If you'd like to use an STS other than the default, click the STS Configure button, and click the Add button to add a different service provider. Click OK to close the STS Configuration dialog.

  16. Click Configure. In the Issuer field, enter MySTS. Click OK to close.

  17. Click the Keystore button to provide your keystore with the alias identifying the service certificate and private key. To do this, click the Load Aliases button, select wssip , then click OK to close the dialog.

  18. Click OK.

    A new file is added to the project. To view the WSIT configuration file, expand Configuration Files | xml-resources | web-services | MySTS | wsdl, then double-click the file MySTSService.wsdl . This file contains the tc:STSConfiguration element within the wsp:Policy elements..

  19. Right-click the MySTSProject tab, select Properties. Select the Run category, and type the following in the Relative URL field: /MySTSService?wsdl .

  20. Run the Project (right-click the project and select Run).

    The STS WSDL appears in the browser.

Check Building custom STS to build a custom STS to control the user attributes to be included in the SAML assertion.

To Secure the Example Service Application (STS)

The following example application starts with the example provided in Developing with NetBeans and demonstrates adding security to both the web service and to the web service client.

For this example, the security mechanism of STS Issued Token is used to secure the application. The steps are similar to the ones described in Example: Username Authentication with Symmetric Key (UA) , with the addition of creating and securing an STS.

To add security to the service part of the example, follow these steps.

  1. Create the CalculatorApplication example by following the steps described in the following sections of Developing with NetBeans .

    1. Creating a Web Service

    2. Skip the section on adding Reliable Messaging.

    3. Deploying and Testing a Web Service (first two steps only, do not run the project yet).

  2. Expand CalculatorApplication | Web Services, then right-click the node for the web service, CalculatorWS, and select Edit Web Service Attributes.

  3. Select the "Version Compatibility" to ".NET 3.5 / Metro 1.3" ( e.g. see Web Service Attributes Editor Page ) . It will use WS-SX version of all WS-* specifications.

  4. Deselect the Reliable Messaging option if it is selected.

  5. Select Secure Service.

  6. From the drop-down list for Security Mechanism, select STS Issued Token.

  7. Click Configure. For Issuer Address and Issuer Metadata Address, enter http://localhost:8080/MySTSProject/MySTSService . For Issuer Metadata, enter http://localhost:8080/MySTSProject/MySTSService/mex

  8. For Algorithm Suite, select Basic 128 bit. For Key Size, select 128 (the algorithm suite value of the service must match the algorithm suite value of the STS). Select OK to close the configuration dialog.

    Note

    If you have configured Unlimited Strength Encryption as described in To Create a Third-Party STS , you can leave the key size at 256. Otherwise, you must set it to 128.

  9. Select Use Development Defaults.

  10. Click OK.

    A new file is added to the project. To view the WSIT configuration file, expand Web Pages | WEB-INF, then double-click the file wsit-org.me.calculator.CalculatorWS.xml and select the Source page. This file contains the security elements within wsp:Policy tags.

  11. Right-click the CalculatorApplication node and select Run. This step compiles the application and deploys it onto GlassFish. A browser will open and display the WSDL file for the application.

To Secure the Example Web Service Client Application (STS)

This section demonstrates adding security to the CalculatorApplication's web service client. The service was secured using the security mechanism described in STS Issued Token .

To add security to the web service client, complete the following steps.

  1. Create the client application by following the steps described in Creating a Client to Consume a WSIT-Enabled Web Service .

    Note

    Whenever you make changes on the service, refresh the client so that the client will pick up the change. To refresh the client, right-click the node for the Web Service Reference for the client, and select Refresh Client.

  2. Drill down from CalculatorWSServletClient | Web Service References.

  3. Right-click CalculatorWSService and select Edit Web Service Attributes, then select the Quality of Service tab.

  4. Provide the client's private key by pointing to an alias in the keystore. To do this, click the Keystore button, click the Load Aliases button, and select xws-security-client from the Alias list.

  5. Provide the service's certificate by pointing to an alias in the client truststore. To do this, click the Truststore button,, click the Load Aliases button for the truststore and select xws-security-server from the Alias list.

    • In some instances, NetBeans will not detect that this client is a JSR-196 client, and thus will require that the keystore and truststore entries be manually configured. To do this, follow the steps in this section.

    • Expand CalculatorWSServletClient | Source Packages | META-INF.

    • Double-click CalculatorWSService.xml to open it in the Source window. Click the Source tab to view the code. Find the sc:KeyStore and sc:TrustStore elements. If these elements contain parameters for location and storepass , then just continue to the next section. If not, add these attributes to this file. The following code shows an example of how these elements should be specified.

      Example 12.17. 

      <sc:TrustStore
         wspp:visibility="private"
         location="<GF_HOME>\glassfish\domains\domain1\config\cacerts.jks"
         storepass="changeit" peeralias="xws-security-server"/>
      <sc:KeyStore
         wspp:visibility="private"
         location="<GF_HOME>\glassfish\domains\domain1\config\keystore.jks"
         storepass="changeit" alias="xws-security-client"/>

  6. Expand the Security Token Service node to provide details for the STS to be used. When the Endpoint and the Metadata values are the same, you only need to enter the Endpoint value. For the Endpoint field, enter the following value: http://localhost:8080/MySTSProject/MySTSService. For WS Trust Version field, select 1.3 if STS endpoint uses ".NET 3.5 / Metro 1.3" version compatibility. Otherwise use the default WS Trust Version.

  7. Click OK to close this dialog.

  8. The service requires a token to be issued from the STS at http://localhost:8080/MySTSProject/MySTSService , with WSDL file http://localhost:8080/MySTSProject/MySTSService?wsdl . To do this, follow these steps:

    1. Right-click the CalculatorWSServletClient node and select New | Web Service Client.

      The New Web Service Client window appears.

    2. Select the WSDL URL option.

    3. Cut and paste the URL of the web service that you want the client to consume into the WSDL URL field. For this example, here is the URL for the MySTS web service:

      http://localhost:8080/MySTSProject/MySTSService?wsdl
    4. Type org.me.calculator.client.sts in the Package field, then click Finish.

      The Projects window displays the new web service client.

  9. Drill down from CalculatorWSServletClient | Web Service References.

  10. Right-click MySTSService and select Edit Web Service Attributes.

  11. Select the Quality of Service tab of the MySTSService dialog.

  12. Provide the client's private key by pointing to an alias in the keystore. To do this, click the Keystore button, click the Load Aliases button, and select xws-security-client from the Alias list. If the Keystore button is not selectable, follow the instructions in the next step for adding the keystore entry manually.

  13. Verify the STS's certificate by pointing to an alias in the client truststore. To do this, click the Truststore button,, click the Load Aliases button and select wssip from the Alias list.

    • In some instances, NetBeans will not detect that this client is a JSR-196 client, and thus will require that the keystore and truststore entries be manually configured. To do this, follow the steps in this section.

    • Expand CalculatorWSServletClient | Source Packages | META-INF.

    • Double-click MySTSService.xml to open it in the Source window. Click the Source tab to view the code. Find the sc:KeyStore and sc:TrustStore elements. If these elements contain parameters for location and storepass , then just continue to the next section. If not, add these attributes to this file. The following code shows an example of how these elements should be specified.

      Example 12.18. 

      <sc:TrustStore
         wspp:visibility="private"
         location="<GF_HOME>\glassfish\domains\domain1\config\cacerts.jks"
         storepass="changeit" peeralias="wssip"/>
      <sc:KeyStore
         wspp:visibility="private"
         location="<GF_HOME>\glassfish\domains\domain1\config\keystore.jks"
         storepass="changeit" alias="xws-security-client"/>

  14. Enter the default user name and password.

    If you followed the steps in Adding Users to GlassFish , this will be User Name wsitUser and Password changeit .

  15. Click OK to close this dialog.

  16. Compile and run this application by right-clicking the CalculatorWSServletClient project and selecting Run. The result of the add operation will display in a browser window.

12.9.8. Example: Broker Trust STS (BT)

Broker Trust STS example illustrates the interaction between client and server of different domains through STS's of corresponding domains. In this kind of scenarios, STS of different domains must have a trust relationship between them. Lets take client/STS2 are in domain A, and server/STS1 are in domain B. Here, STS1 is the remote STS on the server domain(B) and STS2 is the local STS on the client domain(B). There is a trust relationship between STS1 and STS2. Here are steps which client has to follow to comminicate with server.

  • Client wants to communicate with Server.

  • Server asks Client to get a token from STS1 to comminicate with it.

  • Now Client would like to communicate with remote STS (i.e. STS1).

  • STS1 asks Client to get a token from Client's local STS (i.e. STS2) to comminicate with it.

  • Now Client sends a request to local STS (i.e. STS2) asking for a token to communicate with STS1.

  • STS2 issues a token to Client, which Client uses to comminicate with STS1.

  • STS1 issues a token to Client, which Client uses to comminicate with Server.

  • Now Client comminicates with server using a token issued by STS1, which Server understands.

This section describes the following tasks:

To Create and Secure the First STS (BT)

To create and secure a Security Token Service(i.e. Remote STS) for this example, follow these steps.

  1. Create a new project for the STS by selecting File | New Project.

  2. Select Web, then Web Application, then Next.

  3. Type MySTS1Project for the Project Name, then click Finish.

  4. Right-click the MySTS1Project node, select New, then select Other.

  5. Select Web Services from the Categories list.

  6. Select Secure Token Service (STS) from the File Type(s) list, then click Next.

  7. Type the name MySTS1 for the Web Service Class Name.

  8. Enter or select org.me.my.sts1 in the Package field, then click Finish. If prompted to reload the catalog.xml file, click No.

    The IDE takes a while to create the first STS. When created, it appears under the project's Web Services node as MySTS1Service .

  9. The STS wizard creates an implementation of the provider class. To view it, expand Source Packages, then org.me.my.sts1. Double-click MySTS1.java to open it in the right pane.

  10. In the Projects window, expand the MySTS1Service node, then expand the Web Services node. Right-click the MySTS1Service[IMySTS1Service_Port] node and select Edit Web Service Attributes to configure the STS.

  11. Select the "Version Compatibility" to ".NET 3.5 / Metro 1.3" ( e.g. see Web Service Attributes Editor Page ) . It will use WS-SX version of all WS-* specifications.

  12. Select Secure Service if it's not already selected.

  13. Verify that the Security Mechanism of "STS Issued Token" is selected.

  14. Select the Configure button. For Algorithm Suite, verify that Basic128 bit is selected (so that it matches the value selected for the service.) Select OK to close the configuration dialog.

  15. If not already selected, select Act as Secure Token Service (STS).

    Note

    If you'd like to use an STS other than the default, click the STS Configure button, and click the Add button to add a different service provider. Click OK to close the STS Configuration dialog.

  16. Click Configure. In the Issuer field, enter MySTS1. Click OK to close.

  17. Click the Keystore button to provide your keystore with the alias identifying the service certificate and private key. To do this, click the Load Aliases button, select wssip , then click OK to close the dialog.

  18. Click OK.

    A new file is added to the project. To view the WSIT configuration file, expand Configuration Files | xml-resources | web-services | MySTS1 | wsdl, then double-click the file MySTS1Service.wsdl . This file contains the tc:STSConfiguration element within the wsp:Policy elements..

  19. Right-click the MySTS1Project tab, select Properties. Select the Run category, and type the following in the Relative URL field: /MySTS1Service?wsdl .

  20. Run the Project (right-click the project and select Run).

    The STS WSDL appears in the browser.

To Create and Secure the Second STS (BT)

To create and secure a Security Token Service(i.e. local STS) for this example, follow these steps.

  1. Create a new project for the 2nd STS by selecting File | New Project.

  2. Select Web, then Web Application, then Next.

  3. Type MySTS2Project for the Project Name, then click Finish.

  4. Right-click the MySTS2Project node, select New, then select Other.

  5. Select Web Services from the Categories list.

  6. Select Secure Token Service (STS) from the File Type(s) list, then click Next.

  7. Type the name MySTS2 for the Web Service Class Name.

  8. Enter or select org.me.my.sts2 in the Package field, then click Finish. If prompted to reload the catalog.xml file, click No.

    The IDE takes a while to create the first STS. When created, it appears under the project's Web Services node as MySTS2Service .

  9. The STS wizard creates an implementation of the provider class. To view it, expand Source Packages, then org.me.my.sts2. Double-click MySTS2.java to open it in the right pane.

  10. In the Projects window, expand the MySTS2Service node, then expand the Web Services node. Right-click the MySTS2Service[IMySTS2Service_Port] node and select Edit Web Service Attributes to configure the STS.

  11. Select the "Version Compatibility" to ".NET 3.5 / Metro 1.3" ( e.g. see Web Service Attributes Editor Page ) . It will use WS-SX version of all WS-* specifications.

  12. Select Secure Service if it's not already selected.

  13. Verify that the Security Mechanism of Username Authentication with Symmetric Key is selected.

  14. Select the Configure button. For Algorithm Suite, verify that Basic128 bit is selected (so that it matches the value selected for the service.) Select OK to close the configuration dialog.

  15. If not already selected, select Act as Secure Token Service (STS).

    Note

    If you'd like to use an STS other than the default, click the STS Configure button, and click the Add button to add a different service provider. Click OK to close the STS Configuration dialog.

  16. Click Configure. In the Issuer field, enter MySTS2. Click OK to close.

  17. Click the Keystore button to provide your keystore with the alias identifying the service certificate and private key. To do this, click the Load Aliases button, select wssip , then click OK to close the dialog.

  18. Click OK.

    A new file is added to the project. To view the WSIT configuration file, expand Configuration Files | xml-resources | web-services | MySTS2 | wsdl, then double-click the file MySTS2Service.wsdl . This file contains the tc:STSConfiguration element within the wsp:Policy elements..

  19. Right-click the MySTS2Project tab, select Properties. Select the Run category, and type the following in the Relative URL field: /MySTS2Service?wsdl .

  20. Run the Project (right-click the project and select Run).

    The STS WSDL appears in the browser.

To Secure the Example Service Application (BT)

The following example application starts with the example provided in Developing with NetBeans and demonstrates adding security to both the web service and to the web service client.

For this example, the security mechanism of STS Issued Token is used to secure the application. The steps are similar to the ones described in Example: Username Authentication with Symmetric Key (UA), with the addition of creating and securing an STS.

To add security to the service part of the example, follow these steps.

  1. Create the CalculatorApplication example by following the steps described in the following sections of Developing with NetBeans .

    1. Creating a Web Service

    2. Skip the section on adding Reliable Messaging.

    3. Deploying and Testing a Web Service (first two steps only, do not run the project yet).

  2. Expand CalculatorApplication | Web Services, then right-click the node for the web service, CalculatorWS, and select Edit Web Service Attributes.

  3. Select the "Version Compatibility" to ".NET 3.5 / Metro 1.3" ( e.g. see Web Service Attributes Editor Page ) . It will use WS-SX version of all WS-* specifications.

  4. Deselect the Reliable Messaging option if it is selected.

  5. Select Secure Service.

  6. From the drop-down list for Security Mechanism, select STS Issued Token.

  7. Click Configure. For Issuer Address and Issuer Metadata Address, enter http://localhost:8080/MySTS1Project/MySTS1Service . For Issuer Metadata, enter http://localhost:8080/MySTS1Project/MySTS1Service/mex

  8. For Algorithm Suite, select Basic 128 bit. For Key Size, select 128 (the algorithm suite value of the service must match the algorithm suite value of the STS). Select OK to close the configuration dialog.

    Note

    If you have configured Unlimited Strength Encryption as described in To Create a Third-Party STS , you can leave the key size at 256. Otherwise, you must set it to 128.

  9. Select Use Development Defaults.

  10. Click OK.

    A new file is added to the project. To view the WSIT configuration file, expand Web Pages | WEB-INF, then double-click the file wsit-org.me.calculator.CalculatorWS.xml and select the Source page. This file contains the security elements within wsp:Policy tags.

  11. Right-click the CalculatorApplication node and select Properties. Select the Run category, and type the following in the Relative URL field: /CalculatorWSService?wsdl .

  12. Right-click the CalculatorApplication node and select Run. This step compiles the application and deploys it onto GlassFish. A browser will open and display the WSDL file for the application.

To Secure the Example Web Service Client Application (BT)

This section demonstrates adding security to the CalculatorApplication's web service client. The service was secured using the security mechanism described in STS Issued Token .

To add security to the web service client, complete the following steps.

  1. Create the client application by following the steps described in Creating a Client to Consume a WSIT-Enabled Web Service .

    Note

    Whenever you make changes on the service, refresh the client so that the client will pick up the change. To refresh the client, right-click the node for the Web Service Reference for the client, and select Refresh Client.

  2. Drill down from CalculatorWSServletClient | Web Service References.

  3. Right-click CalculatorWSService and select Edit Web Service Attributes, then select the Quality of Service tab.

  4. Provide the client's private key by pointing to an alias in the keystore. To do this, click the Keystore button, click the Load Aliases button, and select xws-security-client from the Alias list.

  5. Provide the service's certificate by pointing to an alias in the client truststore. To do this, click the Truststore button,, click the Load Aliases button for the truststore and select xws-security-server from the Alias list.

    • In some instances, NetBeans will not detect that this client is a JSR-196 client, and thus will require that the keystore and truststore entries be manually configured. To do this, follow the steps in this section.

    • Expand CalculatorWSServletClient | Source Packages | META-INF.

    • Double-click CalculatorWSService.xml to open it in the Source window. Click the Source tab to view the code. Find the sc:KeyStore and sc:TrustStore elements. If these elements contain parameters for location and storepass , then just continue to the next section. If not, add these attributes to this file. The following code shows an example of how these elements should be specified.

      Example 12.19. 

      <sc:TrustStore
         wspp:visibility="private"
         location="<GF_HOME>\glassfish\domains\domain1\config\cacerts.jks"
         storepass="changeit" peeralias="xws-security-server"/>
      <sc:KeyStore
         wspp:visibility="private"
         location="<GF_HOME>\glassfish\domains\domain1\config\keystore.jks"
         storepass="changeit" alias="xws-security-client"/>

  6. Click OK to close this dialog.

  7. The service requires a token to be issued from the first STS (i.e Remote STS) at http://localhost:8080/MySTS1Project/MySTS1Service , with WSDL file http://localhost:8080/MySTS1Project/MySTS1Service?wsdl. To do this, follow these steps:

    1. Right-click the CalculatorWSServletClient node and select New | Web Service Client.

      The New Web Service Client window appears.

    2. Select the WSDL URL option.

    3. Cut and paste the URL of the web service that you want the client to consume into the WSDL URL field. For this example, here is the URL for the MySTS1 web service:

      http://localhost:8080/MySTS1Project/MySTS1Service?wsdl
    4. Type org.me.calculator.client.sts1 in the Package field, then click Finish.

      The Projects window displays the new web service client.

  8. Drill down from CalculatorWSServletClient | Web Service References.

  9. Right-click MySTS1Service and select Edit Web Service Attributes.

  10. Select the Quality of Service tab of the MySTS1Service dialog.

  11. Provide the client's private key by pointing to an alias in the keystore. To do this, click the Keystore button, click the Load Aliases button, and select xws-security-client from the Alias list. If the Keystore button is not selectable, follow the instructions in the next step for adding the keystore entry manually.

  12. Verify the STS's certificate by pointing to an alias in the client truststore. To do this, click the Truststore button,, click the Load Aliases button and select wssip from the Alias list.

    • In some instances, NetBeans will not detect that this client is a JSR-196 client, and thus will require that the keystore and truststore entries be manually configured. To do this, follow the steps in this section.

    • Expand CalculatorWSServletClient | Source Packages | META-INF.

    • Double-click MySTSService.xml to open it in the Source window. Click the Source tab to view the code. Find the sc:KeyStore and sc:TrustStore elements. If these elements contain parameters for location and storepass , then just continue to the next section. If not, add these attributes to this file. The following code shows an example of how these elements should be specified.

      Example 12.20. 

      <sc:TrustStore
         wspp:visibility="private"
         location="<GF_HOME>\glassfish\domains\domain1\config\cacerts.jks"
         storepass="changeit" peeralias="wssip"/>
      <sc:KeyStore
         wspp:visibility="private"
         location="<GF_HOME>\glassfish\domains\domain1\config\keystore.jks"
         storepass="changeit" alias="xws-security-client"/>

  13. Expand the Security Token Service node to provide details for the second STS(i.e. local STS) to be used. When the Endpoint and the Metadata values are the same, you only need to enter the Endpoint value. For the Endpoint field, enter the following value: http://localhost:8080/MySTS2Project/MySTS2Service. For WS Trust Version field, select 1.3 if STS endpoint uses ".NET 3.5 / Metro 1.3" version compatibility. Otherwise use the default WS Trust Version.

  14. Click OK to close this dialog.

  15. The First STS(i.e. Remote STS) requires a token to be issued from the second STS(i.e. local STS) at http://localhost:8080/MySTS2Project/MySTS2Service , with WSDL file http://localhost:8080/MySTS2Project/MySTS2Service?wsdl . To do this, follow these steps:

    1. Right-click the CalculatorWSServletClient node and select New | Web Service Client.

      The New Web Service Client window appears.

    2. Select the WSDL URL option.

    3. Cut and paste the URL of the web service that you want the client to consume into the WSDL URL field. For this example, here is the URL for the MySTS2 web service:

      http://localhost:8080/MySTS2Project/MySTS2Service?wsdl
    4. Type org.me.calculator.client.sts2 in the Package field, then click Finish.

      The Projects window displays the new web service client.

  16. Drill down from CalculatorWSServletClient | Web Service References.

  17. Right-click MySTS2Service and select Edit Web Service Attributes.

  18. Select the Quality of Service tab of the MySTS2Service dialog.

  19. Provide the client's private key by pointing to an alias in the keystore. To do this, click the Keystore button, click the Load Aliases button, and select xws-security-client from the Alias list. If the Keystore button is not selectable, follow the instructions in the next step for adding the keystore entry manually.

  20. Verify the STS's certificate by pointing to an alias in the client truststore. To do this, click the Truststore button,, click the Load Aliases button and select wssip from the Alias list.

    • In some instances, NetBeans will not detect that this client is a JSR-196 client, and thus will require that the keystore and truststore entries be manually configured. To do this, follow the steps in this section.

    • Expand CalculatorWSServletClient | Source Packages | META-INF.

    • Double-click MySTS2Service.xml to open it in the Source window. Click the Source tab to view the code. Find the sc:KeyStore and sc:TrustStore elements. If these elements contain parameters for location and storepass , then just continue to the next section. If not, add these attributes to this file. The following code shows an example of how these elements should be specified.

      Example 12.21. 

      <sc:TrustStore
         wspp:visibility="private"
         location="<GF_HOME>\glassfish\domains\domain1\config\cacerts.jks"
         storepass="changeit" peeralias="wssip"/>
      <sc:KeyStore
         wspp:visibility="private"
         location="<GF_HOME>\glassfish\domains\domain1\config\keystore.jks"
         storepass="changeit" alias="xws-security-client"/>

  21. Enter the default user name and password.

    If you followed the steps in Adding Users to GlassFish , this will be User Name wsitUser and Password changeit .

  22. Click OK to close this dialog.

  23. Compile and run this application by right-clicking the CalculatorWSServletClient project and selecting Run. The result of the add operation will display in a browser window.

12.9.9. Example: STS Issued Token With SecureConversation (STS+SC)

This example illustrates, how SecureConversation Token is used to interact with STS. To have a basic idea of SecureConversation, find this article : Secure Conversations for Web Services With Metro

This section describes the following tasks:

To Create and Secure the STS with SecureConversationToken (STS+SC). 

Same as provided in To Create and Secure the STS (STS)

To Secure the Example Service Application (STS+SC)

The following example application starts with the example provided in Developing with NetBeans and demonstrates adding security to both the web service and to the web service client.

For this example, the security mechanism of STS Issued Token is used to secure the application. The steps are similar to the ones described in Example: Username Authentication with Symmetric Key (UA) , with the addition of creating and securing an STS.

To add security to the service part of the example, follow these steps.

  1. Create the CalculatorApplication example by following the steps described in the following sections of Developing with NetBeans .

    1. Creating a Web Service

    2. Skip the section on adding Reliable Messaging.

    3. Deploying and Testing a Web Service (first two steps only, do not run the project yet).

  2. Expand CalculatorApplication | Web Services, then right-click the node for the web service, CalculatorWS, and select Edit Web Service Attributes.

  3. Select the "Version Compatibility" to ".NET 3.5 / Metro 1.3" ( e.g. see Web Service Attributes Editor Page ) . It will use WS-SX version of all WS-* specifications.

  4. Deselect the Reliable Messaging option if it is selected.

  5. Select Secure Service.

  6. From the drop-down list for Security Mechanism, select STS Issued Token.

  7. Click Configure. For Issuer Address and Issuer Metadata Address, enter http://localhost:8080/MySTSProject/MySTSService . For Issuer Metadata, enter http://localhost:8080/MySTSProject/MySTSService/mex

  8. Select the Configure button and do the following :

    For Algorithm Suite, verify that Basic128 bit is selected (so that it matches the value selected for the service.)

    Check the Establish Secure Session (Secure Conversation) check box to enable the secure conversaion feature

    Note

    If you have configured Unlimited Strength Encryption as described in To Create a Third-Party STS , you can leave the key size at 256. Otherwise, you must set it to 128.

    Select OK to close the configuration dialog.

  9. Select Use Development Defaults.

  10. Click OK.

    A new file is added to the project. To view the WSIT configuration file, expand Web Pages | WEB-INF, then double-click the file wsit-org.me.calculator.CalculatorWS.xml and select the Source page. This file contains the security elements within wsp:Policy tags.

  11. Right-click the CalculatorApplication node and select Run. This step compiles the application and deploys it onto GlassFish. A browser will open and display the WSDL file for the application.

To Secure the Example Web Service Client Application (STS+SC). 

Same as provided in To Secure the Example Web Service Client Application (STS)

12.9.10. Example: Kerberos Token (Kerb)

This section contains the steps for running a Kerberos Token Profile-based WS Security scenario. Kerberos support was added to Metro in 1.1 release. The Netbeans support for configuring a Kerberos Token based secure web service is available from Metro 1.3 and Netbeans 6.5.

For an article discussing using Kerberos with WSIT, go to Building Kerberos-Based Secure Services Using Metro. This article has a sample application, but does not use Netbeans IDE.

The section describes the following tasks:

To Set Up Your System for Kerberos Profile. 

If your system is not already set up to use Kerberos, refer to the steps mentioned in Configuring Kerberos for GlassFish and Tomcat.

To Secure the Example Service Application (Kerb)

The following example application starts with the example provided in Developing with NetBeans and demonstrates adding security to both the web service and to the web service client.

For this example, a Kerberos token is used to secure the application. To add security to the service part of the example, follow these steps.

  1. Create the CalculatorApplication example by following the steps described in the following sections of Developing with NetBeans.

    1. Creating a Web Service

    2. Skip the section on adding Reliable Messaging.

    3. Deploying and Testing a Web Service (first two steps only, do not run the project yet)

  2. Expand CalculatorApplication | Web Services, then right-click the node for the web service (CalculatorWS) and select Edit Web Service Attributes.

  3. Deselect Reliable Messaging if it is selected.

  4. In the CalculatorWSPortBinding section, select Secure Service.

  5. From the drop-down list for Security Mechanism, select Symmetric Binding with Kerberos Tokens.

  6. Select Kerberos button, and specify the Login Module to be used for the service. For details on Login Module to specify refer Configuring Kerberos for GlassFish and Tomcat.

    Figure 12.8. Kerberos Configuration Attributes - Service

    Kerberos Configuration Attributes - Service


  7. Click OK to close the CalculatorWSService dialog.

    Expand Web Pages | WEB-INF, then double-click the file wsit-org.me.calculator.CalculatorWS.xml to open it in the edit window.The Binding level policy looks like: (This section of code has been formatted to fit the page)

    Example 12.22. 

    <wsp:Policy wsu:Id="IFinancialService_policy">
       <wsp:ExactlyOne>
          <wsp:All>
             <wsaws:UsingAddressing
                     xmlns:wsaws="http://www.w3.org/2006/05/addressing/wsdl"/>
             <sp:SymmetricBinding>
                <wsp:Policy>
                   <sp:ProtectionToken>
                      <wsp:Policy>
                         <sp:KerberosToken
                                 sp:IncludeToken="http://docs.oasis-open.org/
                            ws-sx/ws-securitypolicy/200702/IncludeToken/Once">
                            <wsp:Policy>
                               <sp:WssGssKerberosV5ApReqToken11/>
                            </wsp:Policy>
                         </sp:KerberosToken>
                      </wsp:Policy>
                   </sp:ProtectionToken>
                   <sp:Layout>
                      <wsp:Policy>
                         <sp:Strict/>
                      </wsp:Policy>
                   </sp:Layout>
                   <sp:IncludeTimestamp/>
                   <sp:OnlySignEntireHeadersAndBody/>
                   <sp:AlgorithmSuite>
                      <wsp:Policy>
                         <sp:Basic128/>
                      </wsp:Policy>
                   </sp:AlgorithmSuite>
                </wsp:Policy>
             </sp:SymmetricBinding>
             <sp:Wss11>
                <wsp:Policy>
                   <sp:MustSupportRefKeyIdentifier/>
                   <sp:MustSupportRefIssuerSerial/>
                   <sp:MustSupportRefThumbprint/>
                   <sp:MustSupportRefEncryptedKey/>
                </wsp:Policy>
             </sp:Wss11>
             <sc:KerberosConfig xmlns:
                                sc="http://schemas.sun.com/2006/03/wss/server"
                                loginModule="KerberosServer"/>
          </wsp:All>
       </wsp:ExactlyOne>
    </wsp:Policy>

  8. Right-click the CalculatorApplication node and select Run. A browser will open and display the WSDL file for the application.

    If the application doesn't build, expand CalculatorApplication | Web Pages | WEB-INF, and double-click web.xml to open it in the right pane. Select the Security tab, and remove any existing security constraints. Then run the project again.

  9. Follow the steps to secure the client application as described in To Secure the Example Web Service Client Application (Kerb).

To Secure the Example Web Service Client Application (Kerb)

This section demonstrates adding security to the web service client that references the web service created in the previous section. . This section also assumes that Kerberos environment has already been setup on the system. Refer to Configuring Kerberos for GlassFish and Tomcat for more details.

To add security to the client that references this web service, complete the following steps.

  1. Create the client application by following the steps described in Creating a Client to Consume a WSIT-Enabled Web Service.

    Note

    Whenever you make changes on the service, refresh the client so that the client will pick up the change. To refresh the client, right-click the node for the Web Service Reference for the client, and select Refresh Client.

  2. Expand the node for the web service client application, CalculatorWSServletClient.

  3. Expand the Web Service References node.

  4. Right-click on CalculatorWSService, select Edit Web Service Attributes.

  5. Expand the Web Service References node.

  6. In the Security section of the Quality of Service tab, select Kerberos. Specify Login Module, Service Principal and check the box if credentials should be delegated.

    Specify the Login Module to the one you created in login.conf file for the client in the section Configuring Kerberos for GlassFish and Tomcat, and the service principal for which the ticket needs to be obtained.

    Kerberos support in Metro security supports credential delegation from client to service, such that the server can initiate other security contexts on behalf of the client. This feature is useful for single sign-on in a multi-tier environment. Select the checkbox for credential delegation.

    Note

    At the service, we can obtain the delegated credentials from the Subject of the authenticated user. The PrivateCredential set of the will have the delegated client credentials (as GSSCredential). We can pass this GSSCredential to GSSManager.createContext() pretending to be the client.

    Also, the PublicCredential set of the authenticated Subject will always have KerberosPrincipal corresponding to the client.

    Figure 12.9. Kerberos Configuration Attributes - Client

    Kerberos Configuration Attributes - Client

  7. Right-click the CalculatorWSServletClient node and select Run. The result of the add operation will display in a browser window.

    Note

    If your client is a Java SE client, you need to set the following system properties while running your client code:

    Example 12.23. 

    -Djava.security.policy=${glassfish.home}/domains/domain1/config/server.policy
    
    -Djava.security.auth.login.config=${glassfish.home}/domains/domain1/config/login.conf


    If it is WebApp deployed on glassfish, nothing else needs to be done.

Chapter 13. WSIT Security Features: Advanced: Topics

13.1. Using Security Mechanisms

The security mechanism that you need to select reflects the commonly available infrastructure between your organization and another organization with which you will be communicating. The following list provides some common communication issues that need to be addressed using security mechanisms:

  • Asymmetric binding is used for message protection. This binding has two binding specific token properties: the initiator token and the recipient token. If the message pattern requires multiple messages, this binding defines that the initiator token is used for the message signature from initiator to the recipient, and for encryption from recipient to initiator. The recipient token is used for encryption from initiator to recipient, and for the message signature from recipient to initiator.

  • Some organizations have a Kerberos infrastructure, while other organizations have a PKI infrastructure (asymmetric binding). WS-Trust allows two communicating parties having different security infrastructure to communicate securely with one another. In this scenario, the client authenticates with a third party (STS) using its infrastructure. The STS returns a (digitally-signed) SAML token containing authorization and authentication information regarding the client, along with a key. The client then simply relays the token to the server and uses the STS-supplied key to ensure integrity and confidentiality of the messages sent to the server.

    Note

    Kerberos is supported in Metro since 1.1 release. Netbeans support is available for Kerberos from Metro 1.3 and Netbeans 6.5 release. Kerberos is NOT supported on AIX systems.

  • Symmetric binding is used for message protection. This binding has two binding specific token properties: encryption token and signature token. If the message pattern requires multiple messages, this binding defines that the encryption token used from initiator to recipient is also used from recipient to initiator. Similarly, the signature token used from initiator to recipient is also used from recipient to initiator.

    In some cases, the client does not have its own certificates. In this case, the client can choose a security mechanism that makes use of symmetric binding and could use a Username token as a signed supporting token for authentication with the server. The symmetric binding in this case serves the purpose of integrity and confidentiality protection.

  • In the absence of a notion of secure session, the client would have to reauthenticate with the server upon every request. In this situation, if the client is sending a Username token, the client will be asked for its username and password on each request, or, if the client is sending a certificate, the validity of the certificate has to be established with every request. This is expensive! Enable Secure Conversation to remove the requirement for re-authentication.

  • The use of the same session key (Secure Conversation) for repeated message exchanges is sometimes considered a risk. To reduce that risk, enable Require Derived Keys.

  • RSA Signatures (signatures with public-private keys) is more expensive than Symmetric Key signatures. Use the Secure Conversation option to enable Symmetric Key signatures.

  • Enabling WSS 1.1 enables an encrypted key generated by the client to be reused by the server in the response to the client. This saves the time otherwise required to create a Symmetric Key, encrypt it with the client public key (which is also an expensive RSA operation), and transmit the encrypted key in the message (it occupies markup and requires Base64 operations).

13.2. Understanding WSIT Configuration Files

When a web service or a web service client are configured for WSIT features, this information is saved in WSIT Configuration files. The following sections discuss the WSIT configuration files for the service and for the client:

13.2.1. Service-Side WSIT Configuration Files

WSIT features are configured on a web service in the following way:

  1. Right-click the web service in NetBeans IDE.

  2. Select Edit Web Service Attributes.

  3. Select and/or configure the appropriate WSIT features on the Quality Of Service Configuration tab for the web service. Many of the WSIT features are discussed in Using WSIT Security.

  4. Select OK to close the dialog.

  5. Run the web application by right-clicking the project node and selecting Run Project.

The service-side WSIT Configuration file that is used when the web service is deployed can be viewed by expanding the Web Pages | WEB-INF elements of the application in the tree, and then double-clicking the wsit-package.service.xml file to open it in the editor.

For the example application Example: Username Authentication with Symmetric Key (UA), the WSIT configuration file for the service is named wsit-org.me.calculator.CalculatorWS.xml, and looks like this:

Example 13.1. 

<?xml version="1.0" encoding="UTF-8"?>
<definitions
        xmlns="http://schemas.xmlsoap.org/wsdl/"
        xmlns:wsdl="http://schemas.xmlsoap.org/wsdl/"
        xmlns:xsd="http://www.w3.org/2001/XMLSchema"
        xmlns:soap="http://schemas.xmlsoap.org/wsdl/soap/"
        name="CalculatorWSService"
        targetNamespace="http://calculator.me.org/"
        xmlns:tns="http://calculator.me.org/"
        xmlns:wsp="http://schemas.xmlsoap.org/ws/2004/09/policy"
        xmlns:wsu="http://docs.oasis-open.org/wss/2004/01/
                oasis-200401-wss-wssecurity-utility-1.0.xsd"
        xmlns:wsaws="http://www.w3.org/2005/08/addressing"
        xmlns:sp="http://schemas.xmlsoap.org/ws/2005/07/securitypolicy"
        xmlns:sc="http://schemas.sun.com/2006/03/wss/server"
        xmlns:wspp="http://java.sun.com/xml/ns/wsit/policy">
   <message name="add"/>
   <message name="addResponse"/>
   <portType name="CalculatorWS">
      <operation name="add">
         <input message="tns:add"/>
         <output message="tns:addResponse"/>
      </operation>
   </portType>
   <binding name="CalculatorWSPortBinding" type="tns:CalculatorWS">
      <wsp:PolicyReference URI="#CalculatorWSPortBindingPolicy"/>
      <operation name="add">
         <input>
            <wsp:PolicyReference
                    URI="#CalculatorWSPortBinding_add_Input_Policy"/>
         </input>
         <output>
            <wsp:PolicyReference
                    URI="#CalculatorWSPortBinding_add_Output_Policy"/>
         </output>
      </operation>
   </binding>
   <service name="CalculatorWSService">
      <port name="CalculatorWSPort" binding="tns:CalculatorWSPortBinding"/>
   </service>
   <wsp:Policy wsu:Id="CalculatorWSPortBindingPolicy">
      <wsp:ExactlyOne>
         <wsp:All>
            <wsaws:UsingAddressing
                    xmlns:wsaws="http://www.w3.org/2006/05/addressing/wsdl"/>
            <sp:SymmetricBinding>
               <wsp:Policy>
                  <sp:ProtectionToken>
                     <wsp:Policy>
                        <sp:X509Token sp:IncludeToken=
                           "http://schemas.xmlsoap.org/ws/2005/07/
                           securitypolicy/IncludeToken/Never">
                           <wsp:Policy>
                              <sp:WssX509V3Token10/>
                           </wsp:Policy>
                        </sp:X509Token>
                     </wsp:Policy>
                  </sp:ProtectionToken>
                  <sp:Layout>
                     <wsp:Policy>
                        <sp:Strict/>
                     </wsp:Policy>
                  </sp:Layout>
                  <sp:IncludeTimestamp/>
                  <sp:OnlySignEntireHeadersAndBody/>
                  <sp:AlgorithmSuite>
                     <wsp:Policy>
                        <sp:Basic128/>
                     </wsp:Policy>
                  </sp:AlgorithmSuite>
               </wsp:Policy>
            </sp:SymmetricBinding>
            <sp:Wss11>
               <wsp:Policy>
                  <sp:MustSupportRefKeyIdentifier/>
                  <sp:MustSupportRefIssuerSerial/>
                  <sp:MustSupportRefThumbprint/>
                  <sp:MustSupportRefEncryptedKey/>
               </wsp:Policy>
            </sp:Wss11>
            <sp:SignedSupportingTokens>
               <wsp:Policy>
                  <sp:UsernameToken
                          sp:IncludeToken="http://schemas.xmlsoap.org/
                                           ws/2005/07/securitypolicy/
                                           IncludeToken/AlwaysToRecipient">
                     <wsp:Policy>
                        <sp:WssUsernameToken10/>
                     </wsp:Policy>
                  </sp:UsernameToken>
               </wsp:Policy>
            </sp:SignedSupportingTokens>
            <sc:KeyStore wspp:visibility="private"
                         alias="xws-security-server"/>
         </wsp:All>
      </wsp:ExactlyOne>
   </wsp:Policy>
   <wsp:Policy wsu:Id="CalculatorWSPortBinding_add_Input_Policy">
      <wsp:ExactlyOne>
         <wsp:All>
            <sp:EncryptedParts>
               <sp:Body/>
            </sp:EncryptedParts>
            <sp:SignedParts>
               <sp:Body/>
               <sp:Header Name="To"
                          Namespace="http://www.w3.org/2005/08/addressing"/>
               <sp:Header Name="From"
                          Namespace="http://www.w3.org/2005/08/addressing"/>
               <sp:Header Name="FaultTo"
                          Namespace="http://www.w3.org/2005/08/addressing"/>
               <sp:Header Name="ReplyTo"
                          Namespace="http://www.w3.org/2005/08/addressing"/>
               <sp:Header
                       Name="MessageID" Namespace=
                       "http://www.w3.org/2005/08/addressing"/>
               <sp:Header
                       Name="RelatesTo" Namespace=
                       "http://www.w3.org/2005/08/addressing"/>
               <sp:Header Name="Action"
                          Namespace="http://www.w3.org/2005/08/addressing"/>
               <sp:Header Name="AckRequested"
                          Namespace="http://schemas.xmlsoap.org/ws/2005/02/rm"/>
               <sp:Header Name="SequenceAcknowledgement"
                          Namespace="http://schemas.xmlsoap.org/ws/2005/02/rm"/>
               <sp:Header Name="Sequence"
                          Namespace="http://schemas.xmlsoap.org/ws/2005/02/rm"/>
            </sp:SignedParts>
         </wsp:All>
      </wsp:ExactlyOne>
   </wsp:Policy>
   <wsp:Policy wsu:Id="CalculatorWSPortBinding_add_Output_Policy">
      <wsp:ExactlyOne>
         <wsp:All>
            <sp:EncryptedParts>
               <sp:Body/>
            </sp:EncryptedParts>
            <sp:SignedParts>
               <sp:Body/>
               <sp:Header Name="To"
                          Namespace="http://www.w3.org/2005/08/addressing"/>
               <sp:Header Name="From"
                          Namespace="http://www.w3.org/2005/08/addressing"/>
               <sp:Header Name="FaultTo"
                          Namespace="http://www.w3.org/2005/08/addressing"/>
               <sp:Header Name="ReplyTo"
                          Namespace="http://www.w3.org/2005/08/addressing"/>
               <sp:Header Name="MessageID"
                          Namespace="http://www.w3.org/2005/08/addressing"/>
               <sp:Header Name="RelatesTo"
                          Namespace="http://www.w3.org/2005/08/addressing"/>
               <sp:Header Name="Action"
                          Namespace="http://www.w3.org/2005/08/addressing"/>
               <sp:Header Name="AckRequested"
                          Namespace="http://schemas.xmlsoap.org/ws/2005/02/rm"/>
               <sp:Header Name="SequenceAcknowledgement"
                          Namespace="http://schemas.xmlsoap.org/ws/2005/02/rm"/>
               <sp:Header Name="Sequence"
                          Namespace="http://schemas.xmlsoap.org/ws/2005/02/rm"/>
            </sp:SignedParts>
         </wsp:All>
      </wsp:ExactlyOne>
   </wsp:Policy>
</definitions>

13.2.2. Client-Side WSIT Configuration Files

WSIT features are configured on the client in the following way:

  1. Expand the Web Service Reference node for the web service client in NetBeans IDE.

  2. Select Edit Web Service Attributes.

  3. Select and/or configure the appropriate WSIT features on the Quality Of Service tab for the web service client. Many of the WSIT features are discussed in Using WSIT Security.

  4. Select OK to close the dialog.

  5. Run the web service client by right-clicking the project node and selecting Run Project.

The WSIT Configuration information can be viewed by expanding Source Packages | META-INF in NetBeans IDE for the client project. This directory contains two files: serviceService.xml and wsit-client.xml.

The serviceService.xml file is an XML file that must conform to the WSDL specification. The WSIT configuration is written to this file. For the example application Example: Username Authentication with Symmetric Key (UA), the WSIT configuration file for the client is named CalculatorWSService.xml, and looks like this:

Example 13.2. 

<?xml version="1.0" encoding="UTF-8"?>
<!-- Published by JAX-WS RI at http://jax-ws.java.net. RI's version
                is JAX-WS RI 2.1.2_01-hudson-189-. --><!-- Generated by JAX-WS
                RI at http://jax-ws.java.net. RI's version is JAX-WS RI
                2.1.2_01-hudson-189-. -->
<definitions
        xmlns:wsu=
             "http://docs.oasis-open.org/wss/2004/01/oasis-200401-wss-wssecurity-
             utility-1.0.xsd"
        xmlns:wsp="http://schemas.xmlsoap.org/ws/2004/09/policy"
        xmlns:soap="http://schemas.xmlsoap.org/wsdl/soap/"
        xmlns:tns="http://calculator.me.org/"
        mlns:xsd="http://www.w3.org/2001/XMLSchema"
        xmlns="http://schemas.xmlsoap.org/wsdl/"
        targetNamespace="http://calculator.me.org/"
        name="CalculatorWSService"
        xmlns:sc="http://schemas.sun.com/2006/03/wss/client"
        xmlns:wspp="http://java.sun.com/xml/ns/wsit/policy"
        xmlns:tc="http://schemas.sun.com/ws/2006/05/trust/client">
   
   <wsp:UsingPolicy></wsp:UsingPolicy>
   <types>
      <xsd:schema>
         <xsd:import namespace="http://calculator.me.org/"
                     schemaLocation="http://localhost:8080/CalculatorApplication/
                CalculatorWSService?xsd=1">
         </xsd:import>
      </xsd:schema>
   </types>
   <message name="add">
      <part name="parameters" element="tns:add"></part>
   </message>
   <message name="addResponse">
      <part name="parameters" element="tns:addResponse"></part>
   </message>
   <portType name="CalculatorWS">
      <operation name="add">
         <input message="tns:add"></input>
         <output message="tns:addResponse"></output>
      </operation>
   </portType>
   <binding name="CalculatorWSPortBinding" type="tns:CalculatorWS">
      <wsp:PolicyReference URI="#CalculatorWSPortBindingPolicy"/>
      <soap:binding transport="http://schemas.xmlsoap.org/
                soap/http" style="document"></soap:binding>
      <operation name="add">
         <soap:operation soapAction=""></soap:operation>
         <input>
            <soap:body use="literal"></soap:body>
         </input>
         <output>
            <soap:body use="literal"></soap:body>
         </output>
      </operation>
   </binding>
   <service name="CalculatorWSService">
      <port name="CalculatorWSPort" binding="tns:CalculatorWSPortBinding">
         <soap:address location="http://localhost:8080/
                CalculatorApplication/CalculatorWSService">
         </soap:address>
      </port>
   </service>
   <wsp:Policy wsu:Id="CalculatorWSPortBindingPolicy">
      <wsp:ExactlyOne>
         <wsp:All>
            <sc:KeyStore
                  wspp:visibility="private"
                  location="c:\Sun\glassfish\domains\domain1\config\keystore.jks"
                  storepass="changeit" alias="xws-security-client"/>
            <sc:TrustStore
                    wspp:visibility="private"
                    location="c:\Sun\glassfish\domains\domain1\config\cacerts.jks"
                    storepass="changeit"
                    peeralias="xws-security-server"/>
            <tc:PreconfiguredSTS wspp:visibility="private"/>
            <sc:CallbackHandlerConfiguration wspp:visibility="private">
               <sc:CallbackHandler default="wsitUser"
                                   name="usernameHandler"/>
               <sc:CallbackHandler default="changeit"
                                   name="passwordHandler"/>
            </sc:CallbackHandlerConfiguration>
         </wsp:All>
      </wsp:ExactlyOne>
   </wsp:Policy>
</definitions>

The wsit-client.xml file imports the serviceService.xml file. For the example shown about, the wsit-client.xml file looks like this:

Example 13.3. 

<?xml version="1.0" encoding="UTF-8"?>
<definitions
        xmlns="http://schemas.xmlsoap.org/wsdl/"
        xmlns:wsdl="http://schemas.xmlsoap.org/wsdl/"
        xmlns:xsd="http://www.w3.org/2001/XMLSchema"
        xmlns:soap="http://schemas.xmlsoap.org/wsdl/soap/"
        name="mainclientconfig">
    <import location="CalculatorWSService.xml"
            namespace="http://calculator.me.org/"/>
</definitions>

When running the client, these two files will need to be in the classpath, either at the classpath root (i.e., build/classes) or in a META-INF directory under the classpath root.

13.3. Security Mechanism Configuration Options

The following fields shown in Security Mechanism Configuration Options are used to configure different security policies. Not every option is available for every mechanism, but many of the policies include the same configuration options, so they are grouped here for the purposes of defining them in one central location.

Table 13.1. Security Mechanism Configuration Options

Option

Description

Algorithm Suite

This attribute specifies the algorithm suite required for performing cryptographic operations with symmetric or asymmetric key-based security tokens. An algorithm suite specifies actual algorithms and allowed key lengths. A mechanism alternative will define what algorithms are used and how they are used. The value of this attribute is typically referenced by a security binding and is used to specify the algorithms used for all cryptographic operations performed under the security binding. The default value is Basic 128 bit.

Some of the algorithm suite settings require that Unlimited StrengthEncryption be configured in the Java Runtime Environment (JRE), particularly the algorithm suites that use 256 bit encryption. Instructions for downloading and configuring unlimited strength encryption can be found at the following URLS:

http://www.oracle.com/technetwork/java/javase/tech/index-jsp-136007.html

http://java.sun.com/javase/downloads/index_jdk5.jsp#docs

Read the OASIS specification WS-Security Policy section on Security Binding Properties for more description of the components for each of these algorithm suites. A link to this document can be found at https://eclipse-ee4j.github.io/metro-wsit.

Encrypt Before Signing

If selected, specifies that the order of message protection is to encrypt the SOAP content, then sign the entire SOAP body. Encryption key and signing key must be derived from the same source key.

If not selected, the default behavior is Sign Before Encrypt.

Encrypt Signature

Specifies whether the signature must be encrypted. If selected, the primary signature must be encrypted and any signature confirmation elements must also be encrypted. If not selected (the default), the primary signature must not be encrypted and any signature confirmation elements must not be encrypted.

Enable EPR Identity

This feature enables the service to produce its public key in the wsdl.Clients who wants to consume the service can use this public key to encrypt messages and hence they do not need to specify the peerAlias in their configuration, but still TrustStore configuration is needed to validate the certificate. Current Netbeans versions do not support the UI to configure this.So for a detailed description about this feature and to know how to configure this , please visit the blog: http://blogs.sun.com/SureshMandalapu/entry/support_of_endpoint_references_with

Securing only some of the WS operations

With latest metro we can secure only required operations in a service unlike in the older version where we have to secure either all or no operations.This means the security is at binding level , but not at operation level.But with latest metro , the security policies can be specified for individual operations,thus we can secure only required operations in a service

For a detailed description and how to configure this , please go through the blog: http://blogs.sun.com/SureshMandalapu/entry/support_of_binding_assertions_at

Establish Secure Session (Secure Conversation)

Secure Conversation enables a consumer and provider to establish a shared security context when a multiple-message-exchange sequence is first initiated. Subsequent messages use (possibly derived) session keys that increase the overall security while reducing the security processing overhead for each message.

In the absence of a notion of secure session, the client would have to reauthenticate with the server upon every request. In this situation, if the client is sending a Username token, it has to authenticate on every request, or, if the client is sending a certificate, the validity of the certificate has to be established on every request. This is expensive. Enable Secure Conversation to get over this requirement for re-authentication.

When this option and Require Derived Keys are both enabled, a derived key will be used. If not, the original session key will be used.

Note on Secure Conversation with Reliable Message Delivery: Reliable Messaging can be used independently of the security mechanisms; however, when Reliable Messaging (RM) is used with a security mechanism, it requires the use of Secure Conversation, which will be automatically configured for a security mechanism when Reliable Messaging is selected before the security mechanism is selected. If Secure Conversation is selected for a security mechanism and the Reliable Messaging option was not selected before the security mechanism was specified, Reliable Messaging will need to be manually selected in order for Secure Conversation to work. Reliable messaging, as well as the Advanced configuration options and Deliver Messages in Exact Order feature, is discussed in Using Reliable Messaging.

Issuer Address

This optional element specifies the address of the issuer (STS) that will accept the security token that is presented in the message. This element's type is an endpoint reference. An STS contains a set of interfaces to be used for the issuance, exchange, and validation of security tokens. An example that creates and uses an STS can be found at Example: STS Issued Token (STS).

For example, a Metro STS Issuer Address might be:

http://localhost:8080/jaxws-sts/sts

An examle WCF STS Issuer Address might be:

http://131.107.72.15/ \
Security_Federation_SecurityTokenService_Indigo/ \
Symmetric.svc/ \
Scenario_5_IssuedTokenForCertificate_MutualCertificate11

Issuer Metadata Address

Specifies the address (URLs) from which to retrieve the issuer metadata. For example, a Metro STS Issuer Metadata Address might be:

http://localhost:8080/jaxws-sts/sts

For a WCF STS the Issuer Metadata Address might be:

http://131.107.72.15/ \
Security_Federation_SecurityTokenService_Indigo/ \
Symmetric.svc

For more information, read Configuring A Secure Token Service (STS).

Key Type

Applicable for Issued Token mechanisms only. The type of key the service provider desires. The choices are public key or symmetric key. Symmetric key cryptography relies on a shared secret and is usually faster than public key cryptography. Public key cryptography relies on a key that is made public to all and is primarily used for encryption but can be used for verifying signatures.

Key Size

Applicable for Issued Token mechanisms only. The size of the symmetric key requested, specified in number of bits. This is a request, and, as such, the requested security token is not obligated to use the requested key size, nor is the STS obligated to issue a token with the same key size. That said, the recipient should try to use a key at least as strong as the specified value if possible. The information is provided as an indication of the desired strength of the security. Valid choices include 128, 192, and 256.

Require Client Certificate

Select this option to require that a client certificate be provided to the server for verification.

If you are using a security mechanism with SSL, a client certificate will be required by the server both during its initial handshake and again during verification.

Require Derived Keys

Require Derived Keys for:

Issued Token, Secure Session, X509 Token

A derived key is a cryptographic key created from a password or other user data. Derived keys allow applications to create session keys as needed, eliminating the need to store a particular key. The use of the same session key (for example, when using Secure Conversation) for repeated message exchanges is sometimes considered a risk. To reduce that risk, enable Require Derived Keys.

Require Signature Confirmation

When the WSS Version is 1.1, select this option to reduce the risk of attacks because signature confirmation indicates that the responder has processed the signature in the request. For more information, read section 8.5, Signature Confirmation, of the Web Services Security: SOAP Message Security 1.1 specification at http://www.oasis-open.org/committees/download.php/16790/wss-v1.1-spec-os-SOAPMessageSecurity.pdf.

SAML Version

Specifies which version of the SAML token should be used. The SAML Version is something the CallbackHandler has to verify, not the security runtime. SAML tokens are defined in WSS: SAML Token Profile documents, available from http://www.oasis-open.org/specs/index.php.

For an example that uses SAML Callbacks, refer to Example: SAML Authorization over SSL (SA).

Security Header Layout

Specifies which layout rules to apply when adding items to the security header. The options are:

  • Strict: Items are added to the security header following the general principle of "declare before using".

  • Lax: Items are added to the security header in any order that conforms to WSS: SOAP Message Security. However, WSIT follows Strict even when Lax is selected.

  • Lax (Timestamp First or Last): The same as for Lax, except that the first or last item in the security header must be a wsse:Timestamp.

Examples of the layout rules are described in the OASIS WS-SecurityPolicy specification, a link to which can be found at https://eclipse-ee4j.github.io/metro-wsit.

Supporting Token

Specifies the type of supporting token to be used. Supporting Tokens are included in the security header and may sign and/or encrypt additional message parts. Valid options for supporting tokens include X.509 tokens, Username tokens, SAML tokens, or an Issued Token from an STS.

For more information on these options, read Supporting Token Options.

Token Type

The type of SAML token the service provider requires, for example, urn:oasis:names:tc:SAML1.0:assertion.Choices are 1.0, 1.1, or 2.0.

WSS Version

Specifies which version of the Web Services Security specification should be followed, 1.0 or 1.1. These specifications can be viewed from http://www.oasis-open.org/specs/index.php.

Enabling WSS 1.1 enables an encrypted key generated by the client to be reused by the Server in the response to the client. This saves the time otherwise required to create a Symmetric Key during the course of response, encrypt it with the client public key (which is also an expensive RSA operation), and transmit the encrypted key in the message (it occupies markup and requires Base64 operations). Enabling WSS 1.1 also enables encrypted headers.


13.4. Building custom STS

It is described in section 11.8 (To Create a Third-Party STS) how to build a WS-Trust Security Token Service (STS). Thus created STS can be configured to authenticate the client with username/passwords, X.509 certificates, etc. and to issue either SAML 1.0 or SAML 2.0 assertions. By default the issued SAML tokens will contain an SAML AttributeStatement with the user authenticated identity to the STS and a dummy attribute.

In practice, users may have different identities when using different web services. For authorization or privacy purposes, different user identity and/or user attributes (e.g. role or authorization code) are required to be included in the issued SAML assertion for a service.

WSIT provides an interface com.sun.xml.ws.api.security.trust.STSAttributeProvider for use in plugging user identity/attribute mappings into an STS. The implementation class of the STSAttributeProvider is exposed to the system with the standard ServiceFinder mechanism, i.e. using a file META-INF/services/com.sun.xml.ws.api.security.trust.STSAttributeProvider in the classpath. The file contains the names of STSAttributeProvider implementation classes, one per line. The mapped user identity/attributes will be picked up when creating SAML assertions.

Here are the steps for creating a custom STSAttributeProvider and plugging it into an STS created from NetBeans:

  1. Use NetBeans to To Create a Third-Party STS.

  2. Create an MySTSAttributeProvider implementation class in the same package as the STS implementation class which extends the BaseSTSImpl.

  3. Create a directory META-INF/services in the src/java directory.

  4. Create a file with name com.sun.xml.ws.api.security.trust.STSAttributeProvider with content the path to the class MySTSAttributeProvider (e.g. org.me.sts.MySTSAttributeProvider). Then place this file in the src/java/META-INF/services directory.

  5. Run the NetBeans STS project. Your STS will now use your custom attribute provider in creating the SAML assertions.

As a reference, here is a sample STSAttributeProvider.

13.4.1. Handling Claims with Metro STS

In WS-SecurityPolicy, an IssuedToken policy assertion may carry an optional wst:Claims element, to specify the actual claims required to access the service. Here is an example of IssuedToken policy assertions with Claims:

Example 13.4. 

<sp:IssuedToken sp:IncludeToken="...">
   <Issuer xmlns="...">
      <Address xmlns="http://www.w3.org/2005/08/addressing">...</Address>
   </Issuer>
   <sp:RequestSecurityTokenTemplate
           xmlns:t="http://schemas.xmlsoap.org/ws/2005/02/trust">
      <t:TokenType>urn:oasis:names:tc:SAML:2.0:assertion</t:TokenType>
      <t:KeyType>http://schemas.xmlsoap.org/ws/2005/02/trust/SymmetricKey
      </t:KeyType>
      <t:KeySize>256</t:KeySize>
      <t:Claims Dialect="http://schemas.xmlsoap.org/ws/2005/05/identity"
                xmlns:ic="http://schemas.xmlsoap.org/ws/2005/05/identity">
         <ic:ClaimType
                 Uri="http://.../ws/2005/05/identity/claims/givenname"/>
         <ic:ClaimType Uri="http://.../ws/2005/05/identity/claims/surname"
                       Optional="true"/>
      </wst:Claims>
   </sp:RequestSecurityTokenTemplate>
</sp:IssuedToken>

With Oasis standard versions of WS-SecurityPolicy 1.2 and WS-Trust 1.3, syntax is different for Claims, where it is defined as a top level sub-element of IssuedToken, in stead of a sub-element of RequestSecurityTokenTemplate:

Example 13.5. 

<sp:IssuedToken sp:IncludeToken="...">
   <Issuer xmlns="...">
      <Address xmlns="http://www.w3.org/2005/08/addressing">...</Address>
   </Issuer>
   <t:Claims Dialect="http://schemas.xmlsoap.org/ws/2005/05/identity"
             xmlns:ic="http://schemas.xmlsoap.org/ws/2005/05/identity">
      <ic:ClaimType Uri="http://.../ws/2005/05/identity/claims/givenname"/>
      <ic:ClaimType Uri="http://.../ws/2005/05/identity/claims/surname"
                    Optional="true"/>
   </wst:Claims>
   <sp:RequestSecurityTokenTemplate
           xmlns:t="http://schemas.xmlsoap.org/ws/2005/02/trust">
      <t:TokenType>urn:oasis:names:tc:SAML:2.0:assertion</t:TokenType>
      <t:KeyType>http://schemas.xmlsoap.org/ws/2005/02/trust/SymmetricKey
      </t:KeyType>
      <t:KeySize>256</t:KeySize>
   </sp:RequestSecurityTokenTemplate>
</sp:IssuedToken>

On the client side, the Claims, together with all the elements in the RequestSecurityTokenTemplate, is copied into the request message RST to the STS.

With Metro based STS, the Claims will then be available in the STSAttributeProvider, for use to build the user attributes to be included in the issued SAML assertion.

In your implementation of the method, getClaimedAttributes(Subject subject, String appliesTo, String tokenType, Claims claims), one may parse the Claims to obtain the ClaimTypes with the following codes:

Example 13.6. 

String dialect = claims.getDialect();
List<Object> claimTypes = claims.getAny();
for (Object claimType : claimsTypes){
    Element ctElement = (Element) claimType;
    // parsing ctElement according to the dialect to get claim types
    ...
}

Once you parse the Claims, you may create the attributes accordingly. The attributes returned from the STSAttributeProvider is available in the STSTokenProvider through:

Example 13.7. 

(Map<QName, List<String>>) ctx.getOtherProperties().get(IssuedTokenContext.CLAIMED_ATTRUBUTES);


for you to build into your issued SAML assertions.

See also Handling Token and Key Requirements at Run Time for how to inject Claims on the client side at run time.

13.5. Handling Token and Key Requirements at Run Time

In the general model for using STS issued tokens to securing Web services, a service side IssuedToken policy assertion is used to specify the STS information (STS endpoint, STS MEX endpoint, etc) and the token requirements (token type, key type, claims, etc). Alternatively, a client side PreConfiguredSTS assertion can be used to specify the local STS. Only one STS can be specified in PreconfiguredSTS. In this way, the process to go to STS to obtain the issued toke and subsequently use it with the messages to the service was handled by Metro transparently to the users.

Now with Metro 2.0, one may also inject STS information and issued token requirements programmatically at run time on the client side. This This gives the users more control of the its identity and security information to be used to access a service, hence open up for building more interesting and important applications with Metro.

General steps for managing run time configuration:

  1. Use existing STSIssuedTokenConfiguration for run-time configuration, e.g.

    Example 13.8. 

    DefaultSTSIssuedTokenConfiguration config = new DefaultSTSIssuedTokenConfiguration();
    Claims claims = ...
    config.setClaims(claims);


  2. Use Web Service Feature to inject STSIssuedTokenConfiguration into the system:

    Example 13.9. 

    STSIssuedTokenFeature feature = new STSIssuedTokenFeature(config);


  3. STSIssuedTokenFeature is used when creating port from the Service:

    Example 13.10. 

    CalculatorWS port = service.getCalculatorWSPort(new WebServiceFeature[]{feature});


  4. The entries in IssuedToken policy assertion in services WSDL is available through

    Example 13.11. 

    configure.getOtherOptions().get(STSIssuedTokenConfiguration.ISSUED_TOKEN);


    This allows the users to select STS at run time according to the service requirements.

While it is more or less straight forward with TokenType, KeyType, etc., it requires extra effort for managing Claims requirement at run time:

  1. Claims are defined as an extensible element in the WS-SecurityPolicy spec:

    Example 13.12. 

    <wst:Claims Dialect="http://schemas.xmlsoap.org/ws/2005/05/identity"
                xmlns:wst="http://docs.oasis-open.org/ws-sx/ws-trust/200512">
    </wst:Claims>


  2. It is up to the applications and profiles of WS-Trust to define the content of the Claims. So you need to implement com.sun.xml.ws.api.security.trust.Claims to manage claims in your environment. Here is a sample for managing claim types of the following form:

    Example 13.13. 

    <wst:Claims Dialect="http://schemas.xmlsoap.org/ws/2005/05/identity"
                xmlns:wst="http://docs.oasis-open.org/ws-sx/ws-trust/200512"
                xmlns:ic="http://schemas.xmlsoap.org/ws/2005/05/identity">
       <ic:ClaimType
          Uri="http://schemas.xmlsoap.org/ws/2005/05/identity/claims/locality"/>
       <ic:ClaimType
          Uri="http://schemas.xmlsoap.org/ws/2005/05/identity/claims/role"/>
    </wst:Claims>


  3. Make run time requirement for claim types on the client side:

    Example 13.14. 

    DefaultSTSIssuedTokenConfiguration config = new 
            DefaultSTSIssuedTokenConfiguration();
    STSIssuedTokenFeature feature = new STSIssuedTokenFeature(config);
    org.me.calculator.client.CalculatorWS port = service
            .getCalculatorWSPort(new WebServiceFeature[]{feature});
    
    int i = Integer.parseInt(request.getParameter("value1"));
    int j = Integer.parseInt(request.getParameter("value2"));
    
    config.setTokenType("urn:oasis:names:tc:SAML:1.0:assertion");
    MyClaims claims = new MyClaims();
    claims.addClaimType(MyClaims.ROLE);
    config.setClaims(claims);
    int result = port.add(i, j)


In general, you may need to supply your own STSIssuedTokenConfiguration in following cases:

  1. The client has to go through multiple STS in a trust chain across security domains to access the service.

  2. The client needs to select the STS and/or to provide token and key parameters to the STS at run time, according to which service it tries to access and the requirement from the service.

To create a custom configuration class which extends STSIssuedTokenConfiguration:

  1. You may get the targeted service endpoint at run time through

    Example 13.15. 

    getOtherOptions().get(STSIssuedTokenCOnfiguration.APPLIES_TO);


  2. Similarly, you may get an instance of STSIssuedTokenConfiguration, which captures entries from the IssuedToken policy assertion for the targeted service, through

    Example 13.16. 

    getOtherOptions().get(STSIssuedTokenCOnfiguration.ISSUED_TOKEN);


  3. The entries in the IssuedToken policy and in the client side PreConfiguredSTS take high priorities which cannot be override at run time.

  4. Different run time entries should be supplied for different services.

13.6. Advanced Usages of STS in Security

The following sections discuss some features for advanced usages of STS in securing Web services with:

13.6.1. Token Caching and Sharing

Here is a description of how this is supported in Metro:

  1. The services to be accessed with the same token must share the same certificate.

  2. Only issued tokens from the same STS are shared.

  3. Caching and sharing issued tokens can be enabled for each service instance by configuration

To enable this for a service proxy, you need to add attribute shareToken="true" in the wsit-client.xml or the file referenced by it for the proxy:

Example 13.17. 

<t:PreConfiguredSTS
     xmlns:t="http://schemas.sun.com/ws/2006/05/trust/client"
     shareToken="true">
</t:PreConfiguredSTS>


To illustrate the usage, you may find a stand alone sample here. This sample contains 4 parts for client, STS, Service, and Service1. Each service is configured to use the STS issued token to access. On the client side, the client instances for Service and Service1 are configured to be in the circle to share the issued tokens from the STS. The client calls Service first, then Service1. You will see that the client goes to the STS to get the token to access Service, and then to call Service1 without going to the STS but use the token obtained in calling Service.

Here is a description on how to managing the lifetime and renewing of the issued tokens:

  1. The client can request for the life time of an issued token through configuration with a subelement LifeTime of PreConfiguredSTS:

    Example 13.18. 

    <t:PreConfiguredSTS
          xmlns:t="http://schemas.sun.com/ws/2006/05/trust/client"
          shareToken="true">
    
        <t:LifeTime>3600</LifeTime>
    </t:PreConfiguredSTS>


    or programmatically with STSIssuedTokenConfiguration:

    Example 13.19. 

    config.getOtherOptions().put(STSIssuedTokenConfiguration.LIFE_TIME, Integer.valueOf(3600));


    The value is used to construct the Lifetime element in the RST to the STS:

    Example 13.20. 

    <trust:Lifetime>
        <wsu:Created xmlns:wsu="...">2007-10-31T18:39:23.548Z</wsu:Created>
        <wsu:Expires xmlns:wsu="...">2007-11-01T02:39:23.548Z</wsu:Expires>
    </trust:Lifetime>


  2. By default, an exception is thrown if the token cached to be used on the client side is expired.

  3. One can enable to automatically request for a new token for an expired token by configuration with attribute renewExpiredToken in PreConfiguredSTS:

    Example 13.21. 

    <t:PreConfiguredSTS
          xmlns:t="http://schemas.sun.com/ws/2006/05/trust/client"
          shareToken="true"
          renewExpiredToken="true">
    
        <t:LifeTime>3600</LifeTime>
    </t:PreConfiguredSTS>


    or programmatically with STSIssuedTokenConfiguration:

    Example 13.22. 

    config.getOtherOptions()
            .put(STSIssuedTokenConfiguration.RENEW_EXPIRED_TOKEN, "true");


13.6.2. ActAs and Identity Delegation

We provide support for ActAs introduced in WS-Truts 1.4 in Metro 2.0

Figure 13.1. ActAs and Identity Delegation

ActAs and Identity Delegation

This feature is better illustrated by the sample here

  1. The Client send a request to the STS. The request message carries the username/password of the user and is secured with the STS certificate.

  2. The STS issues an SAML assertion containing the username (e.g. Alice) as subject id and role attribute (see src\common\SampleSTSAttributeProvider). Then it send a response message with the issued token to the Client.

  3. The client send a request to the Service. The message carries the SAML assertion from the previous step for authentication and secured with the Service certificate.

  4. The Service send a request to the STS. The message contains the username/password (bob/bob) of the Service, the SAML assertion received from the user in the previous step in an ActAs element in the body (RST), and is secure with the STS certificate (see src\fs\ simple\server\FSImpl.java. The ActAs token is injected into the request using the STSIssuedTokenFeture). It means to ask for an issued token with it the Service can access the Service 1, acting as the user.

  5. The STS issues an (act as) SAML assertion which contains the Service id (bob) in the Subject, and attribute ActAs with the user name (e.g. Alice), and role attribute for the user (see src\common\SampleSTSAttributeProvider). It then send a response message with the issued token to the Service.

  6. The Service sand a request to the Service 1. The message carries the act as SAML from the previous step and is secured with the Service 1 certificate. The Service 1 check the act as SAML assertion (see src\common\SampleSamlValidator.java) and understands it is the Service who made the request act as the user.

  7. The Service 1 send a response to the Service.

  8. The Service sends a response to the Client.

Common issues and solutions:

  1. When a custom SAML assertion validator is used, the SAML assertion is not available in the Subject.

    In this case, you need to use the extended version com.sun.xml.wss.impl.callback.SamlValidator and to add explicitly the DOM based saml assertion to the public credentials of the Subject in your implementation of the method

    Example 13.23. 

    validate(XMLStreamReader assertion, Map runtimeProps,
             Subject clientSubject)
    and
    validate(Element assertion, Map runtimeProps, Subject clientSubject)


    in the interface.

  2. ActAs is not called in your custom STSAttributeProvider:

    You need to use the WSTrustContractImpl for your STS as specified in the STSConfiguration in the sts wsdl:

    Example 13.24. 

    <tc:STSConfiguration
            xmlns:tc="http://schemas.sun.com/ws/2006/05/trust/server"
            sencryptIssuedKey="true" encryptIssuedToken="false">
       <tc:LifeTime>36000</tc:LifeTime>
       <tc:Contract>com.sun.xml.ws.security.trust.impl.WSTrustContractImpl
       </tc:Contract>
       ...
    </tc:STSConfiguration>


    If you use Netbenas to create STS, IssueSAMLTokenContractImpl is set by default. You need to change it to WSTrustContractImpl for "ActAs" support.

Chapter 14. WSIT Example Using a Web Container Without NetBeans IDE

14.1. Environment Configuration Settings

Before you can build and run the samples in this tutorial, you need to complete the following tasks:

14.1.1. Setting the Web Container Listener Port

The Java code and configuration files for the examples used in this tutorial assume that the web container is listening on IP port 8080. Port 8080 is the default listener port for both GlassFish (domain1) and Tomcat. If you have changed the port, you must update the port number in the following files before building and running the examples:

  • wsit-enabled-fromjava/etc/wsit-fromjava.server.AddNumbersImpl.xml

  • wsit-enabled-fromjava/etc/custom-schema.xml

  • wsit-enabled-fromjava/etc/custom-client.xml

  • wsit-enabled-fromjava/etc/build.properties

  • wsit-enabled-fromwsdl/etc/custom-client.xml

  • wsit-enabled-fromwsdl/etc/build.properties

14.1.2. Setting the Web Container Home Directory

Before you build and deploy the web service and its client, set one of the following environment variables:

  • If you are using GlassFish, set the AS_HOME environment variable to the top-level directory of GlassFish.

  • If you are using Tomcat, set the CATALINA_HOME environment variable to the top-level directory of Tomcat.

14.2. WSIT Configuration and WS-Policy Assertions

WSIT features are enabled and configured using a mechanism defined by the Web Services Policy Framework (WS-Policy) specification. A web service expresses its requirements and capabilities through policies embedded in the service's WSDL description. A web service consumer, or client, verifies that it can handle the expressed requirements and, optionally, uses server capabilities advertised in policies.

Each individual WSIT technology, such as Reliable Messaging, Addressing, or Secure Conversation, provides a set of policy assertions it can process. Those assertions provide the necessary configuration details to the WSIT runtime to enable proper operation of the WSIT features used by a given web service. The assertions may specify particular configuration settings or rely on default settings that are predetermined by the specific technology. For instance, in the snippet shown below, the wsrm:InactivityTimeout setting is optional and could be omitted. The following snippet shows WS-Policy assertions for WS-Addressing and WS-Reliable Messaging:

Example 14.1. Sample WS-Policy expression

<wsp:Policy wsu:Id="AddNumbers_policy">
    <wsp:ExactlyOne>
        <wsp:All>
            <wsaw:UsingAddressing/>
            <wsrm:RMAssertion>
                <wsrm:InactivityTimeout Milliseconds="600000"/>
            </wsrm:RMAssertion>
        </wsp:All>
    </wsp:ExactlyOne>
</wsp:Policy>

This snippet is valid in either a WSIT configuration file (wsit-package.service.xml) or in a Web Services Description Language (WSDL) file. Java-first web services use the WSIT configuration file, while WSDL-first web services rely exclusively on the policy elements in the WSDL file. This particular snippet is from the WSIT configuration file in the example, wsit-enabled-fromjava/etc/wsit-fromjava.server.AddNumbersImpl.xml.

14.3. Creating a Web Service without NetBeans

You can create a web service starting from Java code or starting from a WSDL file. The following sections describe each approach:

14.3.1. Creating a Web Service From Java

One way to create a web service application is to start by coding the endpoint in Java. If you are developing your Java web service from scratch or have an existing Java class you wish to expose as a web service, this is the most direct approach.

The Jakarta XML Web Services Specification relies heavily on the use of annotations as specified in A Metadata Facility for the Java Programming Language (JSR-175) and Jakarta Web Services Metadata, as well as additional annotations defined by the Jakarta XML Web Services specification.

The web service is written as a normal Java class. Then the class and its exposed methods are annotated with the web service annotations @WebService and @WebMethod. The following code snippet shows an example:

Example 14.2. 

@WebService
public class AddNumbersImpl {
    @WebMethod(action="addNumbers")
    public int addNumbers(int number1, int number2)
            throws AddNumbersException {
        if (number1 < 0 || number2 < 0) {
            throw new AddNumbersException(
                    "Negative number can't be added!",
                    "Numbers: " + number1 + ", " + number2);
        }
        return number1 + number2;
    }
}

When developing a web service from scratch or based on an existing Java class, WSIT features are enabled using a configuration file. That file, wsit-package.service.xml, is written in WSDL format. An example configuration file can be found in the accompanying samples:

Example 14.3. 

wsit-enabled-fromjava/etc/wsit-fromjava.server.AddNumbersImpl.xml

The settings in the wsit-package.service.xml file are incorporated dynamically by the WSIT runtime into the WSDL it generates for the web service. So when a client requests the web service’s WSDL, the runtime embeds any publicly visible policy assertions contained in the wsit-package.service.xml file into the WSDL. For the example wsit-fromjava.server.AddNumbersImpl.xml in the sample discussed in this tutorial, the Addressing and Reliable Messaging assertions are part of the WSDL as seen by the client.

Note

The wsit-package.service.xml file must be in the WEB-INF sub-directory of the application’s WAR file when it is deployed to the web container. Otherwise, the WSIT run-time environment will not find it.

To create a web service from Java, create the following files:

  • These files define the web service and the WSIT configuration for the service, which are discussed in the sections below.

    • AddNumbersException.java

    • custom-schema.xml

    • sun-jaxws.xml

    • web.xml

  • These files are standard files required for Jakarta XML Web Services. Examples of these files are provided in the wsit-enabled-fromjava sample directory.

    • AddNumbersException.java

    • custom-schema.xml

    • sun-jaxws.xml

    • web.xml

  • These files are standard in any Ant build environment. Examples of these files are provided in the wsit-enabled-fromjava sample directory.

    • build.xml

    • build.properties

14.3.1.1. Web Service Implementation Java File

The sample files define a web service that takes two integers, adds them, and returns the result. If one of the integers is negative, an exception is thrown.

The starting point for developing a web service that uses the WSIT technologies is a Java class file annotated with the jakarta.jws.WebService annotation. The @WebService annotation defines the class as a web service endpoint.

The following file (wsit-enabled-fromjava/src/fromjava/serverAddNumbersImpl.java) implements the web service interface.package fromjava.server;

Example 14.4. 

import jakarta.jws.WebService;
import jakarta.jws.WebMethod;

@WebService
public class AddNumbersImpl {
    @WebMethod(action="addNumbers")
    public int addNumbers(int number1, int number2)
            throws AddNumbersException {
        if (number1 < 0 || number2 < 0) {
            throw new AddNumbersException(
                    "Negative number cannot be added!",
                    "Numbers: " + number1 + ", " + number2);
        }
        return number1 + number2;
    }
}

Note

To ensure interoperability with Windows Communication Foundation (WCF) clients, you must specify the action element of @WebMethod in your endpoint implementation classes. WCF clients will incorrectly generate an empty string for the Action header if you do not specify the action element.

14.3.1.2. wsit-package.service.xml File

This file is the WSIT configuration file. It defines which WSIT technologies are enabled in the web service. The snippet shown below illustrates how to enable the WSIT reliable messaging technology in a wsit-package.service.xml file.

Example 14.5. 

<wsp:Policy wsu:Id="AddNumbers_policy">
    <wsp:ExactlyOne>
        <wsp:All>
            <wsaw:UsingAddressing/>
            <wsrm:RMAssertion>
                <wsrm:InactivityTimeout Milliseconds="600000"/>
                <wsrm:AcknowledgementInterval Milliseconds="200"/>
            </wsrm:RMAssertion>
        </wsp:All>
    </wsp:ExactlyOne>
</wsp:Policy>

For a complete example of a wsit-package.service.xml file, see the wsit-enabled-fromjava example. You can use the wsit-package.service.xml file provided in the example as a reference for creating your own wsit-package.service.xml file.

14.3.2. Creating a Web Service From WSDL

Typically, you start from WSDL to build your web service if you want to implement a web service that is already defined either by a standard or an existing instance of the service. In either case, the WSDL already exists. The wsimport tool processes the existing WSDL document, either from a local copy on disk or by retrieving it from a network address or URL. For an example of using a web browser to access a service’s WSDL, see Verifying Deployment.

When developing a web service starting from an existing WSDL, the process is actually simpler than starting from Java. This is because the policy assertions needed to enable various WSIT technologies are already embedded in the WSDL file. An example WSDL file is included in the fromwsdl sample provided with this tutorial at:

Example 14.6. 

tut-install/wsit-enabled-fromwsdl/etc/AddNumbers.wsdl

To create a web service from WSDL, create the following source files:

The following files are standard files required for Jakarta XML Web Services. Examples of these files are provided in the fromwsdl sample directory.

  • custom-server.xml

  • sun-jaxws.xml

  • web.xml

The build.xml and build.properties files are standard in any Ant build environment. Examples of these files are provided in the respective samples directories.

The sample files provided in this tutorial define a web service that takes two integers, adds them, and returns the result. If one of the integers is negative, an exception is returned.

14.3.2.1. WSDL File

You can create a WSDL file by hand or retrieve it from an existing web service by simply pointing a web browser at the web service’s URL. The snippet shown below illustrates how to enable the WSIT Reliable Messaging technology in a WSDL file.

Example 14.7. 

<wsp:Policy wsu:Id="AddNumbers_policy">
    <wsp:ExactlyOne>
        <wsp:All>
            <wsrm:RMAssertion>
                <wsrm:InactivityTimeout Milliseconds="600000"/>
                <wsrm:AcknowledgementInterval Milliseconds="200"/>
            </wsrm:RMAssertion>
        </wsp:All>
    </wsp:ExactlyOne>
</wsp:Policy>

For a complete example of a WSDL file, see the AddNumbers.wsdl file in the fromwsdl example. Another benefit of the AddNumbers.wsdl file is that it shows how a WSIT-enabled WSDL is constructed. Therefore, you can use it as a reference when you create a WSDL file or modify an existing one.
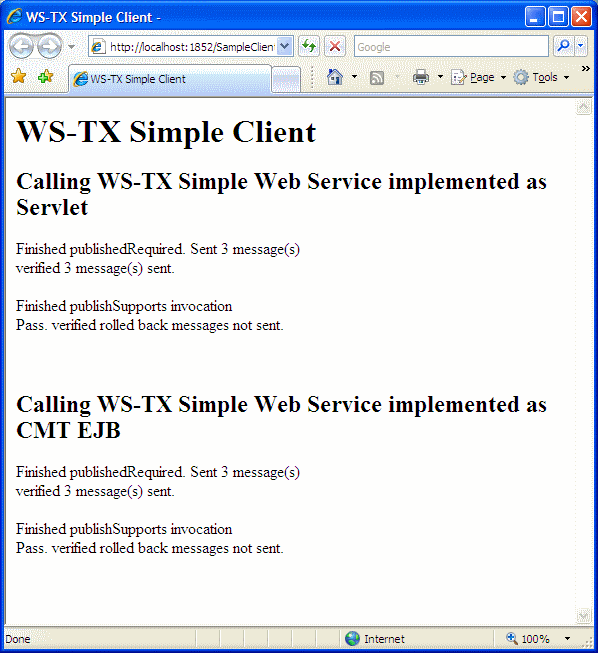
14.3.2.2. Web Service Implementation File

The following file (AddNumbersImpl.java) shows how to implement a web service interface.package fromwsdl.server;

Example 14.8. 

import jakarta.jws.WebService;
import jakarta.jws.WebMethod;

@WebService (endpointInterface=
        "fromwsdl.server.AddNumbersPortType")
public class AddNumbersImpl{
    @WebMethod(action="addNumbers")
    public int addNumbers (int number1, int number2)
            throws AddNumbersFault_Exception {
        if (number1 < 0 || number2 < 0) {
            String message = "Negative number cannot be added!";
            String detail = "Numbers: " + number1 + ", " + number2;
            AddNumbersFault fault = new AddNumbersFault ();
            fault.setMessage (message);
            fault.setFaultInfo (detail);
            throw new AddNumbersFault_Exception(message, fault);
        }
        return number1 + number2;
    }

    public void oneWayInt(int number) {
        System.out.println("Service received: " + number);
    }
}

14.4. Building and Deploying the Web Service

Once configured, you can build and deploy a WSIT-enabled web service in the same manner as you would build and deploy a standard Jakarta XML Web Service.

The following topics describe how to perform this task:

14.4.1. Building and Deploying a Web Service Created From Java

To build and deploy the web service, open a terminal window, go to the tut-install/wsit-enabled-fromjava/ directory and type the following:

This command calls the server target in build.xml, which builds and packages the application into a WAR file, wsit-enabled-fromjava.war, and places it in the wsit-enabled-fromjava/build/war directory. The ant server command also deploys the WAR file to the web container.

The ant command calls multiple tools to build and deploy the web service. The wsgen tool processes the annotated source code and invokes the compiler itself, resulting in the class files for each of the Java source files. In the wsit-enabled-fromjava example, the Ant target build-server-java in build.xml handles this portion of the process. Next, the individual class files are bundled together along with the web service’s supporting configuration files into the application’s WAR file. It is this file that is deployed to the web container by the deploy target.

During execution of the server target, you will see a warning message. The message refers to “Annotation types without processors”. The warning is expected and does not indicate an abnormal situation. The text is included here for reference:

Example 14.9. 

build-server-java:
   [apt] warning: Annotation types without processors:
        [jakarta.xml.bind.annotation.XmlRootElement,
        jakarta.xml.bind.annotation.XmlAccessorType,
        jakarta.xml.bind.annotation.XmlType,
         jakarta.xml.bind.annotation.XmlElement]
   [apt] 1 warning

14.4.2. Building and Deploying a Web Service Created From WSDL

To build and deploy the web service, open a terminal window, go to the tut-install/wsit-enabled-fromwsdl/ directory, and type the following:

ant server

This command calls wsimport, which takes the WSDL description and generates a corresponding Java interface and other supporting classes. Then the Java compiler is called to compile both the user’s code and the generated code. Finally, the class files are bundled together into the WAR file. To see the details of how this is done, see the build-server-wsdl and create-war targets in the wsit-enabled-fromwsdl/build.xml file.

14.4.3. Deploying the Web Service to a Web Container

As a convenience, invoking the ant server command builds the web service’s WAR file and immediately deploys it to the web container. However, in some situations, such as after undeploying a web service, it may be useful to deploy the web service without rebuilding it.

For both scenarios, wsit-enabled-fromjava and fromwsdl, the resulting application is deployed in the same manner.

The following sections describe how to deploy on the different web containers:

14.4.3.1. Deploying to GlassFish

For development purposes, the easiest way to deploy is to use the autodeploy facility of the GlassFish application server. To do so, you simply copy your application’s WAR file to the /autodeploy directory for the domain to which you want to deploy. If you are using the default domain, domain1, which is set up by the GlassFish installation process, the appropriate directory path would be as-install/domains/domain1/autodeploy.

The build.xml file which accompanies this example has a deploy target for GlassFish. To invoke that target, run the following command in the top-level directory of the respective examples, either wsit-enabled-fromjava or wsit-enabled-fromwsdl, as follows.

ant deploy

14.4.3.2. Deploying to Apache Tomcat

Apache Tomcat also has an autoDeploy feature that is enabled by Tomcat’s out-of-the-box configuration settings. If you are not sure whether the autoDeploy is enabled, check tomcat-home/conf/server.xml for the value of autoDeploy, where tomcat-home is the directory where Tomcat is installed. Assuming autoDeploy is enabled, you simply copy your application’s WAR file to the tomcat-home/webapps directory.

The build.xml file which accompanies this example has a deploy target for Tomcat. To invoke that target, run the following command in the top-level directory of the respective examples, either wsit-enabled-fromjava or wsit-enabled-fromwsdl, as follows. You need to use the -Duse.tomcat=true switch to make sure that the application is deployed to Tomcat, and not to the default server, which is GlassFish.

ant -Duse.tomcat=true deploy

14.4.4. Verifying Deployment

A basic test to verify that the application has deployed properly is to use a web browser to retrieve the application’s WSDL from its hosting web container. The following URLs retrieve the WSDL from each of the two example services. If you are running your web browser and web container on different machines, you need to replace localhost with the name of the machine hosting your web service.

Note

Before testing, make sure your web container is running.

  • http://localhost:8080/wsit-enabled-fromjava/addnumbers?wsdl

  • http://localhost:8080/wsit-enabled-fromwsdl/addnumbers?wsdl

If the browser displays a page of XML tags, the web service has been deployed and is working. If not, check the web container log for any error messages related to the sample WAR you have just deployed. For GlassFish, the log can be found at as-install/domains/domain1/logs/server.log. For Apache Tomcat, the appropriate log file can be found at tomcat-home/logs/catalina.out.

14.5. Creating a Web Service Client

Unlike developing a web service provider, creating a web service client application always starts with an existing WSDL file. This process is similar to the process you use to build a service from an existing WSDL file. The WSDL file that the client consumes already contains the WS–* policy assertions (and, in some cases, any value-added WSIT policy assertions that augment Sun’s implementation, but can safely be ignored by other implementations). Most of the policy assertions are defined in the WS-* specifications. Sun’s implementation processes these standard policy assertions.

The policy assertions describe any requirements from the server as well as any optional features the client may use. The WSIT build tools and run-time environment detect the WSDL’s policy assertions and configure themselves appropriately, if possible. If an unsupported assertion is found, an error message describing the problem will be displayed.

Typically, you retrieve the WSDL directly from a web service provider using the wsimport tool. The wsimport tool then generates the corresponding Java source code for the interface described by the WSDL. The Java compiler, javac, is then called to compile the source into class files. The programming code uses the generated classes to access the web service.

The following sections describe how to create a web service client:

14.5.1. Creating a Client from Java

To create a client from Java, you must create the following files:

The build.xml and build.properties files are standard in any Ant build environment. Examples of these files are provided in the wsit-enabled-fromjava sample directory.

14.5.1.1. Client Java File (fromjava)

The client Java file defines the functionality of the web service client. The following code shows the AddNumbersClient.java file that is provided in the sample.

Example 14.10. 

package fromjava.client;

import com.sun.xml.ws.Closeable;
import java.rmi.RemoteException;

public class AddNumbersClient {
    public static void main (String[] args) {
        AddNumbersImpl port = null;
        try {
            port = new AddNumbersImplService().getAddNumbersImplPort();
            int number1 = 10;
            int number2 = 20;
            System.out.printf ("Invoking addNumbers(%d, %d)\n",
                    number1, number2);
            int result = port.addNumbers (number1, number2);
            System.out.printf (
                    "The result of adding %d and %d is %d.\n\n",
                     number1, number2, result);

            number1 = -10;
            System.out.printf ("Invoking addNumbers(%d, %d)\n",
                    number1, number2);
            result = port.addNumbers (number1, number2);
            System.out.printf (
                    "The result of adding %d and %d is %d.\n",
                     number1, number2, result);
        } catch (AddNumbersException_Exception ex) {
            System.out.printf (
                    "Caught AddNumbersException_Exception: %s\n",
                     ex.getFaultInfo ().getDetail ());
        } finally {
            ((Closeable)port).close();
        }
    }
}

This file specifies two positive integers that are to be added by the web service, passes the integers to the web service and gets the results from the web service by using the port.addNumbers method, and prints the results to the screen. It then specifies a negative number to be added, gets the results (which should be an exception), and prints the results (the exception) to the screen.

14.5.1.2. Client Configuration File (fromjava)

The client configuration file defines the URL of the web service WSDL file. It is used by the web container wsimport tool to access and consume the WSDL and to build the stubs that are used to communicate with the web service.

The custom-client.xml file provided in the wsit-enabled-fromjava sample is shown below. The wsdlLocation and the package name xml tags are unique to each client and are highlighted in bold text

Example 14.11. 

<?xml version="1.0" encoding="UTF-8" standalone="yes"?>
<bindings
    xmlns:xsd="http://www.w3.org/2001/XMLSchema"
    xmlns:wsdl="http://schemas.xmlsoap.org/wsdl/"
    wsdlLocation="http://localhost:8080/wsit-enabled-fromjava/ 
        addnumbers?wsdl"
    xmlns="https://jakarta.ee/xml/ns/jaxws">
    <bindings node="wsdl:definitions">
        <package name="fromjava.client"/>
    </bindings>
</bindings>

14.5.2. Creating a Client from WSDL

To create a client from WSDL, you must create the following files:

The build.xml and build.properties files are standard in any Ant build environment. Examples of these files are provided in the fromwsdl sample directory.

14.5.2.1. Client Java File (fromwsdl)

The client Java file defines the functionality of the web service client. The same client Java file is used with both samples, wsit-enabled-fromjava and wsit-enabled-fromwsdl. For more information on this file, see Client Java File (fromjava).

14.5.2.2. Client Configuration File (fromwsdl)

This is a sample custom-client.xml file. The wsdlLocation, package name, and jaxb:package name XML tags are unique to each client and are highlighted in bold text

Example 14.12. 

<?xml version="1.0" encoding="UTF-8" standalone="yes"?>
<bindings
    xmlns:xsd="http://www.w3.org/2001/XMLSchema"
    xmlns:jaxb="https://jakarta.ee/xml/ns/jaxb"
    xmlns:wsdl="http://schemas.xmlsoap.org/wsdl/"
    wsdlLocation="http://localhost:8080/wsit-enabled-fromwsdl/
            addnumbers?wsdl"
    xmlns="https://jakarta.ee/xml/ns/jaxws">
    <bindings node="ns1:definitions"
            xmlns:ns1="http://schemas.xmlsoap.org/wsdl/">
            <package name="fromwsdl.client"/>
    </bindings>
    <bindings node="ns1:definitions/ns1:types/xsd:schema
            [@targetNamespace=’http://duke.org’]"
            xmlns:xs="http://www.w3.org/2001/XMLSchema"
            xmlns:ns1="http://schemas.xmlsoap.org/wsdl/">
        <jaxb:schemaBindings>
            <jaxb:package name="fromwsdl.client"/>
        </jaxb:schemaBindings>
    </bindings>
</bindings>

14.6. Building and Deploying a Client

To build and deploy a client for either of the examples provided in this tutorial, type one of the following Ant commands in the top-level directory of the respective example, (either wsit-enabled-fromjava or wsit-enabled-fromwsdl) depending on which web container you are using:

For GlassFish:

ant client

For Apache Tomcat:

ant -Duse.tomcat=true client

This command runs wsimport, which retrieves the web service’s WSDL, and then it runs javac to compile the source.

14.7. Running a Web Service Client

To run a client for either of the examples provided in this tutorial, type one of the following Ant commands in the top-level directory of the respective example, (either wsit-enabled-fromjava or wsit-enabled-fromwsdl) depending on which web container you are using:

For GlassFish:

ant run

For the Apache Tomcat:

ant -Duse.tomcat=true run

This command executes the run target, which simply runs Java with the name of the client’s class, for example, fromwsdl.client.AddNumbersClient.

14.8. Undeploying a Web Service

During the development process, it is often useful to undeploy a web service. Undeploying a web service means to disable and remove it from the web container. Once the web service is removed, clients are no longer able to use the web service. Further, the web service will not restart without explicit redeployment by the user.

To undeploy from GlassFish, type the following commands:

asadmin undeploy --user admin wsit-enabled-fromjava
asadmin undeploy --user admin wsit-enabled-fromwsdl

To undeploy from Apache Tomcat, type the following commands:

rm $CATALINA_HOME/webapps/wsit-enabled-fromjava.war
rm $CATALINA_HOME/webapps/wsit-enabled-fromwsdl.war

Chapter 15. Accessing Metro Services Using WCF Clients

15.1. Creating a WCF Client

The process of creating a WCF C# client to the addnumbers service is similar to that for a Java programming language client. To create a WCF client you will:

  1. Use the svcutil.exe tool to generate the C# proxy class and contracts for accessing the web service.

  2. Create a client program that uses the generated files to make calls to the addnumbers web service.

This section covers the following topics:

15.1.1. Prerequisites to Creating the WCF Client

You must have the following software installed to create the WCF client:

  • Microsoft Windows Software Development Kit (SDK) for July Community Technology Preview

  • Microsoft .NET Framework 3.5 RTM

  • The csclient-enabled-fromjava.zip example bundle, which is availalble for download.

You must also deploy the addnumbers service described in WSIT Example Using a Web Container Without NetBeans IDE. The service is also available for download.

15.1.2. Examining the Client Class

The client class uses a generated proxy class, AddNumbersImpl, to access the web service. The port instance variable stores a reference to the proxy class.

Example 15.1. 

port = new AddNumbersImplClient("AddNumbersImplPort");
...

Then the web service operation addNumbers is called on port:

Example 15.2. 

...
int result = port.addNumbers (number1, number2);
...

The full Client.cs class is as follows:

Example 15.3. 

using System;

class Client {
    static void Main(String[] args) {
        AddNumbersImplClient port = null;
        try {
            port = new AddNumbersImplClient("AddNumbersImplPort");
            int number1 = 10;
            int number2 = 20;

            Console.Write("Adding {0} and {1}. ", number1, number2);
            int result = port.addNumbers (number1, number2);
            Console.WriteLine("Result is {0}.\n\n",result);

            number1 = -10;
            Console.Write("Adding {0} and {1}. ", number1, number2);
            result = port.addNumbers (number1, number2);
            Console.WriteLine("Result is {0}.\n\n",result);
            port.Close();
        } catch (System.ServiceModel.FaultException e) {
            Console.WriteLine("Exception: " + e.Message);
            if (port != null) port.Close();
        }
    }
}

15.1.3. Building and Running the Client

The example bundle contains all the files you need to build and run a WCF client that accesses a Metro web service written in the Java programming language.

The csclient-enabled-fromjava.zip bundle contains the following files:

  • Client.cs, the C# client class

  • build.bat, the build batch file

This section covers the following topics:

15.1.3.1. Generating the Proxy Class and Configuration File

When creating a Java programming language client, you use the wsimport tool to generate the proxy and helper classes used by the client class to access the web service. When creating a WCF client, the svcutil.exe tool provides the same functionality as the wsimport tool. svcutil.exe generates the C# proxy class and contracts for accessing the service from a C# client program.

The example bundle contains a batch file, build.bat, that calls svcutil.exe to generate the proxy class. The command is:

svcutil /config:Client.exe.config http://localhost:8080/wsit-enabled-fromjava/addnumbers?wsdl
15.1.3.1.1. To Build the AddNumbers Client

The example bundle's build.bat file first generates the proxy class and configuration file for the client, then compiles the proxy class, configuration file, and Client.cs client class into the Client.exe executable file.

To run build.bat, do the following.

  1. At a command prompt, navigate to the location where you extracted the example bundle.

  2. If necessary, customize the build.bat file as described in To Customize the build.bat File.

  3. Type the following command:

    build.bat
15.1.3.1.2. To Customize the build.bat File

To customize the build.bat file for your environment, do the following:

  1. Open build.bat in a text editor.

  2. On the first line, type the full path to the svcutil.exe tool. By default, it is installed at C:\Program Files\Microsoft SDKs\Windows\v6.0\Bin.

  3. On the first line, change the WSDL location URL if you did not deploy the addnumbers service to the local machine, or if the service was deployed to a different port than the default 8080 port number.

    For example, the following command (all on one line) sets the host name to testmachine.example.com and the port number to 8081:

    svcutil /config:Client.exe.config http://testmachine.example.com:8081/wsit-enabled-fromjava/addnumbers?wsdl
  4. On line 2, change the location of the csc.exe C# compiler and the System.ServiceModel and System.Runtime.Serialization support DLLs if you installed the .NET 2.0 and 3.0 frameworks to non-default locations.

15.1.3.1.3. To Run the AddNumbers Client

After the client has been built, run the client by following these steps.

  1. At a command prompt, navigate to the location where you extracted the example bundle.

  2. Type the following command:

    Client.exe

    You will see the following output:

    Adding 10 and 20. Result is 30.
    Adding -10 and 20. Exception: Negative numbers can't be added!

Chapter 16. Data Contracts

16.1. Web Service - Start from Java

This section provides guidelines for designing an XML schema exported by a Java web service designed starting from Java. Jakarta XML Binding provides a rich set of annotations and types for mapping Java classes to different XML Schema constructs. The guidelines provide guidance on using Jakarta XML Binding annotations and types so that developer friendly bindings may be generated by XML serialization mechanisms (svcutil) on WCF client.

Not all Jakarta XML Binding annotations are included here; not all are relevant from an interoperability standpoint. For example, the annotation @XmlAccessorType provides control over default serialization of fields and properties in a Java class but otherwise has no effect on the on-the-wire XML representation or the XML schema generated from a Java class. Select Jakarta XML Binding annotations are therefore not included here in the guidance.

The guidance includes several examples, which use the following conventions:

  • The prefix xs: is used to represent XML Schema namespace.

  • Jakarta XML Binding annotations are defined in jakarta.xml.bind.annotation package but, for brevity, the package name has been omitted.

16.1.1. Data Types

This section covers the following topics:

16.1.1.1. Primitives and Wrappers

Guideline: Java primitive and wrapper classes map to slightly different XML schema representations. Therefore, .NET bindings will vary accordingly.

Example 16.1. A Java primitive type and its corresponding wrapper class

//-- Java code fragment
public class StockItem{
    public Double wholeSalePrice;
    public double retailPrice;
}

//--Schema fragment
<xs:complexType name="stockItem">
    <xs:sequence>
        <xs:element name="wholeSalePrice" type="xs:double" minOccurs="0"/>
        <xs:element name="retailPrice" type="xs:double"/>
    </xs:sequence>
</xs:complexType>

//-- .NET C# auto generated code from schema
public partial class stockItem
{
    private double wholeSalePrice;
    private bool wholeSalePriceFieldSpecified;
    private double retailPrice;

    public double wholeSalePrice
    {
        get{ return this.wholeSalePrice;}
        set{this.wholeSalePrice=value}
    }

    public bool wholeSalePriceSpecified
    {
        get{ return this.wholeSalePriceFieldSpecified;}
        set{this.wholeSalePriceFieldSpecified=value}
    }

    public double retailPrice
    {
        get{ return this.retailPrice;}
        set{this.retailPrice=value}
    }
}

//-- C# code fragment
stockItem s = new stockItem();
s.wholeSalePrice = Double.parse("198.92");
s.wholeSalePriceSpecified = true;
s.retailPrice = Double.parse("300.25");

16.1.1.2. BigDecimal Type

Guideline: Limit decimal values to the range and precision of .NET's System.decimal.

java.math.BigDecimal maps to xs:decimal. .NET maps xs:decimal to System.decimal. These two data types support different range and precision. java.math.BigDecimal supports arbitrary precision. System.decimal does not. For interoperability use only values within the range and precision of System.decimal. (See System.decimal.Minvalue and System.decimal.Maxvalue.) Any values outside of this range require a customized .NET client.

Example 16.2. BigDecimal usage

//--- Java code fragment
public class RetBigDecimal {
    private BigDecimal arg0;

    public BigDecimal getArg0() { return this.arg0; }
    public void setArg0(BigDecimal arg0) { this.arg0 = arg0; }
}

//--- Schema fragment
<xs:complexType name="retBigDecimal">
    <xs:sequence>
        <xs:element name="arg0" type="xs:decimal" minOccurs="0"/>
    </xs:sequence>
</xs:complexType>

//--- .NET auto generated code from schema
public partial class retBigDecimal{
    private decimal arg0Field;
    private bool arg0FieldSpecified;

    public decimal arg0 {
        get { return this.arg0Field;}
        set { this.arg0Field = value;}
    }

    public bool arg0Specified {
        get { return this.arg0FieldSpecified;}
        set { this.arg0FieldSpecified = value;}
    }
}

//--- C# code fragment
System.CultureInfo engCulture = new System.CultureInfo("en-US");
retBigDecimal bd = new retBigDecimal();
bd.arg0 = System.decimal.MinValue;

retBigDecimal negBd = new retBigDecimal();
negBd = System.decimal.Parse("-0.0", engCulture);

16.1.1.3. java.net.URI Type

Guideline: Use the @XmlSchemaType annotation for a strongly typed binding to a .NET client generated with the DataContractSerializer.

java.net.URI maps to xs:string. .NET maps xs:string to System.string. Annotation @XmlSchemaType can be used to define a more strongly typed binding to a .NET client generated with the DataContractSerializer. @XmlSchemaType can be used to map java.net.URI to xs:anyURI. .NET's DataContractSerializer and XmlSerializer bind xs:anyURI differently:

  • DataContractSerializer binds xs:anyURI to .NET type System.Uri.

  • XmlSerializer binds xs:anyURI to .NET type System.string.

Thus, the above technique only works if the WSDL is processed using DataContractSerializer.

Example 16.3. @XmlSchemaType and DataContractSerializer

// Java code fragment
public class PurchaseOrder
{
    @XmlSchemaType(name="anyURI")
     public java.net.URI uri;
}

//-- Schema fragment
<xs:complexType name="purchaseOrder">
    <xs:sequence>
        <xs:element name="uri" type="xs:anyURI" minOccurs="0"/>
    </xs:sequence>
</xs:complexType>

//--- .NET auto generated code from schema
//--- Using svcutil.exe /serializer:DataContractSerializer <wsdl file>
public partial class purchaseOrder : object,
        System.Runtime.Serialization.IExtensibleDataObject
{

    private System.Uri uriField;

    //-- ..... other generated code ........
    public System.Uri uri
    {
        get { return this.uriField; }
        set { this.uriField = value; }
    }
}

//--- C# code fragment
purchaseOrder tmpU = new purchaseOrder()
tmpU.uri = new System.Uri("../Hello", System.UriKind.Relative);

Example 16.4. @XmlSchemaType and XmlSerializer

// Java code fragment
public class PurchaseOrder
{
    @XmlSchemaType(name="anyURI")
    public java.net.URI uri;
}

//--- .NET auto generated code from schema
//--- Using svcutil.exe /serializer:XmlSerializer <wsdl file>
public partial class purchaseOrder
{
    private string uriField;
    public string uri
    {
        get { return this.uriField; }
        set { this.uriField = value; }
    }
}

//--- C# code fragment
purchaseOrder tmpU = new purchaseOrder()
tmpU.uri = "mailto:mailto:mduerst@ifi.unizh.ch";

16.1.1.4. Duration

Guideline: Use .NET's System.Xml.XmlConvert to generate a lexical representation of xs:duration when the binding is to a type of System.string.

javax.xml.datatype.Duration maps to xs:duration. .NET maps xs:duration to a different datatype for DataContractSerializer and XmlSerializer.

  • DataContractSerializer binds xs:duration to .NET System.TimeSpan.

  • XmlSerializer binds xs:duration to .NET System.string.

When xs:duration is bound to .NET System.string, the string value must be a lexical representation for xs:duration. .NET provides utility System.Xml.XmlConvert for this purpose.

Example 16.5. Mapping xs:duration using DataContactSerializer

//-- Java code fragment
public class PurchaseReport {
     public javax.xml.datatype.Duration period;
}

//-- Schema fragment
<xs:complexType name="purchaseReport">
    <xs:sequence>
        <xs:element name="period" type="xs:duration" minOccurs="0"/>
    </xs:sequence>
</xs:complexType>

//-- .NET auto generated code from schema
//-- Using svcutil.exe /serializer:DataContractSerializer <wsdl file>
public partial class purchaseReport: object,
        System.Runtime.Serialization.IExtensibleDataObject
{
    private System.TimeSpan periodField;
    //-- ..... other generated code ........
    public System.TimeSpan period
    {
        get { return this.periodField; }
        set { this.periodField = value; }
    }
}

//-- C# code fragment
purchaseReport tmpR = new purchaseReport();
tmpR.period = new System.TimeSpan.MaxValue;

Example 16.6. Mapping xs:duration using XmlSerializer

//-- .NET auto generated code from schema
//-- Using svcutil.exe /serializer:XmlSerializer <wsdl file>
public partial class purchaseReport
{
    private string periodField;
    public string period
    {
        get { return this.periodField; }
        set { this.periodField = value; }
    }
}

//-- C# code fragment
purchaseReport tmpR = new purchaseReport();
tmpR.period = System.Xml.XmlConvert.ToString(new System.TimeSpan(23, 0,0));

16.1.1.5. Binary Types

Guideline: java.awt.Image, javax.xml.transform.Source, and jakarta.activation.DataHandler map to xs:base64Binary. .NET maps xs:base64Binary to byte[].

Jakarta XML Binding provides the annotation @XmlMimeType, which supports specifying the content type, but .NET ignores this information.

Example 16.7. Mapping java.awt.Image without @XmlMimeType

//-- Java code fragment
public class Claim {
    public java.awt.Image photo;
}

//-- Schema fragment
<xs:complexType name="claim">
    <xs:sequence>
        <xs:element name="photo" type="xs:base64Binary" minOccurs="0"/>
    </xs:sequence>
</xs:complexType>

//-- .NET auto generated code from schema
public partial class claim : object,
        System.Runtime.Serialization.IExtensibleDataObject
{
    private byte[] photoField;
    //-- ..... other generated code .......
    public byte[] photo
    {
        get { return this.photoField; }
        set { this.photoField = value; }
    }
}

//-- C# code fragment
try
{
    claim tmpC = new claim();

    System.IO.FileStream f = new System.IO.FileStream(
        "C:\\icons\\circleIcon.gif", System.IO.FileMode.Open);
    int cnt = (int)f.Length;
    tmpC.photo = new byte[cnt];
    int rCnt = f.Read(tmpC.photo, 0, cnt);

}
catch (Exception e)
{
    Console.WriteLine(e.ToString());
}

Example 16.8. Mapping java.awt.Image with @XmlMimeType

//-- Java code fragment
public class Claim {
    @XmlMimeType("image/gif")
    public java.awt.Image photo;
}

//-- Schema fragment
<xs:complexType name="claim">
    <xs:sequence>
        <xs:element name="photo" ns1:expectedContentTypes="image/gif"
                    type="xs:base64Binary" minOccurs="0"
                    xmlns:ns1="http://www.w3.org/2005/05/xmlmime"/>
    </xs:sequence>
</xs:complexType>

//-- Using the @XmlMimeType annotation doesn't change .NET
//--auto generated code
public partial class claim : object,
        System.Runtime.Serialization.IExtensibleDataObject
{
    private byte[] photoField;
    //-- ..... other generated code .......
    public byte[] photo
    {
        get { return this.photoField; }
        set { this.photoField = value; }
    }
}

//-- This code is unchanged by the different schema
//-- C# code fragment
try
{
    claim tmpC = new claim();

    System.IO.FileStream f = new System.IO.FileStream(
        "C:\\icons\\circleIcon.gif", System.IO.FileMode.Open);
    int cnt = (int)f.Length;
    tmpC.photo = new byte[cnt];
    int rCnt = f.Read(tmpC.photo, 0, cnt);
}
catch (Exception e)
{
    Console.WriteLine(e.ToString());
}

16.1.1.6. XMLGregorianCalendar Type

Guideline: Use java.xml.datatype.XMLGregorianCalendar instead of java.util.Date and java.util.Calendar.

XMLGregorianCalendar supports the following XML schema calendar types: xs:date, xs:time, xs:dateTime, xs:gYearMonth, xs:gMonthDay, xs:gYear, xs:gMonth, and xs:gDay. It is statically mapped to xs:anySimpleType, the common schema type from which all the XML schema calendar types are dervived. .NET maps xs:anySimpleType to System.string.

java.util.Date and java.util.Calendar map to xs:dateTime, but don't provide as complete XML support as XMLGregorianCalendar does.

Guideline: Use the annotation @XmlSchemaType for a strongly typed binding of XMLGregorianCalendar to one of the XML schema calendar types.

Example 16.9. XmlGregorianCalendar without @XmlSchemaType

//-- Java code fragment
public class PurchaseOrder {
    public javax.xml.datatype.XMLGregorianCalendar orderDate;
}

//-- Schema fragment
<xs:complexType name="purchaseOrder">
    <xs:sequence>
        <xs:element name="orderDate" type="xs:anySimpleType" minOccurs="0"/>
    </xs:sequence>
</xs:complexType>

//-- .NET auto generated code from schema
public partial class purchaseOrder
{
    private string orderDateField;
    public string orderDate
    {
        get { return this.orderDateField; }
        set { this.orderDateField = value; }
    }
}

//-- C# code fragment
purchaseOrder tmpP = new purchaseOrder();
tmpP.orderDate = System.Xml.XmlConvert.ToString(
   System.DateTime.Now, System.Xml.XmlDateTimeSerializerMode.RoundtripKind);

Example 16.10. XMLGregorianCalendar with @XmlSchemaType

//-- Java code fragment
public class PurchaseOrder {
    @XmlSchemaType(name="dateTime")
    public javax.xml.datatype.XMLGregorianCalendar orderDate;
}

//-- Schema fragment
<xs:complexType name="purchaseOrder">
    <xs:sequence>
        <xs:element name="orderDate" type="xs:dateTime" minOccurs="0"/>
    </xs:sequence>
</xs:complexType>

//-- .NET auto generated code from schema
public partial class purchaseOrder : object,
        System.Runtime.Serialization.IExtensibleDataObject
{
    private System.Runtime.Serialization.ExtensionDataObject extensionDataField;
    private System.DateTime orderDateField;

    public System.Runtime.Serialization.ExtensionDataObject ExtensionData
    {
        get { return this.extensionDataField; }
        set { this.extensionDataField = value; }
    }

    public System.DateTime orderDate
    {
        get { return this.orderDateField; }
        set { this.orderDateField = value; }
    }
}

//-- C# code fragment
purchaseOrder tmpP = new purchaseOrder();
tmpP.orderDate = System.DateTime.Now;

16.1.1.7. UUID Type

Guideline: Use Leach-Salz variant of UUID at runtime.

java.util.UUID maps to schema type xs:string. .NET maps xs:string to System.string. The constructors in java.util.UUID allow any variant of UUID to be created. Its methods are for manipulation of the Leach-Salz variant.

Example 16.11. Mapping UUID

//-- Java code fragment
public class ReportUid {
    public java.util.UUID uuid;
}

//-- Schema fragment
<xs:complexType name="reportUid">
    <xs:sequence>
        <xs:element name="uuid" type="xs:string" minOccurs="0"/>
    </xs:sequence>
</xs:complexType>

//-- .NET auto generated code from schema
public partial class reportUid: object,
        System.Runtime.Serialization.IExtensibleDataObject
{
    private System.Runtime.Serialization.ExtensionDataObject extensionDataField;
    private string uuidField;

    public System.Runtime.Serialization.ExtensionDataObject ExtensionData
    {
        get { return this.extensionDataField; }
        set { this.extensionDataField = value; }
    }

    public string uuid
    {
        get { return this.uuidField; }
        set { this.uuidField = value; }
    }
}

//-- C# code fragment
reportUid tmpU = new reportUid();
System.Guid guid = new System.Guid("06b7857a-05d8-4c14-b7fa-822e2aa6053f");
tmpU.uuid = guid.ToString();

16.1.1.8. Typed Variables

Guideline: A typed variable maps to xs:anyType. .NET maps xs:anyType to System.Object.

Example 16.12. Using a typed variable

// Java class
public class Shape <T>
{
    private T xshape;

    public Shape() {};
    public Shape(T f)
    {
        xshape = f;
    }
}

//-- Schema fragment
<xs:complexType name="shape">
    <xs:sequence>
        <xs:element name="xshape" type="xs:anyType" minOccurs="0"/>
    </xs:sequence>
</xs:complexType>

// C# code generated by svcutil
public partial class shape
{
    private object xshapeField;

    public object xshape
    {
        get { return this.xshapeField; }
        set { this.xshapeField = value; }
    }
}

16.1.1.9. Collections Types

Java collections types (java.util.Collection and its subtypes, array, List, and parameterized collection types such as List<Integer>) can be mapped to XML schema in different ways and can be serialized in different ways. The following examples show .NET bindings.

16.1.1.9.1. List of Nillable Elements

Guideline: By default, a collection type such as List<Integer> maps to an XML schema construct that is a repeating unbounded occurrence of an optional and nillable element. .NET binds the XML schema construct to System.Nullable<int>[]. The element is optional and nillable. However, when marshalling Jakarta XML Binding marshaller will always marshal a null value using xsi:nil.

Example 16.13. Collection to a list of nillable elements

//-- Java code fragment
@XmlRootElement(name="po")
public PurchaseOrder {
    public List<Integer> items;
}

//-- Schema fragment
<xs:element name="po" type="purchaseOrder">
<xs:complexType name="purchaseOrder">
    <xs:sequence>
        <xs:element name="items" type="xs:int" nillable="true"
                    minOccurs="0" maxOccurs="unbounded"/>
    </xs:sequence>
</xs:complexType>
...

//--- Jakarta XML Binding XML serialization
<po>
    <items> 1 </items>
    <items> 2 </items>
    <items> 3 </items>
</po>

<po>
    <items> 1 </items>
    <items xsi:nil=true/>
    <items> 3 </items>
</po>

//-- .NET auto generated code from schema
partial class purchaseOrder {
        private System.Nullable<int>[] itemsField;

    public System.Nullable<int>[] items
    {
        get { return this.itemsField; }
        set { this.itemsField = value; }
    }
}

16.1.1.9.2. List of Optional Elements

Guideline: This is the same as above except that a collection type such as List<Integer> maps to a repeating unbounded occurrence of an optional (minOccurs="0") but not nillable element. This in turn binds to .NET type int[]. This is more developer friendly. However, when marshalling, Jakarta XML Binding will marshal a null value within the List<Integer> as a value that is absent from the XML instance.

Example 16.14. Collection to a list of optional elements

//-- Java code fragment
@XmlRootElement(name="po")
public PurchaseOrder {
    @XmlElement(nillable=false)
    public List<Integer> items;
}

//-- Schema fragment
<xs:element name="po" type="purchaseOrder">
<xs:complexType name="purchaseOrder">
    <xs:sequence>
        <xs:element name="items" type="xs:int"
                    minOccurs="0" maxOccurs="unbounded"/>
    </xs:sequence>
</xs:complexType>
...

// .NET auto generated code from schema
partial class purchaseOrder {
    private int[] itemsField;

    public int[] items
    {
        get { return this.itemsField; }
        set { this.itemsField = value; }
    }
}

16.1.1.9.3. List of Values

Guideline: A collection such as List<Integer> can be mapped to a list of XML values (that is, an XML schema list simple type) using annotation @XmlList. .NET maps a list simple type to a .NET System.string.

Example 16.15. Collection to a list of values using @XmlList

//-- Java code fragment
@XmlRootElement(name="po")
public PurchaseOrder {
    @XmlList public List<Integer> items;
}

//-- Schema fragment
<xs:element name="po" type="purchaseOrder">
<xs:complexType name="purchaseOrder">
    <xs:element name="items" minOccurs="0">
        <xs:simpleType>
            <xs:list itemType="xs:int"/>
        </xs:simpleType>
    </xs:element>
</xs:complexType>
...

//-- XML serialization
<po>
    <items> 1 2 3 </items>
</po>

// .NET auto generated code from schema
partial class purchaseOrder {
    private string itemsField;

    public string items
    {
        get { return this.itemsField; }
        set { this.itemsField = value; }
    }
}

16.1.1.10. Array Types

Example 16.16. Single and multidimensional arrays

//-- Java code fragment
public class FamilyTree {
    public Person[] persons;
    public Person[][] family;
}

// .NET auto generated code from schema
public partial class familyTree
{
    private person[] persons;
    private person[][] families;

    public person[] persons
    {
        get { return this.membersField; }
        set { this.membersField = value; }
    }

    public person[][] families
    {
        get { return this.familiesField; }
        set { this.familiesField = value; }
    }
}

16.1.2. Fields and Properties

The following guidelines apply to mapping of JavaBeans properties and Java fields, but for brevity Java fields are used.

16.1.2.1. @XmlElement Annotation

Guideline: The @XmlElement annotation maps a property or field to an XML element. This is also the default mapping in the absence of any other Jakarta XML Binding annotations. The annotation parameters in @XmlElement can be used to specify whether the element is optional or required, nillable or not. The following examples illustrate the corresponding bindings in the .NET client.

Example 16.17. Map a field or property to a nillable element

//-- Java code fragment
public class PurchaseOrder {

    // Map a field to a nillable XML element
    @jakarta.xml.bind.annotation.XmlElement(nillable=true)
    public java.math.BigDecimal price;
}

//-- Schema fragment
<xs:complexType name="purchaseOrder">
    <xs:sequence>
        <xs:element name="price" type="xs:decimal"
                    nillable="true" minOccurs="0" />
    </xs:sequence>
</xs:complexType>

// .NET auto generated code from schema
public partial class purchaseOrder {
    private System.Nullable<decimal> priceField;
    private bool priceFieldSpecified;

    public decimal price
    {
        get { return this.priceField; }
        set { this.priceField = value; }
    }

    public bool priceSpecified {
    {
        get { return this.priceFieldSpecified; }
        set { this.priceFieldSpecified = value;}
    }
}

Example 16.18. Map a property or field to a nillable, required element

//-- Java code fragment
public class PurchaseOrder {

    // Map a field to a nillable XML element
    @XmlElement(nillable=true, required=true)
    public java.math.BigDecimal price;
}

//-- Schema fragment
<xs:complexType name="purchaseOrder">
    <xs:sequence>
        <xs:element name="price" type="xs:decimal"
                    nillable="true" minOccurs="1" />
    </xs:sequence>
</xs:complexType>

// .NET auto generated code from schema
public partial class purchaseOrder {
    private System.Nullable<decimal> priceField;

    public decimal price
    {
        get { return this.priceField; }
        set { this.priceField = value; }
    }
}

16.1.2.2. @XmlAttribute Annotation

Guideline: A property or field can be mapped to an XML attribute using @XmlAttribute annotation. .NET binds an XML attribute to a property.

Example 16.19. Mapping a field or property to an XML attribute

//-- Java code fragment
public class UKAddress extends Address {
    @XmlAttribute
    public int exportCode;
}

//-- Schema fragment
<! XML Schema fragment -->
<xs:complexType name="ukAddress">
    <xs:complexContent>
        <xs:extension base="tns:address">
            <xs:sequence/>
            <xs:attribute name="exportCode" type="xs:int"/>
        </xs:extension>
    </xs:complexContent>
</xs:complexType>

// .NET auto generated code from schema
public partial class ukAddress : address
{
    private int exportCodeField;
    public int exportCode
    {
        get { return this.exportCodeField; }
        set { this.exportCodeField = value; }
    }
}

16.1.2.3. @XmlElementRefs Annotation

Guideline: @XmlElementRefs maps to a xs:choice. This binds to a property with name item in the C# class. If there is another field/property named item in the Java class, there will be a name clash that .NET will resolve by generating name. To avoid the name clash, either change the name or use customization, for example @XmlElement(name="foo").

Example 16.20. Mapping a field or property using @XmlElementRefs

//-- Java code fragment
public class PurchaseOrder {
    @XmlElementRefs({
        @XmlElementRef(name="plane", type=PlaneType.class),
        @XmlElementRef(name="auto", type=AutoType.class)})
    public TransportType shipBy;
}

@XmlRootElement(name="plane")
public class PlaneType extends TransportType {}

@XmlRootElement(name="auto")
public class AutoType extends TransportType { }

@XmlRootElement
public class TransportType { ... }

//-- Schema fragment
<!-- XML schema generated by wsgen -->
<xs:complexType name="purchaseOrder">
    <xs:choice>
        <xs:element ref="plane"/>
        <xs:element ref="auto"/>
    </xs:choice>
</xs:complexType>

<!-- XML global elements -->
<xs:element name="plane" type="autoType" />
<xs:element name="auto" type="planeType" />

<xs:complexType name="autoType">
    <!-- content omitted - details not relevant to example -->
</xs:complexType>

</xs:complexType name="planeType">
    <!-- content omitted - details not relevant to example -->
</xs:complexType>

// .NET auto generated code from schema
public partial class purchaseOrder {
    private transportType itemField;

    [System.Xml.Serialization.XmlElementAttribute("auto", typeof(autoType), Order=4)]
    [System.Xml.Serialization.XmlElementAttribute("plane", typeof(planeType), Order=4)]
    public transportType Item
    {
        get { return this.itemField; }
        set { this.itemField = value; }
    }

public partial class planeType { ... } ;
public partial class autoType { ... } ;

16.1.3. Java Classes

A Java class can be mapped to different XML schema type and/or an XML element. The following guidelines apply to the usage of annotations at the class level.

16.1.3.1. @XmlType Annotation - Anonymous Type

Guideline: Prefer mapping class to named XML schema type rather than an anonymous type for a better .NET type binding.

The @XmlType annotation is used to customize the mapping of a Java class to an anonymous type. .NET binds an anonymous type to a .NET class - one per reference to the anonymous type. Thus, each Java class mapped to an anonymous type can generate multiple classes on the .NET client.

Example 16.21. Mapping a Java class to an anonymous type using @XmlType

//-- Java code fragment
public class PurchaseOrder {
    public java.util.List<Item> item;
}
@XmlType(name="")
public class Item {
    public String productName;
    ...
}

//-- Schema fragment
<xs:complexType name="purchaseOrder">
    <xs:sequence>
        <xs:element name="item">
            <xs:complexType>
                <xs:sequence>
                    <xs:element name="productName" type="xs:string"/>
                </xs:sequence>
            </xs:complexType
>        </xs:element>
    </xs:sequence>
</xs:complexType>

// C# code generated by svcutil
public partial class purchaseOrder
{
    private purchaseOrderItem[] itemField;
    System.Xml.Serialization.XmlElementAttribute("item",
        Form=System.Xml.Schema.XmlSchemaForm.Unqualified, IsNullable=true, Order=0)]
    public purchaseOrderItem[] item
    {
        get {
            return this.itemField;
        }

        set {
            this.itemField = value;
        }
    }
}

// .NET auto generated code from schema
public partial class purchaseOrderItem
{
    private string productNameField;
    public string productName {
        get { return this.productNameField; }
        set { this.productNameField = value; }
    }
}

16.1.3.2. @XmlType Annotation - xs:all

Guideline: Avoid using XmlType(propOrder=:{}).

@XmlType(propOrder={}) maps a Java class to an XML Schema complex type with xs:all content model. Since XML Schema places severe restrictions on xs:all, the use of @XmlType(propOrder={}) is therefore not recommended. So, the following example shows the mapping of a Java class to xs:all, but the corresponding .NET code generated by svcutil is omitted.

Example 16.22. Mapping a class to xs:all using @XmlType

//-- Java code fragment
@XmlType(propOrder={})
public class USAddress {
    public String name;
    public String street;
}

//-- Schema fragment
<xs:complexType name="USAddress">
    <xs:all>
        <xs:element name="name" type="xs:string"/>
        <xs:element name="street" type="xs:string"/>
        ...
    </xs:all>
</xs:complexType>

16.1.3.3. @XmlType Annotation - Simple Content

Guideline: A class can be mapped to a complexType with a simpleContent using @XmlValue annotation. .NET binds the Java property annotated with @XmlValue to a property with name "value".

Example 16.23. Class to complexType with simpleContent

//-- Java code fragment
public class InternationalPrice
{
    @XmlValue
    public java.math.BigDecimal price;

    @XmlAttribute public String currency;
}

//-- Schema fragment
<xs:complexType name="internationalPrice">
    <xs:simpleContent>
        <xs:extension base="xs:decimal">
            xs:attribute name="currency" type="xs:string"/>
        </xs:extension>
    </xs:simpleContent>
 </xs:complexType>

// .NET auto generated code from schema
public partial class internationalPrice
{
    private string currencyField;
    private decimal valueField;
    public string currency
    {
        get { return this.currencyField; }
        set { this.currencyField = value;}
    }

    public decimal Value
    {
        get { return this.valueField; }
        set { this.valueField = value;}
    }
}

16.1.4. Open Content

Jakarta XML Binding supports the following annotations for defining open content. (Open content allows content not statically defined in XML schema to occur in an XML instance):

  • The @XmlAnyElement annotation maps to xs:any, which binds to the .NET type System.Xml.XmlElement[].

  • The @XmlAnyAttribute annotation maps to xs:anyAttribute, which binds to the .NET type System.Xml.XmlAttribute[].

Example 16.24. Using @XmlAnyElement for open content

//-- Java code fragment
@XmlType(propOrder={"name", "age", "oc"})
public class OcPerson {
    @XmlElement(required=true)
    public String name;
    public int age;

    // Define open content
    @XmlAnyElement
    public List<Object> oc;
}

//-- Schema fragment
<xs:complexType name="ocPerson">
    <xs:sequence>
        <xs:element name="name" type="xs:string"/>
        <xs:element name="age" type="xs:int"/>
        <xs:any minOccurs="0" maxOccurs="unbounded">
    </xs:sequence>
</xs:complexType>

// .NET auto generated code from schema
public class ocPerson
{
    private String name;
    private int age;
    private System.Xml.XmlElement[] anyField;<

    public String name { ... }
    public int age { ... }

    public System.Xml.XmlElement[] Any {
    {
        get { return this.anyField; }
        set { this.anyField = value; }
    }
}

Example 16.25. Using @XmlAnyAttribute for open content

//-- Java code fragment
@XmlType(propOrder={"name", "age"}
public class OcPerson {
    public String name;
    public int age;

    // Define open content
    @XmlAnyAttribute
    public java.util.Map oc;
}

//-- Schema fragment
<xs:complexType name="ocPerson">
    <xs:sequence>
        <xs:element name="name" type="xs:string"/>
        <xs:element name="age" type="xs:int"/>
    </xs:sequence>
    <xs:anyAttribute/>
</xs:complexType>

// .NET auto generated code from schema
public class ocPerson
{
    private String name;
    private double age;
    private System.Xml.XmlAttribute[] anyAttrField;<

    public String name { ... }
    public double age { ... }

    public System.Xml.XmlElement[] anyAttr {
    {
        get { return this.anyAttrField; }
        set { this.anyAttrField = value; }
    }
}

16.1.5. Enum Type

Guideline: A Java enum type maps to an XML schema type constrained by enumeration facets. This, in turn, binds to the .NET type enum type.

Example 16.26. Java enumxs:simpleType (with enum facets) ↔ .NET enum

//-- Java code fragment
public enum USState {MA, NH}

//-- Schema fragment
<xs:simpleType name="usState">
    <xs:restriction base="xs:string">
        <xs:enumeration value="NH" />
        <xs:enumeration value="MA" />
    </xs:restriction>
</xs:simpleType>

// .NET auto generated code from schema
public enum usState { NH, MA }

16.1.6. Package-level Annotations

The following package-level Jakarta XML Binding annotations are relevant from an interoperability standpoint:

  • @XmlSchema - customizes the mapping of package to XML namespace.

  • @XmlSchemaType - customizes the mapping of XML schema built-in type. The @XmlSchemaType annotation can also be used at the property/field level, as was seen in the example XMLGregorianCalendar Type.

16.1.6.1. @XmlSchema Annotation

A package is mapped to an XML namespace. The following attributes of the XML namespace can be customized using the @XmlSchema annotation parameters:

  • elementFormDefault using @XmlSchema.elementFormDefault()

  • attributeFormDefault using @XmlSchema.attributeFormDefault()

  • targetNamespace using @XmlSchema.namespace()

  • Associate namespace prefixes with the XML namespaces using the @XmlSchema.ns() annotation

These XML namespace attributes are bound to .NET serialization attributes (for example, XmlSerializer attributes).

16.1.6.2. Not Recommended Annotations

Any Jakarta XML Binding annotation can be used, but the following are not recommended:

  • The jakarta.xml.bind.annotation.XmlElementDecl annotation is used to provide complete XML schema support.

  • The @XmlID and @XmlIDREF annotations are used for XML object graph serialization, which is not well supported.

16.2. Web Service - Start from WSDL

The following guidelines apply when designing a Java web service starting from a WSDL:

  1. If the WSDL was generated by DataContractSerializer, enable Jakarta XML Binding customizations described in Customizations for WCF Service WSDL. The rationale for the Jakarta XML Binding customizations is described in the same section.

  2. If the WSDL is a result of contract first approach, verify that the WSDL can be processed by either the DataContractSerializer or XmlSerializer mechanisms.

    The purpose of this step is to ensure that the WSDL uses only the set of XML schema features supported by Jakarta XML Binding or .NET serialization mechanisms. Jakarta XML Binding was designed to support all the XML schema features. The WCF serialization mechanisms, DataContractSerializer and XmlSerializer, provide different levels of support for XML schema features. Thus, the following step will ensure that the WSDL/schema file can be consumed by the WCF serialization mechanisms.

    svcutil wsdl-file

    The svcutil.exe tool, by default, uses DataContractSerializer but falls back to XmlSerializer if it encounters an XML schema construct not supported by XmlFormatter.

16.3. Customizations for WCF Service WSDL

When developing either a Java web service or a Java client from a WCF service WSDL generated using DataContractSerializer, the following Jakarta XML Binding 2.0 customizations are useful and/or required.

  • generateElementProperty attribute

  • mapSimpleTypeDef attribute

The following sections explain the use and rationale of these customizations.

16.3.1. generateElementProperty Attribute

WCF service WSDL generated from a programming language such as C# using DataContractSerializer may contain XML Schema constructs which result in JAXBElement<T> in generated code. A JAXBElement<T> type can also sometimes be generated when a WSDL contains advanced XML schema features such as substitution groups or elements that are both optional and nillable. In all such cases, JAXBElement<T> provides roundtripping support of values in XML instances. However, JAXBElement<T> is not natural to a Java developer. So the generateElementProperty customization can be used to generate an alternate developer friendly but lossy binding. The different bindings along with the trade-offs are discussed below.

16.3.1.1. Default Binding

The following is the default binding of an optional (minOccurs="0") and nillable(nillable="true") element:

Example 16.27. 

<!-- XML schema fragment -->
<xs:element name="person" type="Person"/>
<xs:complexType name="Person">
    <xs:sequence>
        <xs:element name="name" type="xs:string"
                    nillable="true" minOccurs="0"/>
    </xs:sequence>
</xs:complexType>
...

Example 16.28. 

// Binding
public class Person {
    JAXBElement<String> getName() {...};
    public void setName(JAXBElement<String> value) {...}
}

Since the XML element name is both optional and nillable, it can be represented in an XML instance in one of following ways:

Example 16.29. 

<!-- Absence of element name-->
<person>
    <-- element name is absent -->
</person>

<!-- Presence of an element name -->
<person>
    <name xsi:nil="true"/>
</person>

The JAXBElement<String> type roundtrips the XML representation of name element across an unmarshal/marshal operation.

16.3.1.2. Customized Binding

When generateElementProperty is false, the binding is changed as follows:

Example 16.30. 

// set Jakarta XML Binding customization generateElementProperty="false"
public class Person {
    String getName() {...}
    public void setName(String value) {...}
}

The above binding is more natural to Java developer than JAXBElement<String>. However, it does not roundtrip the value of name.

Jakarta XML Binding allows generateElementProperty to be set:

  • Globally in <jaxb:globalBindings>

  • Locally in <jaxb:property> customization

When processing a WCF service WSDL, it is recommended that the generateElementProperty customization be set in <jaxb:globalBindings>:

Example 16.31. 

<jaxb:bindings version="3.0"
               xmlns:jaxb="https://jakarta.ee/xml/ns/jaxb"
               xmlns:xs="http://www.w3.org/2001/XMLSchema">
    <jaxb:bindings schemaLocation="schema-importedby-wcfsvcwsdl"
                   node="/xs:schema">
        <jaxb:globalBindings generateElementProperty="false"/>
    </jaxb:bindings>
    ...

Note

The generateElementProperty attribute was introduced in Jakarta XML Binding 2.1.

16.3.1.3. mapSimpleTypeDef Attribute

XML Schema Part 2: Datatype defines facilities for defining datatypes for use in XML Schemas. .NET platform introduced the CLR types for some of the XML schema datatypes as described in CLR to XML Schema Type Mapping.

Table 16.1. CLR to XML Schema Type Mapping

CLR Type

XML Schema Type

byte

xs:unsignedByte

uint

xs:unsignedInt

ushort

xs:unsignedShor

ulong

xs:unsignedLong


However, there are no corresponding Java types that map to the XML Schema types listed in CLR to XML Schema Type Mapping. Furthermore, Jakarta XML Binding maps these XML schema types to Java types that are natural to Java developer. However, this results in a mapping that is not one-to-one. For example:
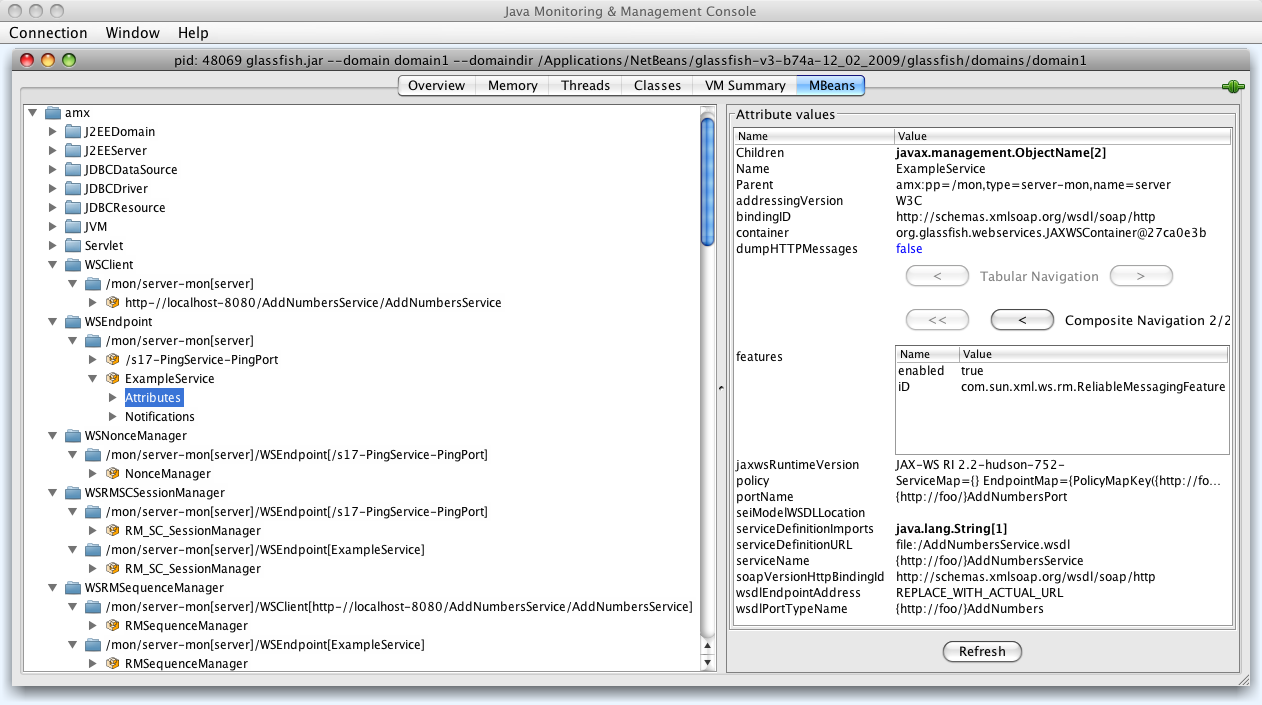
  • xs:int -> int

  • xs:unsignedShort -> int

The lack of a one-to-one mapping means that when XML Schema types shown in CLR to XML Schema Type Mapping are used in an xsi:type construct, they won't be preserved by default across an unmarshal followed by marshal operation. For example:

Example 16.32. 

// C# web method
public Object retObject(Object objvalue);
// Java web method generated from WCF service WSDL
public Object retObject(
    Object objvalue);
}

The following illustrates why xsi:type is not preserved across an unmarshal/marshal operation.

  • A value of type uint is marshalled by WCF serialization mechanism as:

    Example 16.33. 

    <objvalue xsi:type="xs:unsignedShort"/>

  • Jakarta XML Binding unmarshaller unmarshals the value as an instance of int and assigns it to parameter objvalue.
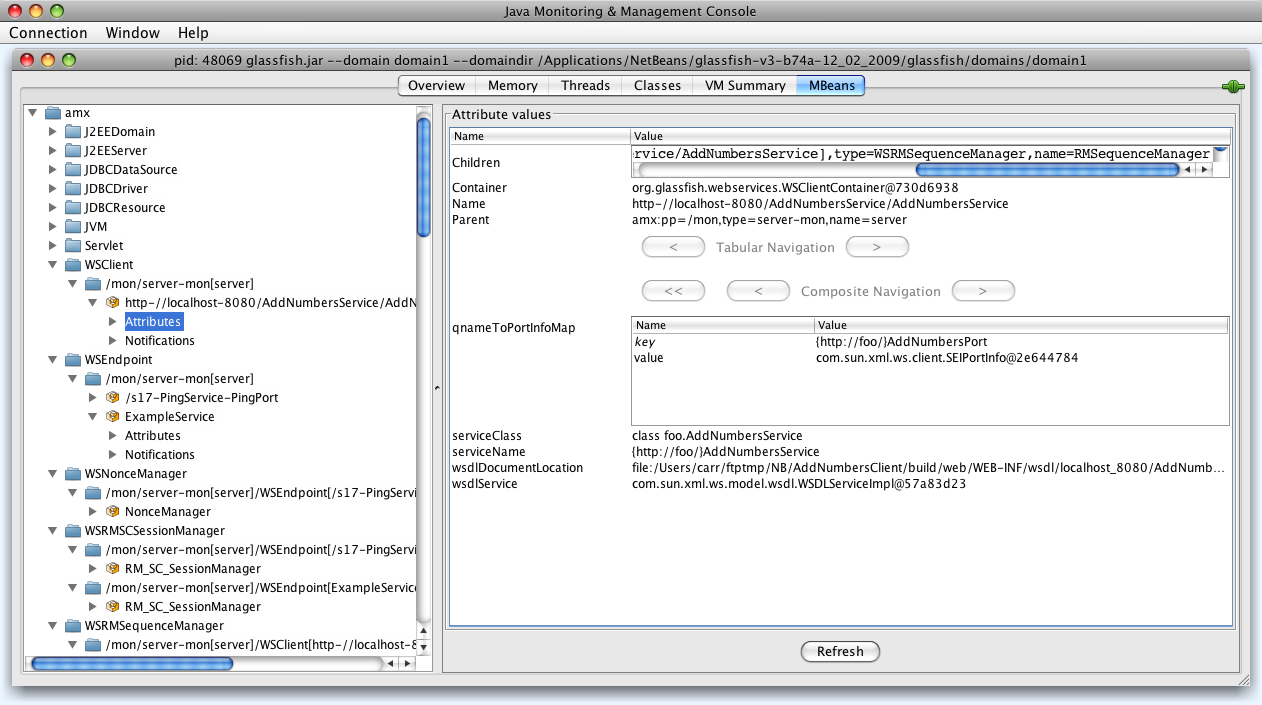
  • The objvalue is marshalled back by Jakarta XML Binding marshaller with an xsi:type of xs:int.
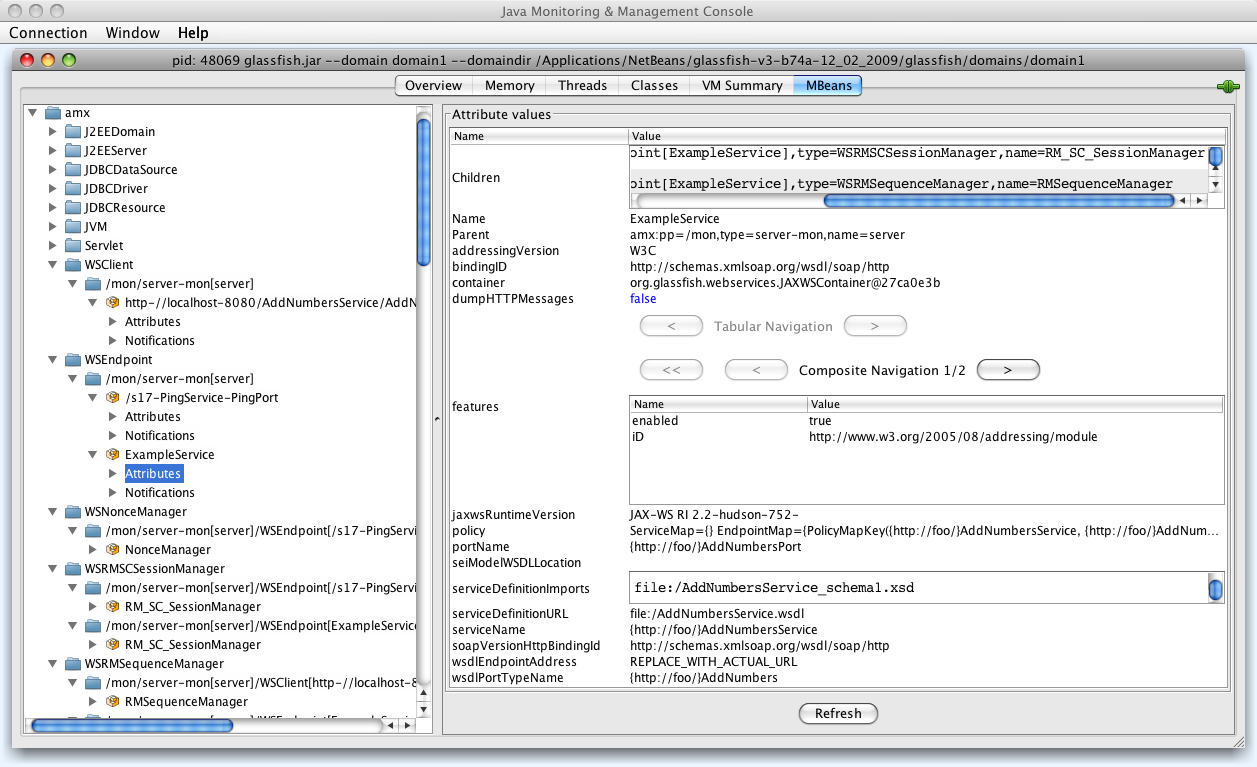
    Example 16.34. 

    <objvalue xsi:type="xs:int"/>

One way to preserve and roundtrip the xsi:type is to use the mapSimpleTypeDef customization. The customization makes the mapping of XML Schema Part 2 datatypes one--to-one by generating additional Java classes. Thus, xs:unsignedShort will be bound to its own class rather than int, as shown:

Example 16.35. 

//Java class to which xs:unsignedShort is bound
public class UnsignedShort { ... }

The following illustrates how the xsi:type is preserved across an unmarshal/marshal operation:

  • A value of type uint is marshalled by WCF serialization mechanism as:

    Example 16.36. 

    <objvalue xsi:type="xs:unsignedShort"/>

  • Jakarta XML Binding unmarshaller unmarshals the value as an instance of UnsignedShort and assigns it to parameter objvalue.

  • The objvalue is marshalled back by Jakarta XML Binding marshaller with an xsi:type of xs:int.

    Example 16.37. 

    <objvalue xsi:type="xs:unsignedShort"/>

Guideline: Use the mapSimpleTypedef customization where roundtripping of XML Schema types in CLR to XML Schema Type Mapping are used in xsi:type. However, it is preferable to avoid the use of CLR types listed in CLR to XML Schema Type Mapping since they are specific to .NET platform.

The syntax of the mapSimpleTypeDef customization is shown below.

Example 16.38. 

<jaxb:bindings version="3.0"
               xmlns:jaxb="https://jakarta.ee/xml/ns/jaxb"
               xmlns:xs="http://www.w3.org/2001/XMLSchema">
    <jaxb:bindings schemaLocation="schema-importedby-wcfsvcwsdl">
        <jaxb:globalBindings mapSimpleTypeDef="true"/>
    </jaxb:bindings>
    ....

16.4. Developing a Microsoft .NET Client

This section describes how to develop a .NET client that uses data binding.

To Develop a Microsoft .NET Client

Perform the following steps to generate a Microsoft .NET client from a Java web service WSDL file.

  1. Generate WCF web service client artifacts using the svcutil.exe tool:

    svcutil.exe java-web-service-wsdl

    svcutil.exe has the following options for selecting a serializer:

    • svcutil.exe /serializer:auto (default)

    • svcutil.exe /serializer:DataContractSerializer

    • svcutil.exe /serializer:XmlSerializer

    It is recommended that you use the default option, /serializer:auto. This option ensures that svcutil.exe falls back to XmlSerializer if an XML schema construct is used that cannot be processed by DataContractSerializer.

    For example, in the following class the field price is mapped to an XML attribute that cannot be consumed by DataContractSerializer.

    Example 16.39. 

    public class POType {
        @jakarta.xml.bind.annotation.XmlAttribute
        public java.math.BigDecimal price;
    }
    
    <!-- XML schema fragment -->
    <xs:complexType name="poType">
        <xs:sequence/>
        <xs:attribute name="price" type="xs:decimal"/>
    </xs:complexType>

  2. Develop the .NET client using the generated artifacts.

16.5. BP 1.1 Conformance

Jakarta XML Web Services enforces strict Basic Profile 1.1 compliance. In one situation, the .NET framework does not enforce strict BP 1.1 semantics, and their usage can lead to interoperability problems.

In rpclit mode, BP 1.1, R2211 disallows the use of xsi:nil in part accessors: An ENVELOPE described with an rpc-literal binding MUST NOT have the xsi:nil attribute with a value of "1" or "true" on the part accessors.

From a developer perspective this means that in rpclit mode, Jakarta XML Web Services does not allow a null to be passed in a web service method parameter.

Example 16.40. 

//Java Web method
public byte[] retByteArray(byte[] inByteArray) {
    return inByteArray;
}

Example 16.41. 

<!-- In rpclit mode, the above Java web service method will throw an exception
  if the following XML instance with xsi:nil is passed by a .NET client.-->
  <RetByteArray xmlns="http://tempuri.org/">
      <inByteArray a:nil="true" xmlns=""
          xmlns:a="http://www.w3.org/2001/XMLSchema-instance"/>
  </RetByteArray>

Chapter 17. Using Atomic Transactions

17.1. Using Web Services Atomic Transactions

This section describes how to use Web services atomic transactions to enable interoperability with other external transaction processing systems.

17.1.1. Overview of Web Services Atomic Transactions

Web services enable interoperability with other external transaction processing systems, such as WebLogic, Websphere, JBoss, Microsoft .NET, and so on, through the support of the following specifications:

  • Web Services Atomic Transaction (WS-AtomicTransaction) Versions 1.0, 1.1 and 1.2: http://docs.oasis-open.org/ws-tx/wstx-wsat-1.2-spec-cs-01/wstx-wsat-1.2-spec-cs-01.html

  • Web Services Coordination (WS-Coordination) Versions 1.0, 1.1 and 1.2: http://docs.oasis-open.org/ws-tx/wstx-wscoor-1.2-spec-cs-01/wstx-wscoor-1.2-spec-cs-01.html

These specifications define an extensible framework for coordinating distributed activities among a set of participants. The coordinator, shown in the following figure, is the central component, managing the transactional state (coordination context) and enabling Web services and clients to register as participants.

Figure 17.1. Web Services Atomic Transactions Framework

Web Services Atomic Transactions Framework

The following table describes the components of Web services atomic transactions, shown in the previous figure.

Table 17.1. Components of Web Services Atomic Transactions

Component

Description

Coordinator

Manages the transactional state (coordination context) and enables Web services and clients to register as participants.

Activation Service

Enables the application to activate a transaction and create a coordination context for an activity. Once created, the coordination context is passed with the transaction flow.

Registration Service

Enables an application to register as a participant.

Application Protocol X, Y

Supported coordination protocols, such as WS-AtomicTransaction.


The following figure shows two server instances interacting within the context of a Web services atomic transaction.

Figure 17.2. Atomic Transaction - Interaction between two Servers

Atomic Transaction - Interaction between two Servers

Please note the following:

  • Using the local Jakarta Transactions transaction manager, a transaction can be imported to or exported from the local Jakarta Transactions environment as a subordinate transaction, all within the context of a Web service request.

  • Creation and management of the coordination context is handled by the local Jakarta Transactions transaction manager.

  • All transaction integrity management and recovery processing is done by the local Jakarta Transactions transaction manager.

The following describes a sample end-to-end Web services atomic transaction interaction:

  1. Application A begins a transaction on the current thread of control using the Jakarta Transactions transaction manager on Server A.

  2. Application A calls a Web service method in Application B on Server B.

  3. Server A updates its transaction information and creates a SOAP header that contains the coordination context, and identifies the transaction and local coordinator.

  4. Server B receives the request for Application B, detects that the header contains a transaction coordination context and determines whether it has already registered as a participant in this transaction. If it has, that transaction is resumed and if not, a new transaction is started.

    Application B executes within the context of the imported transaction. All transactional resources with which the application interacts are enlisted with this imported transaction.

  5. Server B enlists itself as a participant in the WS-AtomicTransaction transaction by registering with the registration service indicated in the transaction coordination context.

  6. Server A resumes the transaction.

  7. Application A resumes processing and commits the transaction.

17.1.2. Enabling Web Services Atomic Transactions on Web Service Endpoint

To enable Web services atomic transactions on a Web service endpoint:

  • When starting from Java (bottom-up), add the @com.sun.xml.ws.api.tx.at.Transactional annotation to the Web service endpoint implementation class or method.

The following tables summarizes the configuration options that you can set when enabling Web services atomic transactions:

Table 17.2. Web Services Atomic Transactions Configuration Options

Attribute

Description

Version

Version of the Web services atomic transaction coordination context that is used for Web services and clients. For clients, it specifies the version used for outbound messages only. The value specified must be consistent across the entire transaction.

Valid values include WSAT10, WSAT11, WSAT12, and DEFAULT. The DEFAULT value for Web services is all three versions (driven by the inbound request); the DEFAULT value for Web service clients is WSAT12.

Flow type

Whether the Web services atomic transaction coordination context is passed with the transaction flow. See table for valid values.


The following table summarizes the valid values for flow type and their meaning on the Web service and client. The table also summarizes the valid value combinations when configuring web services atomic transactions for an EJB-style web service that uses the @TransactionAttribute annotation.

Table 17.3. Flow Types Values

Value

Web Service Client

Web Service

Valid EJB @TransactionAttribute Values

NEVER

Jakarta Transactions transaction: Do not export transaction coordination context.

No Jakarta Transactions transaction: Do not export transaction coordination context.

Transaction flow exists: Do not import transaction coordination context. If the CoordinationContext header contains mustunderstand="true", a SOAP fault is thrown.

No transaction flow: Do not import transaction coordination context.

NEVER, NOT_SUPPORTED, REQUIRED, REQUIRES_NEW, SUPPORTS

SUPPORTS (Default)

Jakarta Transactions transaction: Export transaction coordination context.

No Jakarta Transactions transaction: Do not export transaction coordination context.

Transaction flow exists: Import transaction context.

No transaction flow: Do not import transaction coordination context.

REQUIRED, SUPPORTS

MANDATORY

Jakarta Transactions transaction: Export transaction coordination context.

No Jakarta Transactions transaction: An exception is thrown.

Transaction flow exists: Import transaction context.

No transaction flow: Service-side exception is thrown.

MANDATORY, REQUIRED, SUPPORTS


17.1.2.1. Using the @Transactional Annotation in Your JWS File

To enable Web services atomic transactions, specify the @com.sun.xml.ws.api.tx.at.Transactional annotation on the Web service endpoint implementation class or method.

  • If you specify the @Transactional annotation at the Web service class level, the settings apply to all two-way methods defined by the service endpoint interface. You can override the flow type value at the method level; however, the version must be consistent across the entire transaction.

  • You cannot explicitly specify the @Transactional annotation on a Web method that is also annotated with @Oneway.

  • Web services atomic transactions cannot be used with the client-side asynchronous programming model.

The format for specifying the @Transactional annotation is as follows:

Example 17.1. @Transactional annotation format

@Transactional(
    version=Transactional.Version.[WSAT10|WSAT11|WSAT12|DEFAULT],
    value=Transactional.TransactionFowType.[MANDATORY|SUPPORTS|NEVER]
)

For more information about the version and flow type configuration options, see Table.

The following sections provide examples of using the @Transactional annotation at the Web service implementation class and method levels, and with the EJB @TransactionAttribute annotation.

17.1.2.1.1. Example: Using @Transactional Annotation on a Web Service Class

The following example shows how to add @Transactional annotation on a Web service class. As shown in the example, there is an active Jakarta Transactions transaction.

Example 17.2. @Transactional Annotation on a Web Service Class

package examples.webservices.jaxws.wsat.simple.service;
. . .
import jakarta.transaction.UserTransaction;
. . .
import jakarta.jws.WebService;
import com.sun.xml.ws.api.tx.at.Transactional;
import com.sun.xml.ws.api.tx.at.Transactional.Version;
import com.sun.xml.ws.api.tx.at.Transactional.TransactionFlowType;

/**
 * This JWS file forms the basis of a WS-Atomic Transaction Web Service 
 * with the
 * operations: createAccount, deleteAccount, transferMonet, listAccount
 *
 */
@WebService(serviceName = "WsatBankTransferService", 
        targetNamespace = "http://tempuri.org/",
        portName = "WSHttpBindingIService")
@Transactional(value = Transactional.TransactionFlowType.MANDATORY,
        version = com.sun.xml.ws.api.tx.at.Transactional.Version.WSAT10)
public class WsatBankTransferService {

    public String createAccount(String acctNo, String amount) throws java
            .lang.Exception {

        Context ctx = null;
        UserTransaction tx = null;
        try {
            ctx = new InitialContext();
            tx = (UserTransaction) ctx.lookup("java:comp/UserTransaction");
            try {
                DataSource dataSource = (DataSource) ctx.lookup
                        ("examples-demoXA-2");

                String sql = "insert into wsat_acct_remote (acctno, " +
                        "amount) values (" + acctNo +
                        ", " + amount + ")";

                int insCount = dataSource.getConnection()
                        .prepareStatement(sql).executeUpdate();

                if (insCount != 1)
                    throw new java.lang.Exception("insert fail at remote" +
                            ".");

                return ":acctno=" + acctNo + " amount=" + amount + " " +
                        "creating. ";
            } catch (SQLException e) {
                System.out.println("**** Exception caught *****");
                e.printStackTrace();

                throw new SQLException("SQL Exception during " +
                        "createAccount() at remote.");
            }
        } catch (java.lang.Exception e) {
            System.out.println("**** Exception caught *****");
            e.printStackTrace();
            throw new java.lang.Exception(e);
        }
    }

    public String deleteAccount(String acctNo) throws java.lang.Exception {
        ...
    }

    public String transferMoney(String acctNo, String amount,
                                String direction)
            throws java.lang.Exception {
        ...
    }

    public String listAccount() throws java.lang.Exception {
        ...
    }
}

17.1.2.1.2. Example: Using @Transactional Annotation on a Web Service Method

The following example shows how to add @Transactional annotation on a Web service implementation method.

Example 17.3. @Transactional Annotation on a Web Service Method

package examples.webservices.jaxws.wsat.simple.service;
. . .
import jakarta.transaction.UserTransaction;
. . .
import jakarta.jws.WebService;
import com.sun.xml.ws.api.tx.at.Transactional;
import com.sun.xml.ws.api.tx.at.Transactional.Version;
import com.sun.xml.ws.api.tx.at.Transactional.TransactionFlowType;

/**
 * This JWS file forms the basis of a WS-Atomic Transaction Web Service 
 * with the
 * operations: createAccount, deleteAccount, transferMonet, listAccount
 *
 */
@WebService(serviceName = "WsatBankTransferService",
        targetNamespace = "http://tempuri.org/",
        portName = "WSHttpBindingIService")
public class WsatBankTransferService {

    @Transactional(value = Transactional.TransactionFlowType.MANDATORY,
            version = com.sun.xml.ws.api.tx.at.Transactional.Version
                    .WSAT10)
    public String createAccount(String acctNo, String amount) throws java
            .lang.Exception {
        
        Context ctx = null;
        UserTransaction tx = null;
        try {
            ctx = new InitialContext();
            tx = (UserTransaction) ctx.lookup("jakarta.transaction" + "" +
                    ".UserTransaction");
            try {
                DataSource dataSource = (DataSource) ctx.lookup
                        ("examples-demoXA-2");

                String sql = "insert into wsat_acct_remote (acctno, " +
                        "amount) values (" + acctNo +
                        ", " + amount + ")";

                int insCount = dataSource.getConnection()
                        .prepareStatement(sql).executeUpdate();
                
                if (insCount != 1)
                    throw new java.lang.Exception("insert fail at remote" +
                            ".");
                
                return ":acctno=" + acctNo + " amount=" + amount + " " +
                        "creating. ";
            } catch (SQLException e) {
                System.out.println("**** Exception caught *****");
                e.printStackTrace();
                
                throw new SQLException("SQL Exception during " + 
                        "createAccount() at remote.");
            }
        } catch (java.lang.Exception e) {
            System.out.println("**** Exception caught *****");
            e.printStackTrace();
            throw new java.lang.Exception(e);
        }
    }

    public String deleteAccount(String acctNo) throws java.lang.Exception {
        ...
    }

    public String transferMoney(String acctNo, String amount,
                                String direction)
            throws java.lang.Exception {
        ...
    }

    public String listAccount() throws java.lang.Exception {
        ...
    }
}

17.1.2.1.3. Example: Using the @Transactional and the EJB @TransactionAttribute Annotations Together

The following example illustrates how to use the @Transactional and EJB @TransactionAttribute annotations together. In this case, the flow type values must be compatible.

Example 17.4. @Transactional and the EJB @TransactionAttribute Used Together

package examples.webservices.jaxws.wsat.simple.service;
. . .
import jakarta.transaction.UserTransaction;
. . .
import jakarta.jws.WebService;
import javax.ejb.TransactionAttribute;
import javax.ejb.TransactionAttributeType;
import com.sun.xml.ws.api.tx.at.Transactional;
import com.sun.xml.ws.api.tx.at.Transactional.Version;
import com.sun.xml.ws.api.tx.at.Transactional.TransactionFlowType;

/**
 * This JWS file forms the basis of a WS-Atomic Transaction Web Service 
 * with the
 * operations: createAccount, deleteAccount, transferMonet, listAccount
 *
 */
@WebService(serviceName = "WsatBankTransferService",
        targetNamespace = "http://tempuri.org/",
        portName = "WSHttpBindingIService")
@Transactional(value = Transactional.TransactionFlowType.MANDATORY,
        version = com.sun.xml.ws.api.tx.at.Transactional.Version.WSAT10)
@TransactionAttribute(TransactionAttributeType.REQUIRED)
public class WsatBankTransferService {
. . .
}

17.1.2.2. Enabling Web Services Atomic Transactions Starting From WSDL

When enabled, Web services atomic transactions are advertised in the WSDL file using a policy assertion.

This table summarizes the WS-AtomicTransaction 1.2 policy assertions that correspond to a set of common Web services atomic transaction flow type and EJB Transaction attribute combinations.

Web Services Atomic Transaction Policy Assertion Values (WS-AtomicTransaction 1.2)

Table 17.4. Web Services Atomic Transaction Policy Assertion Values (WS-AtomicTransaction 1.2)

Atomic Transaction Flow Type

EJB @TransactionAttribute

WS-AtomicTransaction 1.2 Policy Assertion

MANDATORY

MANDATORY, REQUIRED, SUPPORTS

<wsat:ATAssertion/>

SUPPORTS

REQUIRED, SUPPORTS

<wsat:ATAssertion wsp:Optional="true"/>

NEVER

REQUIRED, REQUIRES_NEW, NEVER, SUPPORTS, NOT_SUPPORTED

No policy advertisement


17.1.3. Enabling Web Services Atomic Transactions on Web Service Clients

On a Web service client, enable Web services atomic transactions using one of the following methods:

  • Add the @com.sun.xml.ws.api.tx.at.Transactional annotation on the Web service reference injection point for a client.

  • Pass the com.sun.xml.ws.api.tx.at.TransactionalFeature as a parameter when creating the Web service proxy or dispatch.

  • At run-time, if the non-atomic transactional Web service client calls an atomic transaction-enabled Web service, then based on the flow type settings:

    • If the flow type is set to SUPPORTS or NEVER on the service-side, then the call is included as part of the transaction.

    • If the flow type is set to MANDATORY, then an exception is thrown.

17.1.3.1. Using @Transactional Annotation with the @WebServiceRef Annotation

To enable Web services atomic transactions, specify the @com.sun.xml.ws.api.tx.at.Transactional annotation on the Web service client at the Web service reference (@WebServiceRef) injection point.

See Using the @Transactional Annotation in Your JWS File for the description of @Transactional annotation format.

The following example illustrates how to annotate the Web service reference injection point. As shown in the example, the active Jakarta Transactions transaction becomes a part of the atomic transaction.

Example 17.5. Using @Transactional Annotation with the @WebServiceRef Annotation

package examples.webservices.jaxws.wsat.simple.client;
. . .
import jakarta.servlet.*;
import jakarta.servlet.http.*;
. . .
import java.net.URL;
import javax.xml.namespace.QName;

import jakarta.transaction.UserTransaction;
import jakarta.transaction.SystemException;

import jakarta.xml.ws.WebServiceRef;
import com.sun.xml.ws.api.tx.at.Transactional;
*/

/**
 * This example demonstrates using a WS-Atomic Transaction to create or
 * delete an account,
 * or transfer money via Web service as a single atomic transaction.
 */

public class WsatBankTransferServlet extends HttpServlet {
    ...
    String url = "http://localhost:7001";
    URL wsdlURL = new URL(url + 
            "/WsatBankTransferService/WsatBankTransferService");
    ...
    DataSource ds = null;
    UserTransaction utx = null;

    try {
        ctx = new InitialContext();
        utx = (UserTransaction) ctx.lookup("jakarta.transaction" +
                ".UserTransaction");
        utx.setTransactionTimeout(900);
    } catch (java.lang.Exception e) {
        e.printStackTrace();
    }

    WsatBankTransferService port = getWebService(wsdlURL);

    try {
        utx.begin();
        if (remoteAccountNo.length() > 0) {
            if (action.equals("create")) {
                result = port.createAccount(remoteAccountNo, 
                        amount);
            } else if (action.equals("delete")) {
                result = port.deleteAccount(remoteAccountNo);
            } else if (action.equals("transfer")) {
                result = port.transferMoney(remoteAccountNo, 
                        amount, direction);
            }
        }
        utx.commit();
        result = "The transaction is committed " + result;
    } catch (java.lang.Exception e) {
        try {
            e.printStackTrace();
            utx.rollback();
            result = "The transaction is rolled back. " + e
                    .getMessage();
        } catch (java.lang.Exception ex) {
            e.printStackTrace();
            result = "Exception is caught. Check stack trace.";
        }
    }
    request.setAttribute("result", result);

    ...
    @Transactional(value = Transactional.TransactionFlowType.MANDATORY,
            version = Transactional.Version.WSAT10)
    @WebServiceRef()
    WsatBankTransferService_Service service;

    private WsatBankTransferService getWebService() {
        return service.getWSHttpBindingIService();
    }

    public String createAccount(String acctNo, String amount) throws 
            java.lang.Exception {
        Context ctx = null;
        UserTransaction tx = null;
        try {
            ctx = new InitialContext();
            tx = (UserTransaction) ctx.lookup("jakarta.transaction" +
                    ".UserTransaction");
            try {
                DataSource dataSource = (DataSource) ctx.lookup
                        ("examples-dataSource-demoXAPool");
                
                String sql = "insert into wsat_acct_local (acctno, " +
                        "amount) values (
                " + acctNo + ", " + amount + ")";
                        
                int insCount = dataSource.getConnection()
                        .prepareStatement(sql).executeUpdate();
                
                if (insCount != 1)
                    throw new java.lang.Exception("insert fail at " +
                            "local.");
                
                return ":acctno=" + acctNo + " amount=" + amount + " " +
                        "creating.. ";
            } catch (SQLException e) {
                System.out.println("**** Exception caught *****");
                e.printStackTrace();
                
                throw new SQLException("SQL Exception during " +
                        "createAccount() at local.");
            }
        } catch (java.lang.Exception e) {
            System.out.println("**** Exception caught *****");
            e.printStackTrace();
            throw new java.lang.Exception(e);
        }
    }

    public String deleteAccount(String acctNo) throws java.lang.Exception {
        ...
    }

    public String transferMoney(String acctNo, String amount,
                                String direction)
            throws java.lang.Exception {
        ...
    }

    public String listAccount() throws java.lang.Exception {
        ...
    }
}

17.1.3.2. Passing the TransactionalFeature to the Client

To enable Web services atomic transactions on the client of the Web service, you can pass the com.sun.xml.ws.api.tx.at.TransactionalFeature as a parameter when creating the Web service proxy or dispatch, as illustrated in the following example.

Example 17.6. Passing the TransactionalFeature to the Client

package examples.webservices.jaxws.wsat.simple.client;
. . .
import jakarta.servlet.*;
import jakarta.servlet.http.*;
. . .
import java.net.URL;
import javax.xml.namespace.QName;

import jakarta.transaction.UserTransaction;
import jakarta.transaction.SystemException;

import com.sun.xml.ws.api.tx.at.TransactionalFeature;
import com.sun.xml.ws.api.tx.at.Transactional.Version;
import com.sun.xml.ws.api.tx.at.Transactional.TransactionFlowType;
*/

/**
 * This example demonstrates using a WS-Atomic Transaction to create 
 * or delete an account,
 * or transfer money via Web service as a single atomic transaction.
 */

public class WsatBankTransferServlet extends HttpServlet {
    ...
    String url = "http://localhost:7001";
    URL wsdlURL = new URL(url + 
            "/WsatBankTransferService/WsatBankTransferService");
    ...
    DataSource ds = null;
    UserTransaction utx = null;

    try {
        ctx = new InitialContext();
        utx = (UserTransaction) ctx.lookup("jakarta.transaction" +
                ".UserTransaction");
        utx.setTransactionTimeout(900);
    } catch (java.lang.Exception e) {
        e.printStackTrace();
    }

    WsatBankTransferService port = getWebService(wsdlURL);

    try {
        utx.begin();
        if (remoteAccountNo.length() > 0) {
            if (action.equals("create")) {
                result = port.createAccount(remoteAccountNo, 
                        amount);
            } else if (action.equals("delete")) {
                result = port.deleteAccount(remoteAccountNo);
            } else if (action.equals("transfer")) {
                result = port.transferMoney(remoteAccountNo, 
                        amount, direction);
            }
        }
        utx.commit();
        result = "The transaction is committed " + result;
    } catch (java.lang.Exception e) {
        try {
            e.printStackTrace();
            utx.rollback();
            result = "The transaction is rolled back.    " + e
                    .getMessage();
        } catch (java.lang.Exception ex) {
            e.printStackTrace();
            result = "Exception is caught. Check stack trace.";
        }
    }
    request.setAttribute("result", result);

    ...

    // Passing the TransactionalFeature to the Client
    private WsatBankTransferService getWebService(URL wsdlURL) {
        TransactionalFeature feature = new TransactionalFeature();
        feature.setFlowType(TransactionFlowType.MANDATORY);
        feature.setVersion(Version.WSAT10);
        
        WsatBankTransferService_Service service = new 
                WsatBankTransferService_Service(wsdlURL, 
                new QName("http://tempuri.org/", 
                        "WsatBankTransferService"));
        
        return service.getWSHttpBindingIService(new jakarta.xml.ws.soap
                .AddressingFeature(), feature);
    }

    public String createAccount(String acctNo, String amount) throws 
            java.lang.Exception {
        Context ctx = null;
        UserTransaction tx = null;
        try {
            ctx = new InitialContext();
            tx = (UserTransaction) ctx.lookup("jakarta.transaction" +
                    ".UserTransaction");
            try {
                DataSource dataSource = (DataSource) ctx.lookup
                        ("examples-dataSource-demoXAPool");
                
                String sql = "insert into wsat_acct_local (acctno, " +
                        "amount) values (
                " + acctNo + ", " + amount + ")";
                        
                int insCount = dataSource.getConnection()
                        .prepareStatement(sql).executeUpdate();
                
                if (insCount != 1)
                    throw new java.lang.Exception("insert fail at " +
                            "local.");
                
                return ":acctno=" + acctNo + " amount=" + amount + " " +
                        "creating.. ";
            } catch (SQLException e) {
                System.out.println("**** Exception caught *****");
                e.printStackTrace();
                
                throw new SQLException("SQL Exception during " +
                        "createAccount() at local.");
            }
        } catch (java.lang.Exception e) {
            System.out.println("**** Exception caught *****");
            e.printStackTrace();
            throw new java.lang.Exception(e);
        }
    }

    public String deleteAccount(String acctNo) throws java.lang.Exception {
        ...
    }

    public String transferMoney(String acctNo, String amount,
                                String direction)
            throws java.lang.Exception {
        ...
    }

    public String listAccount() throws java.lang.Exception {
        ...
    }
}

17.1.4. System Level Configuration

To specify SSL be used for WS-AT protocol exchanges set the wsat.ssl.enabled system property to true, i.e. start the server with -Dwsat.ssl.enabled=true. The default value is false.

To disabled WS-AT transaction logging and recovery set the wsat.recovery.enabled system property to false, i.e. start the server with -Dwsat.recovery.enabled=false. The default value is true.

The WS-C and WS-AT endpoints necessary for WS-AT are deployed only when the first web service is deployed to the container. Therefore, it is necessary to have at least one web service deployed to the target container for WS-AT to function properly even in the case where only clients are used in the Metro instance.

17.1.5. Compatibility

Compatibility between the Metro 2.1 and pre-2.1 (submission version) WS-AT implementions is not supported.

17.2. About the basicWSTX Example

The basicWSTX example shows the following on the client-side:

  1. Developers use existing Jakarta Transactions APIs. Invocations of transacted web service operations flow transactional context from client to web service. Persistent resources updated with client-created transactions are all committed or rolled back as a single atomic transaction.

  2. After the client-side code commits or aborts the Jakarta Transactions transaction, the client confirms that all operations in the transaction succeeded or failed by using calls to verify methods on the transacted web service.

SampleServiceClient, a WSIT servlet that initiates the transaction, and msclient, a client that performs the same operations but runs on the Microsoft side, both interact with the following components running on the service-side:

  1. SimpleService, a web service implemented as a Java servlet with transacted operations. The Edit Web Service Attributes feature in the NetBeans IDE WSIT plug-in is used to configure Transaction Attributes of each web service operation.

  2. SimpleServiceASCMTEJB, a web service implemented as container-managed transaction enterprise bean (CMT EJB). No configuration is necessary for this case.

  3. LibraryFacadeWebServiceBean, a web service that uses the Jakarta Persistence API with two JDBC resources

  4. Managed Jakarta EE resources participating in a distributed transaction having its transacted updates all committed or rolled back

    The servlet and CMT EJB transacted web service operations manipulate two Jakarta Messaging resources:

    • jms/ConnectionFactory, an XATransaction connection factory

    • jms/Queue, a Jakarta Messaging queue

    The LibraryFacadeWebServiceBean web service operations manipulate the JDBC resources:

    • connectionPool, an XATransaction JDBC connection pool

    • jdbc/javaProgrammingLibrary, a JDBC connection resource

This example shows how to use XATransaction -enabled Jakarta Messaging and JDBC. The first version of this example, showing WSIT-to-WSIT operations, has the SampleServiceClient client configured to run on one GlassFish instance and the service running on the other GlassFish instance. Either the Java client or the Java web service could be replaced by a semantically equivalent Microsoft implementation. The Java client is, in fact, replaced by a Microsoft WCF client in the more advanced version of the example.

With the SampleServiceClient client, the WS-Coordination/WS-AtomicTransaction protocol messages flow back and forth between the two GlassFish instances just as they do in the Microsoft-to-Sun transaction interoperability scenario with the msclient client.

The basicWSTX example was initially designed so it could be run in either one or in two GlassFish domains. If you run the example in one domain, only one coordinator is used; no WS-Coordination protocol messages will be exchanged. This chapter explains how to run the example in two domains so both protocols, WS-Coordination and WS-AtomicTransaction (WS-AT), are used, as shown in WS-Coordination and WS-AtomicTransaction Protocols in Two GlassFish Domains.

Figure 17.3. WS-Coordination and WS-AtomicTransaction Protocols in Two GlassFish Domains

WS-Coordination and WS-AtomicTransaction Protocols in Two GlassFish Domains

The example also provides the msclient client, which is the equivalent of the client servlet shown in Domain 2.

Components in the basicWSTX Example shows the components that make up the two domain example. Again, the msclient client would be equivalent to the client servlet in Domain 2 in this figure as well.

Figure 17.4. Components in the basicWSTX Example

Components in the basicWSTX Example

The service, which runs in domain1, is comprised of two components:

  • SimpleService, a web service that is implemented as a servlet with transacted operations

  • SimpleServiceASCMTEJB, a container-managed transaction enterprise bean (CMT EJB) web service

The SimpleService web service uses two Jakarta Messaging resources that are created in domain1:

  • jms/ConnectionFactory, an XATransaction connection factory

  • jms/Queue, a Jakarta Messaging queue

The LibraryFacadeWebServiceBean web service uses the Jakarta Persistence API with two JDBC resources that are created in domain1:

  • connectionPool, an XATransaction JDBC connection pool

  • jdbc/javaProgrammingLibrary, a JDBC connection resource

The client servlet, which runs in domain2, initiates the transaction.

17.3. Building, Deploying and Running the basicWSTX Example

Complete the following steps to configure your environment then build, deploy, and run the basicWSTX example.

To Build, Deploy, and Run the basicWSTX Example

  1. Download the wsittutorial.zip sample kit for this example.

  2. Ensure that properties that point to your local Application Server (or GlassFish) and WSIT Tutorial installations have been set.

    1. Copy file tut-install/wsittutorial/examples/bp-project/build.properties.sample to file tut-install/wsittutorial/examples/bp-project/build.properties.

    2. Set the javaee.home and wsit.tutorial.home properties in the file tut-install/wsittutorial/examples/bp-project/build.properties.

    3. Ensure that Application Server (or GlassFish) and at least Ant 1.6.5 have been installed and are on the path.

      Application Server (or GlassFish) includes Ant 1.6.5, which can be found in the as-install/lib/ant/bin directory.

  3. Set up your environment to run the basicWSTX example.

    To configure your environment to run the example:

    1. Change to the tut-install/wsittutorial/examples/wstx/basicWSTX/SampleService directory:

      cd tut-install/wsittutorial/examples/wstx/basicWSTX/SampleService
    2. Issue the following command to configure your environment to run the example:

      ant setup

    This step performs the following configuration tasks for you:

    • Starts domain1.

    • Creates the resources (jms/Queue and XATransaction jms/ConnectionFactory) used in the example.

    • Creates and sets up two Application Server (or GlassFish) domains.

      The domains can be created either on one machine or on two different machines. These steps show you how to do it on one machine. The first domain, domain1, is created as part of the Application Server (or GlassFish) installation.

    • Establishes trust between the two domains by installing each domain's s1as security certificate in the other domain's truststore.

  4. Use the NetBeans IDE to create a database connection.

    1. Start the NetBeans IDE.

    2. In the Services tab, right-click Databases and select New Connection.

      The New Database Connection dialog displays.

    3. Select Java DB (Network) as name

    4. Type localhost in the Host field.

    5. Type 1527 in the Port field.

    6. Type wstxSampleDB in the Database field.

    7. Type app in the User Name field.

    8. Type app in the Password field.

    9. Select the Remember password checkbox.

    10. Click OK.

  5. Register the Application Server (or GlassFish) server instances (domain1 and domain2) in the NetBeans IDE.

    1. If Sun Java System Application Server (domain1) is already registered, go to Step 5j. If it is not, go to Step 4b.

    2. In the Services tab, right-click Servers, and select Add Server.

      The Add Server Instance dialog appears.

    3. Choose the server (Sun Java System Application Server (or GlassFish V2) from the drop-down list and give it a descriptive name, such as Sun Java System Application Server - domain1 (Server), and then click Next.

      The Platform Location dialog displays.

    4. ClickBrowse, navigate to the location where the Application Server (or GlassFish server) is installed, then click Choose.

    5. Make sure that the Register Local Default Domain radio button has been selected.

    6. Use the drop-down list to select domain1, then click Next.

      The Domain Admin Login Info dialog displays.

    7. Type admin in the Admin Username field.

    8. Type adminadmin in the Admin Password field.

    9. Click Finish.

      The server instance you just registered is the one in which you will run the web service (SampleService).

    10. Right-click Servers and select Add Server.

      The Add Server Instance dialog appears.

    11. Choose the server (Sun Java System Application Server (or GlassFish V2) from the drop-down list and give it a descriptive name, such as Sun Java System Application Server - domain2 (Client), and then click Next.

      The Platform Location dialog displays.

    12. ClickBrowse, navigate to the location where the Application Server (or GlassFish server) is installed, then click Choose.

    13. Make sure that the Register Local Default Domain radio button has been selected.

    14. Use the drop-down list to select domain2, then click Next.

      The Domain Admin Login Info dialog displays.

    15. Type admin in the Admin Username field.

    16. Type adminadmin in the Admin Password field.

    17. Click Finish.

      The server instance you just registered is the one in which you will run the web service client (SampleServiceClient).

  6. Open the SampleService project and associate the SampleService web service with the appropriate instance (domain1) of the Application Server (or GlassFish server).

    1. Select File, then Open Project.

    2. Browse to the tut-install/wsittutorial/examples/wstx/basicWSTX/ directory and select the SampleService project.

    3. Select the Open as Main Project check box.

    4. Select the Open Required Projects check box.

    5. Click Open Project.

      The SampleService project and two required projects, SampleService-ejb and SampleService-war, are opened and are shown in the Projects tab.

    6. In the Projects tab, right-click SampleService, select Properties, then select the Run category.

    7. Use the Server drop-down list to point to the default domain, domain1, for the GlassFish server instance you registered in Step 5.

    8. Click OK.

  7. Resolve references to or add the Toplink Essentials Library to the SampleService-ejb project.

    The SampleService-ejb project references the Toplink Essentials Library Module that is included with NetBeans IDE. To verify whether the reference to this library is resolved in your NetBeans IDE environment:

    1. Right click the SampleService-ejb project and select Properties.

    2. Select the Libraries category.

      You should see Toplink Essentials in the Compile-time Libraries pane of the Compile tab.

    3. If you do not see the library, click Add Library to display the Add Library dialog.

    4. Locate and select Toplink Essentials and then click Add Library.

      You should now see Toplink Essentials in the Compile-time Libraries pane of the Compile tab.

    5. Click OK.

    To verify that you have Toplink Essentials library in NetBeans IDE, select Tools and then Library Manager. You should see "Toplink Essentials" in the left pane. If you don't, you can create the library yourself using the two Toplink JAR files in the Application Server (or GlassFish) lib directory and then resolve the reference to the newly created library.

  8. Set the proper transaction attributes for each mapping (wsdl:binding /wsdl:operation) in the SimpleService-war web service.

    To set the transaction attributes for the SampleService-war web service:

    1. In the Projects tab, expand the SampleService-war node.

    2. Expand the Web Services node.

    3. Right-click Simple Service and select Edit Web Service Attributes.

    4. In the Quality of Service tab, expand the five operation nodes and then expand the method nodes under each operation node. Use the Transaction drop-down list to set the appropriate transaction attribute for each method:

      • Set init to Required.

      • Set publishRequired to Required.

      • Set publishSupports to Supported.

      • Set verify to Required.

      • Set getMessage to Required.

      If any other operations are displayed, ignore them.

    5. Click OK.

      Transaction attributes for SampleServiceASCMTEJB do not need to be set; EJB 3.0 transaction attributes are used.

    The transaction attribute settings for the SampleService-war are stored in the file SampleService\SampleService-war\web\WEB-INF\wsit-wstx.sample.service.Simple.xml.

  9. Deploy the SampleService web service.

    Right-click SampleService and select Undeploy and Deploy. NetBeans IDE will start domain1 and deploy the web service to that domain.

  10. Register the SampleServiceClient client with the appropriate instance (domain2) of the Application Server (or GlassFish) server.

    1. Select File, then Open Project.

    2. Browse to the tut-install/wsittutorial/examples/wstx/basicWSTX/ directory and select the SampleServiceClient project.

    3. Select the Open as Main Project check box.

    4. Select the Open Required Projects check box.

    5. Click Open Project.

      The SampleServiceClient project is opened and is displayed in the Projects tab.

    6. In the Projects tab, right-click SampleServiceClient, select Properties, then select the Run category.

    7. Use the Server drop-down list to point to domain2.

    8. Click OK.

  11. Create web service references for the client (three web service clients, a simpleServlet and two CMT EJB clients) and generate the WSDL for all.

    1. In the Projects tab, right-click SampleServiceClient, select New, then select Web Service Client.

      The New Web Service Client dialog displays.

    2. Click Browse next to the Project field.

      The Browse Web Services dialog displays.

    3. Expand SampleService-war, select Simple, then click OK.

    4. In the Package field, type wstx.sample.client, then click Finish.

    5. Right-click SampleServiceClient, select New, then select Web Service Client.

      The New Web Service Client dialog displays.

    6. Click Browse next to the Project field.

      The Browse Web Services dialog displays.

    7. Expand SampleService-ejb, select SimpleAsCMTEjb, then click OK.

    8. In the Package field, type wstx.sample.ejbclient, then click Finish.

    9. Right-click SampleServiceClient, select New, then select Web Service Client.

      The New Web Service Client dialog displays.

    10. Click Browse next to the Project field.

      The New Web Service Client dialog displays.

    11. Expand SampleService-ejb, select LibraryFacadeWebServiceBean, then click OK.

    12. In the Package field, type wstx.sample.library, then click Finish.

  12. If transaction attributes for the servlet (see Step 7) or CMT EJB web service have changed, those services must be deployed and client web service references refreshed to get new web service attributes.

    To refresh the client web service references for this example:

    1. In the Projects tab, open the SampleServiceClient, then open Web Service References.

    2. Right-click Simple and select Refresh Client to refresh the client node and regenerate the WSDL for the simpleServlet.

    3. Right-click SimpleAsCMTEjb to do the same for the CMT EJB client.

    4. Right-click LibraryFacadeWebServiceBean to do the same for the LibraryFacadeWebServiceBean client.

  13. Deploy and run the client.

    Right-click SampleServiceClient and select Run.

    NetBeans IDE will start domain2, deploy the servlet and EJB CMT clients to that domain, then display the results for both in a pop-up browser window, as shown in basicWSTX Results.

    Figure 17.5. basicWSTX Results

    basicWSTX Results

Chapter 18. Managing Policies

18.1. Managing Policies

18.1.1. Introduction

The section WSIT Configuration and WS-Policy Assertions explained how WSIT functionality is configured using policies. If you are deploying a web service bundled with WSDL then all these policies are contained in the WSDL document. A web service that has no WSDL bundled will read the policies from a configuration file and then generate WSDL that contains these policies. This model works fine if you develop a few web services and do not want to share policies. NetBeans will generate the configuration with the policies for you and you do not need to be concerned with the details. Sometimes however, particularly in larger scale deployments, you will want to use the same policies for all web services or you might want to use an enterprise-wide policy. The following sections explain how to use externally defined policies.

18.1.2. Policy References

Policies are referenced using the XML element PolicyReference. Here is an example of a WSDL fragment that contains a policy and its reference:

Example 18.1. 

<?xml version="1.0" encoding="UTF-8"?>
<definitions
        xmlns:wsu="http://docs.oasis-open.org/wss/2004/01/
                   oasis-200401-wss-wssecurity-utility-1.0.xsd"
        xmlns:soap="http://schemas.xmlsoap.org/wsdl/soap/"
        xmlns:tns="http://service.test.policy.ws.xml.sun.com/"
        xmlns:xsd="http://www.w3.org/2001/XMLSchema"
        xmlns:wsp="http://schemas.xmlsoap.org/ws/2004/09/policy"
        xmlns="http://schemas.xmlsoap.org/wsdl/"
        targetNamespace="http://service.test.policy.ws.xml.sun.com/"
        name="TestServiceService">
   ...
   <wsp:Policy
           wsu:Id="TestServicePortBindingPolicy"
           xmlns:wsaws="http://www.w3.org/2005/08/addressing"
           xmlns:wsrm="http://schemas.xmlsoap.org/ws/2005/02/rm/policy">
      <wsp:ExactlyOne>
         <wsp:All>
            <wsaws:UsingAddressing
               xmlns:wsaws="http://www.w3.org/2006/05/addressing/wsdl"/>
            <wsrm:RMAssertion/>
         </wsp:All>
      </wsp:ExactlyOne>
   </wsp:Policy>
   ...
   <binding name="TestServicePortBinding" type="tns:TestService">
      <wsp:PolicyReference URI="#TestServicePortBindingPolicy"/>
      <soap:binding transport="http://schemas.xmlsoap.org/soap/http"
                    style="document"/>
      <operation name="echo">
         <soap:operation soapAction=""/>
         <input>
            <soap:body use="literal"/>
         </input>
         <output>
            <soap:body use="literal"/>
         </output>
      </operation>
   </binding>
   ...
</definitions>


Above you see one policy defined with the id TestServicePortBindingPolicy. This policy is referenced by the PolicyReference element in the WSDL binding section. You can see here that the policy reference #TestServicePortBindingPolicy is relative as signified by the leading # character. This is telling the policy processor that it is to look for this policy only in the enclosing document.

An alternative to WS-Policy identifiers and relative references are WS-Policy Names. A Name is an absolute URI that can be resolved across document boundaries. Here is an example of a WSDL fragment that contains a policy identified by a Name and the corresponding PolicyReference:

Example 18.2. 

<?xml version="1.0" encoding="UTF-8"?>
<definitions
        xmlns:wsu="http://docs.oasis-open.org/wss/2004/01/
                   oasis-200401-wss-wssecurity-utility-1.0.xsd"
        xmlns:soap="http://schemas.xmlsoap.org/wsdl/soap/"
        xmlns:tns="http://service.test.policy.ws.xml.sun.com/"
        xmlns:xsd="http://www.w3.org/2001/XMLSchema"
        xmlns:wsp="http://schemas.xmlsoap.org/ws/2004/09/policy"
        xmlns="http://schemas.xmlsoap.org/wsdl/"
        targetNamespace="http://service.test.policy.ws.xml.sun.com/"
        name="TestServiceService">
   ...
   <wsp:Policy
           Name="http://service.test.policy.ws.xml.sun.com/
                 TestServicePortBindingPolicy"
           xmlns:wsaws="http://www.w3.org/2005/08/addressing"
           xmlns:wsrm="http://schemas.xmlsoap.org/ws/2005/02/rm/policy">
      <wsp:ExactlyOne>
         <wsp:All>
            <wsaws:UsingAddressing
               xmlns:wsaws="http://www.w3.org/2006/05/addressing/wsdl"/>
            <wsrm:RMAssertion/>
         </wsp:All>
      </wsp:ExactlyOne>
   </wsp:Policy>
   ...
   <binding name="TestServicePortBinding" type="tns:TestService">
      <wsp:PolicyReference
              URI="http://service.test.policy.ws.xml.sun.com/
                   TestServicePortBindingPolicy"/>
      <soap:binding transport="http://schemas.xmlsoap.org/soap/http"
                    style="document"/>
      <operation name="echo">
         <soap:operation soapAction=""/>
         <input>
            <soap:body use="literal"/>
         </input>
         <output>
            <soap:body use="literal"/>
         </output>
      </operation>
   </binding>
   ...
</definitions>


The mechanism of using a PolicyReference element to reference a policy is defined in WS-Policy. The PolicyReference element in the above examples is a direct child element of the WSDL binding element. That effectively means that we attached the policy with id TestServicePortBindingPolicy to this particular WSDL binding element. In theory, policies could be attached to any WSDL element using that technique. In practice however, policies may only be attached to a few select elements, depending on the policy assertions that the policy contains. In the example above we have one addressing and one reliable messaging assertion. Both may only be attached to WSDL port and WSDL binding elements.

18.1.3. WSDL Import

The WSDL import statement lets us to manage policies in one central document and refer to these policies from any other WSDL document. The policies contained in a separate WSDL document are best identified using the WS-Policy Name attribute because that allows to reference these policies by an absolute URI that does not depend on the location of the imported WSDL document. Here is an example of how this may look.

Example 18.3. policies.wsdl

<?xml version="1.0" encoding="UTF-8"?>
<definitions xmlns:tns="http://policies.test.policy.ws.xml.sun.com/"
             xmlns:wsp="http://schemas.xmlsoap.org/ws/2004/09/policy"
             xmlns="http://schemas.xmlsoap.org/wsdl/"
             targetNamespace="http://policies.test.policy.ws.xml.sun.com/"
             name="Policies">

   <wsp:Policy
           Name="http://policies.test.policy.ws.xml.sun.com/
                 ReliableMessagingPolicy"
           xmlns:wsaws="http://www.w3.org/2005/08/addressing"
           xmlns:wsrm="http://schemas.xmlsoap.org/ws/2005/02/rm/policy">
      <wsp:ExactlyOne>
         <wsp:All>
            <wsaws:UsingAddressing
               xmlns:wsaws="http://www.w3.org/2006/05/addressing/wsdl"/>
            <wsrm:RMAssertion/>
         </wsp:All>
      </wsp:ExactlyOne>
   </wsp:Policy>

   <wsp:Policy
        Name="http://policies.test.policy.ws.xml.sun.com/SecurePolicy"
        xmlns:sp="http://schemas.xmlsoap.org/ws/2005/07/securitypolicy">
      <wsp:ExactlyOne>
         <wsp:All>
            <wsaws:UsingAddressing
               xmlns:wsaws="http://www.w3.org/2006/05/addressing/wsdl"/>
            <sp:SymmetricBinding>
               <wsp:Policy>
                  <sp:ProtectionToken>
                     <wsp:Policy>
                        <sp:X509Token
                            sp:IncludeToken="http://schemas.xmlsoap.org/
                            ws/2005/07/securitypolicy/IncludeToken/Never">
                           <wsp:Policy>
                              <sp:WssX509V3Token10/>
                           </wsp:Policy>
                        </sp:X509Token>
                     </wsp:Policy>
                  </sp:ProtectionToken>
                  <sp:Layout>
                     <wsp:Policy>
                        <sp:Strict/>
                     </wsp:Policy>
                  </sp:Layout>
                  <sp:IncludeTimestamp/>
                  <sp:OnlySignEntireHeadersAndBody/>
                  <sp:AlgorithmSuite>
                     <wsp:Policy>
                        <sp:Basic128/>
                     </wsp:Policy>
                  </sp:AlgorithmSuite>
               </wsp:Policy>
            </sp:SymmetricBinding>
            <sp:Wss11>
               <wsp:Policy>
                  <sp:MustSupportRefKeyIdentifier/>
                  <sp:MustSupportRefIssuerSerial/>
                  <sp:MustSupportRefThumbprint/>
                  <sp:MustSupportRefEncryptedKey/>
               </wsp:Policy>
            </sp:Wss11>
         </wsp:All>
      </wsp:ExactlyOne>
   </wsp:Policy>

</definitions>


Example 18.4. reliable-service.wsdl

<?xml version="1.0" encoding="UTF-8"?>
<definitions xmlns:soap="http://schemas.xmlsoap.org/wsdl/soap/"
             xmlns:xsd="http://www.w3.org/2001/XMLSchema"
             xmlns:wsp="http://schemas.xmlsoap.org/ws/2004/09/policy"
             xmlns="http://schemas.xmlsoap.org/wsdl/"
             xmlns:tns="http://reliable.service.test.policy.ws.xml.sun.com/"
             targetNamespace="http://reliable.service.test.policy.ws.xml.sun.com/"
             name="ReliableService">
   ...
   <import namespace="http://reliable.service.test.policy.ws.xml.sun.com/"
           location=".../policies.wsdl"/>
   ...
   <binding name="ReliableServicePortBinding"
            type="tns:ReliableService">
      <wsp:PolicyReference
              URI="http://policies.test.policy.ws.xml.sun.com/
                   ReliableMessagingPolicy"/>
      <soap:binding transport="http://schemas.xmlsoap.org/soap/http"
                    style="document"/>
      <operation name="echo">
         <soap:operation soapAction=""/>
         <input>
            <soap:body use="literal"/>
         </input>
         <output>
            <soap:body use="literal"/>
         </output>
      </operation>
   </binding>
   ...
</definitions>


Example 18.5. secure-service.wsdl

<?xml version="1.0" encoding="UTF-8"?>
<definitions xmlns:soap="http://schemas.xmlsoap.org/wsdl/soap/"
             xmlns:xsd="http://www.w3.org/2001/XMLSchema"
             xmlns:wsp="http://schemas.xmlsoap.org/ws/2004/09/policy"
             xmlns="http://schemas.xmlsoap.org/wsdl/"
             xmlns:tns="http://secure.service.test.policy.ws.xml.sun.com/"
             targetNamespace="http://secure.service.test.policy.ws.xml.sun.com/"
             name="SecureService">
   ...
   <import namespace="http://secure.service.test.policy.ws.xml.sun.com/"
           location=".../policies.wsdl"/>
   ...
   <binding name="SecureServicePortBinding" type="tns:SecureService">
      <wsp:PolicyReference
              URI="http://policies.test.policy.ws.xml.sun.com/SecurePolicy"/>
      <soap:binding transport="http://schemas.xmlsoap.org/soap/http"
                    style="document"/>
      <operation name="echo">
         <soap:operation soapAction=""/>
         <input>
            <soap:body use="literal"/>
         </input>
         <output>
            <soap:body use="literal"/>
         </output>
      </operation>
   </binding>
   ...
</definitions>


18.1.4. External Policy References

Since the PolicyReference is a URI, it comes natural to use an absolute URI instead of a relative URI. This is exactly how you would attach an external policy, i.e. a policy that is not contained in the same document as the PolicyReference. You still need to reference the policy ID by attaching it to the URI of the document. Here is an example of a file that contains the same policy as the one that was inside the WSDL document previously:

Example 18.6. 

<wsp:Policy wsu:Id="TestServicePortBindingPolicy"
            xmlns:wsu="http://docs.oasis-open.org/wss/2004/01/
                       oasis-200401-wss-wssecurity-utility-1.0.xsd"
            xmlns:wsp="http://schemas.xmlsoap.org/ws/2004/09/policy"
            xmlns:wsaws="http://www.w3.org/2005/08/addressing"
            xmlns:wsrm="http://schemas.xmlsoap.org/ws/2005/02/rm/policy">
   <wsp:ExactlyOne>
      <wsp:All>
         <wsaws:UsingAddressing
                 xmlns:wsaws="http://www.w3.org/2006/05/addressing/wsdl"/>
         <wsrm:RMAssertion/>
      </wsp:All>
   </wsp:ExactlyOne>
</wsp:Policy>


Let's assume the document above can be retrieved from the URI http://example.test/policy. You could now write a WSDL document like this:

Example 18.7. 

<?xml version="1.0" encoding="UTF-8"?>
<definitions xmlns:soap="http://schemas.xmlsoap.org/wsdl/soap/"
             xmlns:tns="http://service.test.policy.ws.xml.sun.com/"
             xmlns:xsd="http://www.w3.org/2001/XMLSchema"
             xmlns:wsp="http://schemas.xmlsoap.org/ws/2004/09/policy"
             xmlns="http://schemas.xmlsoap.org/wsdl/"
             targetNamespace="http://service.test.policy.ws.xml.sun.com/"
             name="TestServiceService">
   ...
   <binding name="TestServicePortBinding" type="tns:TestService">
      <wsp:PolicyReference
              URI="http://example.test/policy#TestServicePortBindingPolicy"/>
      <soap:binding transport="http://schemas.xmlsoap.org/soap/http"
                    style="document"/>
      <operation name="echo">
         <soap:operation soapAction=""/>
         <input>
            <soap:body use="literal"/>
         </input>
         <output>
            <soap:body use="literal"/>
         </output>
      </operation>
   </binding>
   ...
</definitions>


Note that the PolicyReference above uses an absolute URI. It references the document URI appended with the # character and the ID of the policy. The fact that you need to state the particular ID allows to contain multiple policies inside one document and reference single policies out of that document. Here is an example of a document with more than one policy:

Example 18.8. 

<?xml version="1.0" encoding="UTF-8"?>
<policies xmlns:wsp="http://schemas.xmlsoap.org/ws/2004/09/policy"
          xmlns:wsu="http://docs.oasis-open.org/wss/2004/01/
                     oasis-200401-wss-wssecurity-utility-1.0.xsd"
          xmlns:wsoma="http://schemas.xmlsoap.org/ws/2004/09/policy/
                       optimizedmimeserialization"
          xmlns:wsaws="http://www.w3.org/2006/05/addressing/wsdl"
          xmlns:wsrm="http://schemas.xmlsoap.org/ws/2005/02/rm/policy">

   <wsp:Policy wsu:Id="GlobalRMPolicy">
      <wsp:ExactlyOne>
         <wsp:All>
            <wsaws:UsingAddressing
                    xmlns:wsaws="http://www.w3.org/2006/05/addressing/wsdl"/>
            <wsrm:RMAssertion/>
         </wsp:All>
      </wsp:ExactlyOne>
   </wsp:Policy>

   <wsp:Policy wsu:Id="GlobalMtomPolicy">
      <wsp:ExactlyOne>
         <wsp:All>
            <wsoma:OptimizedMimeSerialization/>
         </wsp:All>
      </wsp:ExactlyOne>
   </wsp:Policy>

</policies>


The policies are contained by a policies element so that this document is valid XML. This root element may actually have any name. Assuming that this document has the absolute URI http://example.test/policies, you can now create references for both policies: <PolicyReference URI="http://example.test/policies#GlobalRMPolicy"/> and <PolicyReference URI="http://example.test/policies#GlobalMtomPolicy"/>.

Note that unlike the approach discussed in section WSDL Import, external policy references may not be interoperable with other products.

Chapter 19. Monitoring and Management

19.1. Introduction to Metro JMX Monitoring

JMX monitoring and management is built into Metro-based services and clients. Monitoring allows one to view the state of parts of Metro runtime system while it is in operation. Management allows one to change values dynamically. The rest of this document will refer to Metro monitoring and management as simply "monitoring".

Metro monitoring should not be confused with Metro's Web Service Configuration Management (Metro CM). Monitoring enables one to view the state of the Metro runtime, whereas Metro CM is for (re)configuring a web service.

19.2. Enabling and Disabling Monitoring

Metro-based services have monitoring turned on by default.

Metro-based clients have monitoring turned off by default.

Clients are off by default because there is no standard way to dispose of a client and release its resources. Metro does include a proprietary method for disposing a proxy. Assuming you have an AddNumbers service:

Example 19.1. 

AddNumbersPortType port = new AddNumbersService().getAddNumbersPort();
...            
((java.io.Closeable)port).close();

If you enable client monitoring it is recommended you close client proxies when they are no longer used.

19.2.1. Enabling and disabling Metro monitoring via system properties

Metro has two system properties for controlling monitoring scoped to the JVM:

Example 19.2. 

com.sun.xml.ws.monitoring.endpoint
com.sun.xml.ws.monitoring.client

Setting either to false will disable all monitoring for Metro-based endpoints (i.e., web services) or clients, respectively, in a JVM.

19.2.2. Enabling and disabling endpoint monitoring via policy

Metro includes a policy assertion for enabling and disabling monitoring for specific services and endpoints. For an endpoint (using an AddNumbersService as an example):

Example 19.3. 

<service name="AddNumbersService">
    <port name="AddNumbersPort" binding="tns:AddNumbersPortBinding">
        <wsp:Policy>
            <sunman:ManagedService
                xmlns:sunman="http://java.sun.com/xml/ns/metro/management"
                management="false"
                monitoring="true">
            </sunman:ManagedService>
        </wsp:Policy>
        ...
    </port>
</service>

The ManagedService assertion is placed inside (or referenced from) the port element in the endpoint's WSDL (if creating a service from WSDL) or in the endpoint's configuration file (if creating a service from Java).

This assertion is used by both Metro CM and monitoring. See Metro CM for the meaning and operation of the management attribute.

Metro monitoring is turned off for the specific endpoint if the monitoring attribute is set to false. If the policy assertion or the monitoring attribute is not present, or the monitoring attribute is set to true then monitoring is turned on for that endpoint (unless endpoint monitoring is turned off for the JVM).

19.2.3. Enabling and disabling client monitoring via policy

For a client the ManagedClient assertion is used:

Example 19.4. 

<sunman:ManagedClient
        xmlns:sunman="http://java.sun.com/xml/ns/metro/management"
        management="false"
        monitoring="true"
        >
</sunman:ManagedClient>

This is placed inside the <service>/<port> element of the *.xml file corresponding to the service referenced from the src/java/META-INF/wsit-client.xml configuration file. (Note: the example path to the wsit-client.xml file is where the file is located when building using NetBeans.)

When the monitoring attribute of ManagedClient is set to true then monitoring will be turned on for that specific client (unless the client JVM property is set to false).

19.3. Monitoring Identifiers

19.3.1. Endpoint Monitoring Identifiers

19.3.1.1. Default Endpoint Monitoring Identifiers

Each endpoint is given a unique monitoring identifier (also call "root name"). That identifier is made up of (in order):

  • The context path (if it is available).

  • The local part of the service name.

  • The local part of the port name.

For example, suppose one creates a web application with a context path of /AddNumbersService and a Metro web service is deployed under that context path with an AddNumbersService service name and a AddNumbersPort port name. Then the identifier will be:

Example 19.5. 

/AddNumbersService-AddNumbersService-AddNumbersPort

When deploying in GlassFish an INFO log message is output to GlassFish's server.log file when the monitoring root is created. In this example the message would be:

Example 19.6. 

Metro monitoring rootname successfully set to: amx:pp=/mon/server-mon[server],type=WSEndpoint,name=/AddNumbersService-AddNumbersService-AddNumbersPort

The name part is the identifier. The amx:pp=... part reflects that this Metro endpoint is federated under GlassFish's AMX tree. Note: when deploying in non-GlassFish containers then Metro monitoring will be under a top-level node: com.sun.metro.

19.3.1.2. User-assigned Endpoint Monitoring Identifiers

It is possible to give user-assigned identifiers to monitoring endpoints. Include an id attribute in the ManagedService policy assertion. For example:

Example 19.7. 

<sunman:ManagedService
        xmlns:sunman="http://java.sun.com/xml/ns/metro/management"
        management="false"
        monitoring="true"
        id="ExampleService"
        >
</sunman:ManagedService>

In this case, the INFO log will say:

Example 19.8. 

Metro monitoring rootname successfully set to: amx:pp=/mon/server-mon[server],type=WSEndpoint,name=ExampleService

19.3.2. Client monitoring identifiers

19.3.2.1. Default Client Monitoring Identifiers

Each client stub is given a unique monitoring identifier. That identifier is the endpoint address of the service it will communicate with. For example, for a client of the AddNumbersService above the identifier, as shown in GlassFish's log, will be:

Example 19.9. 

Metro monitoring rootname successfully set to: amx:pp=/mon/server-mon[server],type=WSClient,name=http-//localhost-8080/AddNumbersService/AddNumbersService

(Note that ':' characters have been replaced with '-'. See below for more info.)

19.3.2.2. User-assigned Client Monitoring Identifiers

To give a user-assigned identifier use the id attribute in the ManagedClient policy assertion.

19.3.3. Identifier Character Mapping

Some characters in a root name are converted to the '-' character. This is to avoid the need to quote characters that are not legal in JMX. The regular expression used to find and replace those characters is:

Example 19.10. 

"\n|\\|\"|\\*|\\?|:|=|,"

19.3.4. Resolving Monitoring Root Name Conflicts

It is possible that two root names can be the same. This can happen when deploying web services with the same service name and port name under different context paths in non-GlassFish containers because the context path is not available to the naming mechanism when in other containers. This can also happen when two different proxies are communicating with the same service.

When root names clash, then the rootname has -<N> appended, where N is a unique integer.

19.4. Available Monitoring Information

To show what monitoring information is available we will use two tools:

Neither of these tools is officially supported by GlassFish nor Metro. However, they are useful for browsing the mbeans in a JVM.

The following screenshot shows one client and two services running inside the same instance of GlassFish.

Figure 19.1. Monitoring - One client and two services running inside the same instance of GlassFish

Monitoring - One client and two services running inside the same instance of GlassFish


Metro has five mbean types:

  • WSClient

    • General information for a client.

  • WSEndpoint

    • General information for an endpoint.

  • WSNonceManager

    • Nonce manager used by endpoints to prevent replay attacks.

    • This only exists on the endpoint side, scoped per-endpoint.

  • WSRMSCSessionManager

    • Manages Reliable Messaging (RM) and/or Secure Conversation (SC) sessions.

    • This only exists on the endpoint side, scoped per-endpoint.

  • WSRMSequenceManager

    • Manages Reliable Messaging sequences.

    • This exists on both client and endpoints sides, scoped per-stub and per-endpoint respectively.

In the screenshot there is

  • one client that is connected to the AddNumbersService

  • two endpoints: a /s17... service and an ExampleService

  • one WSNonceManager associated with the /s17... service

  • two WSRMSCSessionManagers, one for each of the two services

  • two WSRMSequenceManagers, one associated with the client, the other with ExampleService.

Using Jmxterm you can find these same mbeans (note: the output of beans show a lot of beans, this has been edited to only show Metro's mbeans):

Example 19.11. 

java -jar <Jmxterm-jar>
Welcome to JMX terminal. Type "help" for available commands.
$>open localhost:8686
#Connection to localhost:8686 is opened
$>beans
...
#domain = amx:
amx:name=/s17-PingService-PingPort,pp=/mon/server-mon[server],type=WSEndpoint

amx:name=ExampleService,pp=/mon/server-mon[server],type=WSEndpoint

amx:name=NonceManager,pp=/mon/server-mon[server]/WSEndpoint[/s17-PingService-PingPort],type=WSNonceManager

amx:name=RMSequenceManager,pp=/mon/server-mon[server]/WSClient[http-//localhost-8080/AddNumbersService/AddNumbersService],type=WSRMSequenceManager

amx:name=RMSequenceManager,pp=/mon/server-mon[server]/WSEndpoint[ExampleService],type=WSRMSequenceManager

amx:name=RM_SC_SessionManager,pp=/mon/server-mon[server]/WSEndpoint[/s17-PingService-PingPort],type=WSRMSCSessionManager

amx:name=RM_SC_SessionManager,pp=/mon/server-mon[server]/WSEndpoint[ExampleService],type=WSRMSCSessionManager

amx:name=http-//localhost-8080/AddNumbersService/AddNumbersService,pp=/mon/server-mon[server],type=WSClient
...    

19.4.1. WSClient Information

The following screenshot shows the top-level information available for each client:

Figure 19.2. Monitoring - top-level information available for each client

Monitoring - top-level information available for each client


  • Children: the WSRMSequenceManager that is used by this client.

  • Container: the container in which the client is deployed---in this case: GlassFish. Note that the actual container object has not been instrumented with monitoring so it Java class@address is printed.

  • Name: the root name given for this client.

  • Parent: show the WSClient under the AMX mbean.

  • qnameToPortInfoMap: an internal map used by the runtime system.

  • serviceClass: The SEI (service endpoint interface).

  • serviceName: From the WSDL.

  • wsdlDocumentLocation: Where the WSDL used to create the client lives. (Note: when a service is created using NetBeans it makes a local copy of the WSDL, therefore the example shows a file instead of an http location.)

  • wsdlService: an internal data structure that is not instrumented.

To see these attributes in jmxterm:

Example 19.12. 

$>bean amx:name=http-//localhost-8080/AddNumbersService/AddNumbersService,pp=/mon/server-mon[server],type=WSClient

$>info
#class name = WSClient
# attributes
  %0   - Children ([Ljavax.management.ObjectName;, r)
  %1   - Container (java.lang.String, r)
  %2   - Name (java.lang.String, r)
  %3   - Parent (javax.management.ObjectName, r)
  %4   - qnameToPortInfoMap (javax.management.openmbean.TabularData, r)
  %5   - serviceClass (java.lang.String, r)
  %6   - serviceName (java.lang.String, r)
  %7   - wsdlDocumentLocation (java.lang.String, r)
  %8   - wsdlService (java.lang.String, r)

$>get Name

Name = http-//localhost-8080/AddNumbersService/AddNumbersService;

19.4.2. WSEndpoint Information

Figure 19.3. Monitoring - WSEndpoint information

Monitoring - WSEndpoint information


  • Children: in this example there are two other mbeans associated with the example service.

  • addressingVersion: generally this will be W3C unless explicitly using a different version of addressing.

  • bindingID: the namespace for the type of binding used for the service.

  • dumpHTTPMessages: when set to true then HTTP messages received and sent by this service are "dumped" into the log file. It is possible to dynamically set this value. Just click on the value, type in the value and hit return using JConsole. In jmxterm:

    Example 19.13. 

    $>bean amx:name=ExampleService,pp=/mon/server-mon[server],type=WSEndpoint
    
    $>set dumpHTTPMessages true


  • features: the "features" (see the Jakarta XML Web Services specification) used in this endpoint. Using jmxterm (assuming the bean has been set as in dump above:

    Example 19.14. 

    $>get features
    features = [ { 
      enabled = true;
      iD = http://www.w3.org/2005/08/addressing/module;
     }, { 
      enabled = true;
      iD = com.sun.xml.ws.rm.ReliableMessagingFeature;
     } ];


  • jaxwsRuntimeVersion: the version of the Jakarta XML Web Services specification which is implemented by Metro.

  • policy: A representation of the policy used by the endpoint. The entire policy is more easily viewed using jmxterm: $>get policy. Note: the format of the policy output can and will change.

  • portName: The WSDL port name.

  • seiModelWSDLLocation: not currently supported.

  • serviceDefinitionImports: a list of any of files imported by the main WSDL file for this service.

  • serviceDefinitionURL: the service's WSDL.

  • serviceName: The WSDL service name.

  • soapVersionHttpBindingId: The namespace of the HTTP binding.

  • wsdlEndpointAddress: this generally will not contain the real address since it depends on a client calling the service to exist and the value is taken before that happens.

  • wsdlPortTypeName: The WSDL port type.

19.4.3. WSNonceManager Information

This allows one to examine the contents of a nonce manager of a specific service. Using jmxterm:

Example 19.15. 

$>bean amx:name=NonceManager,pp=/mon/server-mon[server]/WSEndpoint[/s17-PingService-PingPort],type=WSNonceManager

$>get NonceCache

NonceCache = { 
  maxNonceAge = 900000;
  nonceCache = { 
    ( F2jz9MkcI9Gcshk1K0snDPhC ) = { 
      key = F2jz9MkcI9Gcshk1K0snDPhC;
      value = 2009-12-03T22:21:39Z;
     };
   };
  oldNonceCache = { 
   };
  scheduled = true;
  wasCanceled = false;
 };

19.4.4. WSRMSCSessionManager Information

Examine reliable messaging and secure conversation keys and sessions for a specific service. Using jmxterm:

Example 19.16. 

$>bean amx:name=RM_SC_SessionManager,pp=/mon/server-mon[server]/WSEndpoint[ExampleService],type=WSRMSCSessionManager

$>get keys

keys = [ uuid:8593cea6-9328-41fe-986a-abf0745c4470, uuid:0987fa78-cd7d-4c1c-9ec2-e849b7f68881 ];

$>get sessions

sessions = [ { 
  creationTime = 1259879310907;
  lastAccessedTime = 1259879310907;
  securityInfo = { 
    creationTime = null;
    expirationTime = null;
    externalId = null;
    identifier = null;
    issuedTokenContext = null;
    secret = null;
   };
  sessionKey = uuid:8593cea6-9328-41fe-986a-abf0745c4470;
 }, { 
  creationTime = 1259866808000;
  lastAccessedTime = 1259866808000;
  securityInfo = { 
    creationTime = null;
    expirationTime = null;
    externalId = null;
    identifier = null;
    issuedTokenContext = null;
    secret = null;
   };
  sessionKey = uuid:0987fa78-cd7d-4c1c-9ec2-e849b7f68881;
 } ];

19.4.5. WSRMSequenceManager Information

Figure 19.4. Monitoring - WSRMSequenceManager Information

Monitoring - WSRMSequenceManager Information


  • boundSequences: generally an inbound sequence will be bound to an outbound sequence so that requests and replies are reliable. This table gives the sequence identifiers for those pairs.

  • concurrentlyOpenedInbound: the number of inbound sequences opened.

  • persistent: true if using Metro's persistent reliable messaging.

  • sequences: a map from a sequence identifier to information on that sequence. In jmxterm:

    Example 19.17. 

    $>bean amx:name=RMSequenceManager,pp=/mon/server-mon[server]/WSEndpoint[ExampleService],type=WSRMSequenceManager
    
    $>get sequences
    
    sequences = { 
      ( uuid:5145de4e-618b-4da3-9004-c715770934d2 ) = { 
        key = uuid:5145de4e-618b-4da3-9004-c715770934d2;
        value = { 
          ackRequested = false;
          boundSecurityTokenReferenceId = null;
          closed = false;
          expired = false;
          hasUnacknowledgedMessages = true;
          id = uuid:5145de4e-618b-4da3-9004-c715770934d2;
          lastActivityTime = 1259880084724;
          lastMessageNumber = 1;
          state = CREATED;
         };
       };
      ( uuid:d16b0fb9-7e80-4598-a3e2-789c9bac9474 ) = { 
        key = uuid:d16b0fb9-7e80-4598-a3e2-789c9bac9474;
        value = { 
          ackRequested = false;
          boundSecurityTokenReferenceId = null;
          closed = false;
          expired = false;
          hasUnacknowledgedMessages = false;
          id = uuid:d16b0fb9-7e80-4598-a3e2-789c9bac9474;
          lastActivityTime = 1259880084724;
          lastMessageNumber = 1;
          state = CREATED;
         };
       };
     };


  • uniqueEndpointId: An identifier used by the reliable messaging implementation. Note: this is not related to client and endpoint root name identifiers

19.5. Notes

The AMX mbean is created lazily. Therefore, if one deploys an endpoint in GlassFish and then looks for the Metro WSEndpoint mbeans using JConsole there are times where the AMX mbean does not appear. To activate it start up the asadmin GUI or CLI. Or use jmxterm and issue its domains command.

In some cases Metro endpoint mbeans will not appear until the endpoint receives its first client invocation.

WSClient mbeans can appear and disappear quickly if the stub is just used for one call then closed immediately. A stub that uses reliable messaging or secure conversation generally stays active longer since it will most likely be used for multiple calls.

Chapter 20. Further Information

20.1. Links to more information

For more information on Metro, visit the Metro web site at https://eclipse-ee4j.github.io/metro-wsit/ . On that site, you will find information about the specifications implemented in Metro product, source code, support information, links to documentation updates, and much more.

Some other sources that contain blogs and/or screencasts about using Metro include the following:

Back to the top