IMQ_VARHOME/instances/instanceName/etc/passwd9 Configuring and Managing Security Services
This chapter describes Message Queue’s facilities for security-related administration tasks, such as configuring user authentication, defining access control, configuring a Secure Socket Layer (SSL) connection service to encrypt client-broker communication, and setting up a password file for administrator account passwords. In addition to Message Queue’s own built-in authentication mechanisms, you can also plug in a preferred external service based on the Java Authentication and Authorization Service (JAAS) API.
This chapter includes the following sections:
Introduction to Security Services
Message Queue provides security services for user access control (authentication and authorization) and for encryption:
-
Authentication ensures that only verified users can establish a connection to a broker.
-
Authorization specifies which users or groups have the right to access resources and to perform specific operations.
-
Encryption protects messages from being tampered with during delivery over a connection.
As a Message Queue administrator, you are responsible for setting up the
information the broker needs to authenticate users and authorize their
actions. The broker properties pertaining to security services are
listed under Security Properties. The
boolean property imq.accesscontrol.enabled acts as a master switch
that controls whether access control is applied on a brokerwide basis;
for finer control, you can override this setting for a particular
connection service by setting the imq.`serviceName
`.accesscontrol.enabled property, where serviceName is the name of the
connection service, as shown in Table
6-1: for example, imq.httpjms.accesscontrol.enabled.
The following figure shows the components used by the broker to provide
authentication and authorization services. These services depend on a
user repository containing information about the users of the messaging
system: their names, passwords, and group memberships. In addition, to
authorize specific operations for a user or group, the broker consults
an access control file that specifies which operations a user or group
can perform. You can designate a single access control file for the
broker as a whole, using the configuration property
imq.accesscontrol.file.filename, or for a single connection service
with imq.serviceName. accesscontrol.file.filename.
Figure 9-1 Security Support
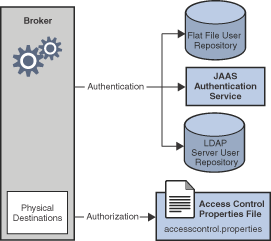
As Figure 9-1 shows, you can store user data in a flat file user repository that is provided with the Message Queue service, you can access an existing LDAP repository, or you can plug in a Java Authentication and Authorization Service (JAAS) module.
-
If you choose a flat-file repository, you must use the
imqusermgrutility to manage the repository. This option is easy to use and built-in. -
If you want to use an existing LDAP server, you use the tools provided by the LDAP vendor to populate and manage the user repository. You must also set properties in the broker instance configuration file to enable the broker to query the LDAP server for information about users and groups.
The LDAP option is better if scalability is important or if you need the repository to be shared by different brokers. This might be the case if you are using broker clusters. -
If you want to plug-in an existing JAAS authentication service, you need to set the corresponding properties in the broker instance configuration file.
The broker’s imq.authentication.basic.user_repository property
specifies which type of repository to use. In general, an LDAP
repository or JAAS authentication service is preferable if scalability
is important or if you need the repository to be shared by different
brokers (if you are using broker clusters, for instance). See
User Authentication for more information on setting up a
flat-file user repository, LDAP access, or JAAS authentication service.
Authentication
A client requesting a connection to a broker must supply a user name and
password, which the broker compares with those stored in the user
repository. Passwords transmitted from client to broker are encoded
using either base-64 encoding (for flat-file repositories) or message
digest (MD5) hashing (for LDAP repositories). The choice is controlled
by the imq.authentication.type property for the broker as a whole, or
by imq.serviceName. authentication.type for a specific connection
service. The imq.authentication.client.response.timeout property sets
a timeout interval for authentication requests.
As described under Password Files, you can choose to put
your passwords in a password file instead of being prompted for them
interactively. The boolean broker property imq.passfile.enabled
controls this option. If this property is true, the
imq.passfile.dirpath and imq.passfile.name properties give the
directory path and file name for the password file. The
imq.imqcmd.password property (which can be embedded in the password
file) specifies the password for authenticating an administrative user
to use the Command utility (imqcmd) for managing brokers, connection
services, connections, physical destinations, durable subscriptions, and
transactions.
If you are using an LDAP-based user repository, there are a whole range
of broker properties available for configuring various aspects of the
LDAP lookup. The address (host name and port number) of the LDAP server
itself is specified by imq.user_repository.ldap.server. The
imq.user_repository.ldap.principal property gives the distinguished
name for binding to the LDAP repository, while
imq.user_repository.ldap.password supplies the associated password.
Other properties specify the directory bases and optional JNDI filters
for individual user and group searches, the provider-specific attribute
identifiers for user and group names, and so forth; see
Security Properties for details.
Authorization
Once authenticated, a user can be authorized to perform various Message
Queue-related activities. As a Message Queue administrator, you can
define user groups and assign individual users membership in them. The
default access control file explicitly refers to only one group, admin
(see User Groups and Status). A user in this group has
connection permission for the admin connection service, which allows
the user to perform administrative functions such as creating
destinations and monitoring and controlling a broker. A user in any
other group that you define cannot, by default, get an admin service
connection.
When a user attempts to perform an operation, the broker checks the user’s name and group membership (from the user repository) against those specified for access to that operation (in the access control file). The access control file specifies permissions to users or groups for the following operations:
-
Connecting to a broker
-
Accessing destinations: creating a consumer, a producer, or a queue browser for any given destination or for all destinations
-
Auto-creating destinations
For information on configuring authorization, see User Authorization.
Encryption
To encrypt messages sent between clients and broker, you need to use a connection service based on the Secure Socket Layer (SSL) standard. SSL provides security at the connection level by establishing an encrypted connection between an SSL-enabled broker and client.
To use an SSL-based Message Queue connection service, you generate a
public/private key pair using the Message Queue Key Tool utility
(imqkeytool). This utility embeds the public key in a self-signed
certificate and places it in a Message Queue key store. The key store is
itself password-protected; to unlock it, you must provide a key store
password at startup time, specified by the imq.keystore.password
property. Once the key store is unlocked, a broker can pass the
certificate to any client requesting a connection. The client then uses
the certificate to set up an encrypted connection to the broker.
For information on configuring encryption, see Message Encryption.
User Authentication
Users attempting to connect to a Message Queue message broker must provide a user name and password for authentication. The broker will grant the connection only if the name and password match those in a broker-specific user repository listing the authorized users and their passwords. Each broker instance can have its own user repository, which you as an administrator are responsible for maintaining. This section tells how to create, populate, and manage the user repository.
Message Queue can support any of three types of authentication mechanism:
-
A flat-file repository that is shipped with Message Queue. This type of repository is very easy to populate and manage, using the Message Queue User Manager utility (
imqusermgr). See Using a Flat-File User Repository. -
A Lightweight Directory Access Protocol (LDAP) server. This could be a new or existing LDAP directory server using the LDAP v2 or v3 protocol. You use the tools provided by the LDAP vendor to populate and manage the user repository. This type of repository is not as easy to use as the flat-file repository, but it is more scalable and therefore better for production environments. See Using an LDAP User Repository.
-
An external authentication mechanism plugged into Message Queue by means of the Java Authentication and Authorization Service (JAAS) API. See Using JAAS-Based Authentication.
Using a Flat-File User Repository
Message Queue provides a built-in flat-file user repository and a
command line tool, the User Manager utility (imqusermgr), for
populating and managing it. Each broker has its own flat-file user
repository, created automatically when you start the broker. By default,
the user repository resides in a file named passwd, in a directory
identified by the name of the broker instance with which the repository
is associated:
If you have changed these file name or directory defaults using the
imq.user_repository.file.filename or
imq.user_repository.file.dirpath broker properties, you must use the
-D option to specify the non-default values when running imqusermgr
if you did not specify the values in the broker properties file. For
example, if imq.user_repository.file.dirpath is specified in a cluster
configuration file, start imqusermgr using the form:
imqusermgr -Dimq.cluster.url=location-of-cluster-properties-file ...As another example, if imq.user_repository.file.filename is specified
on the imqbrokerd command line to start the broker, start imqusermgr
using the form:
imqusermgr -Dimq.user_repository.file.filename=filename-used-in-imqbrokerd-command ...User Groups and Status
Each user in the repository can be assigned to a user group, which defines the default access privileges granted to all of its members. You can then specify authorization rules to further restrict these access privileges for specific users, as described in User Authorization. A user’s group is assigned when the user entry is first created, and cannot be changed thereafter. The only way to reassign a user to a different group is to delete the original user entry and add another entry specifying the new group.
The flat-file user repository provides three predefined groups:
admin-
For broker administrators. By default, users in this group are granted the access privileges needed to configure, administer, and manage message brokers.
user-
For normal (non-administrative) client users. Newly created user entries are assigned to this group unless otherwise specified. By default, users in this group can connect to all Message Queue connection services of type
NORMAL, produce messages to or consume messages from all physical destinations, and browse messages in any queue. anonymous-
For Message Queue clients that do not wish to use a user name known to the broker (for instance, because they do not know of a real user name to use). This group is analogous to the anonymous account provided by most FTPservers. No more than one user at a time can be assigned to this group. You should restrict the access privileges of this group in comparison to the
usergroup, or remove users from the group at deployment time.
You cannot rename or delete these predefined groups or create new ones.
In addition to its group, each user entry in the repository has a user status: either active or inactive . New user entries added to the repository are marked active by default. Changing a user’s status to inactive rescinds all of that user’s access privileges, making the user unable to open new broker connections. Such inactive entries are retained in the user repository, however, and can be reactivated at a later time. If you attempt to add a new user with the same name as an inactive user already in the repository, the operation will fail; you must either delete the inactive user entry or give the new user a different name.
To allow the broker to be used immediately after installation without further intervention by the administrator, the flat-file user repository is created with two initial entries, summarized in Table 9-1:
-
The
adminentry (user name and passwordadmin/admin) enables you to administer the broker with Command utility (imqcmd) commands. Immediately on installation, you should update this initial entry to change its password (see Changing a User’s Password). -
The
guestentry allows clients to connect to the broker using a default user name and password (guest/guest).
You can then proceed to add any additional user entries you need for individual users of your message service.
Table 9-1 Initial Entries in Flat-File User Repository
| User Name | Password | Group | Status |
|---|---|---|---|
|
|
|
Active |
|
|
|
Active |
Using the User Manager Utility
The Message Queue User Manager utility (imqusermgr) enables you to
populate or edit a flat-file user repository.
SeeUser Manager Utility for
general reference information about the syntax, subcommands, and options
of the imqusermgr command.
User Manager Preliminaries
Before using the User Manager, keep the following things in mind:
-
The
imqusermgrcommand must be run on the host where the broker is installed. -
If a broker-specific user repository does not yet exist, you must start up the corresponding broker instance to create it.
-
You must have appropriate permissions to write to the repository; in particular, on Solaris and Linux platforms, you must be logged in as the root user or the user who first created the broker instance.
Subcommands and General Options
Table 9-2 lists the subcommands of the imqusermgr
command. For full reference information about these subcommands, see
Table 16-15.
Table 9-2 User Manager Subcommands
| Subcommand | Description |
|---|---|
|
Add user and password to repository |
|
Delete user from repository |
|
Set user’s password or active status (or both) |
|
Display user information |
The general options listed in Table 9-3 apply to all
subcommands of the imqusermgr command.
Table 9-3 General User Manager Options
| Option | Description |
|---|---|
|
Specify a broker property value when
starting |
|
Perform action without user confirmation |
|
Silent mode (no output displayed) |
|
Display version informationFoot 1 |
|
Display usage helpFootref 1 |
Footnote 1 Any other options specified on the command line are ignored.
Displaying the Product Version
To display the Message Queue product version, use the -v option. For
example:
imqusermgr -vIf you enter an imqusermgr command line containing the -v option in
addition to a subcommand or other options, the User Manager utility
processes only the -v option. All other items on the command line are
ignored.
Displaying Help
To display help on the imqusermgr command, use the -h option, and do
not use a subcommand. You cannot get help about specific subcommands.
For example, the following command displays help about imqusermgr:
imqusermgr -hIf you enter an imqusermgr command line containing the -h option in
addition to a subcommand or other options, the Command utility processes
only the -h option. All other items on the command line are ignored.
Adding a User to the Repository
The subcommand imqusermgr add adds an entry to the user repository,
consisting of a user name and password:
imqusermgr add  [-i brokerName]
-u userName  -p password
                   [-g group]
The -u and -p options specify the user name and password,
respectively, for the new entry. These must conform to the following
conventions:
-
All user names and passwords must be at least one character long. Their maximum length is limited only by command shell restrictions on the maximum number of characters that can be entered on a command line.
-
A user name cannot contain an asterisk (
*), a comma (,), a colon (:), or a new-line or carriage-return character. -
If a user name or password contains a space, the entire name or password must be enclosed in quotation marks (
" ").
The optional -g option specifies the group (admin, user, or
anonymous) to which the new user belongs; if no group is specified,
the user is assigned to the user group by default. If the broker name
(-i option) is omitted, the default broker imqbroker is assumed.
For example, the following command creates a user entry on broker
imqbroker for a user named AliBaba, with password Sesame, in the
admin group:
imqusermgr add -u AliBaba -p Sesame -g adminDeleting a User From the Repository
The subcommand imqusermgr delete deletes a user entry from the
repository:
imqusermgr delete  [-i brokerName]
-u userName
The -u option specifies the user name of the entry to be deleted. If
the broker name (-i option) is omitted, the default broker imqbroker
is assumed.
For example, the following command deletes the user named AliBaba from
the user repository on broker imqbroker:
imqusermgr delete -u AliBabaChanging a User’s Password
You can use the subcommand imqusermgr update to change a user’s
password:
imqusermgr update  [-i brokerName]
-u userName  -p password
The -u identifies the user; -p specifies the new password. If the
broker name (-i option) is omitted, the default broker imqbroker is
assumed.
For example, the following command changes the password for user
AliBaba to Shazam on broker imqbroker:
imqusermgr update -u AliBaba -p Shazam|
Note
|
For the sake of security, you should change the password of the You can quickly confirm that this change is in effect by running any of the command line tools when the broker is running. For example, the following command will prompt you for a password: Entering the new password ( After changing the password, you should supply the new password whenever you use any of the Message Queue administration tools, including the Administration Console. |
Activating or Deactivating a User
The imqusermgr update subcommand can also be used to change a user’s
active status:
imqusermgr update  [-i brokerName]
-u userName  -a activeStatus
The -u identifies the user; -a is a boolean value specifying the
user’s new status as active (true) or inactive (false). If the
broker name (-i option) is omitted, the default broker imqbroker is
assumed.
For example, the following command sets user AliBaba's status to
inactive on broker imqbroker:
imqusermgr update -u AliBaba -a falseThis renders AliBabe unable to open new broker connections.
You can combine the -p (password) and -a (active status) options in
the same imqusermgr update command. The options may appear in either
order: for example, both of the following commands activate the user
entry for AliBaba and set the password to plugh:
imqusermgr update  -u AliBaba  -p plugh  -a true
imqusermgr update  -u AliBaba  -a true  -p plugh
Viewing User Information
The imqusermgr list command displays information about a user in the
user repository:
imqusermgr list  [-i brokerName]
[-u userName]
The command
imqusermgr list -u AliBabadisplays information about user AliBabe, as shown in
Example 9-1.
Example 9-1 Viewing Information for a Single User
User repository for broker instance: imqbroker
----------------------------------
User Name    Group    Active State
----------------------------------
AliBaba      admin    true
If you omit the -u option
imqusermgr listthe command lists information about all users in the repository, as in Example 9-2.
Example 9-2 Viewing Information for All Users
User repository for broker instance: imqbroker
--------------------------------------
User Name    Group        Active State
--------------------------------------
admin        admin        true
guest        anonymous    true
AliBaba      admin        true
testuser1    user         true
testuser2    user         true
testuser3    user         true
testuser4    user         false
testuser5    user         false
Using an LDAP User Repository
You configure a broker to use an LDAP directory server by setting the
values for certain configuration properties in the broker’s instance
configuration file (config.properties). These properties enable the
broker instance to query the LDAP server for information about users and
groups when a user attempts to connect to the broker or perform
messaging operations.
-
The
imq.authentication.basic.user_repositoryproperty specifies the kind of user authentication the broker is to use. By default, this property is set tofile, for a flat-file user repository. For LDAP authentication, set it toldapinstead:
imq.authentication.basic.user_repository =ldap
-
The
imq.authentication.typeproperty controls the type of encoding used when passing a password between client and broker. By default, this property is set todigest, denoting MD5 encoding, the form used by flat-file user repositories. For LDAP authentication, set it tobasicinstead:
imq.authentication.type=basic
This denotes base-64 encoding, the form used by LDAP user repositories.
* The following properties control various aspects of LDAP access. See
Table 17-11 for more detailed
information:
imq.user_repository.ldap.server
imq.user_repository.ldap.principal
imq.user_repository.ldap.password
imq.user_repository.ldap.`propertyName +
`imq.user_repository.ldap.base
imq.user_repository.ldap.uidattr
imq.user_repository.ldap.usrfilter
imq.user_repository.ldap.grpsearch
imq.user_repository.ldap.grpbase
imq.user_repository.ldap.gidattr
imq.user_repository.ldap.memattr
imq.user_repository.ldap.grpfilter
imq.user_repository.ldap.timeout
imq.user_repository.ldap.ssl.enabled
* The imq.user_repository.ldap.userformat property, if set to a value
of dn, specifies that the login username for authentication be in DN
username format (for example:
uid=mquser,ou=People,dc=red,dc=sun,dc=com). In this case, the broker
extracts the value of the imq.user.repository.lpdap.uidatr attribute
from the DN username, and uses this value as the user name in access
control operations (see User Authorization).
* If you want the broker to use a secure, encrypted SSL (Secure Socket
Layer) connection for communicating with the LDAP server, set the
broker’s imq.user_repository.ldap.ssl.enabled property to true
imq.user_repository.ldap.ssl.enabled =trueand the imq.user_repository.ldap.server property to the port used by
the LDAP server for SSL communication: for example,
imq.user_repository.ldap.server=myhost:7878You will also need to activate SSL communication in the LDAP server.
In addition, you may need to edit the user and group names in the broker’s access control file to match those defined in the LDAP user repository; see User Authorization for more information.
For example, to create administrative users, you use the access control
file to specify those users and groups in the LDAP directory that can
create ADMIN connections.
Any user or group that can create an ADMIN connection can issue
administrative commands.
To Set Up an Administrative User
The following procedure makes use of a broker’s access control file, which is described in User Authorization.
-
Enable the use of the access control file by setting the broker property
imq.accesscontrol.enabledtotrue, which is the default value.
Theimq.accesscontrol.enabledproperty enables use of the access control file. -
Open the access control file,
IMQ_VARHOME/instances/`instanceName/etc/accesscontrol.properties`.
The file contains an entry such as the following:
service connection access control
##################################
connection.NORMAL.allow.user=*
connection.ADMIN.allow.group=admin
The entries listed are examples. Note that the admin group exists by
default in the file-based user repository but does not exist by default
in the LDAP directory.
3. To grant Message Queue administrator privileges to users, enter the
user names as follows:
connection.ADMIN.allow.user= userName[[,userName2] …]The users must be defined in the LDAP directory.
4. To grant Message Queue administrator privileges to groups, enter the
group names as follows:
connection.ADMIN.allow.group= groupName[[,groupName2] …]The groups must be defined in the LDAP directory.
Using JAAS-Based Authentication
The Java Authentication and Authorization Service (JAAS) API allows you to plug an external authentication mechanism into Message Queue. This section describes the information that the Message Queue message broker makes available to a JAAS-compliant authentication service and explains how to configure the broker to use such a service. The following sources provide further information on JAAS:
-
For complete information about the JAAS API , see the Java Authentication and Authorization Service (JAAS) Reference Guide.
-
For information about writing a JAAS login module, see the Java Authentication and Authorization Service (JAAS) LoginModule Developer’s Guide.
JAAS is a core API in Java 2 Standard Edition (J2SE), and is therefore an integral part of Message Queue’s runtime environment. It defines an abstraction layer between an application and an authentication mechanism, allowing the desired mechanism to be plugged in with no change to application code. In the case of the Message Queue service, the abstraction layer lies between the broker (application) and an authentication provider. By setting a few broker properties, it is possible to plug in any JAAS-compliant authentication service and to upgrade this service with no disruption or change to broker code.
|
Note
|
You cannot use the Java Management Extensions (JMX) API to change JAAS-related broker properties. However, once JAAS-based authentication is configured, JMX client applications (like other clients) can be authenticated using this mechanism. |
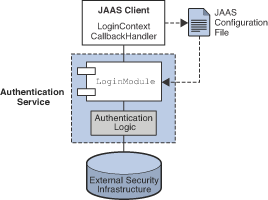
Elements of JAAS
Figure 9-2 shows the basic elements of JAAS: a JAAS client, a JAAS-compliant authentication service, and a JAAS configuration file.
-
The JAAS client is an application wishing to perform authentication using a JAAS-compliant authentication service. The JAAS client communicates with the authentication service using one or more login modules and is responsible for providing a callback handler that the login module can call to obtain the user name, password, and other information needed for authentication.
-
The JAAS-compliant authentication service consists of one or more login modules along with logic to perform the needed authentication. The login module (
LoginModule) may include the authentication logic itself, or it may use a private protocol or API to communicate with an external security service that provides the logic. -
The JAAS configuration file is a text file that the JAAS client uses to locate the login module(s) to be used.
Figure 9-2 JAAS Elements
JAAS and Message Queue
Figure 9-3 shows how JAAS is used by the Message Queue broker. It shows a more complex implementation of the JAAS model shown in Figure 9-2.
Figure 9-3 How Message Queue Uses JAAS
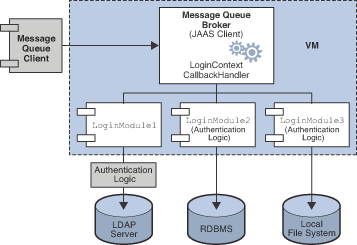
The authentication service layer, consisting of one or more login modules (if needed) and corresponding authentication logic, is separate from the broker. The login modules run in the same Java virtual machine as the broker. The broker is represented to the login module as a login context, and communicates with the login module by means of a callback handler that is part of the broker runtime code.
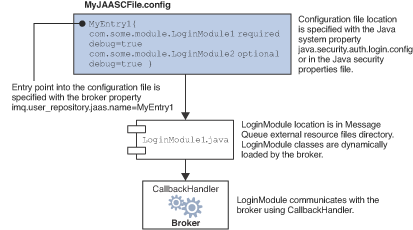
The authentication service also supplies a JAAS configuration file
containing entries that reference the login modules. The configuration
file specifies the order in which the login modules (if more than one)
are to be used and any conditions for their use. When the broker starts
up, it locates the configuration file by consulting either the Java
system property java.security.auth.login.config or the Java security
properties file. The broker then selects an entry in the JAAS
configuration file according to the value of the broker property
imq.user_repository.jaas.name. That entry specifies which login
module(s) will be used for authentication. The classes for the login
modules are found in the Message Queue external resource files
directory, IMQ_HOMElib/ext.
The relation between the configuration file, the login module, and the broker is shown in the following figure. Figure 9-4.
Figure 9-4 Setting Up JAAS Support
The fact that the broker uses a JAAS plug-in authentication service remains completely transparent to the Message Queue client. The client continues to connect to the broker as it did before, passing a user name and password. In turn, the broker uses a callback handler to pass login information to the authentication service, and the service uses the information to authenticate the user and return the results. If authentication succeeds, the broker grants the connection; if it fails, the client runtime returns a JMS security exception that the client must handle.
After the Message Queue client is authenticated, if there is further authorization to be done, the broker proceeds as it normally would, consulting the access control file to determine whether the authenticated client is authorized to perform the actions it undertakes: accessing a destination, consuming a message, browsing a queue, and so on.
Setting up JAAS-Compliant Authentication
Setting up JAAS-compliant authentication involves setting broker and system properties to select this type of authentication, to specify the location of the configuration file, and to specify the entries to the login modules that are going to be used.
To set up JAAS support for Message Queue, you perform the following general steps. (These steps assume you are creating your own authentication service.)
-
Create one or more login module classes that implement the authentication service. The JAAS callback types that the broker supports- are listed below.
javax.security.auth.callback.LanguageCallback-
The broker uses this callback to pass the authentication service the locale in which the broker is running. This value can be used for localization.
javax.security.auth.callback.NameCallback-
The broker uses this callback to pass to the authentication service the user name specified by the Message Queue client when the connection was requested.
javax.security.auth.callback.TextInputCallback-
The broker uses this callback to pass the value of the following information to the login module (authentication service) when requested through the TextInputCallback.getPrompt() with the following strings:
-
imq.authentication.type: The broker authentication type in effect at runtime -
imq.accesscontrol.type: The broker access control type in effect at runtime -
imq.authentication.clientip: The client IP address (null if unavailable) -
imq.servicename: The name of the connection service (jms,ssljms,admin, orssladmin) being used by the client -
imq.servicetype: The type of the connection service (NORMALorADMIN) being used by the client
-
javax.security.auth.callback.PasswordCallback-
The broker uses this callback to pass to the authentication service the password specified by the Message Queue client when the connection was requested.
javax.security.auth.callback.TextOutputCallback-
The broker handles this callback to provide logging service to the authentication service by logging the text output to the broker’s log file. The callback’s
MessageTypeERROR,INFORMATION,WARNINGare mapped to the broker logging levelsERROR,INFO,WARNINGrespectively.
-
Create a JAAS configuration file with entries that reference the login module classes created in Step 1 and specify the location of this file.
-
Note the name of the entry in the JAAS configuration file (that references the login module implementation classes). -
Archive the classes that implement the login modules to a jar file, and place the jar file in the Message Queue
lib/extdirectory. -
Set the broker configuration properties that relate to JAAS support. These are described in Table 9-4.
-
Set the following system property (to specify the location of the JAAS configuration file).
java.security.auth.login.config=`JAAS_Config_File_Location +
For example, you can specify the location when you start the broker. +
`imqbrokerd -Djava.security.auth.login.config=`JAAS_Config_File_Location +
There are other ways to specify the location of the JAAS configuration
file. For additional information, see +
`http://download.oracle.com/javase/1.5.0/docs/guide/security/jaas/tutorials/LoginConfigFile.html
The following table lists the broker properties that need to be set to set up JAAS support.
Table 9-4 Broker Properties for JAAS Support
| Property | Description |
|---|---|
|
Set to |
|
Set to |
|
Set to the name of the desired entry (in the JAAS configuration file) that references the login modules you want to use as the authentication mechanism. This is the name you noted inStep 3. |
|
This property, used by
Message Queue access control, specifies the |
|
This property, used by
Message Queue access control, specifies the |
User Authorization
An access control file contains rules that specify which users (or groups of users) are authorized to perform certain operations on a message broker. These operations include the following:
-
Creating a connection
-
Creating a message producer for a physical destination
-
Creating a message consumer for a physical destination
-
Browsing a queue destination
-
Auto-creating a physical destination
If access control is enabled (that is, if the broker’s
imq.accesscontrol.enabled configuration property is set to true, the
broker will consult its access control file whenever a client attempts
one of these operations, to verify whether the user generating the
request (or a group to which the user belongs) is authorized to perform
the operation. By editing this file, you can restrict access to these
operations to particular users and groups. Changes take effect
immediately; there is no need to restart the broker after editing the
file.
Access Control File Syntax
Each broker has it own access control file, created automatically when
the broker is started. The file is named accesscontrol.properties and
is located at IMQ_VARHOME/instances/`instanceName/etc`.
The file is formatted as a Java properties file. It starts with a
version property defining the version of the file:
version=JMQFileAccessControlModel/100This is followed by three sections specifying the access control for three categories of operations:
-
Creating connections
-
Creating message producers or consumers, or browsing a queue destination
-
Auto-creating physical destinations
Each of these sections consists of a sequence of authorization rules specifying which users or groups are authorized to perform which specific operations. These rules have the following syntax:
resourceType.resourceVariant.operation.access.principalType=principalsTable 9-5 describes the various elements.
Table 9-5 Authorization Rule Elements
| Element | Description |
|---|---|
resourceType |
Type of resource to which the rule applies:
|
resourceVariant |
Specific resource (connection service type or destination) to which the rule applies An asterisk ( |
operation |
Operation to which the rule applies This syntax element is not used for resourceType= |
access |
Level of access authorized:
|
principalType |
Type of principal (user or group) to which the rule applies:
|
principals |
List of principals (users or groups) to whom the rule applies, separated by commas An asterisk ( |
Example 9-3 Example 1
Rule: queue.q1.consume.allow.user=*
Description: allows all users to consume messages from the queue
destination q1.
Example 9-4 Example 2
Rule: queue.*.consume.allow.user=Snoopy
Description: allows user Snoopy to consume messages from all queue
destinations.
Example 9-5 Example 3
Rule: topic.t1.produce.deny.user=Snoopy
Description: prevents Snoopy from producing messages to the topic
destination t1
Application of Authorization Rules
Authorization rules in the access control file are applied according to the following principles:
-
Any operation not explicitly authorized through an authorization rule is implicitly prohibited. For example, if the access control file contains no authorization rules, all users are denied access to all operations.
-
Authorization rules for specific users override those applying generically to all users. For example, the rules
queue.q1.produce.allow.user=*
queue.q1.produce.deny.user=Snoopy
authorize all users except Snoopy to send messages to queue
destination q1.
* Authorization rules for a specific user override those for any group
to which the user belongs. For example, if user Snoopy is a member of
group user, the rules
queue.q1.consume.allow.group=user
queue.q1.consume.deny.user=Snoopy
authorize all members of user except Snoopy to receive messages from
queue destination q1.
* Authorization rules applying generically to all users override those
applying to all groups. For example, the rules
topic.t1.produce.deny.group=*
topic.t1.produce.allow.user=*
authorize all users to publish messages to topic destination t1,
overriding the rule denying such access to all groups.
* Authorization rules for specific resources override those applying
generically to all resources of a given type. For example, the rules
topic.*.consume.allow.user=Snoopy
topic.t1.consume.deny.user=Snoopy
authorize Snoopy to subscribe to all topic destinations except t1.
* Authorization rules authorizing and denying access to the same
resource and operation for the same user or group cancel each other out,
resulting in authorization being denied. For example, the rules
queue.q1.browse.deny.user=Snoopy
queue.q1.browse.allow.user=Snoopy
prevent Snoopy from browsing queue q1. The rules
topic.t1.consume.deny.group=user
topic.t1.consume.allow.group=user
prevent all members of group user from subscribing to topic t1.
* When multiple authorization rules are specified for the same resource,
operation, and principal type, only the last rule applies. The rules
queue.q1.browse.allow.user=Snoopy,Linus
queue.q1.browse.allow.user=Snoopy
authorize user Snoopy, but not Linus, to browse queue destination
q1.
Authorization Rules for Connection Services
Authorization rules with the resource type connection control access
to the broker’s connection services. The rule’s resourceVariant element
specifies the service type of the connection services to which the rule
applies, as shown in Table 6-1; the
only possible values are NORMAL or ADMIN. There is no operation
element.
The default access control file contains the rules
connection.NORMAL.allow.user=*
connection.ADMIN.allow.group=admin
giving all users access to NORMAL connection services (jms,
ssljms, httpjms, and httpsjms) and those in the admin group
access to ADMIN connection services (admin and ssladmin). You can
then add additional authorization rules to restrict the connection
access privileges of specific users: for example, the rule
connection.NORMAL.deny.user=Snoopydenies user Snoopy access privileges for connection services of type
NORMAL.
If you are using a file-based user repository, the admin user group is
created by the User Manager utility. If access control is disabled
(imq.accesscontrol.enabled = false), all users in the admin group
automatically have connection privileges for ADMIN connection
services. If access control is enabled, access to these services is
controlled by the authorization rules in the access control file.
If you are using an LDAP user repository, you must define your own user
groups in the LDAP directory, using the tools provided by your LDAP
vendor. You can either define a group named admin, which will then be
governed by the default authorization rule shown above, or edit the
access control file to refer to one or more other groups that you have
defined in the LDAP directory. You must also explicitly enable access
control by setting the broker’s imq.accesscontrol.enabled property to
true.
Authorization Rules for Physical Destinations
Access to specific physical destinations on the broker is controlled by
authorization rules with a resource type of queue or topic, as the
case may be. These rules regulate access to the following operations:
-
Sending messages to a queue: produce operation
-
Receiving messages from a queue: consume operation
-
Publishing messages to a topic: produce operation
-
Subscribing to and consuming messages from a topic: consume operation
-
Browsing a queue: browse operation
By default, all users and groups are authorized to perform all of these operations on any physical destination. You can change this by editing the default authorization rules in the access control properties file or overriding them with more specific rules of your own. For example, the rule
topic.Admissions.consume.deny.group=userdenies all members of the user group the ability to subscribe to the
topic Admissions.
Authorization Rules for Auto-Created Physical Destinations
When a client creates a message producer or consumer for a physical
destination that does not already exist, the broker will auto-create the
destination (provided that the broker’s imq.autocreate.queue or
imq.autocreate.topic property is set to true).
The final section of the access control file controls the ability of
users and groups to auto-create destinations, and to access any
auto-created destinations. This is governed by authorization rules with
a resourceType of queue or topic and an operation element of
create. the resourceVariant element is omitted, since these rules
apply to all auto-created queues or all auto-created topics, rather than
any specific destination.
The default access control file contains the rules
queue.create.allow.user=*
topic.create.allow.user=*
authorizing all users to have physical destinations auto-created for them by the broker, and to have access to any auto-created destinations. You can edit the file to restrict such authorization for specific users. For example, the rule
topic.create.deny.user=Snoopydenies user Snoopy the ability to auto-create topic destinations or to
access any auto-created topic destinations.
|
Note
|
The effect of such auto-creation rules must be congruent with that of other physical destination access rules. For example, if you change the destination authorization rule to prohibit any user from sending a message to a queue, but enable the auto-creation of queue destinations, the broker will create the physical destination if it does not exist, but will not deliver a message to it. |
Message Encryption
This section explains how to set up a connection service based on the Secure Socket Layer (SSL) standard, which enables delivery of encrypted messages over the connection. Message Queue supports the following SSL-based connection services:
-
The
ssljmsservice delivers secure, encrypted messages between a client and a broker, using the TCP/IP transport protocol. -
The
httpsjmsservice delivers secure, encrypted messages between a client and a broker, using an HTTPS tunnel servlet with the HTTP transport protocol. -
The
ssladminservice creates a secure, encrypted connection between the Message Queue Command utility (imqcmd) and a broker, using the TCP/ IP transport protocol. Encrypted connections are not supported for the Administration Console (imqadmin). -
The
clusterconnection service is used internally to provide secure, encrypted communication between brokers in a cluster, using the TCP/IP transport protocol. -
A JMX connector that supports secure, encrypted communication between a JMX client and a broker’s MBean server using the RMI transport protocol over TCP.
The remainder of this section describes how to set up secure connections
over TCP/IP, using the ssljms, ssladmin, and cluster connection
services. For information on setting up secure connections over HTTP
with the httpsjms service, see
HTTP/HTTPS Support.
Using Self-Signed Certificates
To use an SSL-based connection service over TCP /IP, you generate a
public/private key pair using the Key Tool utility (imqkeytool). This
utility embeds the public key in a self-signed certificate that is
passed to any client requesting a connection to the broker, and the
client uses the certificate to set up an encrypted connection. This
section describes how to set up an SSL-based service using such
self-signed certificates.
For a stronger level of authentication, you can use signed certificates verified by a certification authority. The use of signed certificates involves some additional steps beyond those needed for self-signed certificates: you must first perform the procedures described in this section and then perform the additional steps in Using Signed Certificates.
Message Queue’s support for SSL with self-signed certificates is oriented toward securing on-the-wire data, on the assumption that the client is communicating with a known and trusted server. Configuring SSL with self-signed certificates requires configuration on both the broker and client:
Setting Up an SSL-Based Connection Service Using Self-Signed Certificates
The following sequence of procedures are needed to set up an SSL-based connection service for using self-signed certificates:
|
Note
|
Starting with release 4.0, the default value for the client connection
factory property The administration tool Alternatively, you can import the broker’s self-signed certificate into the client runtime trust store. Use the procedure in To Install a Signed Certificate. |
-
Generate a self-signed certificate.
-
Enable the desired SSL-based connection services in the broker. These can include the
ssljms,ssladmin, orclusterconnection services. -
Start the broker.
To Generate a Self-Signed Certificate
Run the Key Tool utility (imqkeytool) to generate a self-signed
certificate for the broker. (On Solaris and Linux operating systems, you
may need to run the utility as the root user in order to have permission
to create the keystore file.) The same certificate can be used for all
SSL-based connection services (ssljms, ssladmin, cluster
connection services, and the ssljmxrmi connector).
-
Enter the following at the command prompt:
imqkeytoolbroker
The Key Tool utility prompts you for a key store password: -
At the prompt type a keystore password.
The Keystore utility prompts you for identifying information from which to construct an X.500 distinguished name. The following table shows the prompts and the values to be provided for each. Values are case-insensitive and can include spaces.
Prompt |
X.500 Attribute |
Description |
Example |
|
commonName (CN) |
Fully qualified name of server running the broker |
|
|
organizationalUnit (OU) |
Name of department or division |
|
|
organizationName (ON) |
Name of larger organization, such as a company or government entity |
|
|
localityName (L) |
Name of city or locality |
|
|
stateName (ST) |
Full (unabbreviated) name of state or province |
|
|
country © |
Standard two-letter country code |
|
The Key Tool utility displays the information you entered for
confirmation. For example,
   Is CN=mqserver.sun.com, OU=purchasing, ON=Acme Widgets, Inc.,
L=San Francisco, ST=California, C=US correct?-
Accept the current values and proceed by typing
yes.
To reenter values, accept the default or enterno. After you confirm, the utility pauses while it generates a key pair.
The utility asks for a password to lock the key pair (key password). -
Press return.
This will set the same password for both the key password and the keystore password.
|
Caution
|
Be sure to remember the password you specify. You must provide this password when you start the broker, to allow the broker to open the keystore file. You can store the keystore password in a password file (see Password Files). |
The Key Tool utility generates a self-signed certificate and places it
in Message Queue’s keystore file. The keystore file is located in
IMQ_HOME/etc by default.
The following are the configurable properties for the Message Queue
keystore for SSL-based connection services:::
imq.keystore.file.dirpath::
Path to directory containing keystore file
imq.keystore.file.name::
Name of key store file
imq.keystore.password::
Ke store password (to be used only in a password file)
In some circumstances, you may need to regenerate a key pair in order to
solve certain problems: for example, if you forget the key store
password or if the SSL-based service fails to initialize when you start
a broker and you get the exception:
java.security.UnrecoverableKeyException: Cannot recover key(This exception may result if you provided a key password different from the keystore password when you generated the self-signed certificate.)
To Regenerate a Key Pair
-
Remove the broker’s keystore file.
The file is located inIMQ_HOME/etcby default. -
Run
imqkeytoolagain.
The command will generate a new key pair, as described above.
To Enable an SSL-Based Connection Service in the Broker
To enable an SSL-based connection service in the broker, you need to add
the corresponding service or services to the imq.service.activelist
property.
-
Open the broker’s instance configuration file:
IMQ_VARHOME/instances/instanceName/props/config.properties
-
Add an entry (if one does not already exist) for the
imq.service.activelistproperty and include the desired SSL-based service(s) in the list.
By default, the property includes thejmsandadminconnection services. Add the SSL-based service or services you wish to activate (ssljms,ssladmin, or both):
imq.service.activelist=jms,admin,ssljms,ssladmin
::
|
Note
|
The SSL-based |
-
Save and close the instance configuration file.
To Start the Broker
Start the broker, providing the key store password.
|
Note
|
When you start a broker or client with SSL, you may notice a sharp
increase in CPU usage for a few seconds. This is because the JSSE (Java
Secure Socket Extension) method |
-
Start the broker, providing the keystore password.
Put the keystore password in a password file, as described in Password Files and set theimq.passfile.enabledproperty totrue. You can now do one of the following:-
Pass the location of the password file to the
imqbrokerdcommand:
imqbrokerd -passfile /`passfileDirectory/`passfileName -
Start the broker without the
-passfileoption, but specify the location of the password file using the following two broker configuration properties:
`imq.passfile.dirpath=/`passfileDirectory
`imq.passfile.name=/`passfileName
-
-
If you are not using a password file, enter the keystore password at the prompt.
imqbrokerd
You are prompted for the keystore passwrd.
Configuring and Running an SSL-Based Client Using Self-Signed Certificates
The procedure for configuring a client to use an SSL-based connection
service differs depending on whether it is an application client (using
the ssljms connection service) or a Message Queue administrative
client such as imqcmd (using the ssladmin connection service.)
Application Clients
For application clients, you must make sure the client has the following
.jar files specified in its CLASSPATH variable:
imq.jar
jms.jar
Once the CLASSPATH files are properly specified, one way to start the
client and connect to the broker’s ssljms connection service is by
entering a command like the following:
java -DimqConnectionType=TLS clientAppNameThis tells the connection to use an SSL-based connection service.
Administrative Clients
For administrative clients, you can establish a secure connection by
including the -secure option when you invoke the imqcmd command: for
example,
imqcmd list svc -b hostName:portNumber -u userName -securewhere userName is a valid ADMIN entry in the Message Queue user
repository. The command will prompt you for the password.
Listing the connection services is a way to verify that the ssladmin
service is running and that you can successfully make a secure
administrative connection, as shown in Example 9-6.
Example 9-6 Connection Services Listing
Listing all the services on the broker specified by:

Host                 Primary Port
localhost            7676

Service Name     Port Number       Service State
admin            33984 (dynamic)   RUNNING
httpjms          -                 UNKNOWN
httpsjms         -                 UNKNOWN
jms              33983 (dynamic)   RUNNING
ssladmin         35988 (dynamic)   RUNNING
ssljms           dynamic           UNKNOWN

Successfully listed services.
Using Signed Certificates
Signed certificates provide a stronger level of server authentication than self-signed certificates. You can implement signed certificates only between a client and broker, and currently not between multiple brokers in a cluster. This requires the following extra procedures in addition to the ones described in Using Self-Signed Certificates. Using signed certificates requires configuration on both the broker and client:
Obtaining and Installing a Signed Certificate
The following procedures explain how to obtain and install a signed certificate.
To Obtain a Signed Certificate
-
Use the J2SE
keytoolcommand to generate a certificate signing request (CSR) for the self-signed certificate you generated in the preceding section.
Information about thekeytoolcommand can be found at-
http://download.oracle.com/javase/1.5.0/docs/tooldocs/solaris/keytool.html
Here is an example:
-
keytool  -certreq  -keyalg RSA  -alias imq  -file certreq.csr
-keystore /etc/imq/keystore  -storepass  myStorePassword
This generates a CSR encapsulating the certificate in the specified file
(certreq.csr in the example).
2. Use the CSR to generate or request a signed certificate.
You can do this by either of the following methods:
* Have the certificate signed by a well known certification authority
(CA), such as Thawte or Verisign. See your CA’s documentation for more
information on how to do this.
* Sign the certificate yourself, using an SSL signing software package.
The resulting signed certificate is a sequence of ASCII characters. If
you receive the signed certificate from a CA, it may arrive as an e-mail
attachment or in the text of a message.
3. Save the signed certificate in a file.
The instructions below use the example name broker.cer to represent
the broker certificate.
To Install a Signed Certificate
-
Check whether J2SE supports your certification authority by default.
The following command lists the root CAs in the system key store:
keytool -v -list -keystore $JAVA_HOME/lib/security/cacerts
If your CA is listed, skip the next step.
2. If your certification authority is not supported in J2SE, import the
CA’s root certificate into the Message Queue key store.
Here is an example:
keytool  -import  -alias ca  -file ca.cer  -noprompt  -trustcacerts
-keystore /etc/imq/keystore  -storepass  myStorePassword
where ca.cer is the file containing the root certificate obtained from
the CA.
If you are using a CA test certificate, you probably need to import the
test CA root certificate. Your CA should have instructions on how to
obtain a copy.
3. Import the signed certificate into the key store to replace the
original self-signed certificate.
Here is an example:
keytool  -import  -alias imq  -file broker.cer  -noprompt  -trustcacerts
-keystore /etc/imq/keystore  -storepass  myStorePassword
where broker.cer is the file containing the signed certificate that
you received from the CA.
The Message Queue key store now contains a signed certificate to use for
SSL connections.
Configuring the Client to Require Signed Certificates
You must now configure the Message Queue client runtime to require signed certificates, and ensure that it trusts the certification authority that signed the certificate.
|
Note
|
By default, starting with release 4.0, the connection factory object
that the client will be using to establish broker connections has its
|
To Configure the Client Runtime to Require Signed Certificates
-
Verify whether the signing authority is registered in the client’s trust store.
To test whether the client will accept certificates signed by your certification authority, try to establish an SSL connection, as described above under Configuring and Running an SSL-Based Client Using Self-Signed Certificates. If the CA is in the client’s trust store, the connection will succeed and you can skip the next step. If the connection fails with a certificate validation error, go on to the next step. -
Install the signing CA’s root certificate in the client’s trust store.
The client searches the key store filescacertsandjssecacertsby default, so no further configuration is necessary if you install the certificate in either of those files. The following example installs a test root certificate from the Verisign certification authority from a file namedtestrootca.cerinto the default system certificate file,cacerts. The example assumes that J2SE is installed in the directory$JAVA_HOME/usr/j2se:
keytool  -import  -keystore /usr/j2se/jre/lib/security/cacerts
-alias VerisignTestCA  -file testrootca.cer  -noprompt
-trustcacerts  -storepass myStorePassword
An alternative (and recommended) option is to install the root
certificate into the alternative system certificate file, jssecacerts:
keytool  -import  -keystore /usr/j2se/jre/lib/security/jssecacerts
-alias VerisignTestCA  -file testrootca.cer  -noprompt
-trustcacerts  -storepass myStorePassword
A third possibility is to install the root certificate into some other
key store file and configure the client to use that as its trust store.
The following example installs into the file /home/smith/.keystore:
keytool  -import  -keystore /home/smith/.keystore
-alias VerisignTestCA  -file testrootca.cer  -noprompt
-trustcacerts  -storepass myStorePassword
Since the client does not search this key store by default, you must
explicitly provide its location to the client to use as a trust store.
You do this by setting the Java system property
javax.net.ssl.trustStore once the client is running:
javax.net.ssl.trustStore=/home/smith/.keystorePassword Files
Several types of command require passwords. In Table 9-6, the first column lists the commands that require passwords and the second column lists the reason that passwords are needed.
Table 9-6 Commands That Use Passwords
| Command | Description | Purpose of Password |
|---|---|---|
|
Start broker |
Access a JDBC-based persistent data store, an SSL certificate key store, or an LDAP user repository |
|
Manage broker |
Authenticate an administrative user who is authorized to use the command |
|
Manage JDBC-based data store |
Access the data store |
You can specify these passwords in a password file and use the
-passfile option to specify the name of the file. This is the format
for the -passfile option:
imqbrokerd -passfile filePath|
Note
|
In previous versions of Message Queue, you could use the |
Security Considerations for Passwords and Password Files
Typing a password interactively, in response to a prompt, is the most secure method of specifying a password (provided that your monitor is not visible to other people). You can also specify a password file on the command line. For non-interactive use of commands, however, you must use a password file.
A password file that contains clear passwords should be obfusticated
using imqusermgr encode. An obfusticated password file must be stored
in location that allows you to set directory and file permissions to
protect them from unauthorized access. Set the permissions so that they
limit the users who can view the file, but provide read access to the
user who starts the broker.
|
Note
|
Oracle recommends using |
Password File Contents
A password file is a simple text file containing a set of properties and values. Each value is a password used by a command. Table 9-7 shows the types of passwords that a password file can contain.
Table 9-7 Passwords in a Password File
| Password | Affected Commands | Description |
|---|---|---|
|
|
Administrator password for Message Queue Command utility (authenticated for each command) |
|
|
Key store password for SSL-based services |
|
|
Password for opening a database connection, if required |
|
|
Password associated with the distinguished name assigned to a broker for binding to a configured LDAP user repository |
A sample password file, IMQ_HOME/etc/passfile.sample, is provided as
part of your Message Queue installation.
Secure Password Files
As of Message Queue 5.0, Oracle provides User Manager utility
(imqusermgr) commands to obfuscate (convert to an unreadable format)
password files (passfiles).
Obfuscate a Passfile
To obfuscate a password file:
-
Place all password property name`=`value pairs in a password file. See Password File Contents.
-
Use
imqusermgr encodeto obfuscate the password file to a new password file. See User Manager Utility.
For example:imqusermgr encode -src IMQ_HOME/etc/passfile.clear -target IMQ_HOME/etc/passfile.secure -
Use the new password file for commands that require those passwords. For example:
imqbrokerd -passfile IMQ_HOME/etc/passfile.secure
Add a Password to a Password File
To add a new password to an existing password file:
-
Add the new name`=`value pair to an existing passfile (clear text or obfuscated).
-
Use
imqusermgr encodeto obfuscate the password file. See Obfuscate a Passfile.
Delete a Password from a Password File
To delete an existing password from a passfile (clear text or obfuscated), delete the line containing the password and save the passfile.
Change a Password in a Password File
To change a password in an obfuscated passfile:
-
Delete the existing password from the passfile (clear text or obfuscated).
-
Add a new line containing the new password.
-
Use
imqusermgr encodeto obfuscate the password file. See Obfuscate a Passfile.
Deobfuscate a Password File
To convert an obfuscated passfile to clear text, use
imqusermgr decode. See User
Manager Utility.For example:
imqusermgr decode -src IMQ_HOME/etc/passfile.secure -target IMQ_HOME/etc/passfile.clear
Upgrading Clear Text Password Files
Although using clear text passfiles is still supported in this release
of Message Queue, Oracle recommends existing clear text passfiles be
obfuscated by running imqusermgr encode. See
User Manager Utility.
A broker logs a warning message when a clear text password is found in a password file.
Connecting Through a Firewall
When a client application is separated from the broker by a firewall,
special measures are needed in order to establish a connection. One
approach is to use the httpjms or httpsjms connection service, which
can "tunnel" through the firewall; see
HTTP/HTTPS Support for details. HTTP
connections are slower than other connection services, however; a faster
alternative is to bypass the Message Queue Port Mapper and explicitly
assign a static port address to the desired connection service, and then
open that specific port in the firewall. This approach can be used to
connect through a firewall using the jms or ssljms connection
service (or, in unusual cases, admin or ssladmin).
Table 9-8 Broker Configuration Properties for Static Port Addresses
| Connection Service | Configuration Property |
|---|---|
|
|
|
|
|
|
|
|
To Enable Broker Connections Through a Firewall
-
Assign a static port address to the connection service you wish to use.
To bypass the Port Mapper and assign a static port number directly to a connection service, set the broker configuration propertyimq.`serviceName.protocolType.port`, where serviceName is the name of the connection service andprotocolType is its protocol type (see Table 9-8). As with all broker configuration properties, you can specify this property either in the broker’s instance configuration file or from the command line when starting the broker. For example, to assign port number10234to thejmsconnection service, either include the line
imq.jms.tcp.port=10234
in the configuration file or start the broker with the command
imqbrokerd -name brokerName -Dimq.jms.tcp.port=10234where brokerName is the name of the broker to be started.
2. Configure the firewall to allow connections to the port number you
assigned to the connection service.
You must also allow connections through the firewall to Message Queue’s
Port Mapper port (normally 7676, unless you have reassigned it to some
other port). In the example above, for instance, you would need to open
the firewall for ports 10234 and 7676.
Audit Logging with the Solaris BSM Audit Log
Message Queue supports audit logging. When audit logging is enabled, Message Queue generates a record for the following types of events:
-
Startup, shutdown, restart, and removal of a broker instance
-
User authentication and authorization
-
Reset of a persistent store
-
Creation, purge, and destruction of a physical destination
-
Administrative destruction of a durable subscriber
Message Queue supports logging audit records to the Message Queuebroker log file and to the Solaris BSM audit log:
-
To log audit records to the Message Queue broker log file, set the
imq.audit.enabledbroker property totrue. All audit records in the broker log contain the keywordAUDIT. -
To log audit records to the Solaris BSM audit log, set the
imq.audit.bsm.disabledbroker property tofalse.
|
Note
|
To log audit records to the Solaris BSM audit log, you must run the
broker as |